call.center™ Overview
call.center™ is an innovative SIP-based softphone for Mac OS, iOS, Android, Windows devices and computers. It is specifically designed to securely and efficiently manage and control remote apps.
The call.center™ app presents a unique, simple-to-use, and intuitive drag-to-call user interface. All its necessary functions are displayed front and center, smoothly integrating and optimizing voice operations with the workflow processes.
A fully-featured management portal is provided to use in conjunction with the call.center™ apps. This allows administrators to securely configure and maintain apps installed on user devices, regardless of their location or operating system. This means that SIP passwords are hidden from users, providing a significant layer of security for the underlying network.
Back to the topArchitecture
The call.center™ platform consists of two distinct components:
- A softphone app installed on the end-user device, computer, or any so called call.centerTM device
- The call.center™ management portal, which is used to:
- Configure and manage service providers and SIP accounts associated with each provider
- Configure and manage contacts and the devices allocated to contacts
- Manage and control devices (end-user apps)
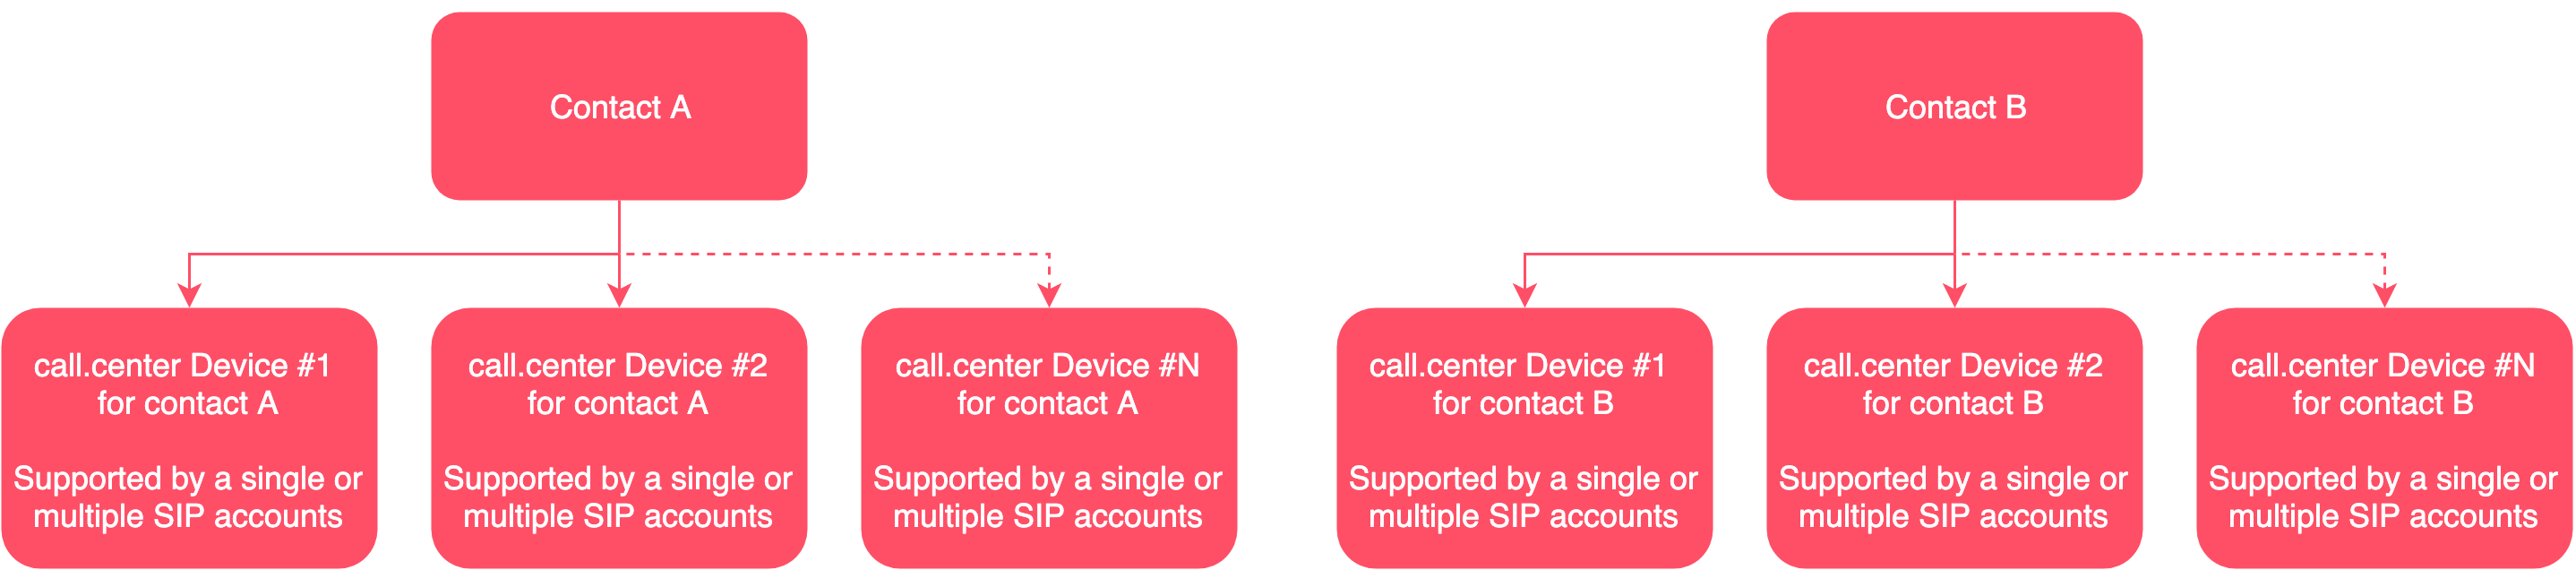
Multiple service providers may be included and multiple SIP accounts may be added to each provider.

Multiple contacts, each with multiple end-user devices, may be included. In addition, each end-user device may be supported by a single or multiple SIP account(s).
You can activate and deactivate devices via the management portal.
You can use call.center™ with any SIP-compatible VoIP provider. call.center™ is integrated with phone.systems™, the cloud-based PBX platform from telecom.center™. call.center™ configuration and management depends whether you are using phone.systems™ or an alternative service provider. Both phone.systems™ and generic SIP providers may be used simultaneously by call.center™ apps.
Features
By using the call.center™ app, you can easily do the following:
- Receive and make calls using SIP-based infrastructure
- Mute calls
- Put calls on hold
- Enable the "Do not disturb" mode
- Enable “Smart do not disturb” mode
- Transfer calls
- Host conference calls
- Access call history
- Import and manage contacts
- Make notes
- Use push notifications on the app
- Initiate calls directly from a web browser or another application using callto and tel protocols
- Configure multiple SIP lines per app
- Forward calls
- Create synchronised Company Directory
System Requirements
The following are the supported call.center™ operating system requirements:
-
Android
Android 5.0 or later -
iOS
iOS 9.0 or later -
Mac OS
macOS 10.12 or later -
Windows
Windows 10 (v.1709) or newer
.Net Framework: 4.6.1 -
Windows Click once version
Windows 7 (Convenience rollup update for Windows 7 SP1)
.Net Framework: 4.6.1
Registering a call.center™ account
Free registration for the call.center™ management portal is available at https://my.call.center/.
The call.center™ management portal is hosted on the telecom.center™ platform. Registration on the telecom.center™ website provides a single sign-on access to a number of projects supporting open interconnectivity and standards, such as the cloud-based phone.systems™ PBX.
To register a call.center™ account:
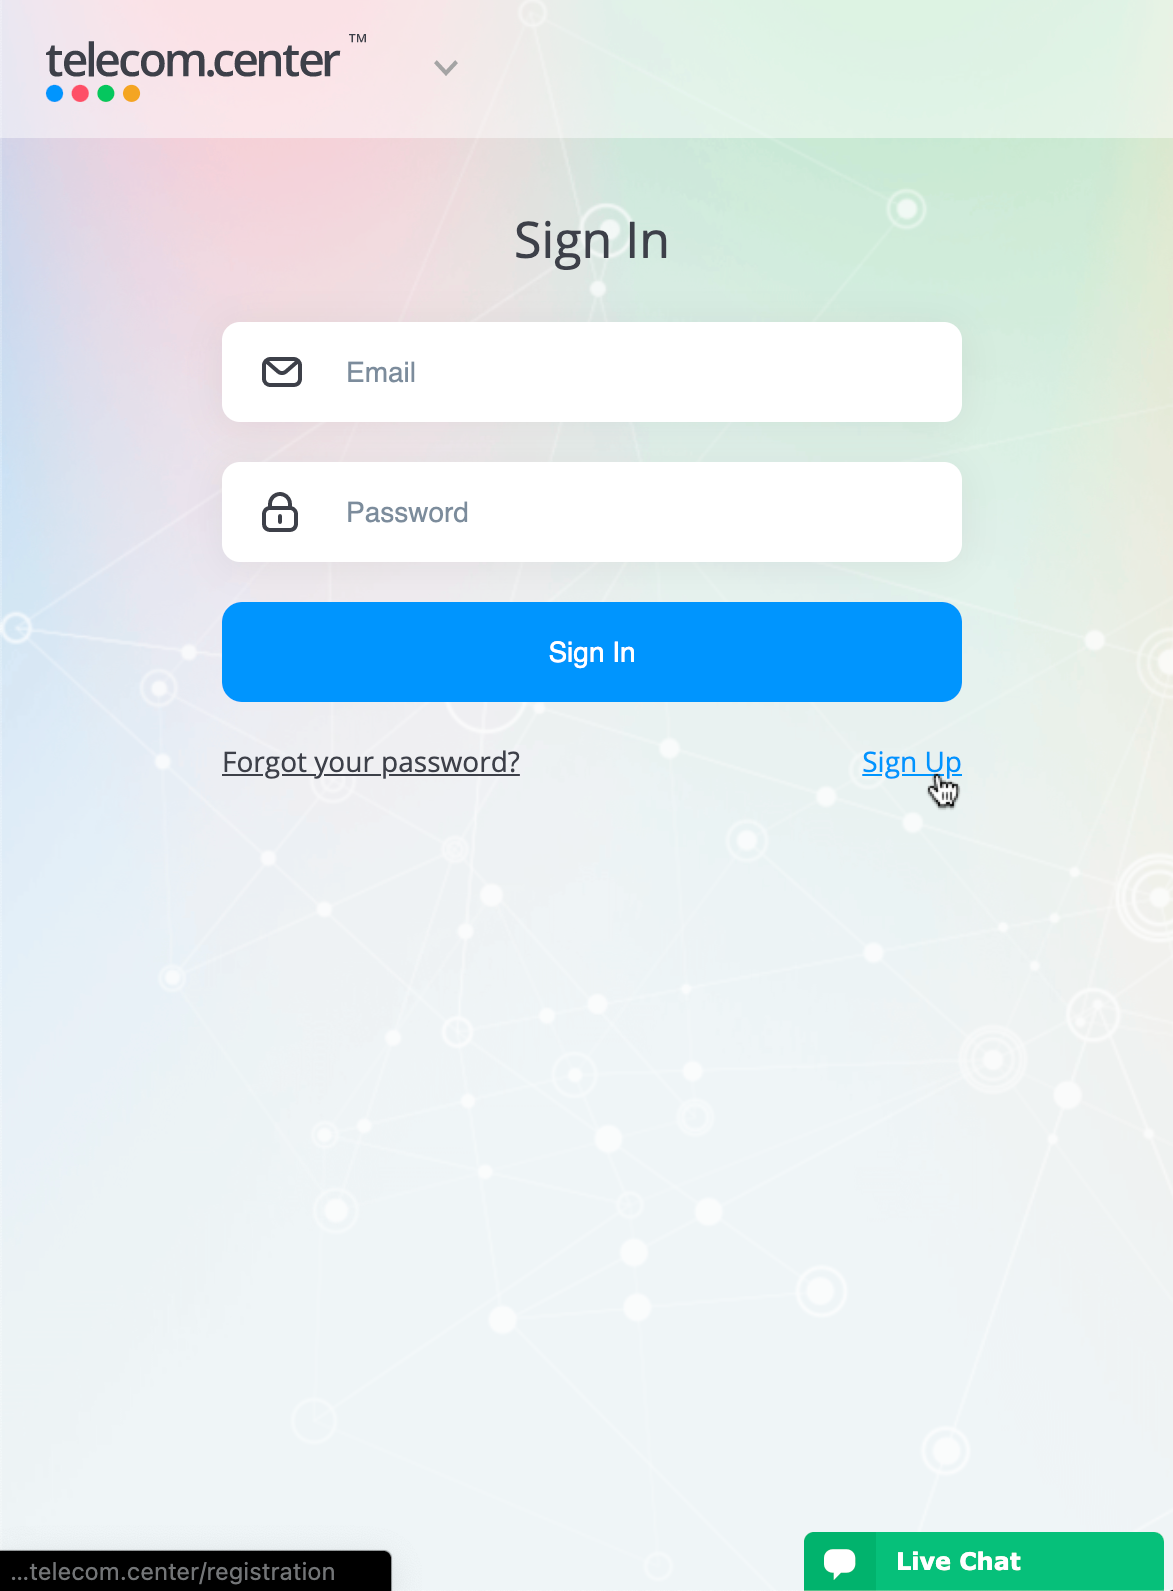
- Go to the https://my.call.center/ website. You will be redirected to https://my.telecom.center/ to log in.
- Click Sign Up.
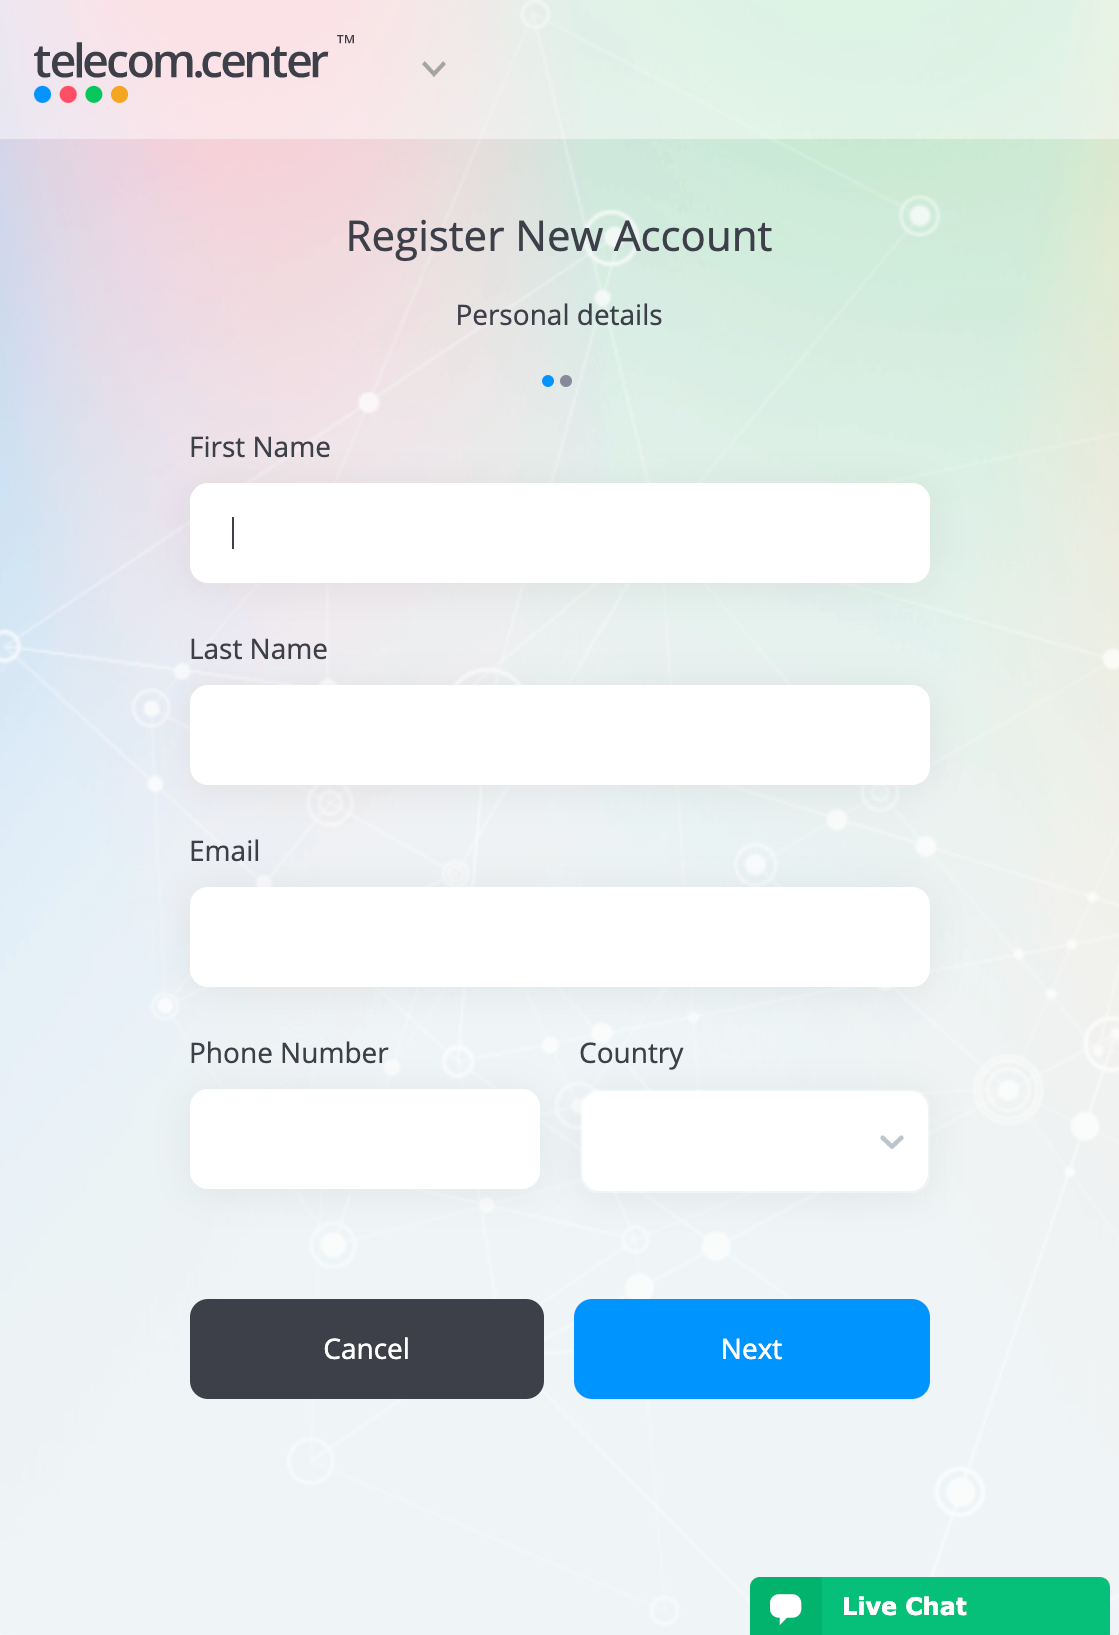
- In the Register page, provide the following details:
- First Name
- Last Name
- Phone Number
- Country
- Click Next
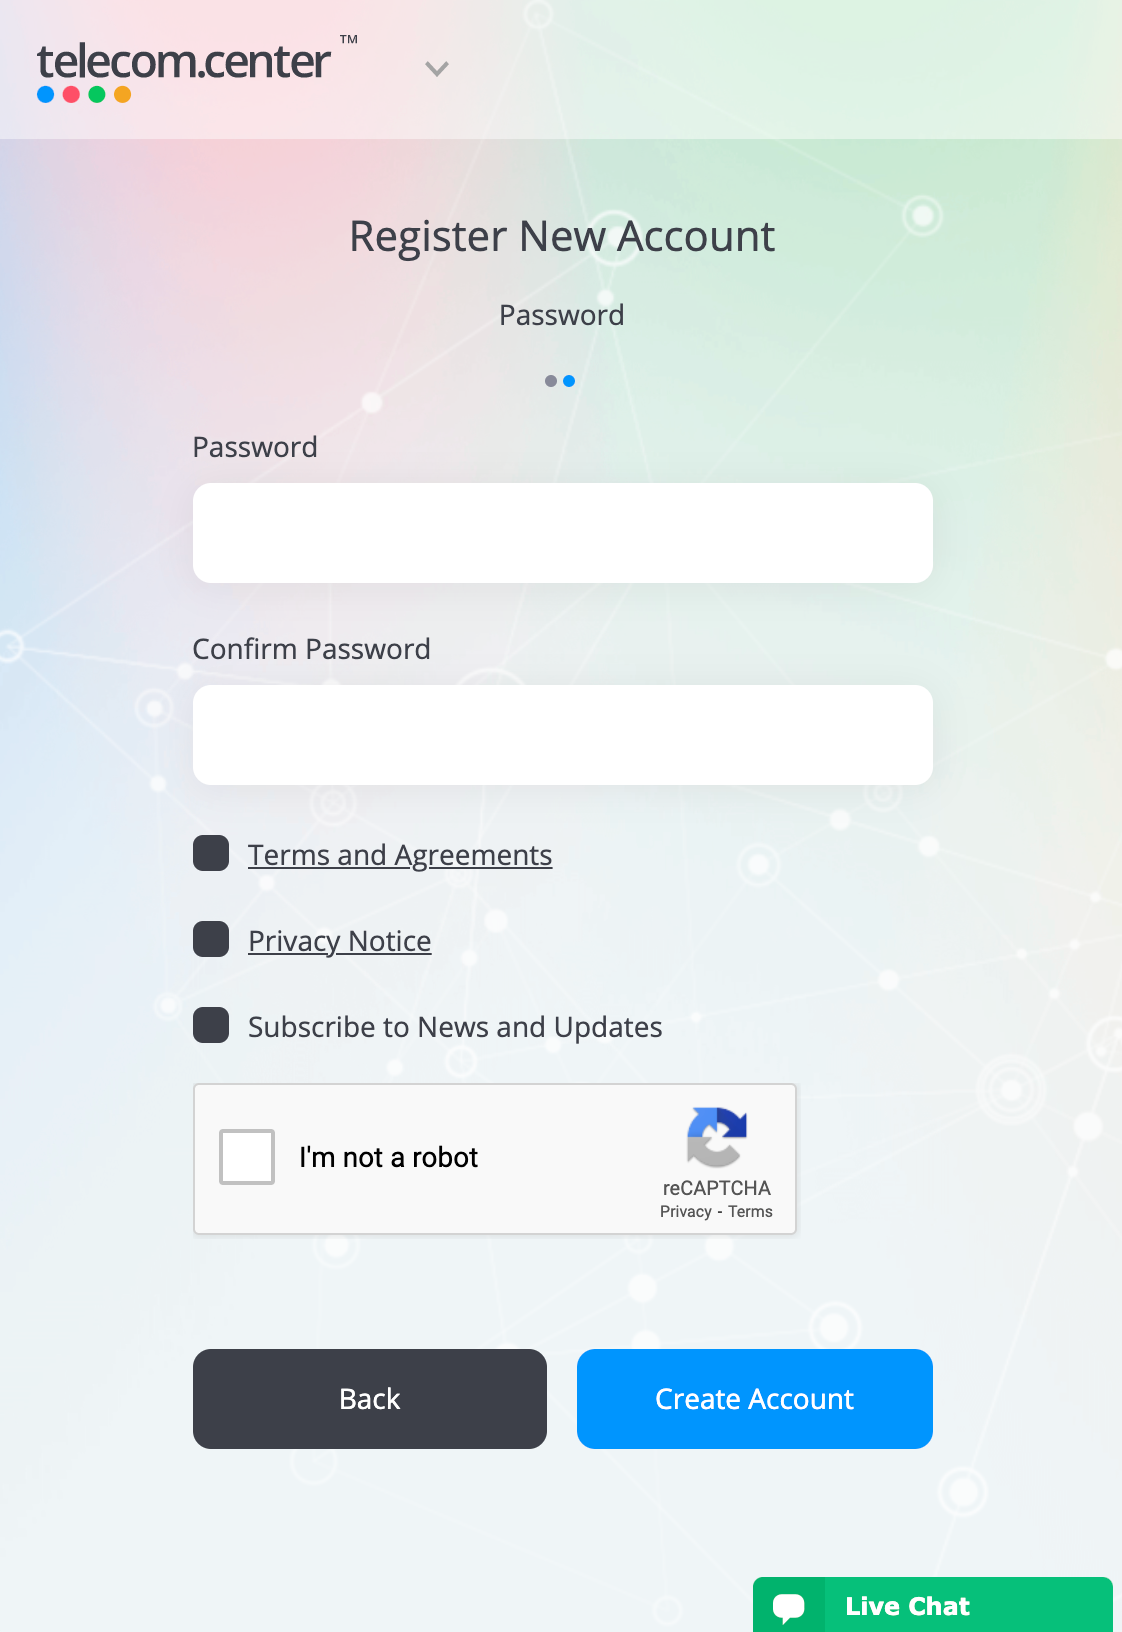
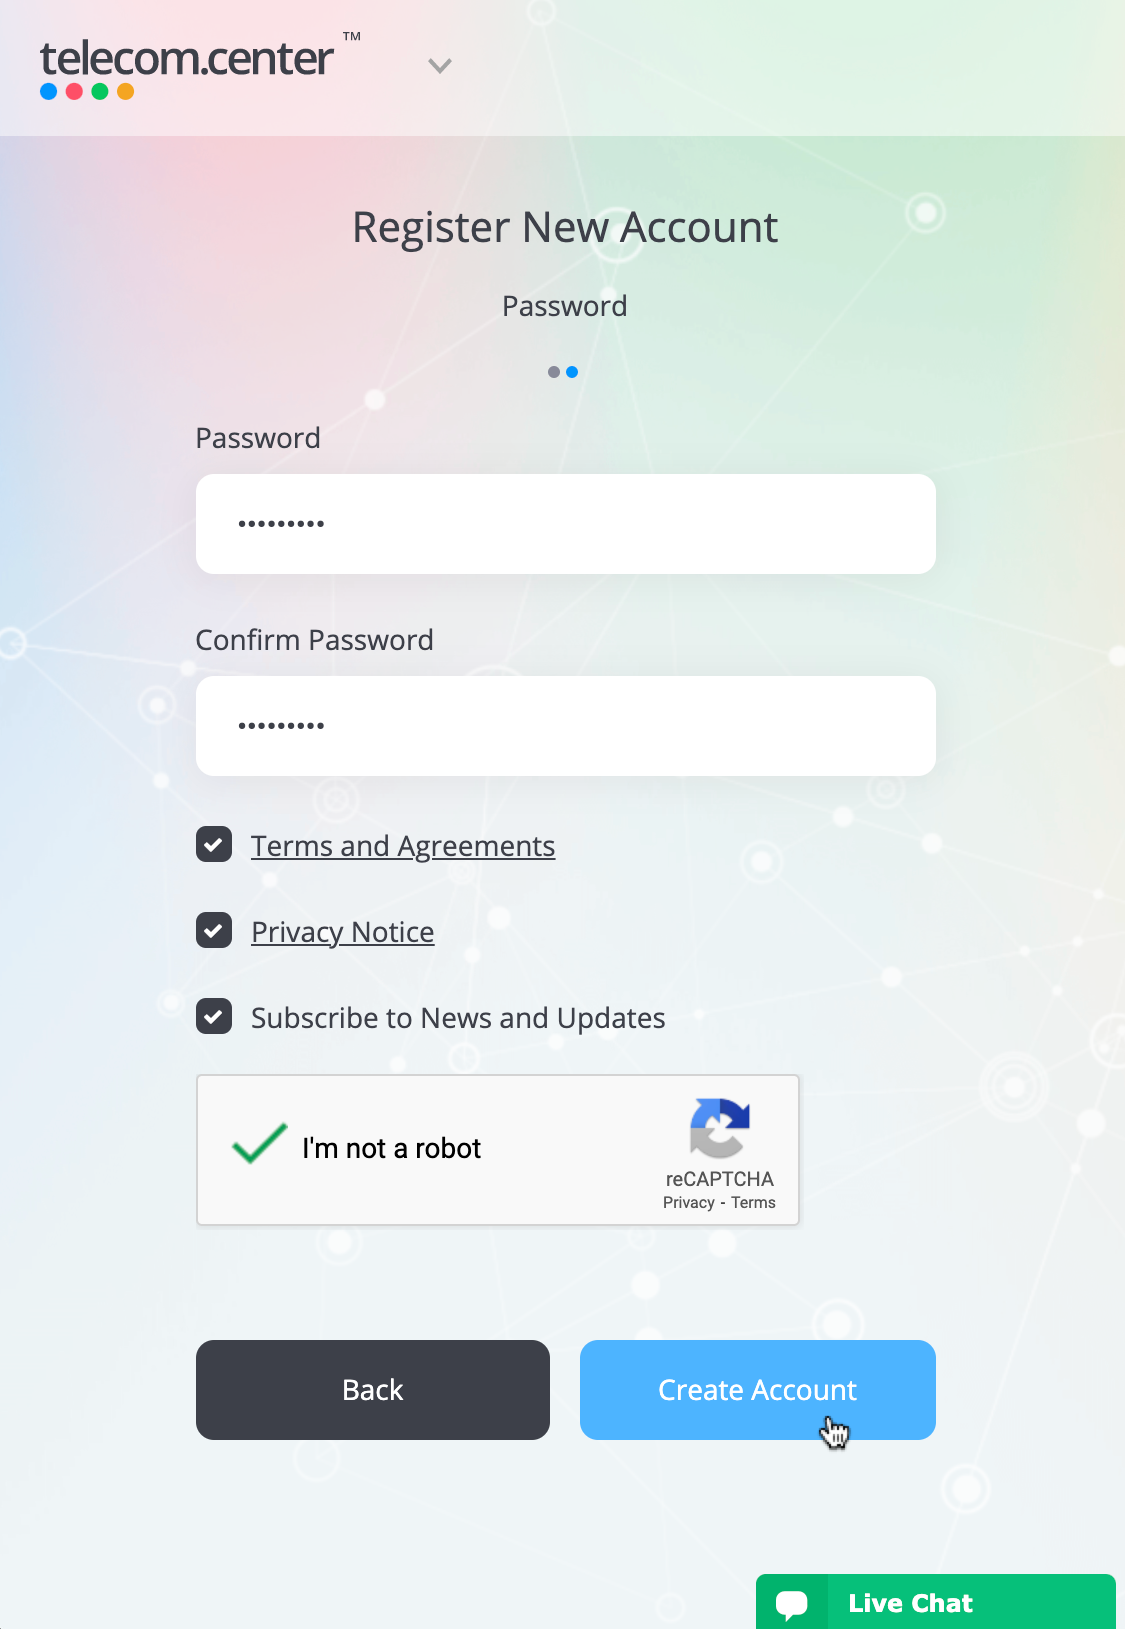
- Provide a password.
- Confirm the password.
- Check that you have read and agree with the Terms and Agreements (required).
- Check that you have read and agree with the Privacy Notice (required).
- Check the Subscribe to News and Updates checkbox (optional).
- Click the I’m not a robot checkbox to confirm that you are not a robot.
- Click Create Account.
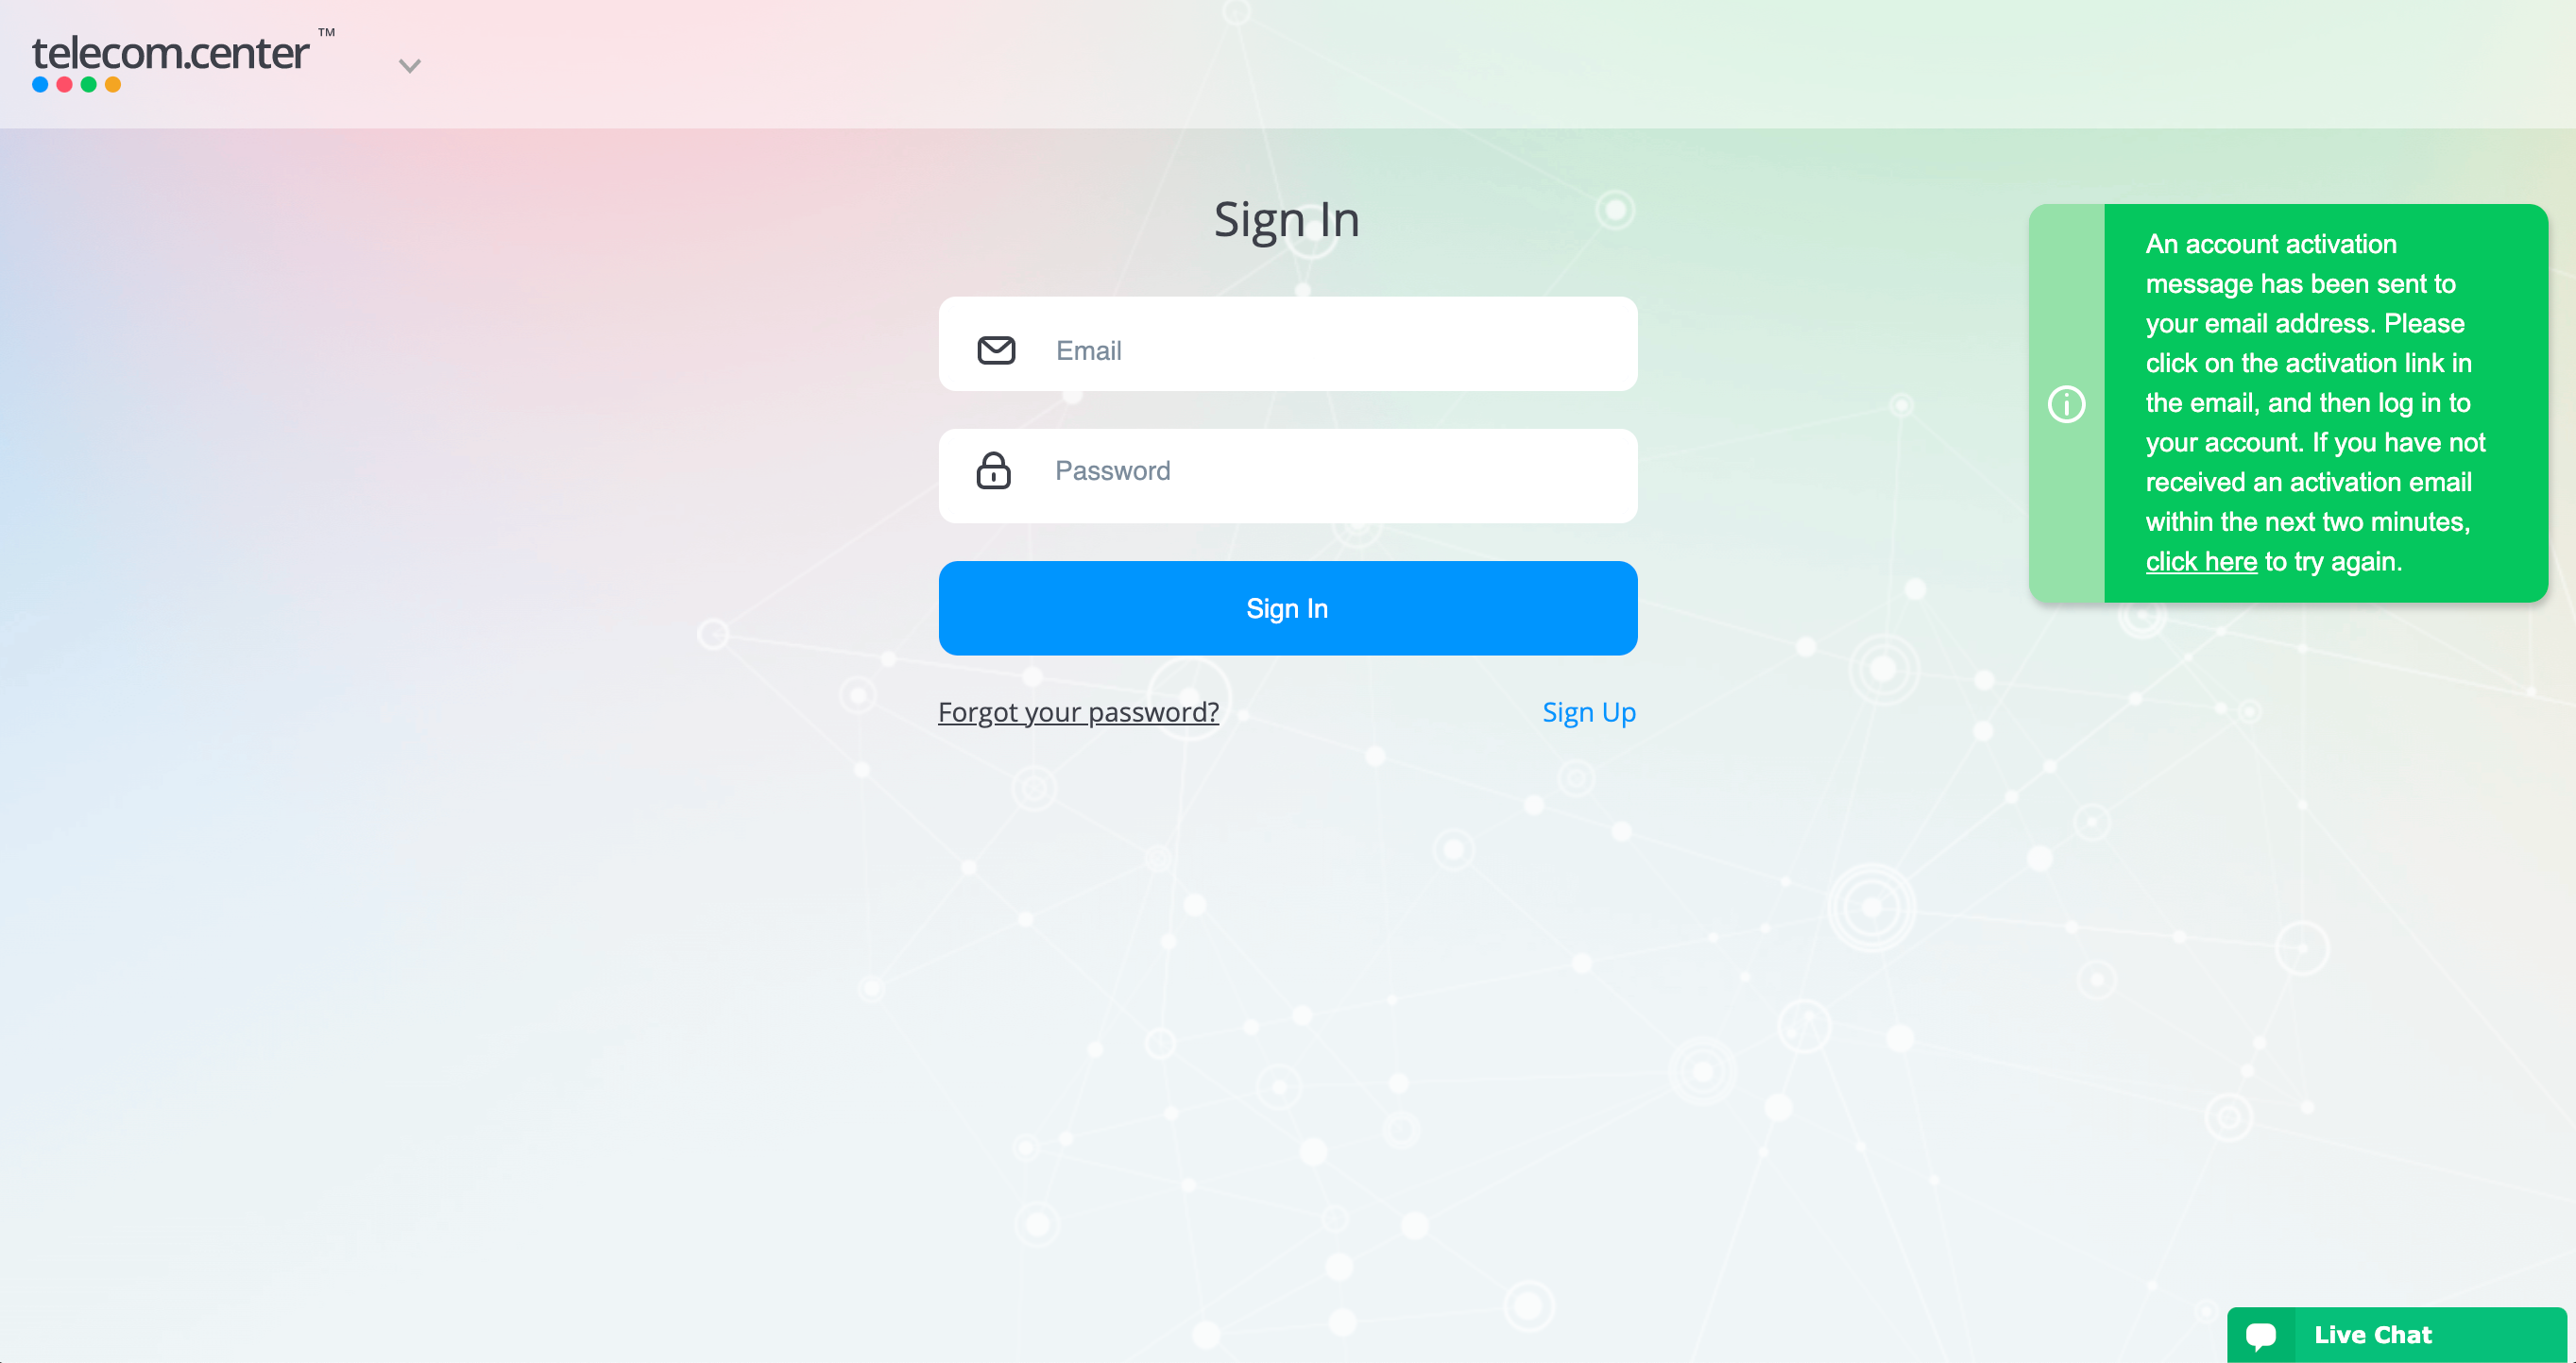
- A message will be displayed informing you that an account activation link was sent to your email.
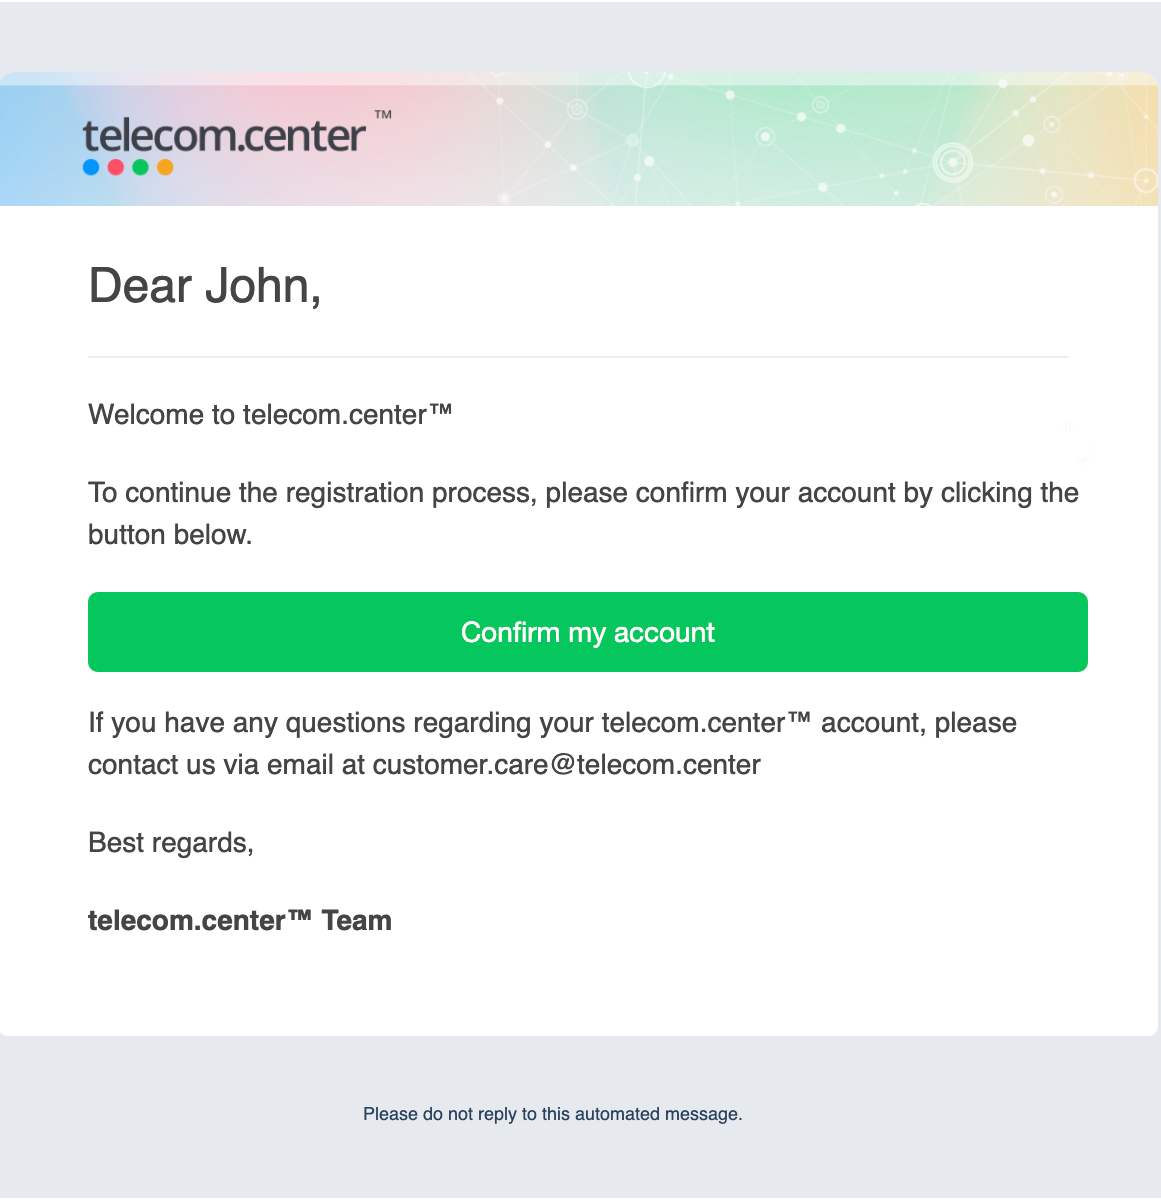
- To continue your registration, click the Confirm my account button.
- The telecom.center™ page will be displayed, with a message showing that your email has been confirmed.
Open the email which contains your activation link. Note that this email may have been filed in your junk or spam inbox folders.
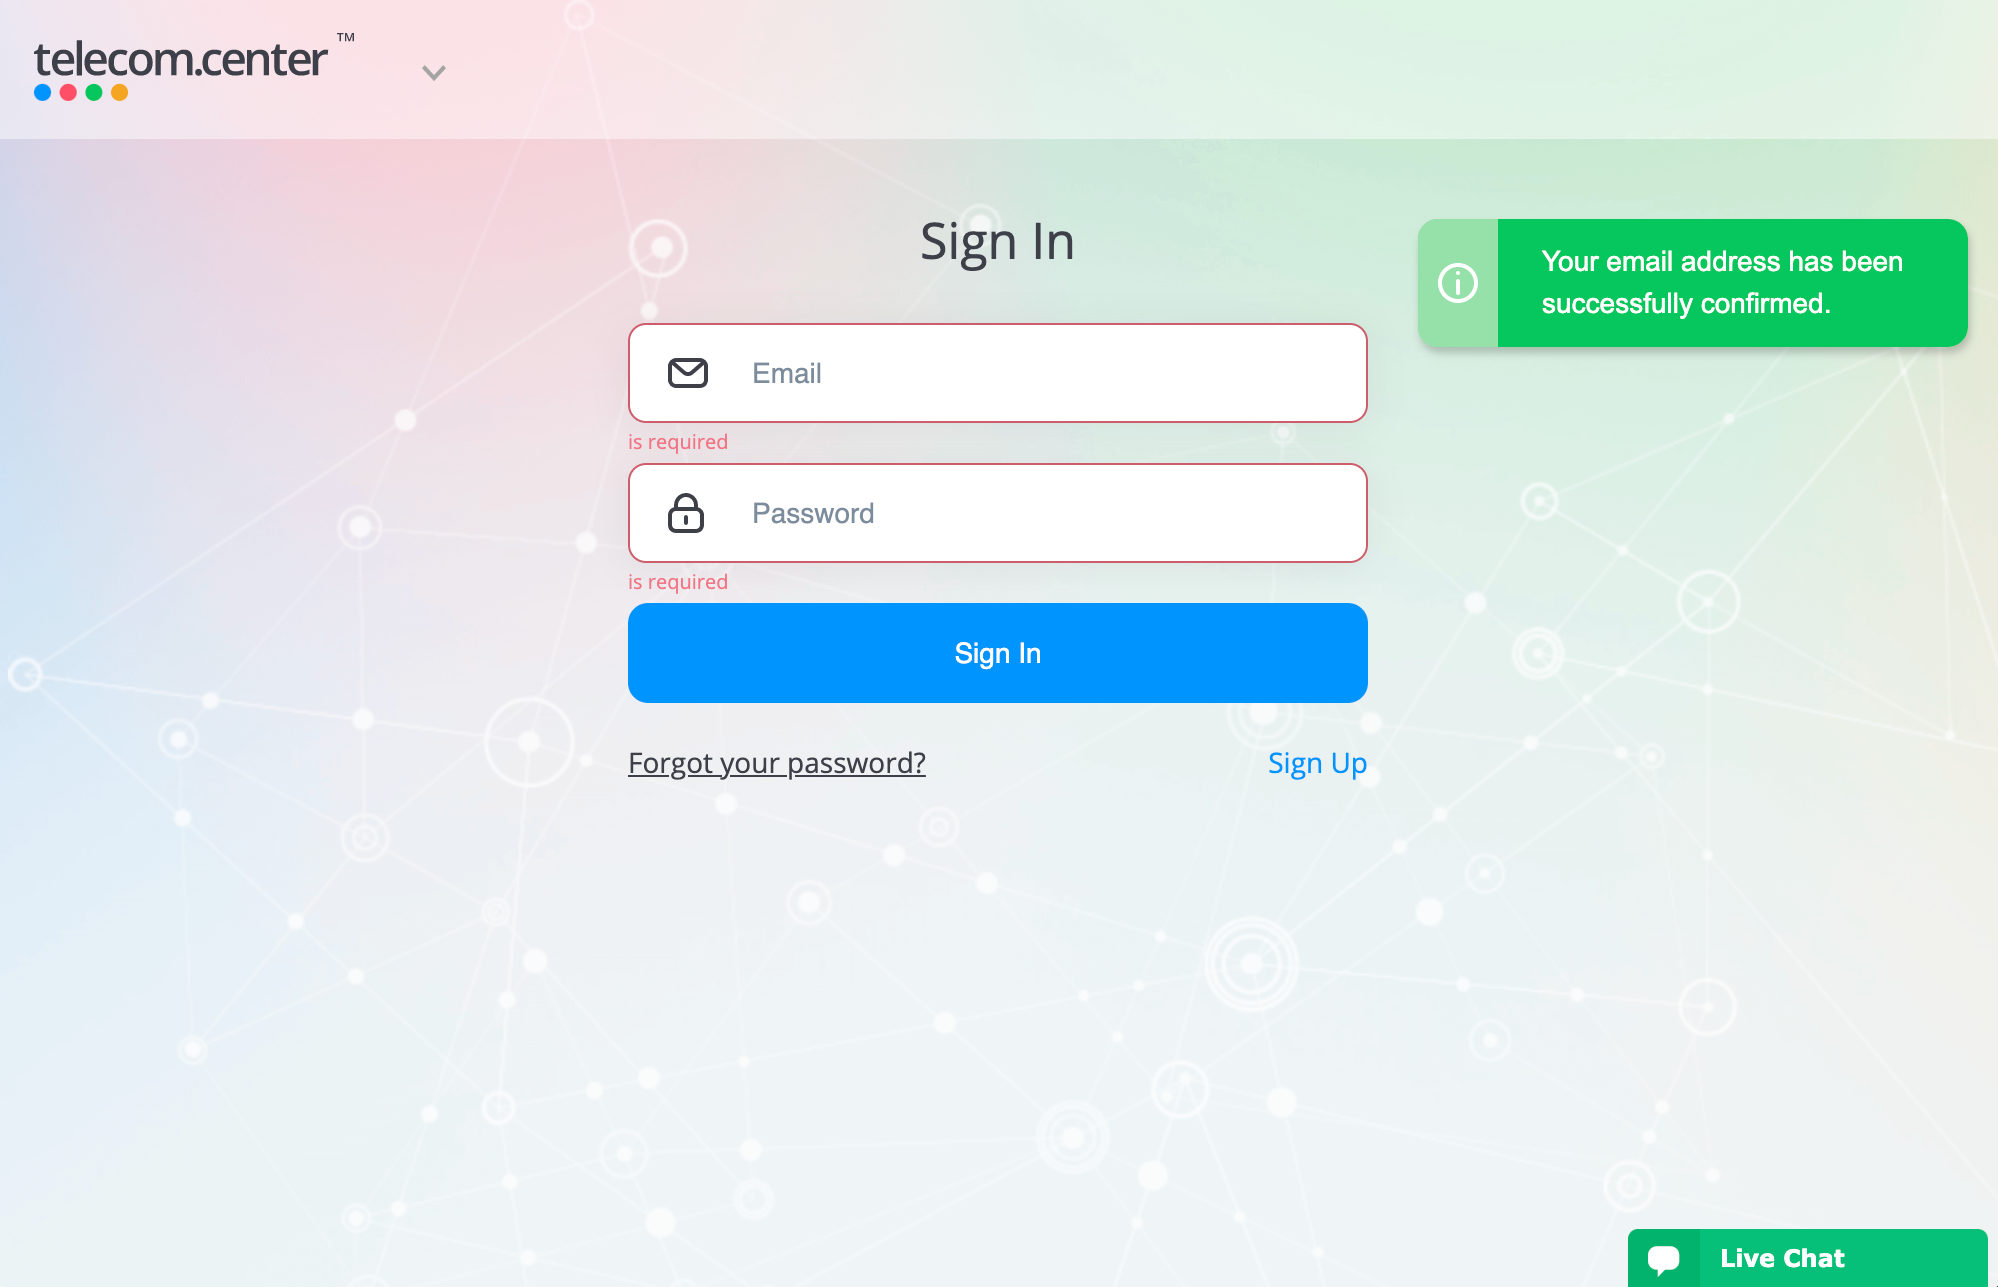
You can now enter your email and password to access your account.
Installing call.center™
To download the call.center™ softphone application, visit the official call.center™ website at https://call.center/softphone-download/ and select your preferred operating system.
Each platform has several download options that include links to the native app store, as well as allowing the direct download of the app installation files. The latest Beta code versions may also be listed as available download options.
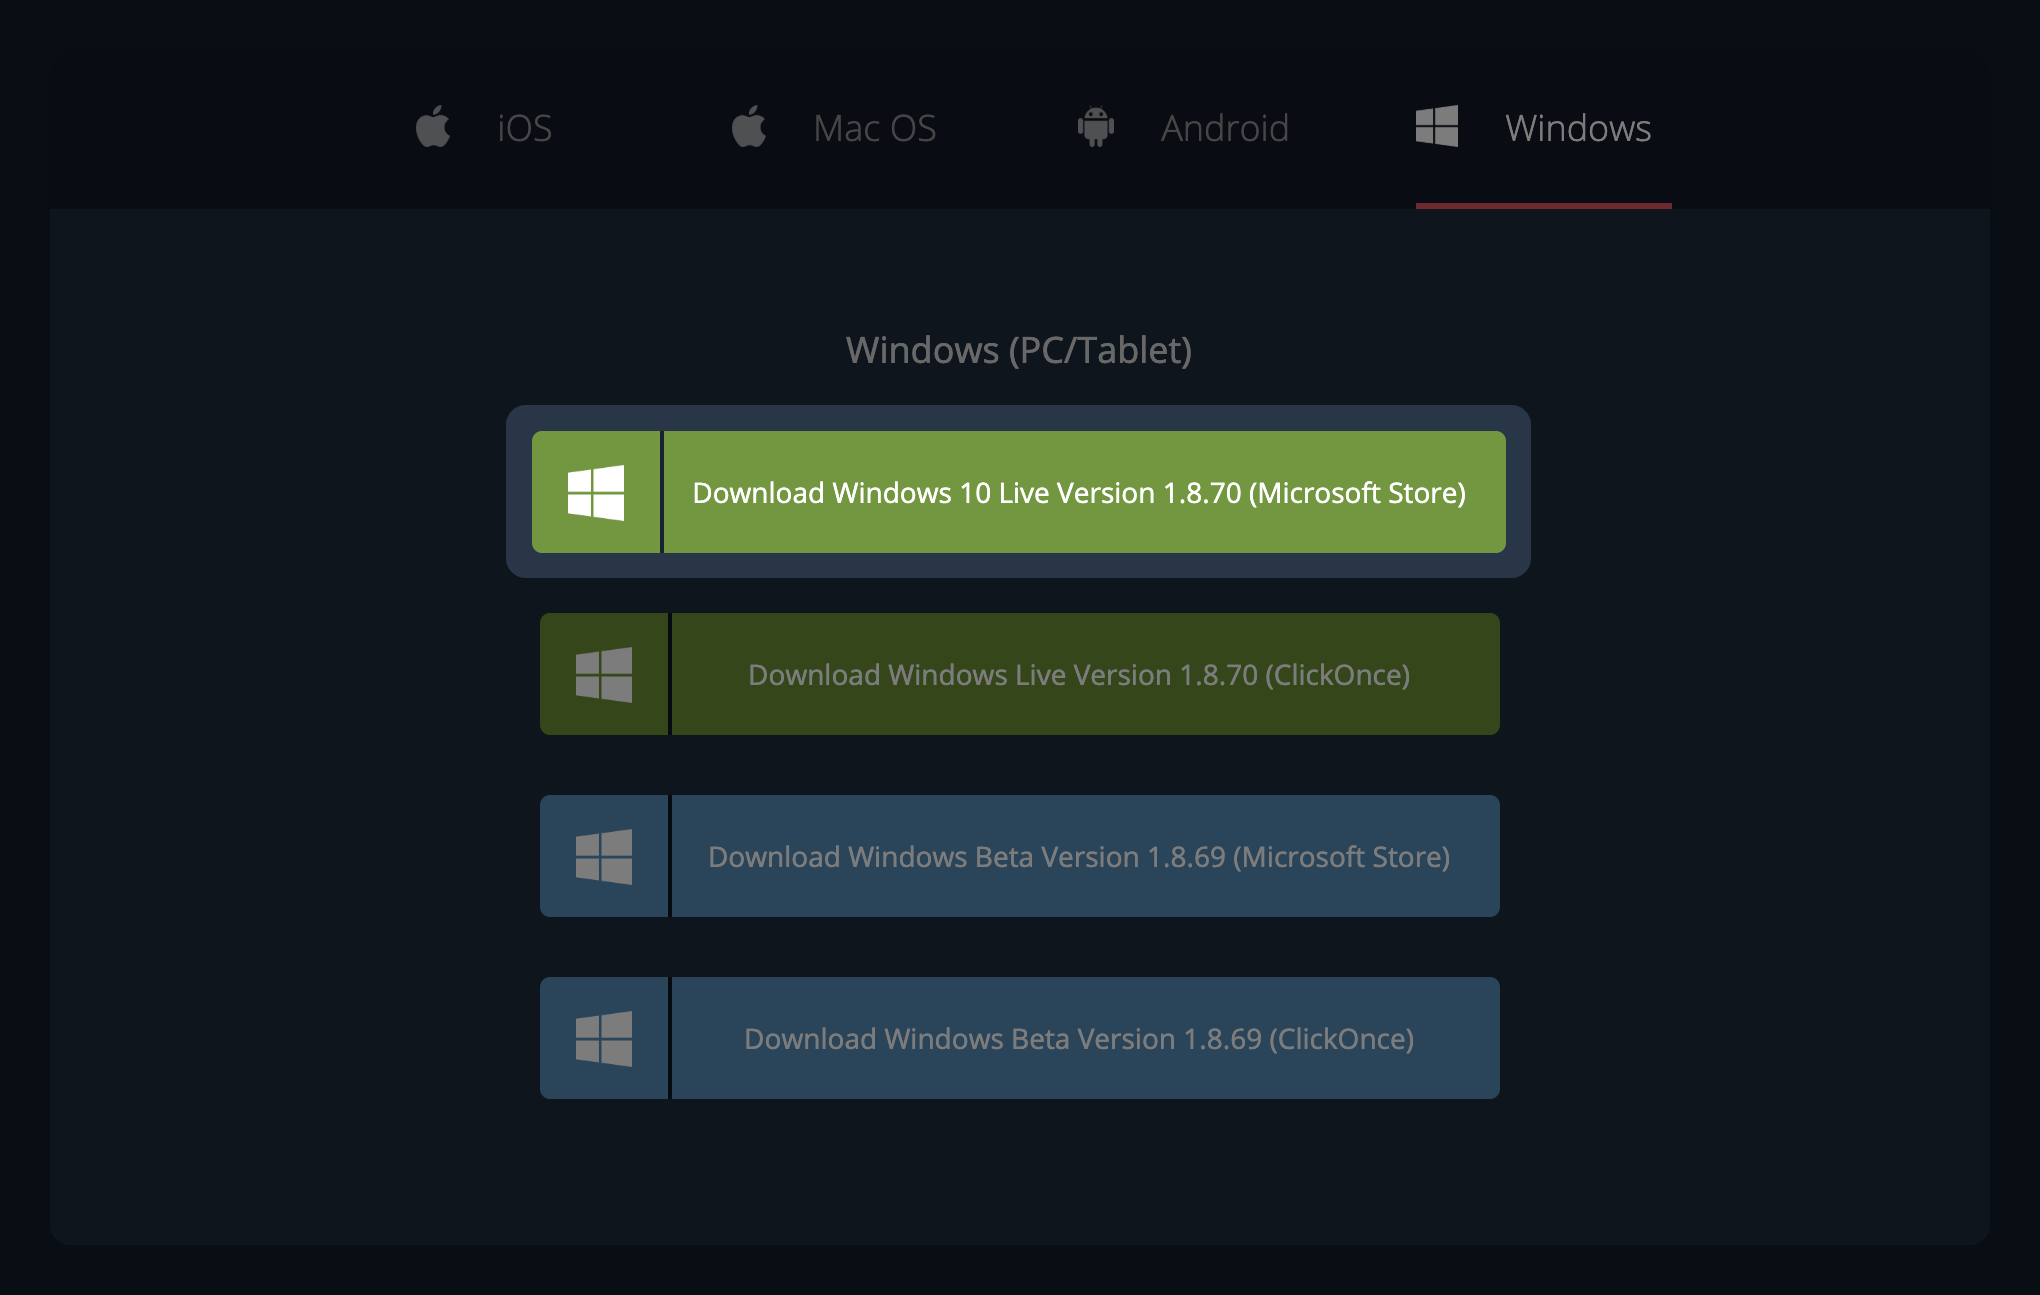
Back to the topInstalling on the Windows platform
Two versions of the call.center™ exist for the Windows platform:
- From the Microsoft Store
- Using the installation file (ClickOnce)
The difference between these options is that the Microsoft Store version of call.center™ is only available for the Windows 10 OS, and may only be accessed through the Microsoft Store application. However, the ClickOnce version of the call.center™ may be downloaded and used without a Microsoft Account.
It is important to note that the Microsoft Store version supports Push notifications, while the ClickOnce version does not include this feature.
Microsoft Store method:
- Click on the link “Download Windows 10 Live (Microsoft Store)” to access the Microsoft Store web portal displaying the call.center™ page.
- Click the GET button, and the Microsoft Store application will open to display the call.center™ page.
- Click the Install button and wait until the installation process has been completed.
- Click the Launch button to start the call.center™ application.
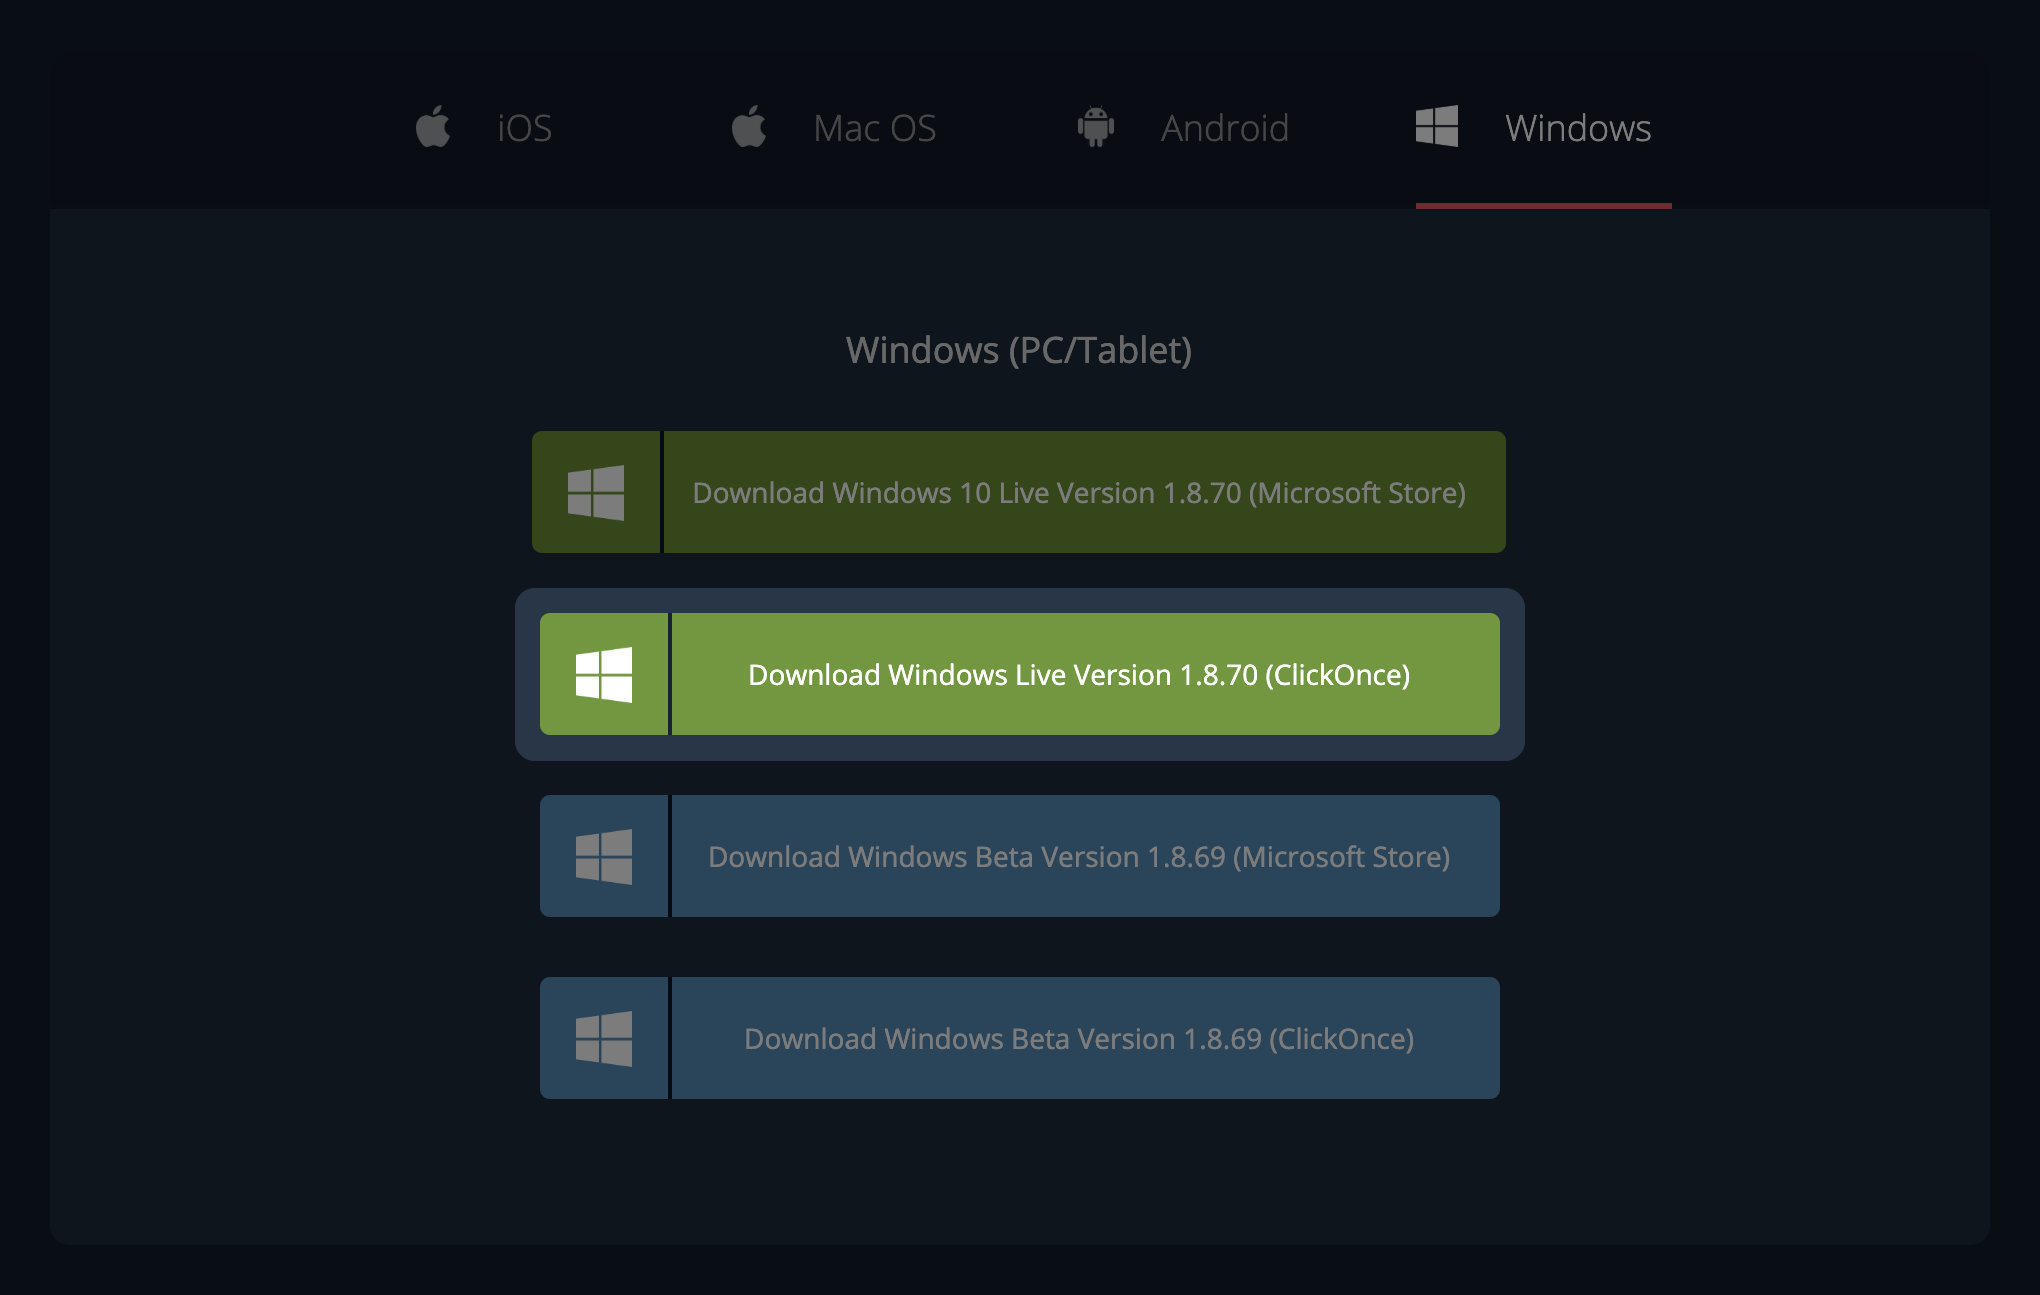
ClickOnce method:
- Click on the link “Download Windows Live Version (ClickOnce)” and a Setup.exe file will be downloaded.
- Launch the Setup.exe file and follow the installation instructions.
- After the installation process has been completed, the call.center™ application will be immediately launched.
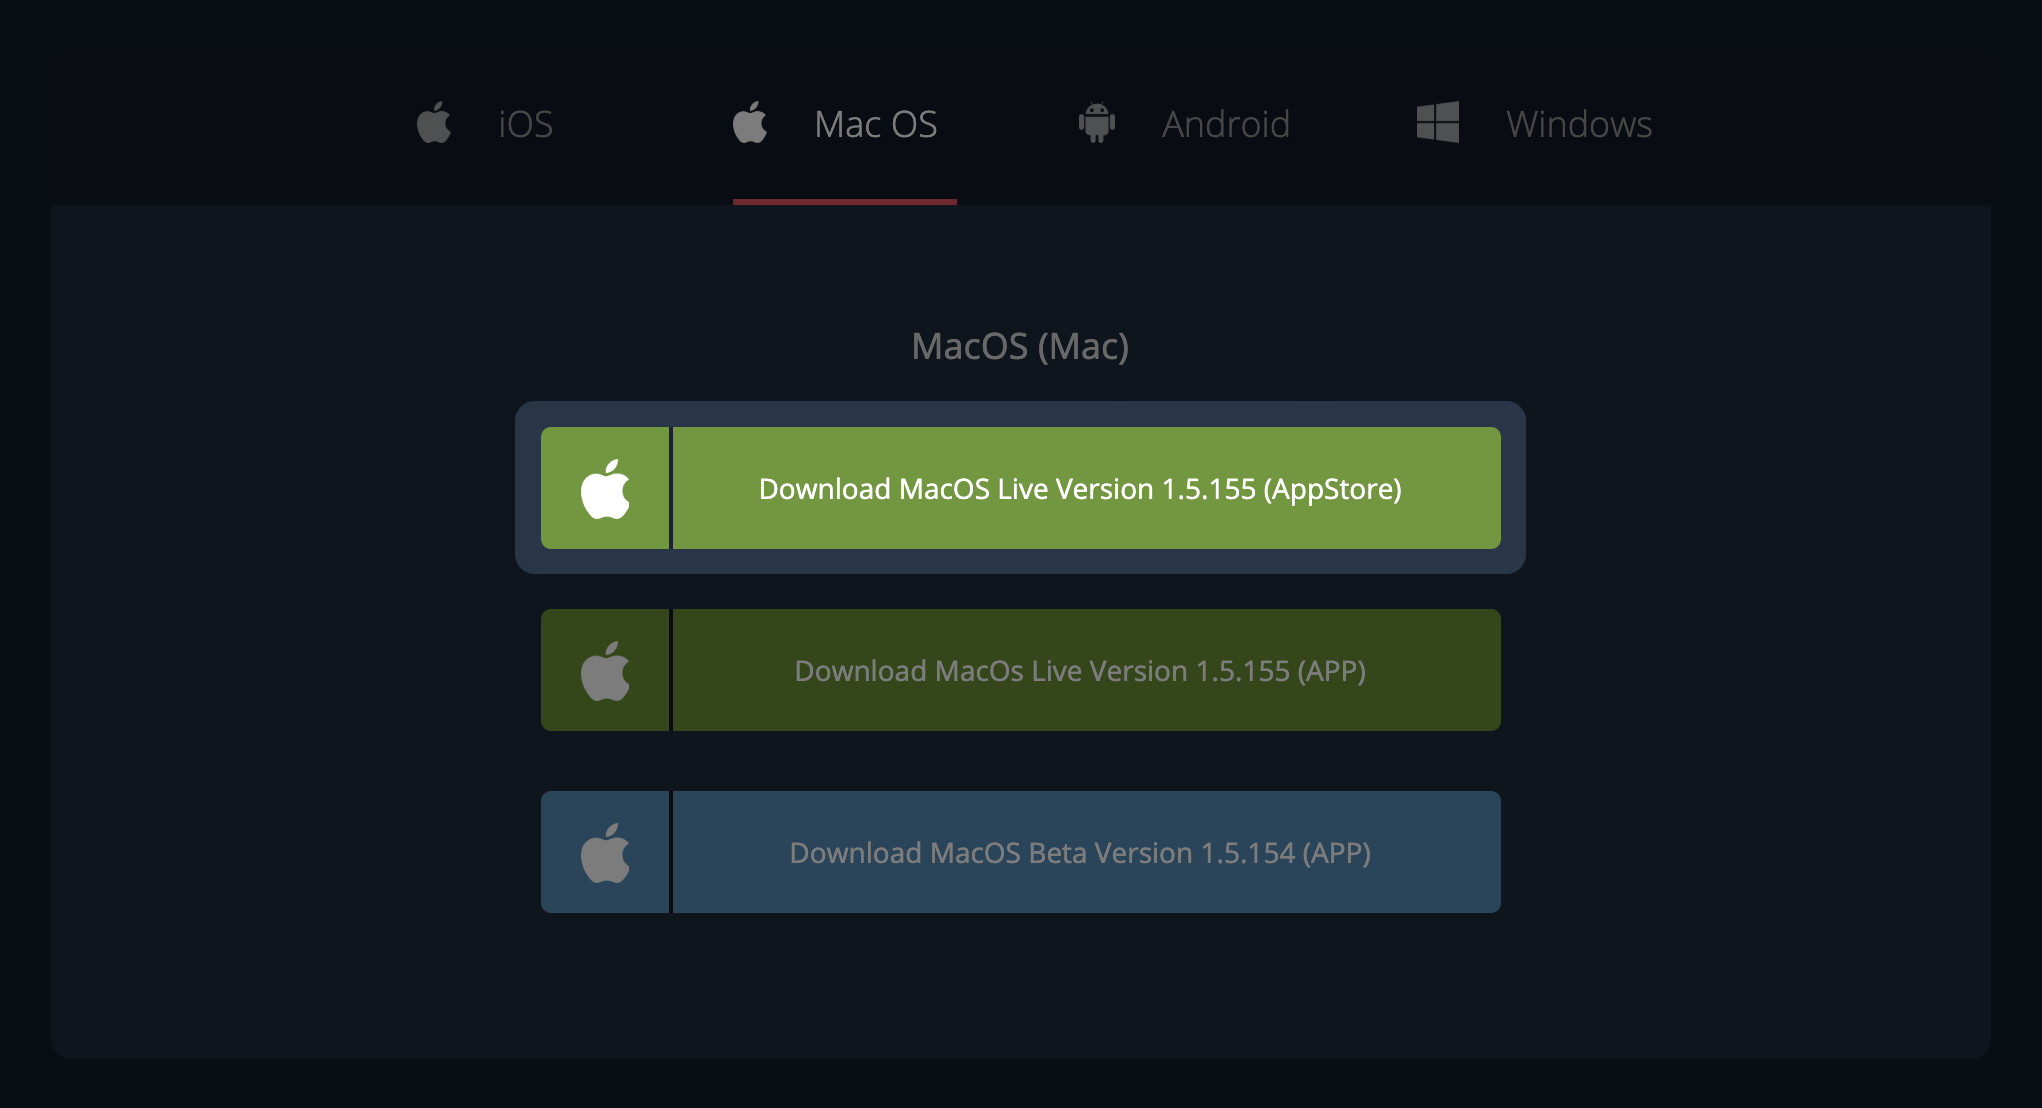
Installing on a macOS platform
Two download and installation options are available for macOS platform:
- From the App Store
- Using APP file
App Store method:
- Click on the link “Download iOS Live Version (App Store)”.
- A prompt will appear that provides a link to the App Store. Press the Open button to continue.
- Install the application from the App Store onto your device.
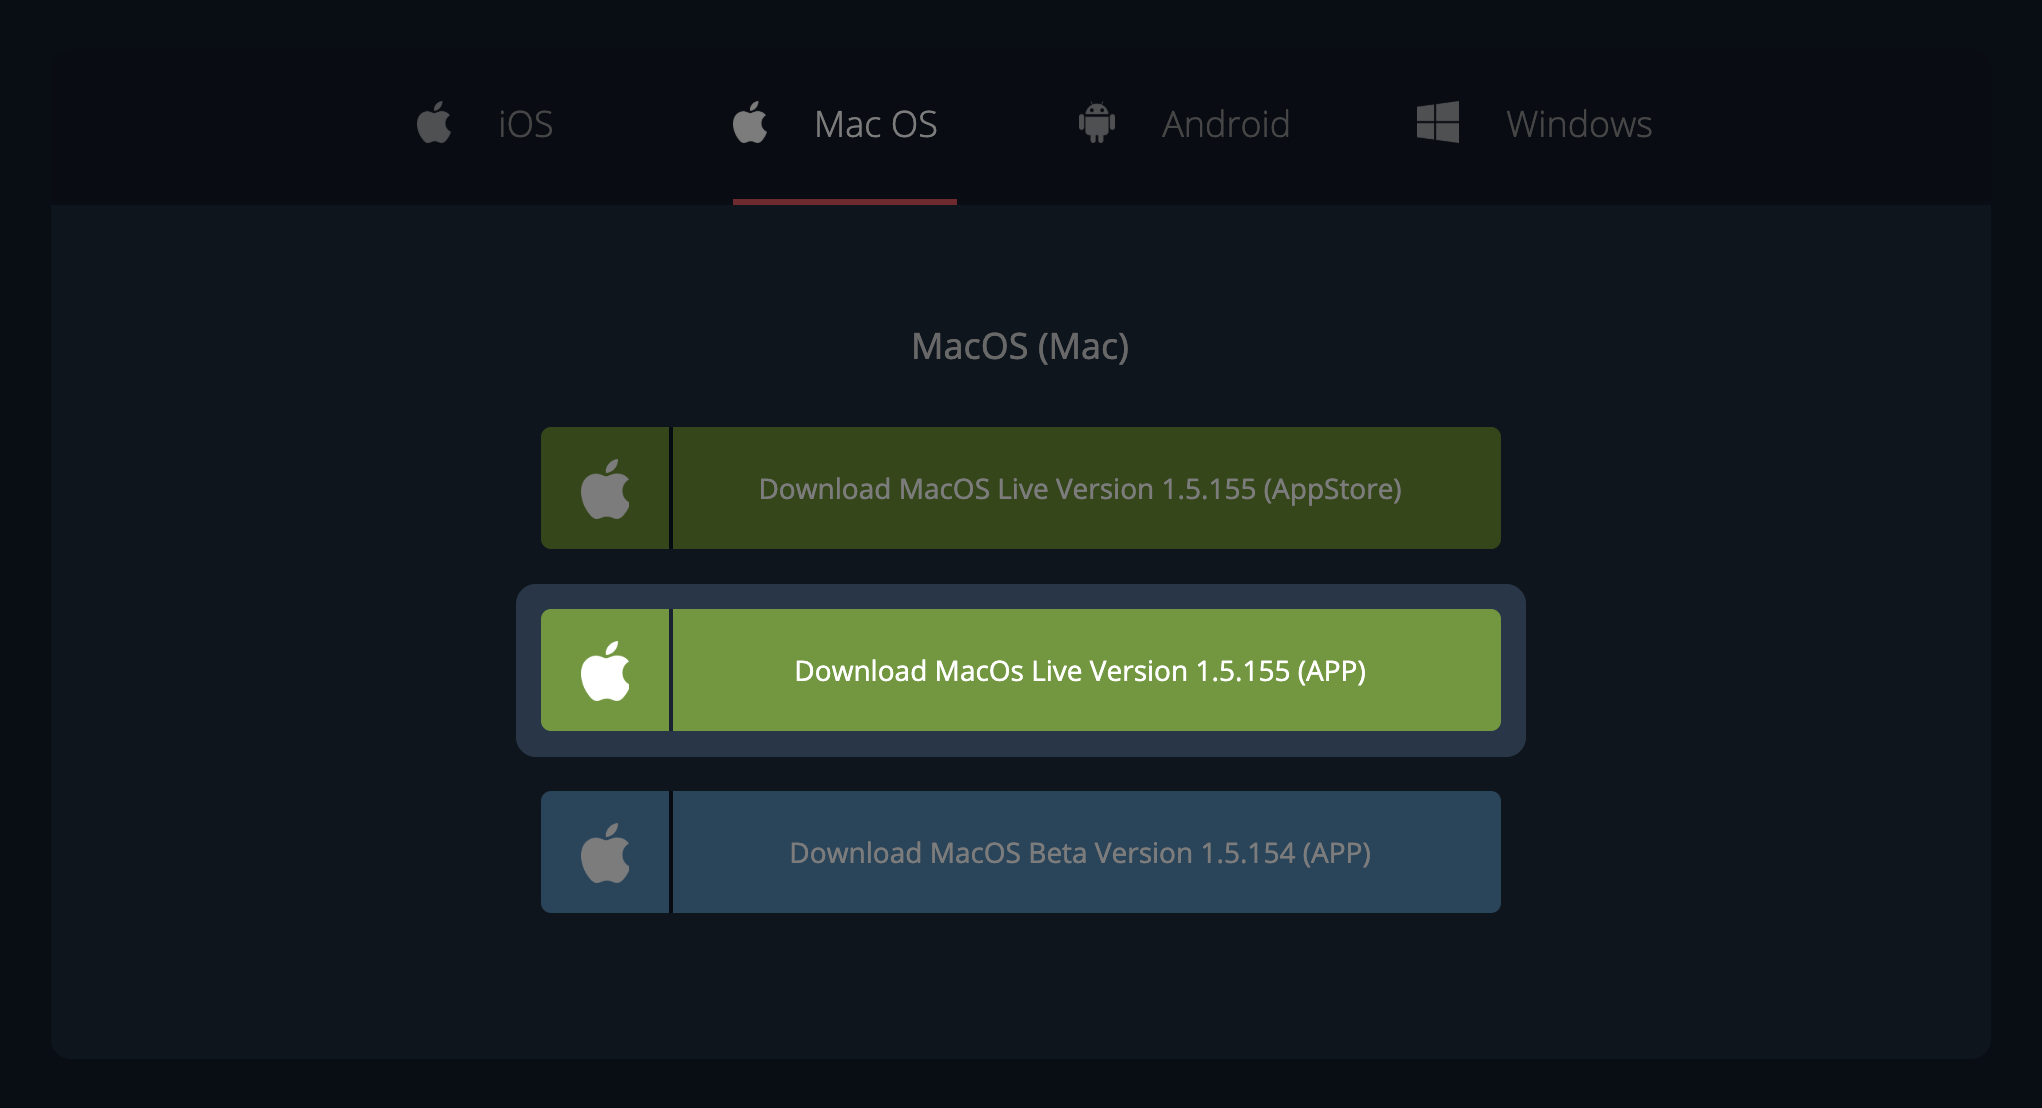
APP file method:
- Click on the link “Download MacOS Live Version (APP)” to download the ZIP file to your computer.
- Unzip the downloaded file in the directory where you would like to store the call.center™ application.
- Run the call.center.app file, and the application will open without installation.
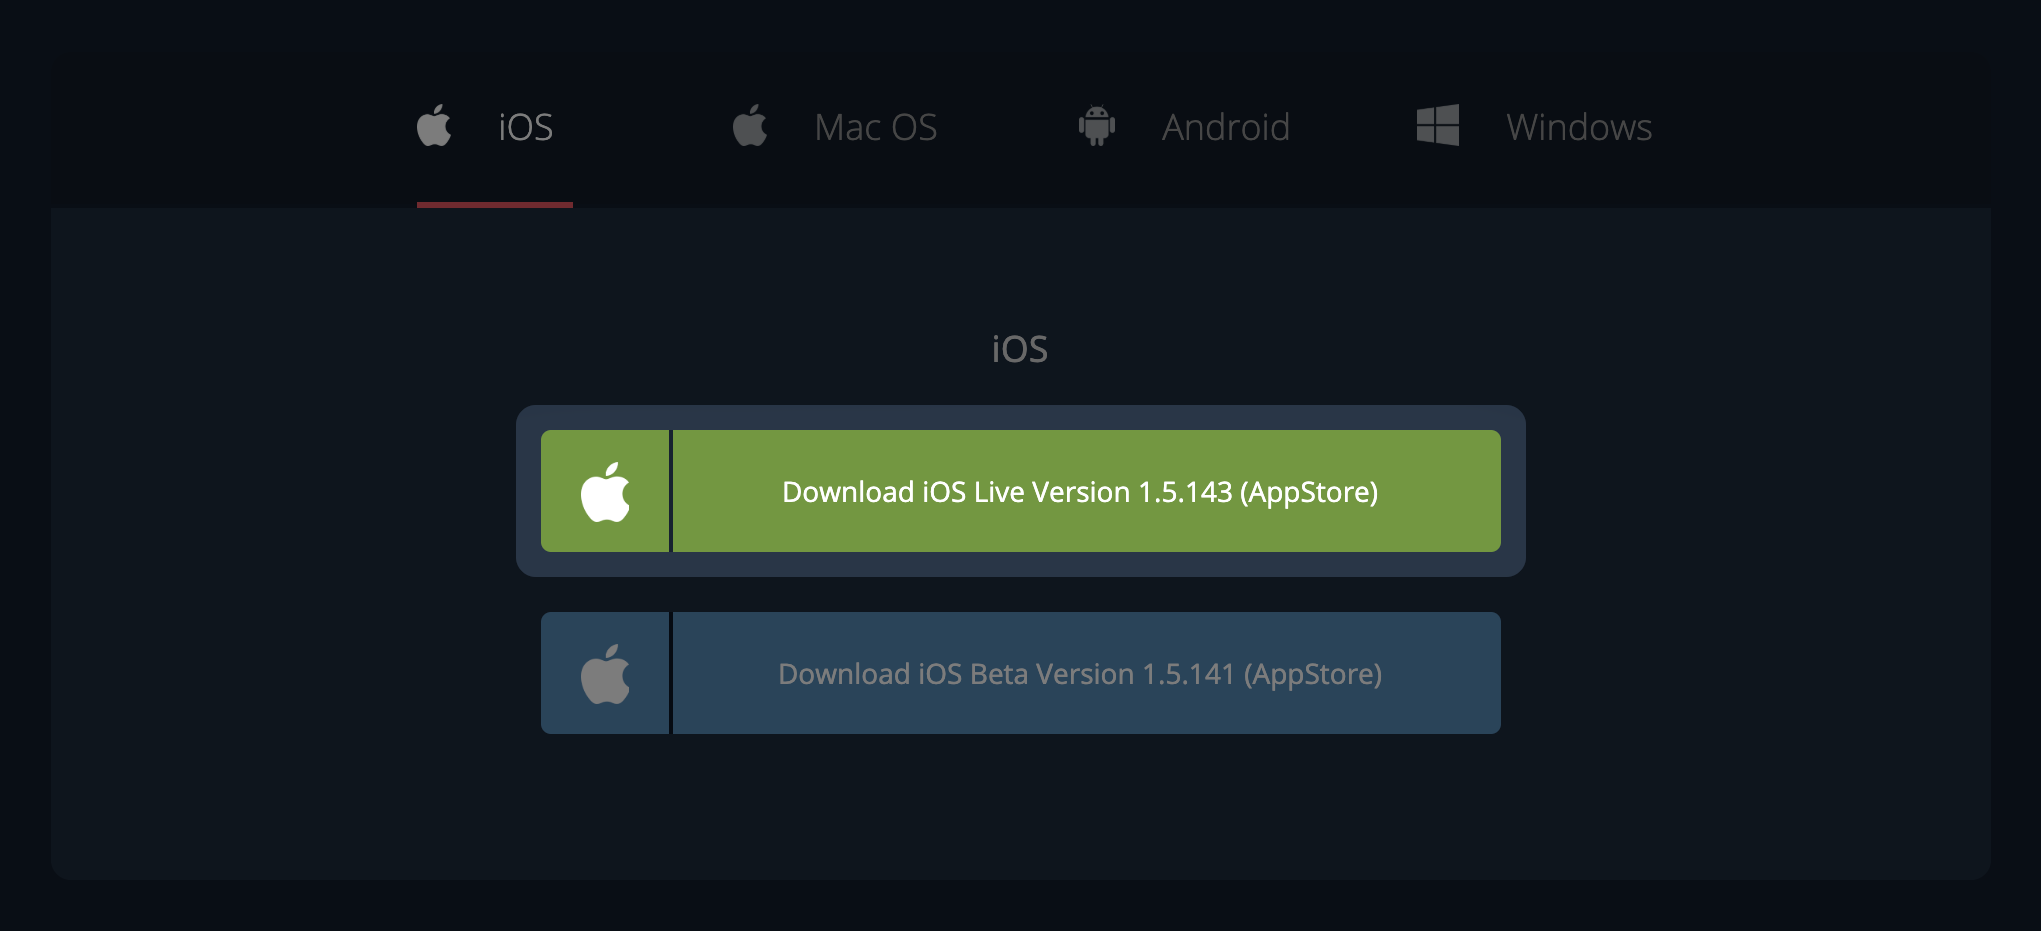
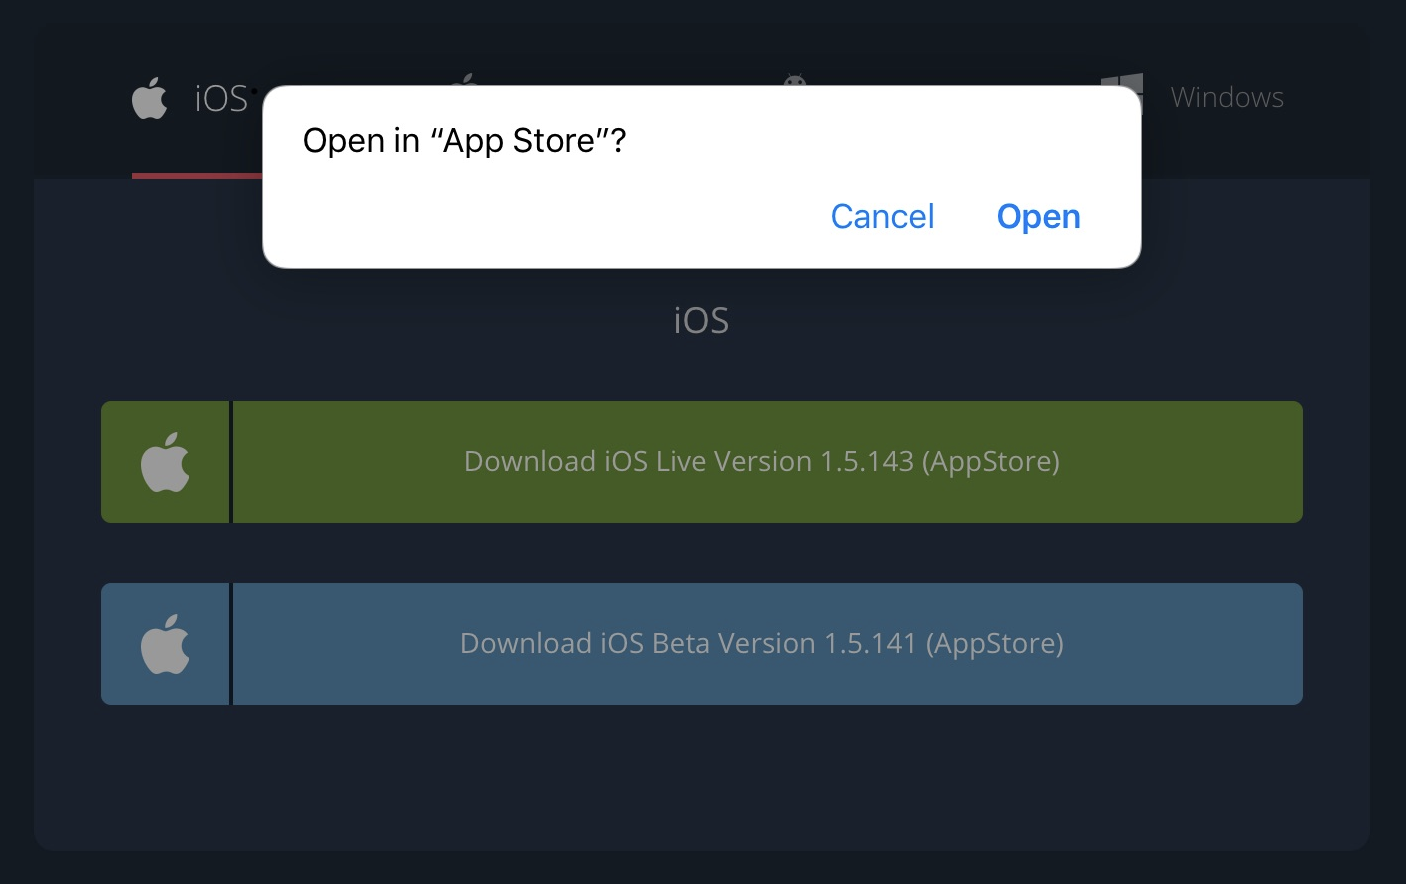
Installing on an iOS platform
- Click on the link “Download iOS Live Version (App Store)”.
- A prompt will appear with the option to open a link to the App Store. Press the Open button to continue to the App Store.
- Install the application from the App Store onto your device.
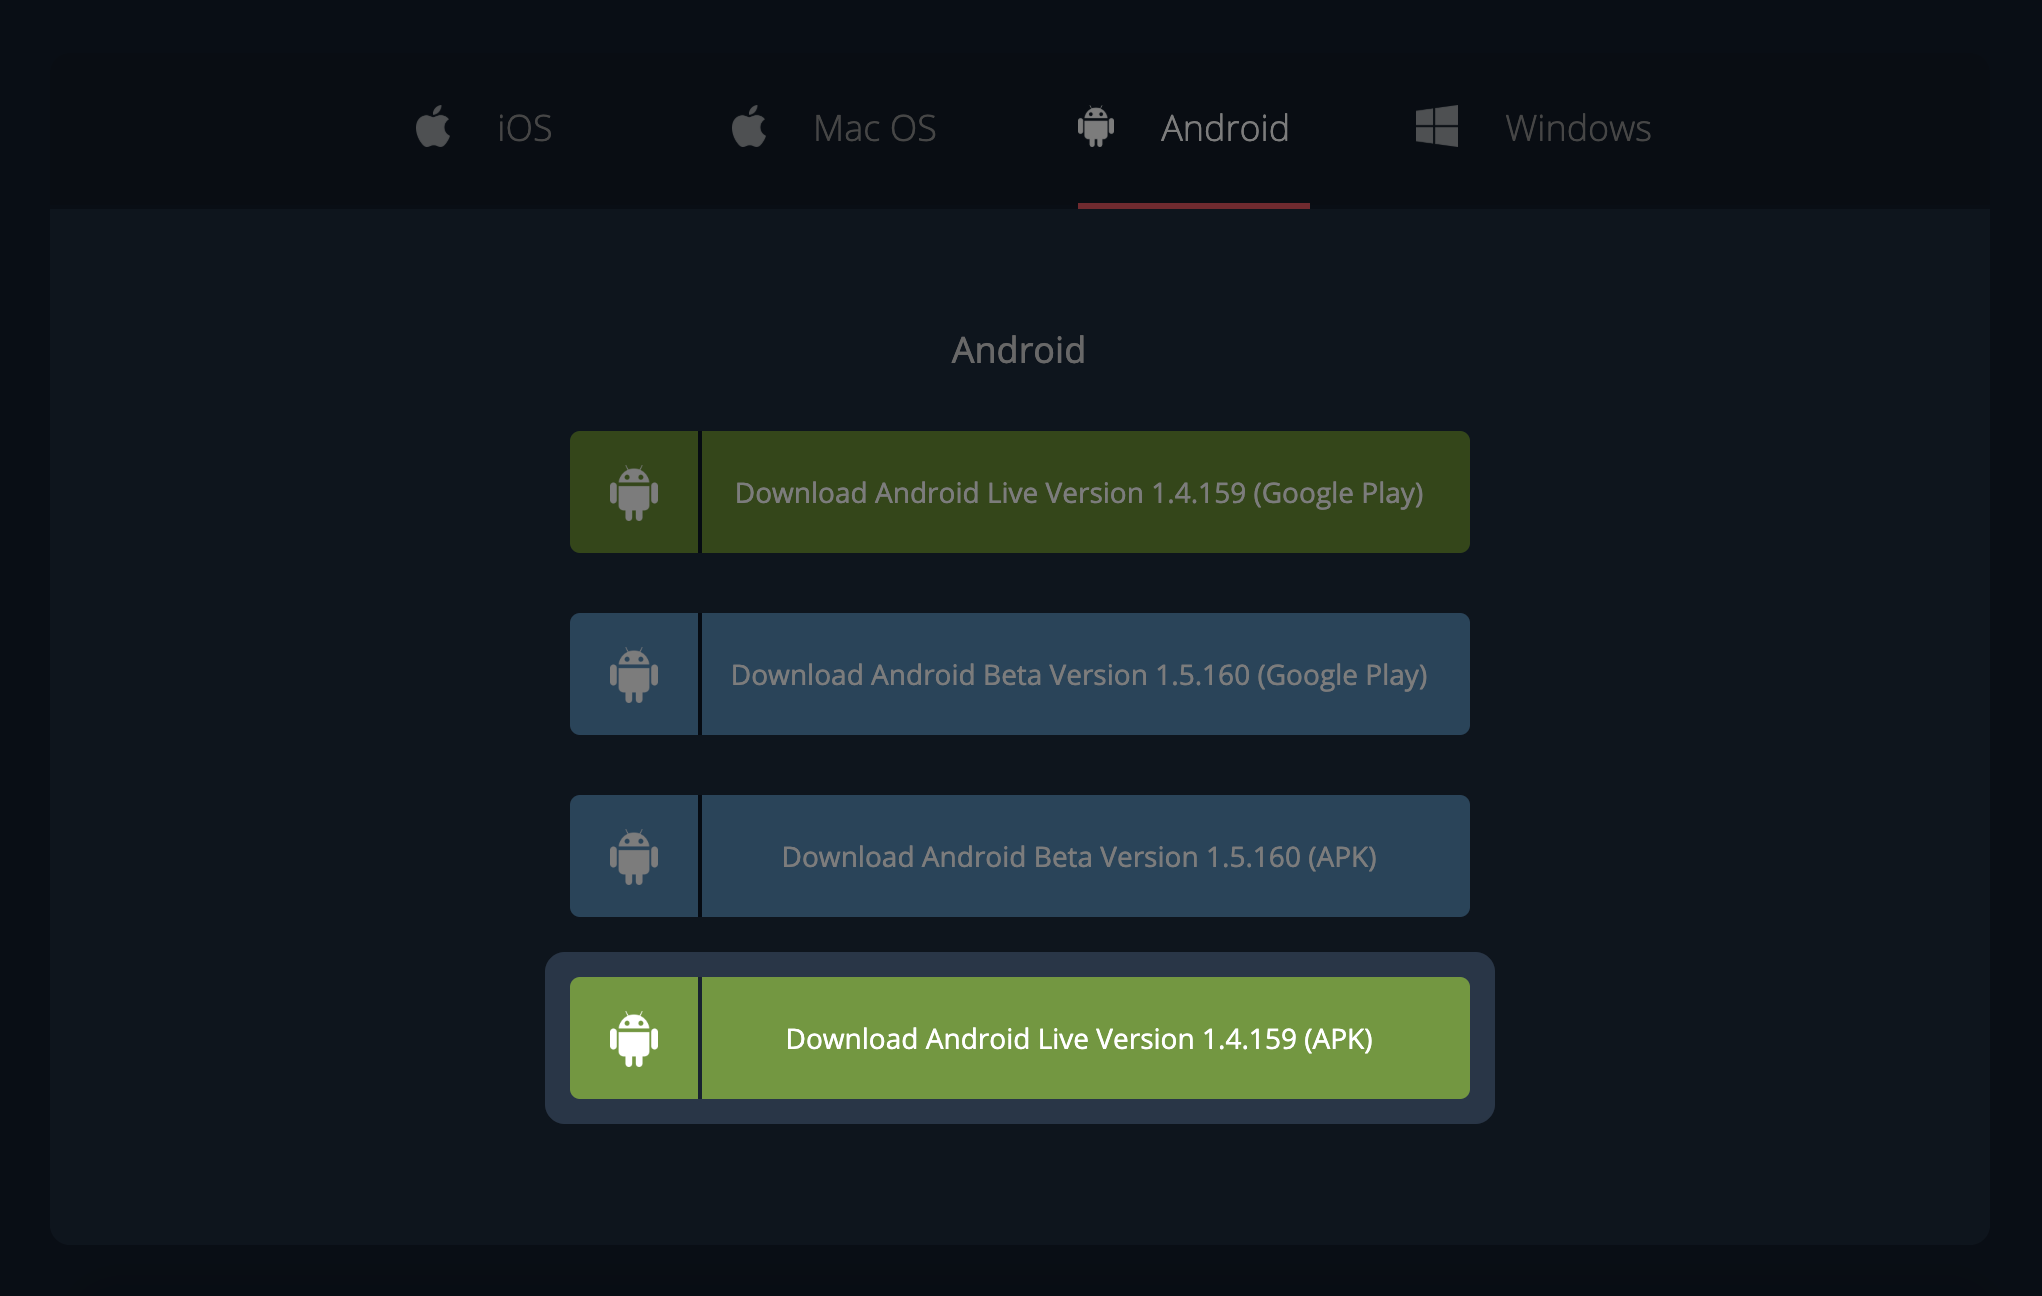
Installing on an Android platform
Two download and installation options are available for the Android platform:
- From the Google Play store
- Using an APK installation file
Google Play method:
- Click on the link “Download Android Live Version (Google Play)”.
- A Google Play application will launch, displaying a call.center™ app window.
- Install the application from Google Play onto your device.

APK installation file method:
- Click on the link “Download Android Live Version (APK)”.
- Open up the APK file to install the call.center™ application on your device.
Joining the call.center™ Beta program
Each supported operating system has a Beta version of call.center™ available for download.
The purpose of the Beta version is for users to test the yet unreleased version of call.center™, explore new features, and provide general feedback to our development team via our built-in feedback option.
If you wish to participate and test the Beta version of call.center™, you may download the Beta version of the application and install it on your device.
Note that for certain platforms, it is necessary to submit a request to join the Beta program. If so, instructions on how to join this program are provided after selecting the Download Beta option.
Back to the topConfiguring call.center™ in the management portal
The call.center™ management portal is hosted on the telecom.center™ platform. Registration on the telecom.center™ website provides a single sign-on access to a number of projects supporting open interconnectivity and standards, such as call.center™ and, phone.systems™, the cloud-based PBX.
Note that the phone.systems™ PBX platform is the default service provider for call.center™, but users may add their own VoIP service providers to support call.center™.
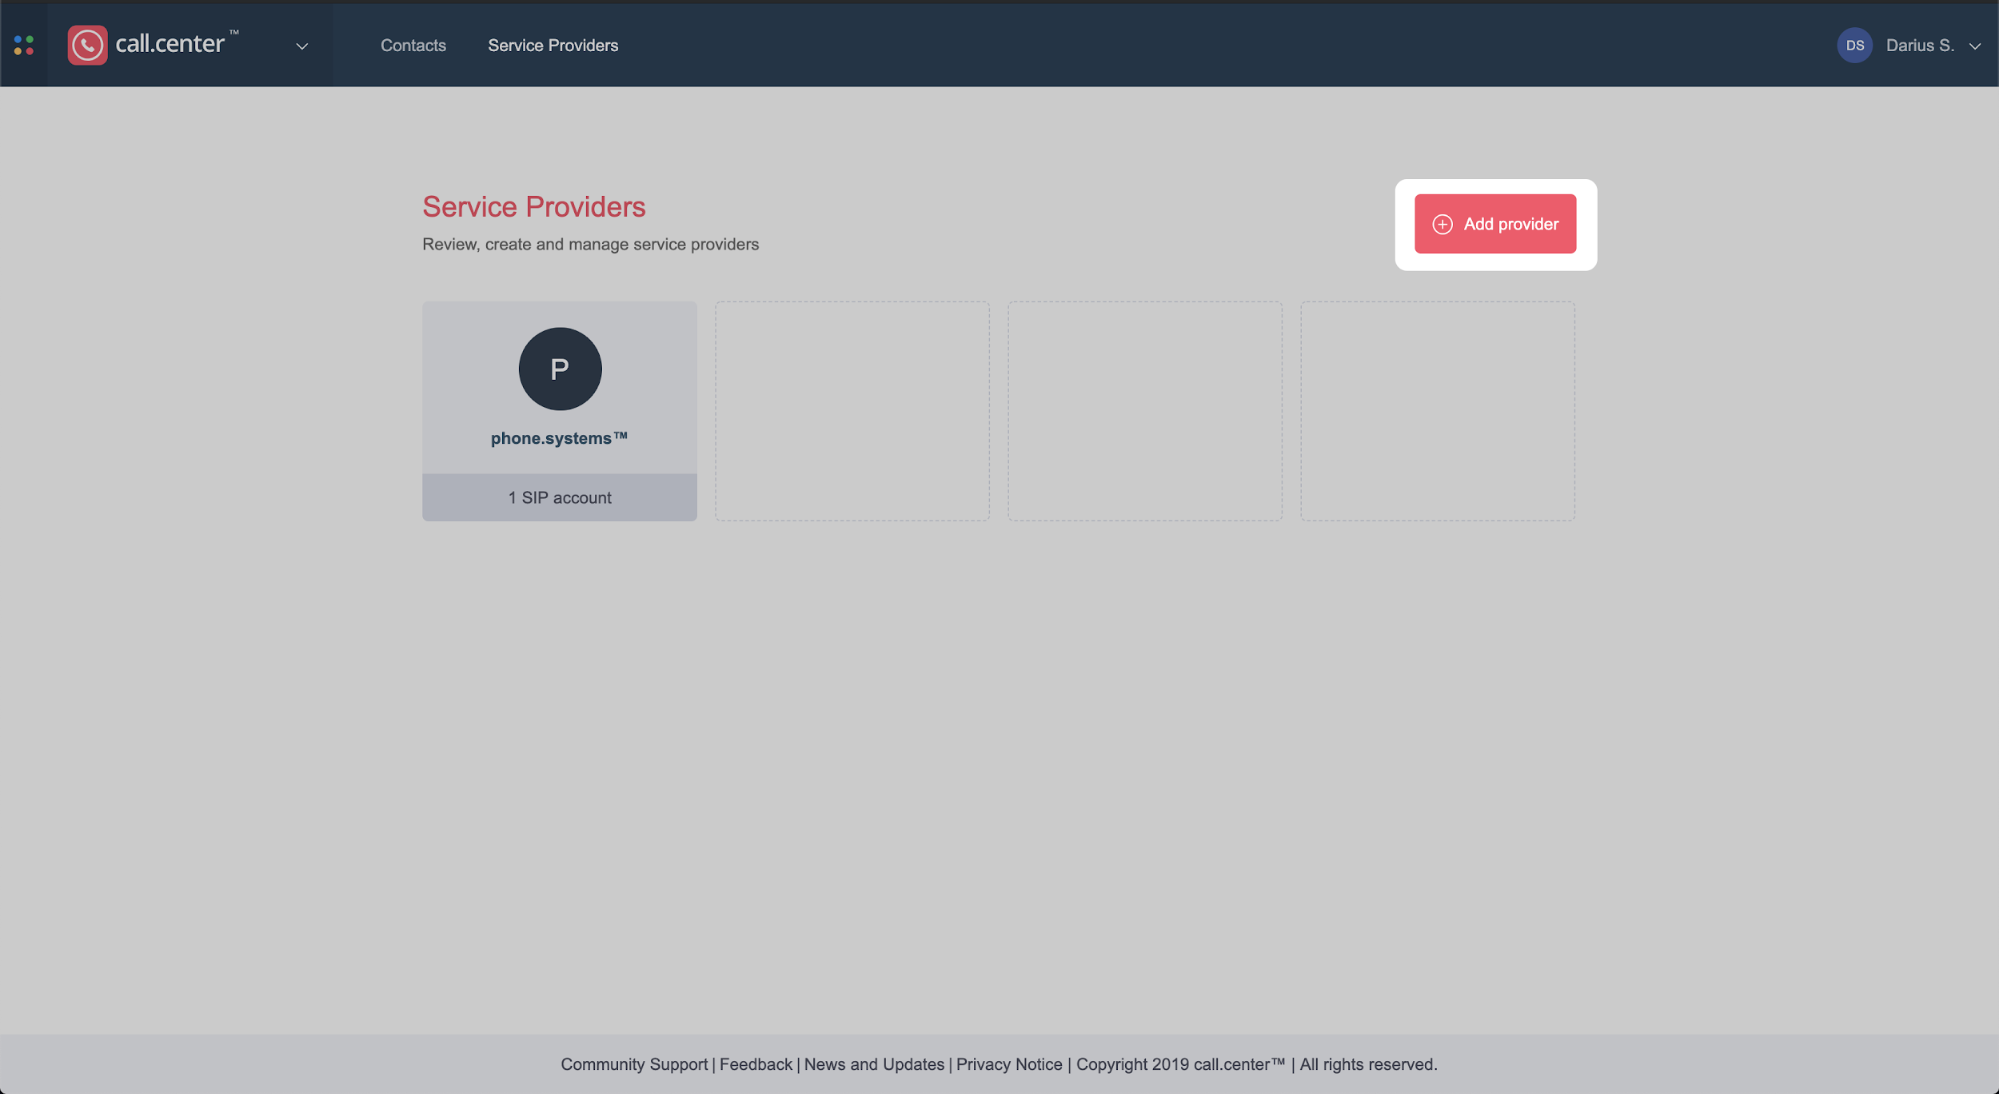
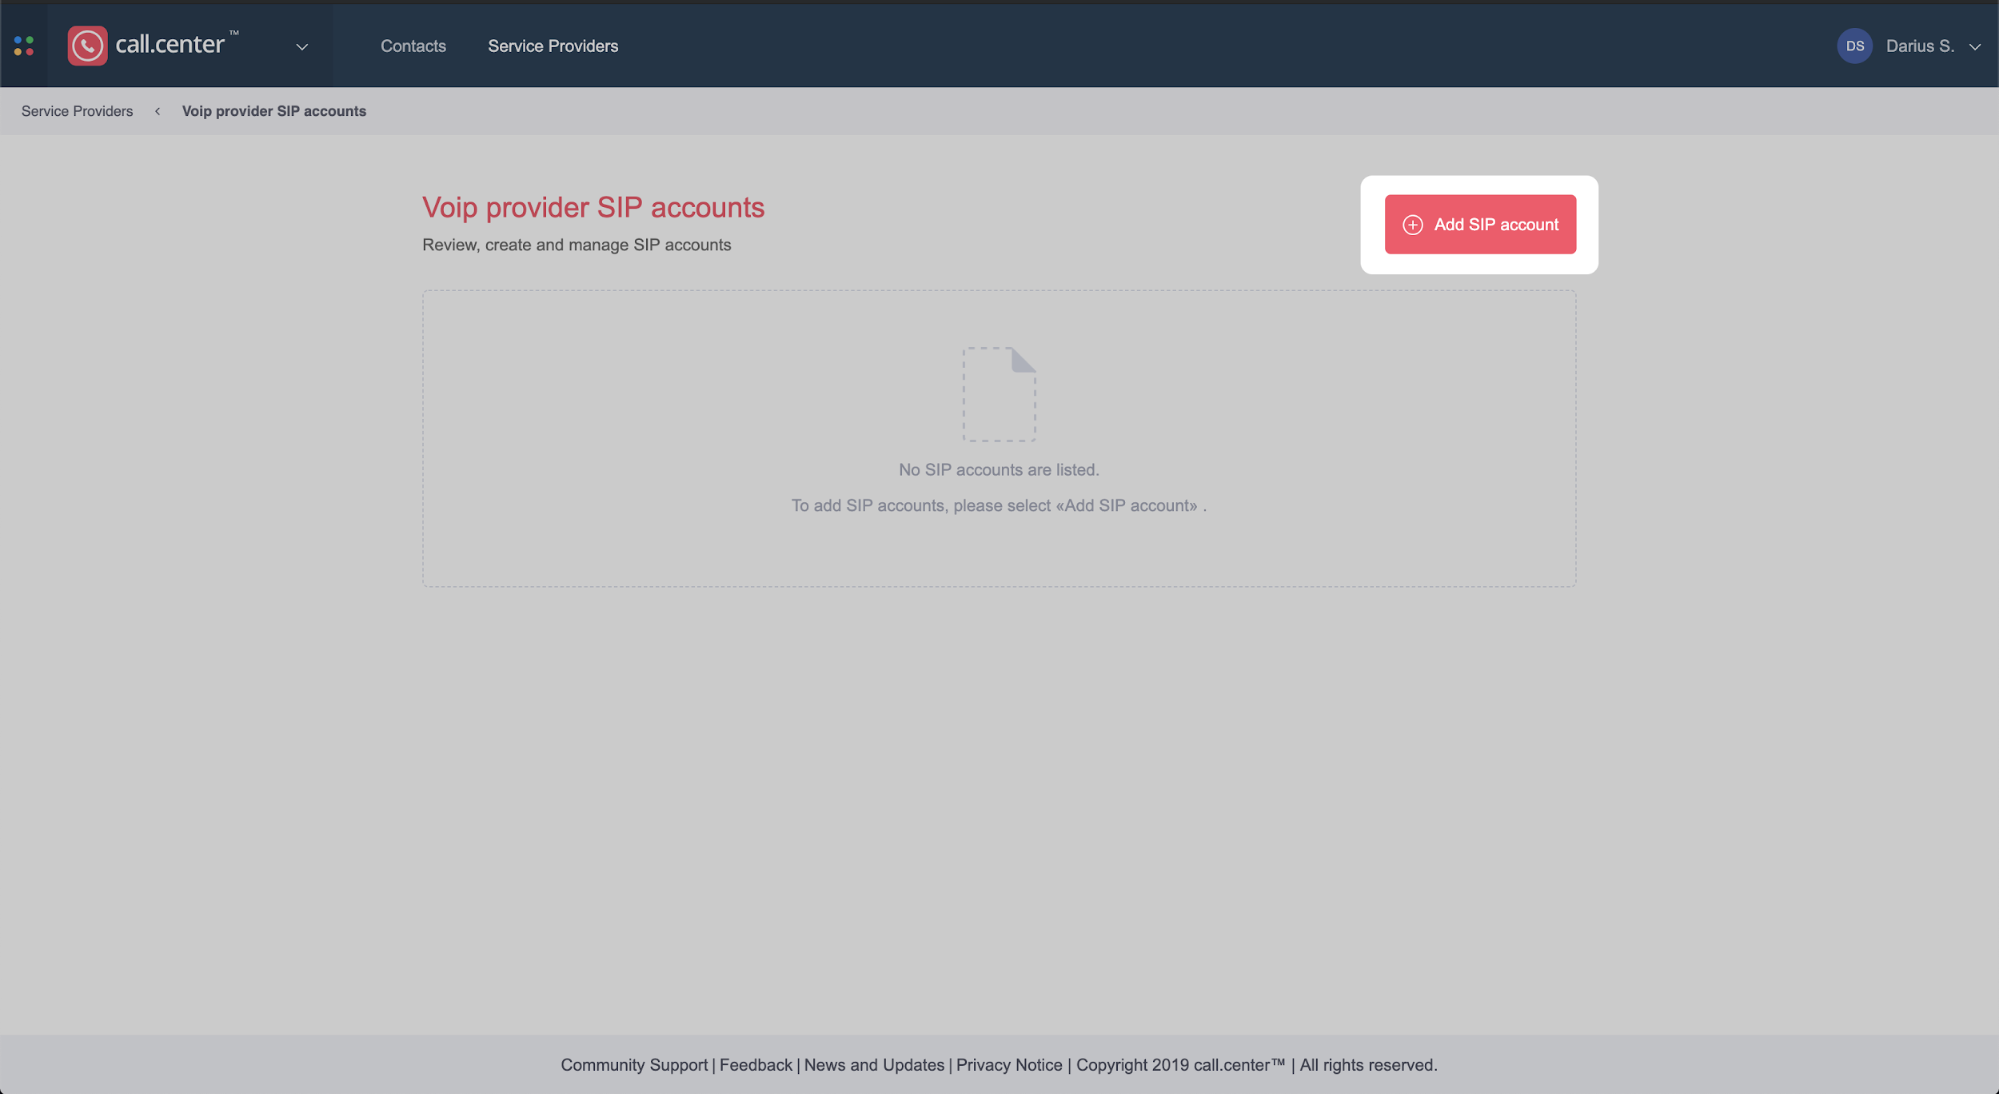
Adding a service provider
If you intend to use a service provider other than phone.systems™, it is necessary to first add the details of that service provider before configuring the SIP accounts supported by that provider .
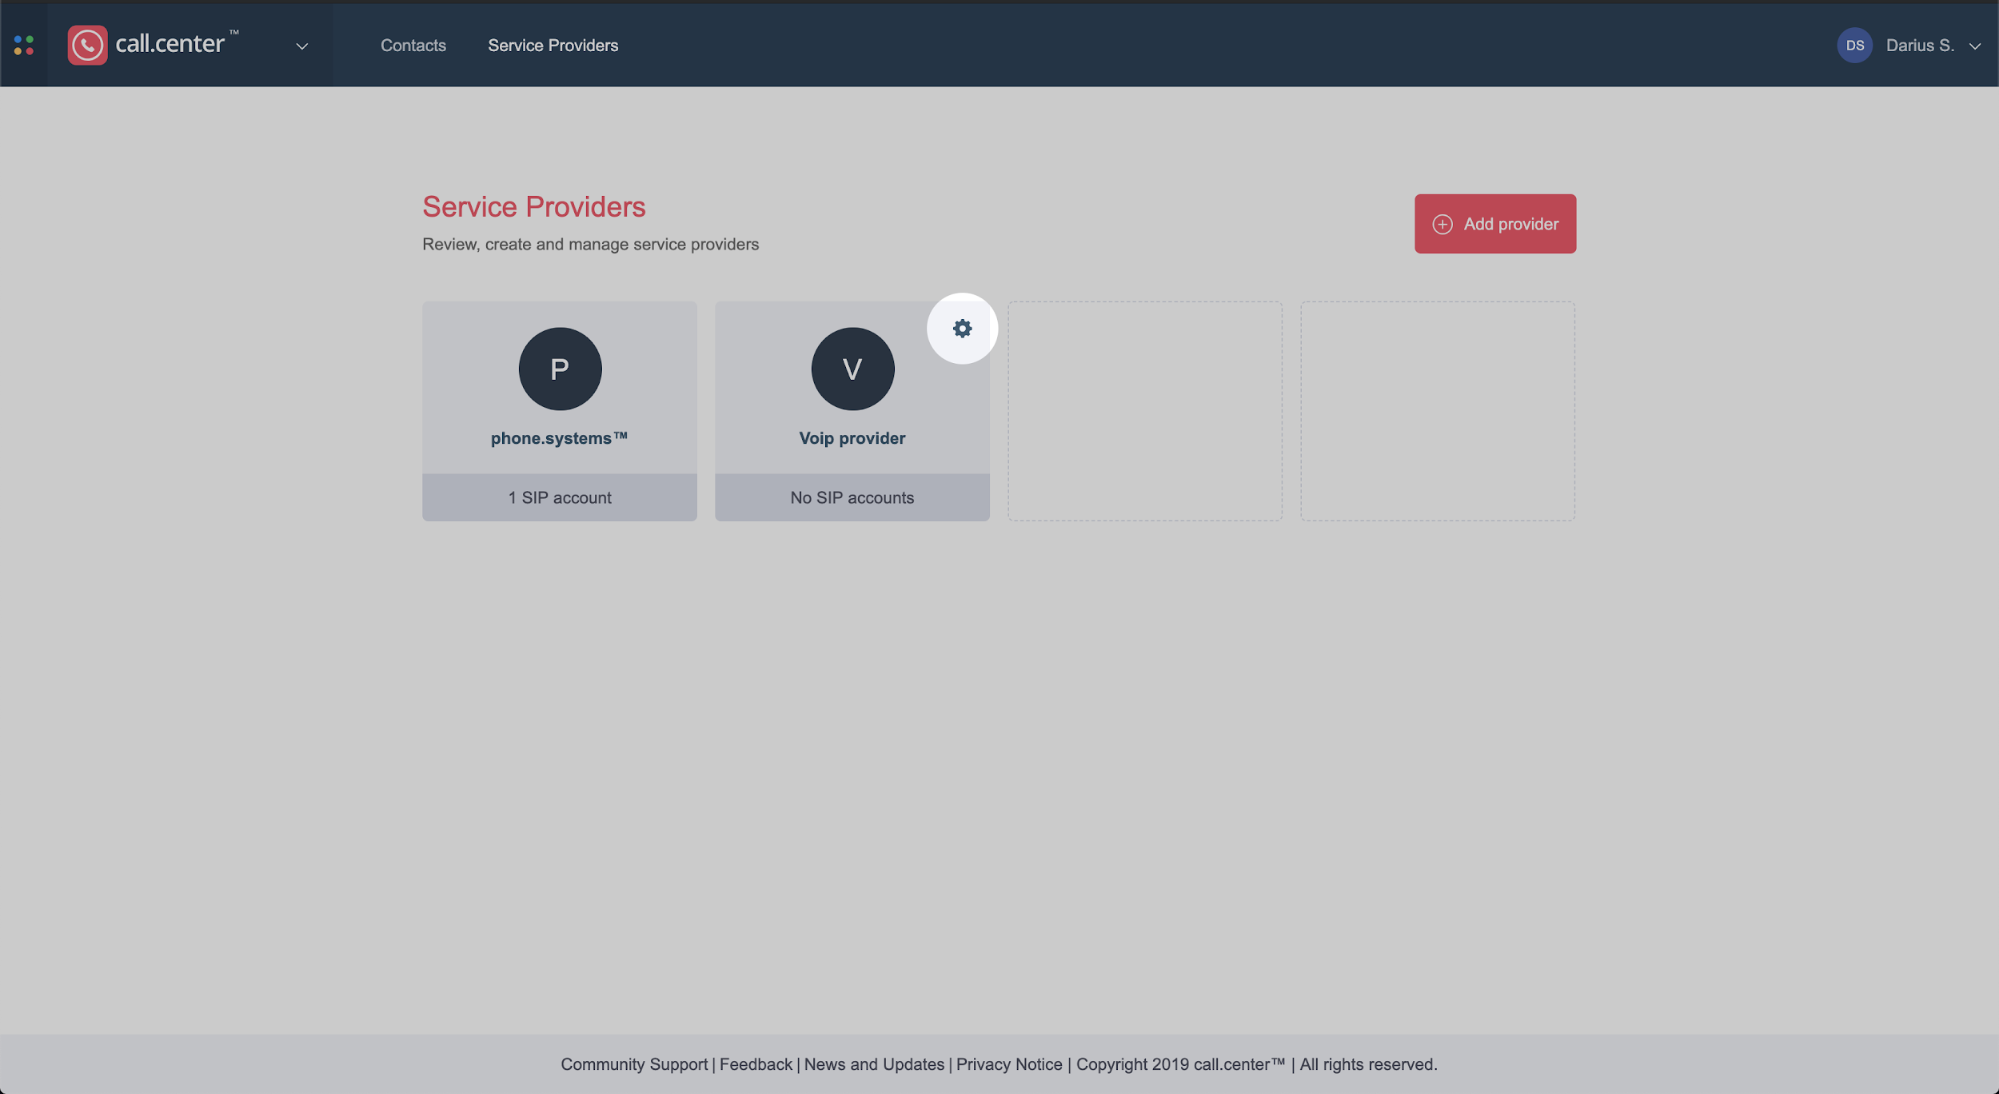
- Select the Service Providers section in the top menu.
- To add other SIP-compatible VoIP providers, click Add Provider.
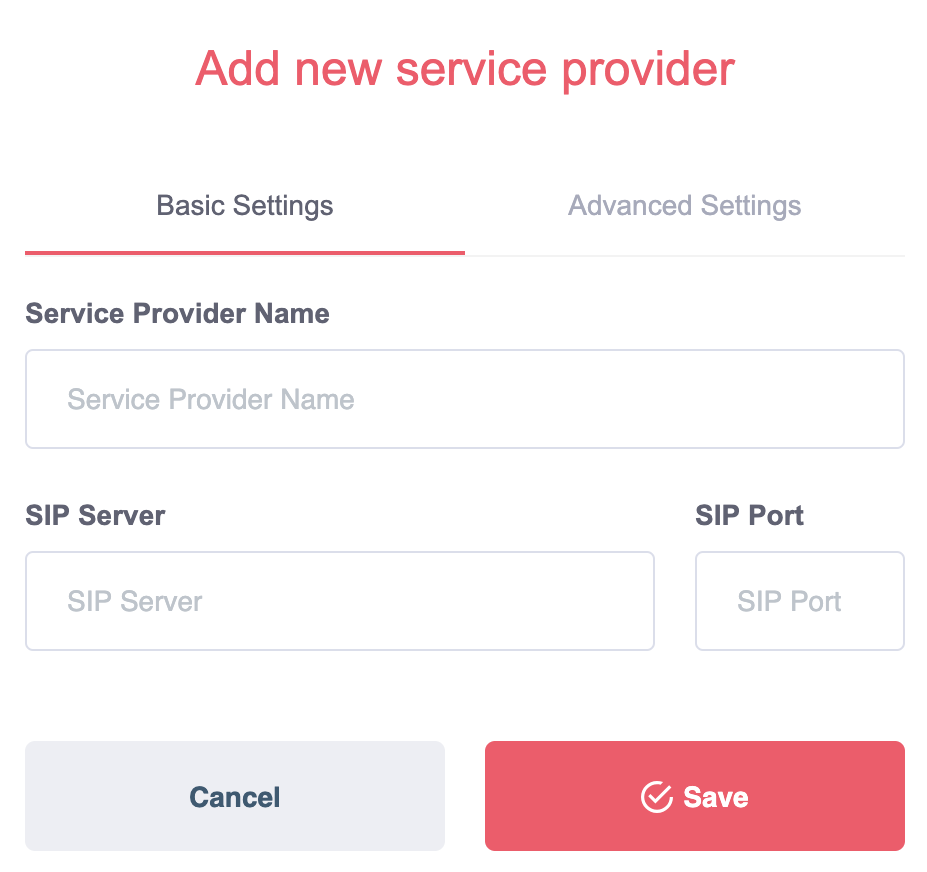
- Add the service provider(s) by configuring the Basic Settings parameters.
- Service Provider Name (required) - A friendly name to reference the provider
- SIP Server (required) - The SIP host domain address
- SIP Port (optional) - The port number carrying the SIP traffic. If no value is entered, the default port 5060 is used.
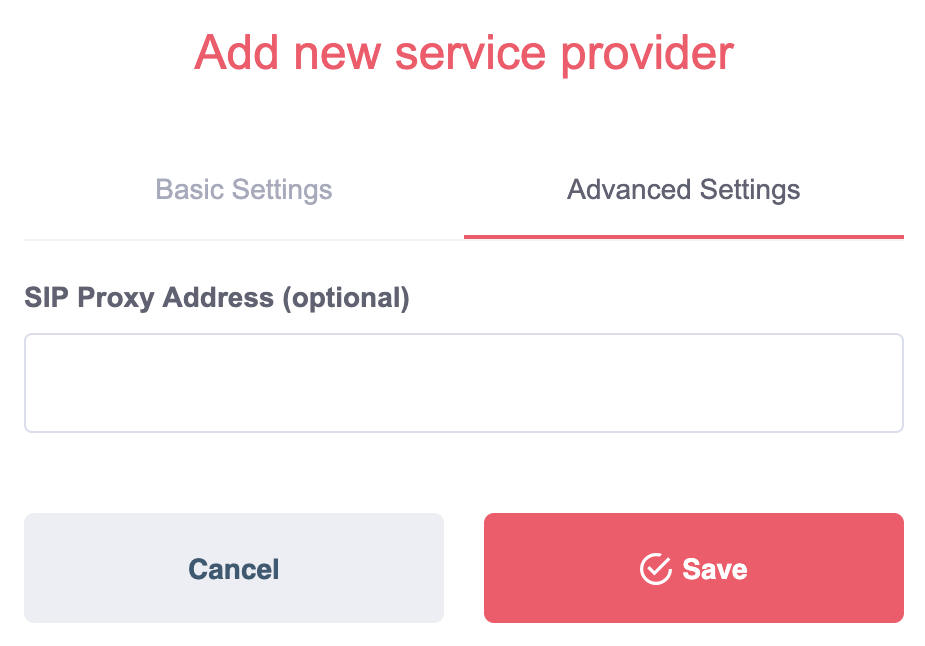
- In Advanced Settings, provide the SIP Proxy Address (optional). The service provider may require this parameter for outbound traffic.
- Click the Save button to complete the service provider configuration.
Managing Service Providers
Editing a Service Provider
- Click the Gear icon associated with the Service Provider to which changes should be made.
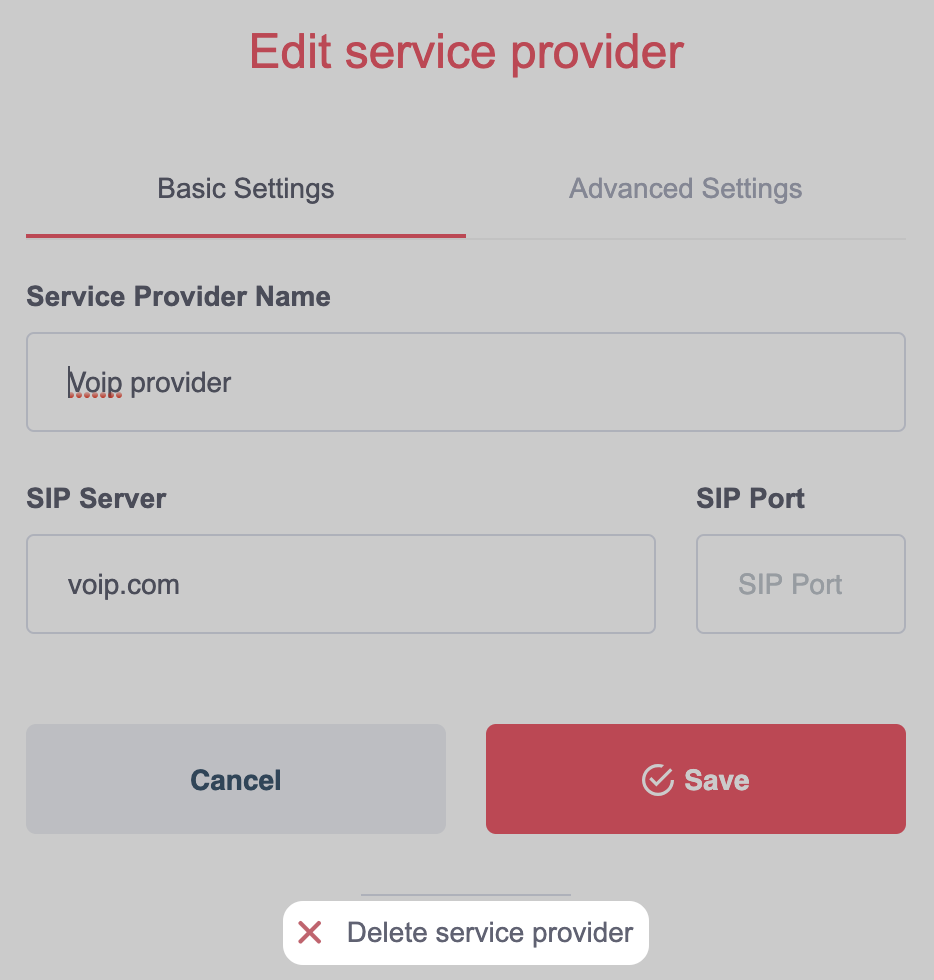
- Make the appropriate changes according to your requirements.
- Click the Save button to confirm the changes.
Deleting a Service Provider
- Click the Gear icon associated with the Service Provider to be deleted.
- Click “Delete service provider”.
- Confirm that you wish to delete the Service Provider.
Adding a SIP account or multiple SIP accounts to the service
provider(s)
- Once you have added a service provider, click Add SIP account to add a SIP account to that service provider.
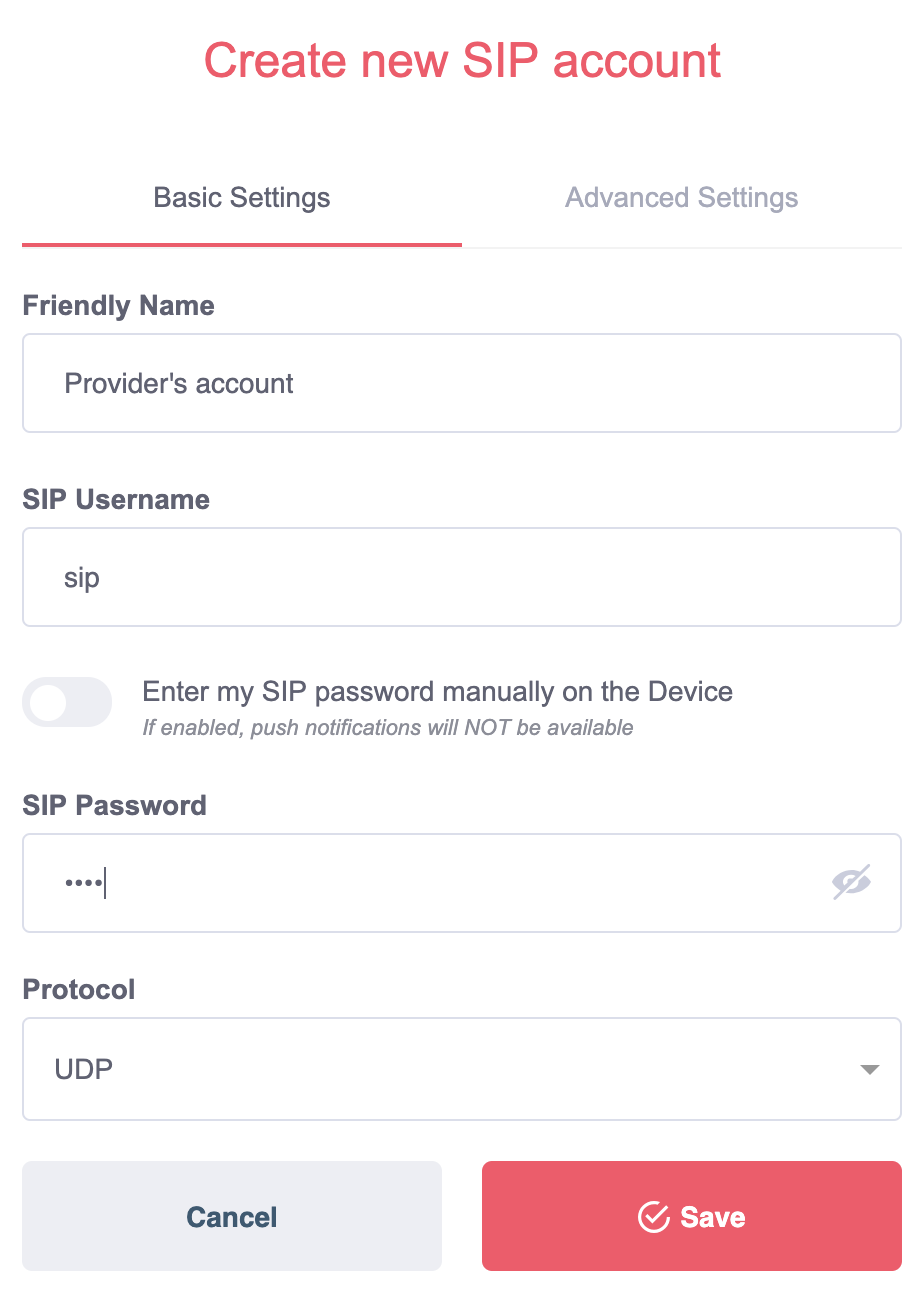
- Enter the following required Basic Settings parameters:
- Friendly Name – Enter a friendly name to reference the SIP account.
-

 - Toggle to
manually enter the SIP password on the device, or vice versa.
- Toggle to
manually enter the SIP password on the device, or vice versa.
- SIP Username – The SIP username provided by your service provider.
- Protocol - The underlying transport layer protocol responsible for SIP requests and responses. Select the UDP or TCP protocol option via the Protocol drop-down list.
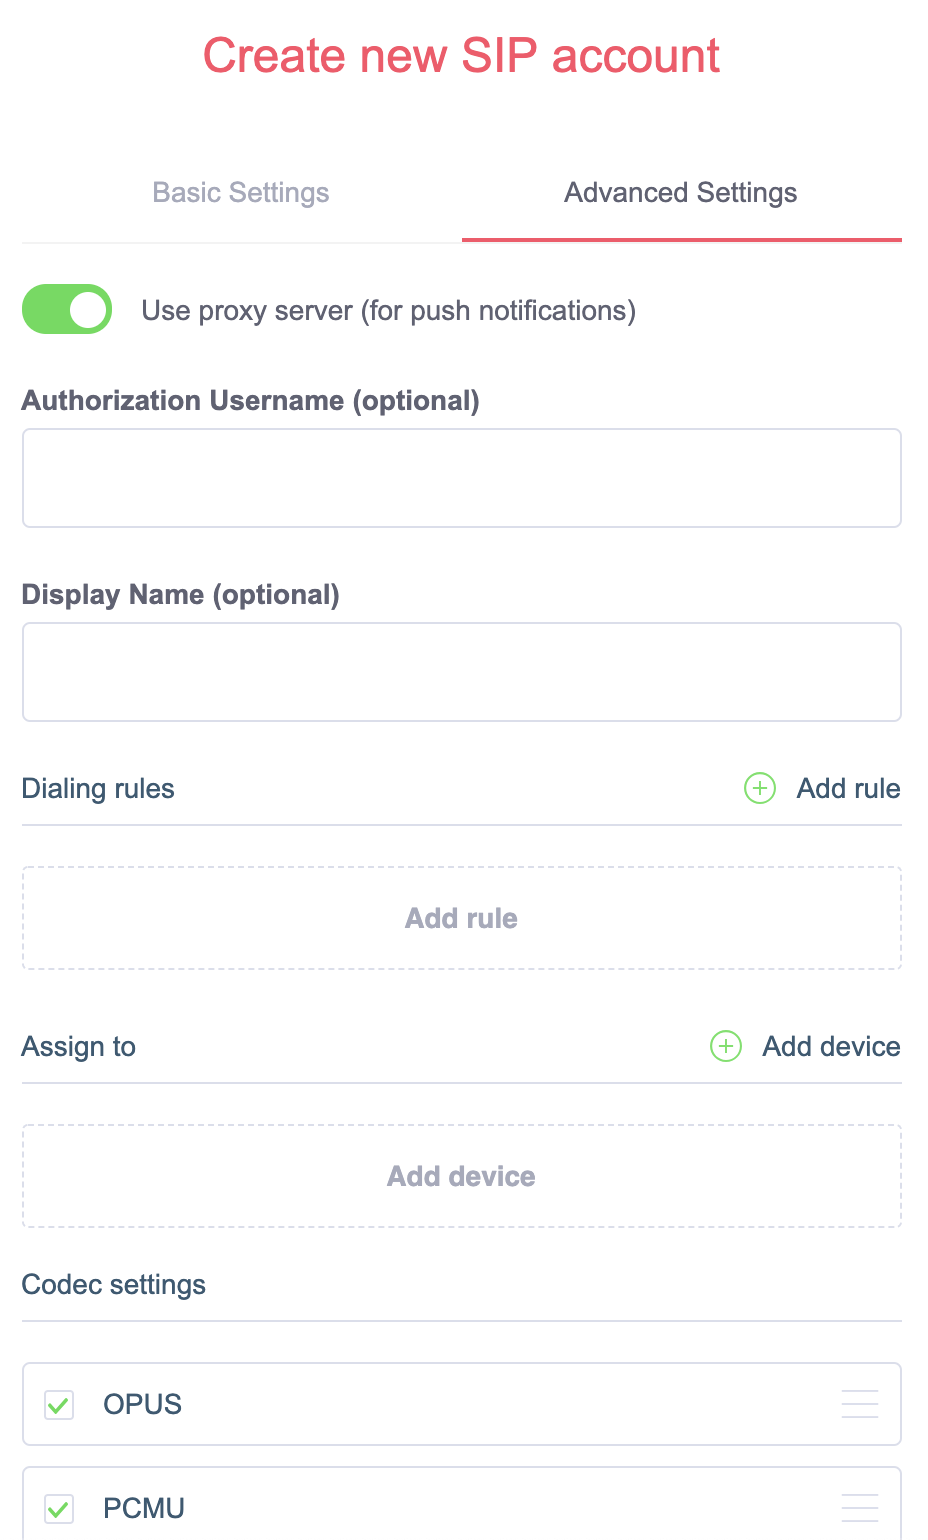
- Enter the optional Advanced Settings parameters:
-
- Toggle to
use a proxy server for push notifications. Push notifications are used for features such as
automatically waking the device from sleep mode on incoming calls. If the toggle option is
disabled (grey), then push notifications will NOT be available.
Authorization Username (optional) - May be required by the service provider.
- Display Name (optional) – The name of the caller for the outbound call. This name usually appears when making internal calls (between extensions) when using the same SIP service provider.
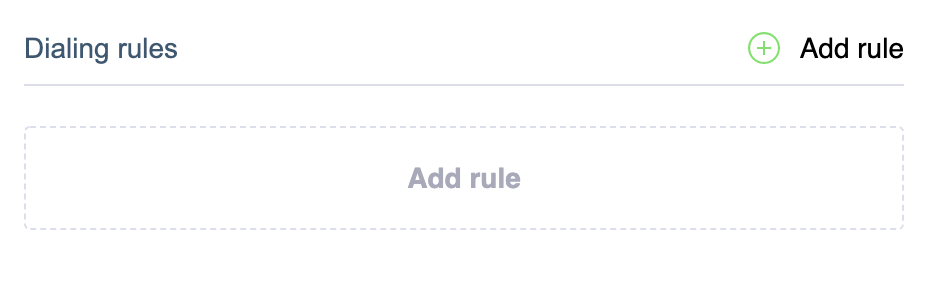
- Dialing rules (optional) - Rules for modifying the destination number in outbound calls. Note that multiple dialing rules may be defined.
- Start with - Defines the prefix in the destination number that will be substituted by the prefix specified in the “Replace with” field
- Replace with - The prefix that will be used to replace the matched “Start with” prefix
- Min length - The minimum length of the number to which the dialing rule will be applied
By default, when the toggle option is gray, the SIP passwords are automatically provisioned for devices during activation, allowing the administrator to “pre-configure” call.center™ devices. The end-user should simply follow the “activation instructions” to set up the application on their selected device, without concerning themselves with the details of SIP credentials. This option provides additional security, as the actual SIP passwords are not stored locally on the call.center™ device.
When the toggle option is green, the SIP passwords must be manually entered on the devices. This option allows for the creation of devices that do not store the SIP passwords on the my.call.center management panel. Instead, the user must manually input the SIP account credentials directly on their call.center™ softphone client.
Important – If the SIP password has to be manually entered on the end-user device, the user is prompted to enter that password after device activation.
To enable this feature, click on the
 button.
The available dialing rules are as follows:
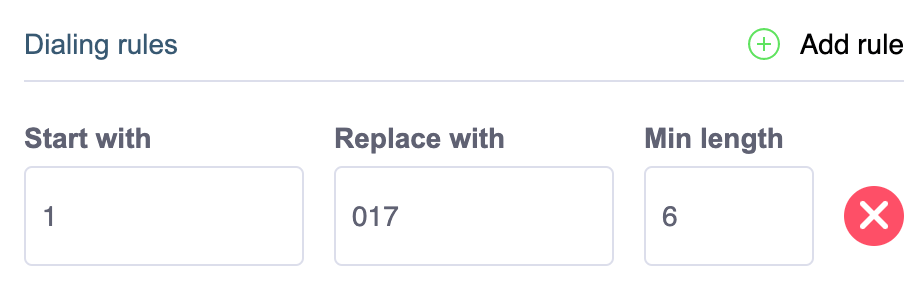
In the dialing rule illustrated above, the called number 0174448746 will be automatically modified to be 14448746.
Click the Save button to complete the SIP account configuration. Additional SIP accounts may be added to this service provider by clicking on the Add SIP account button.
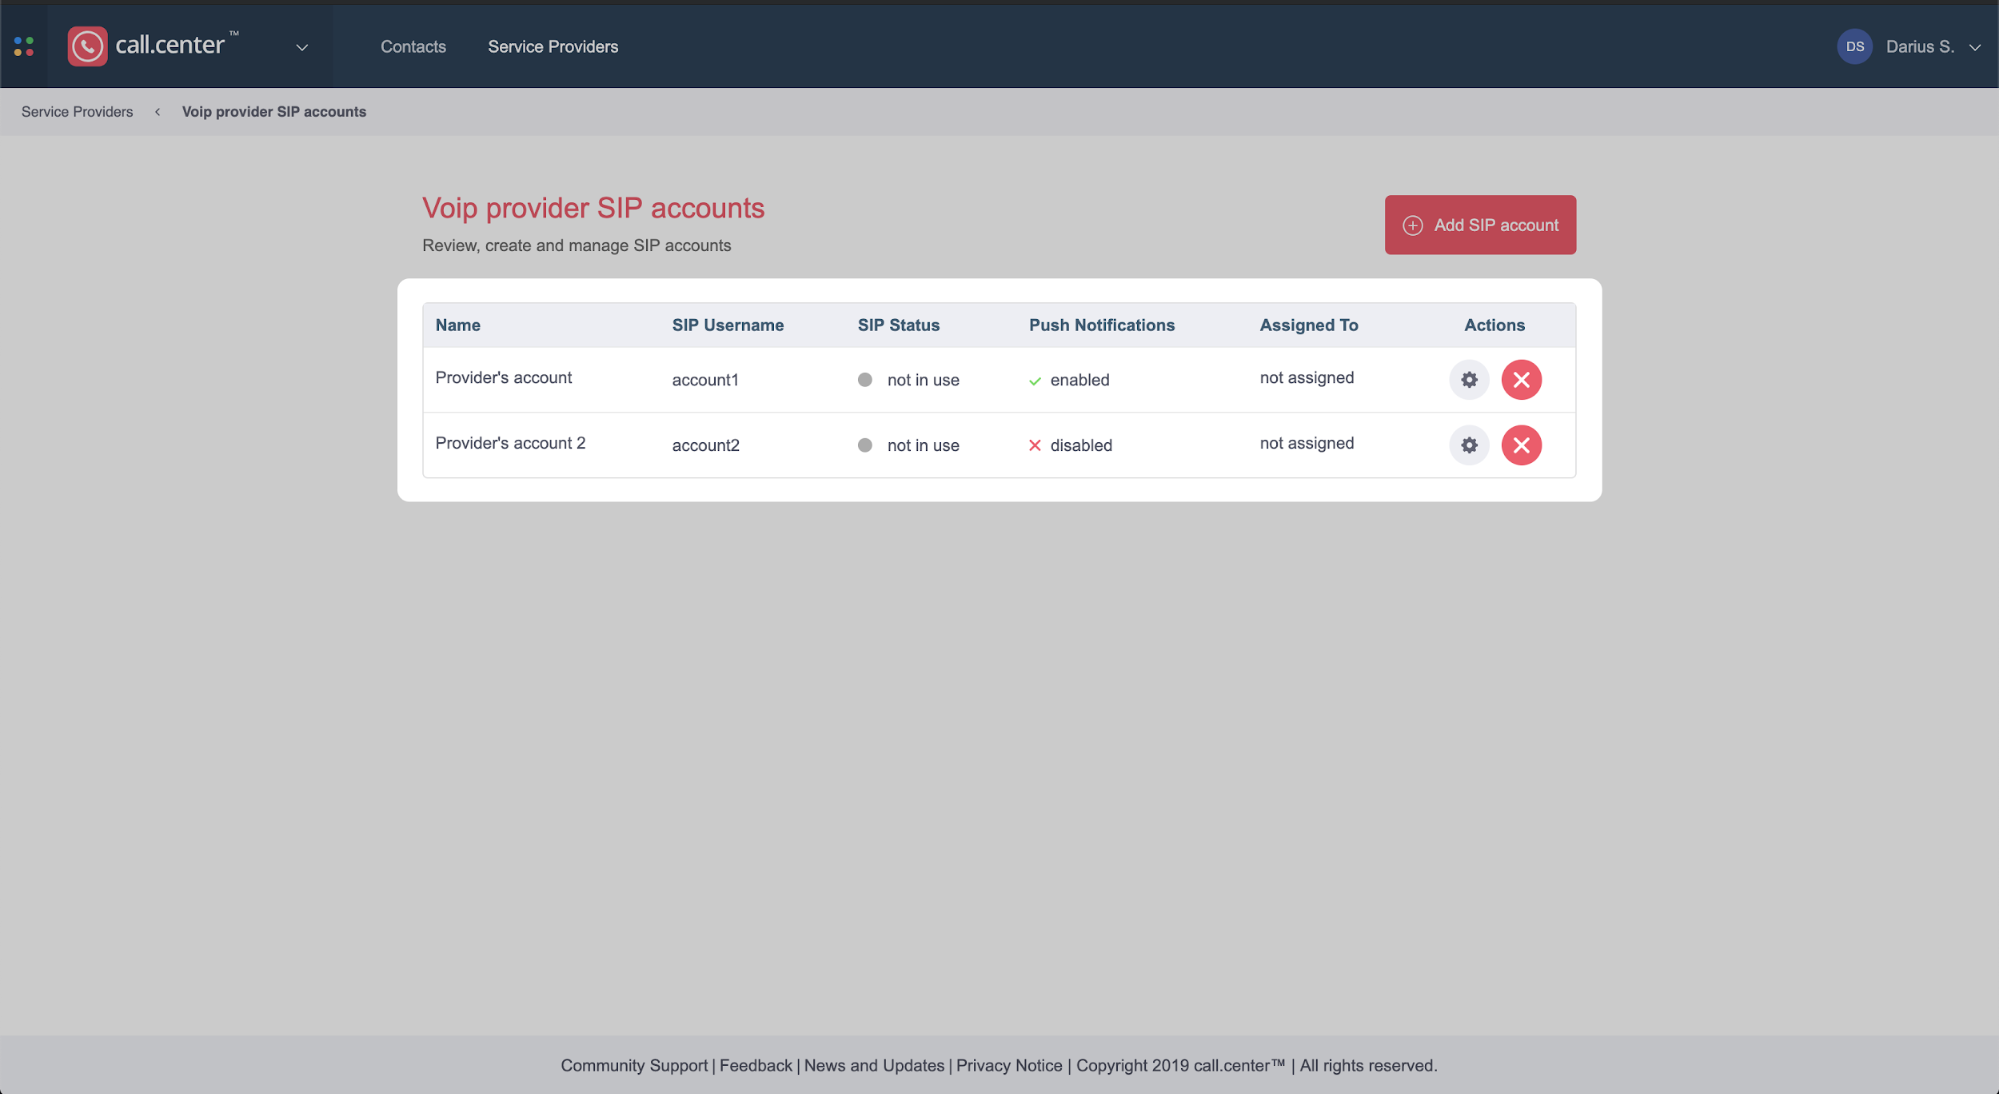
Back to the topManaging SIP Accounts
SIP accounts may be added, edited or deleted from the Service Provider’s page.
The Service Provider’s page displays the following parameters:
- Name - Friendly name used to reference SIP account.
- SIP Username - SIP account’s username that was configured during the setup.
- SIP Status - Status of the SIP account
- Online - SIP account is assigned to at least one of the devices and is currently online
- Offline - SIP account is assigned to at least one of the devices, but is currently offline
- Not in use - SIP account is not assigned to any of the devices
- Push Notification - Shows if push notifications have been enabled or disabled as follows:
- Enabled - SIP account has PUSH notifications enabled.
- Disabled - SIP account has PUSH notifications disabled.
- Assigned to - Shows to which device(s) the SIP account is assigned.
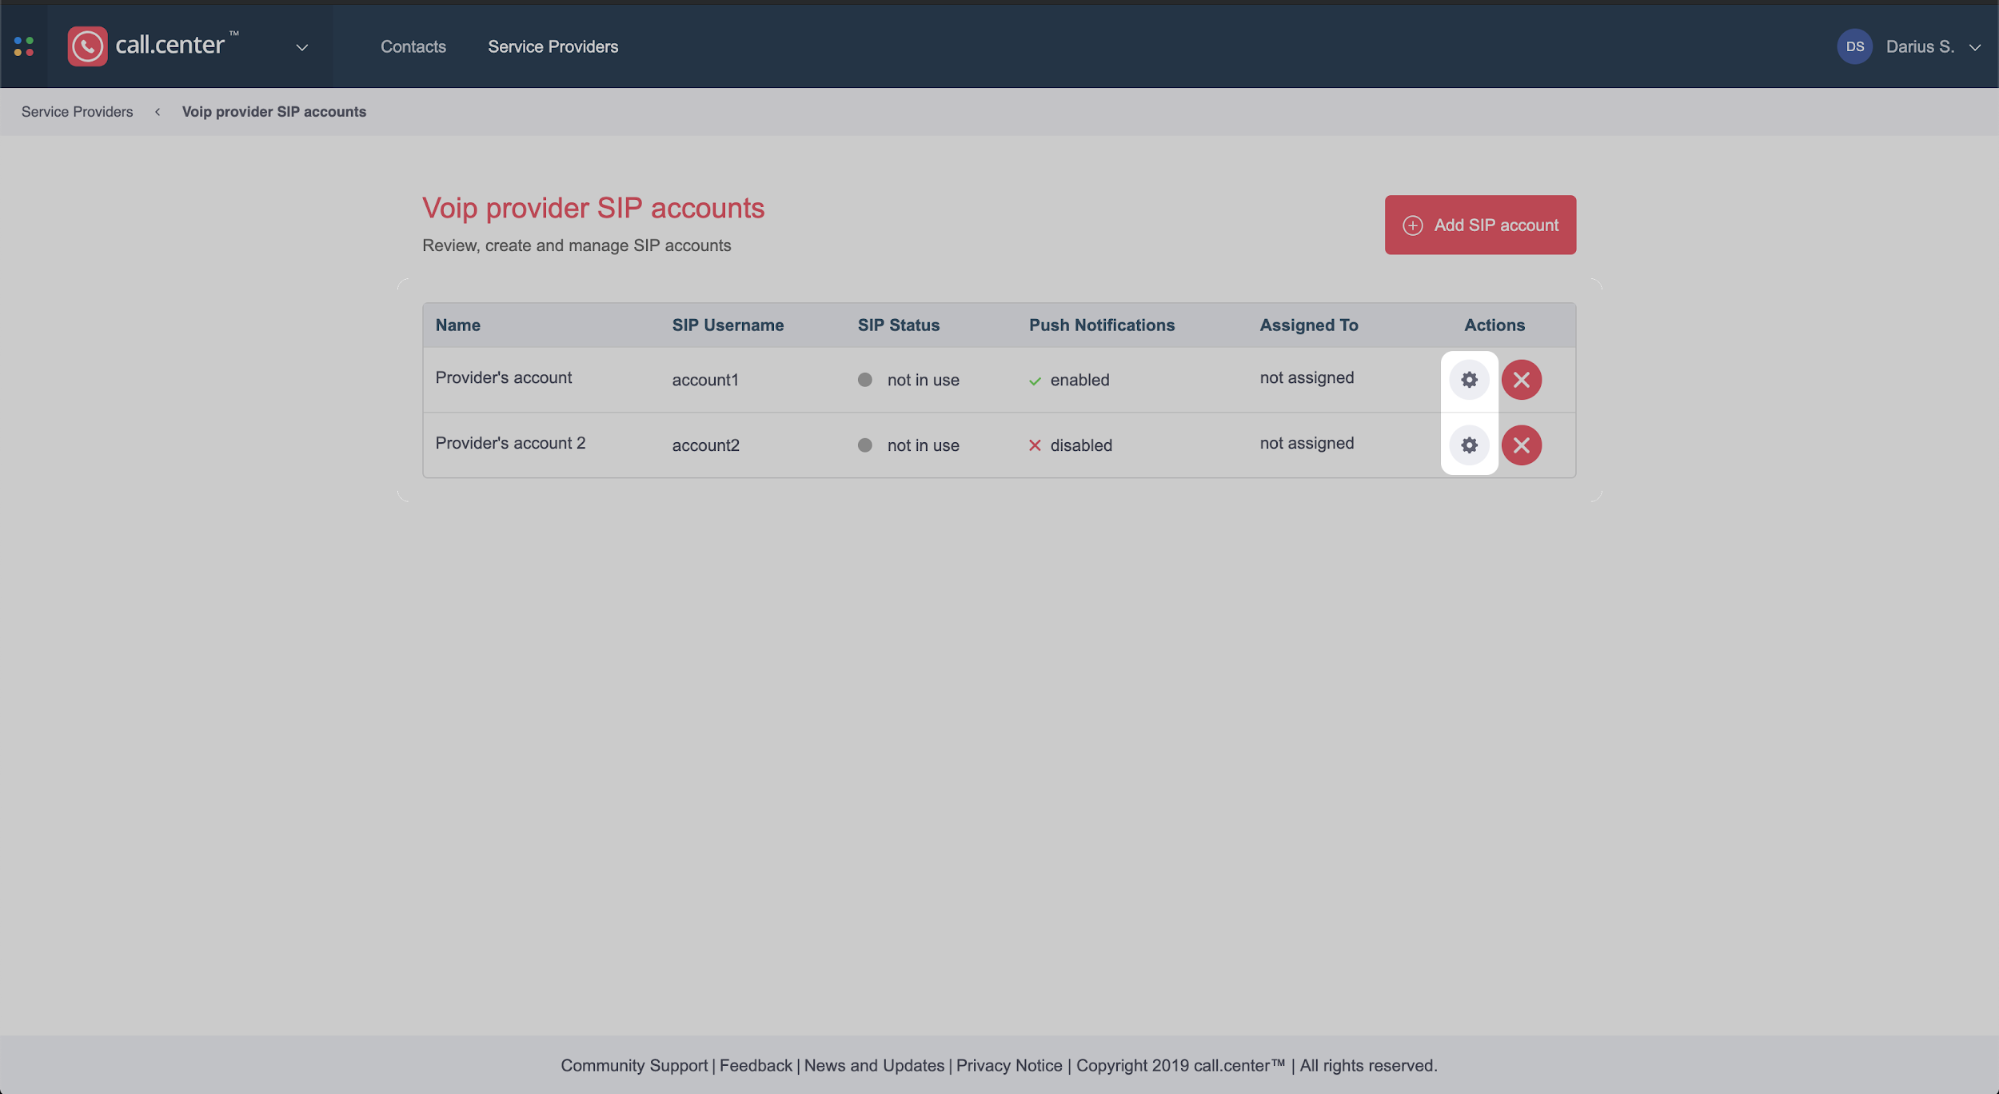
- Actions - Allows the user to do the following actions:
- Click on the
 icon to edit the device.
 - Click on the
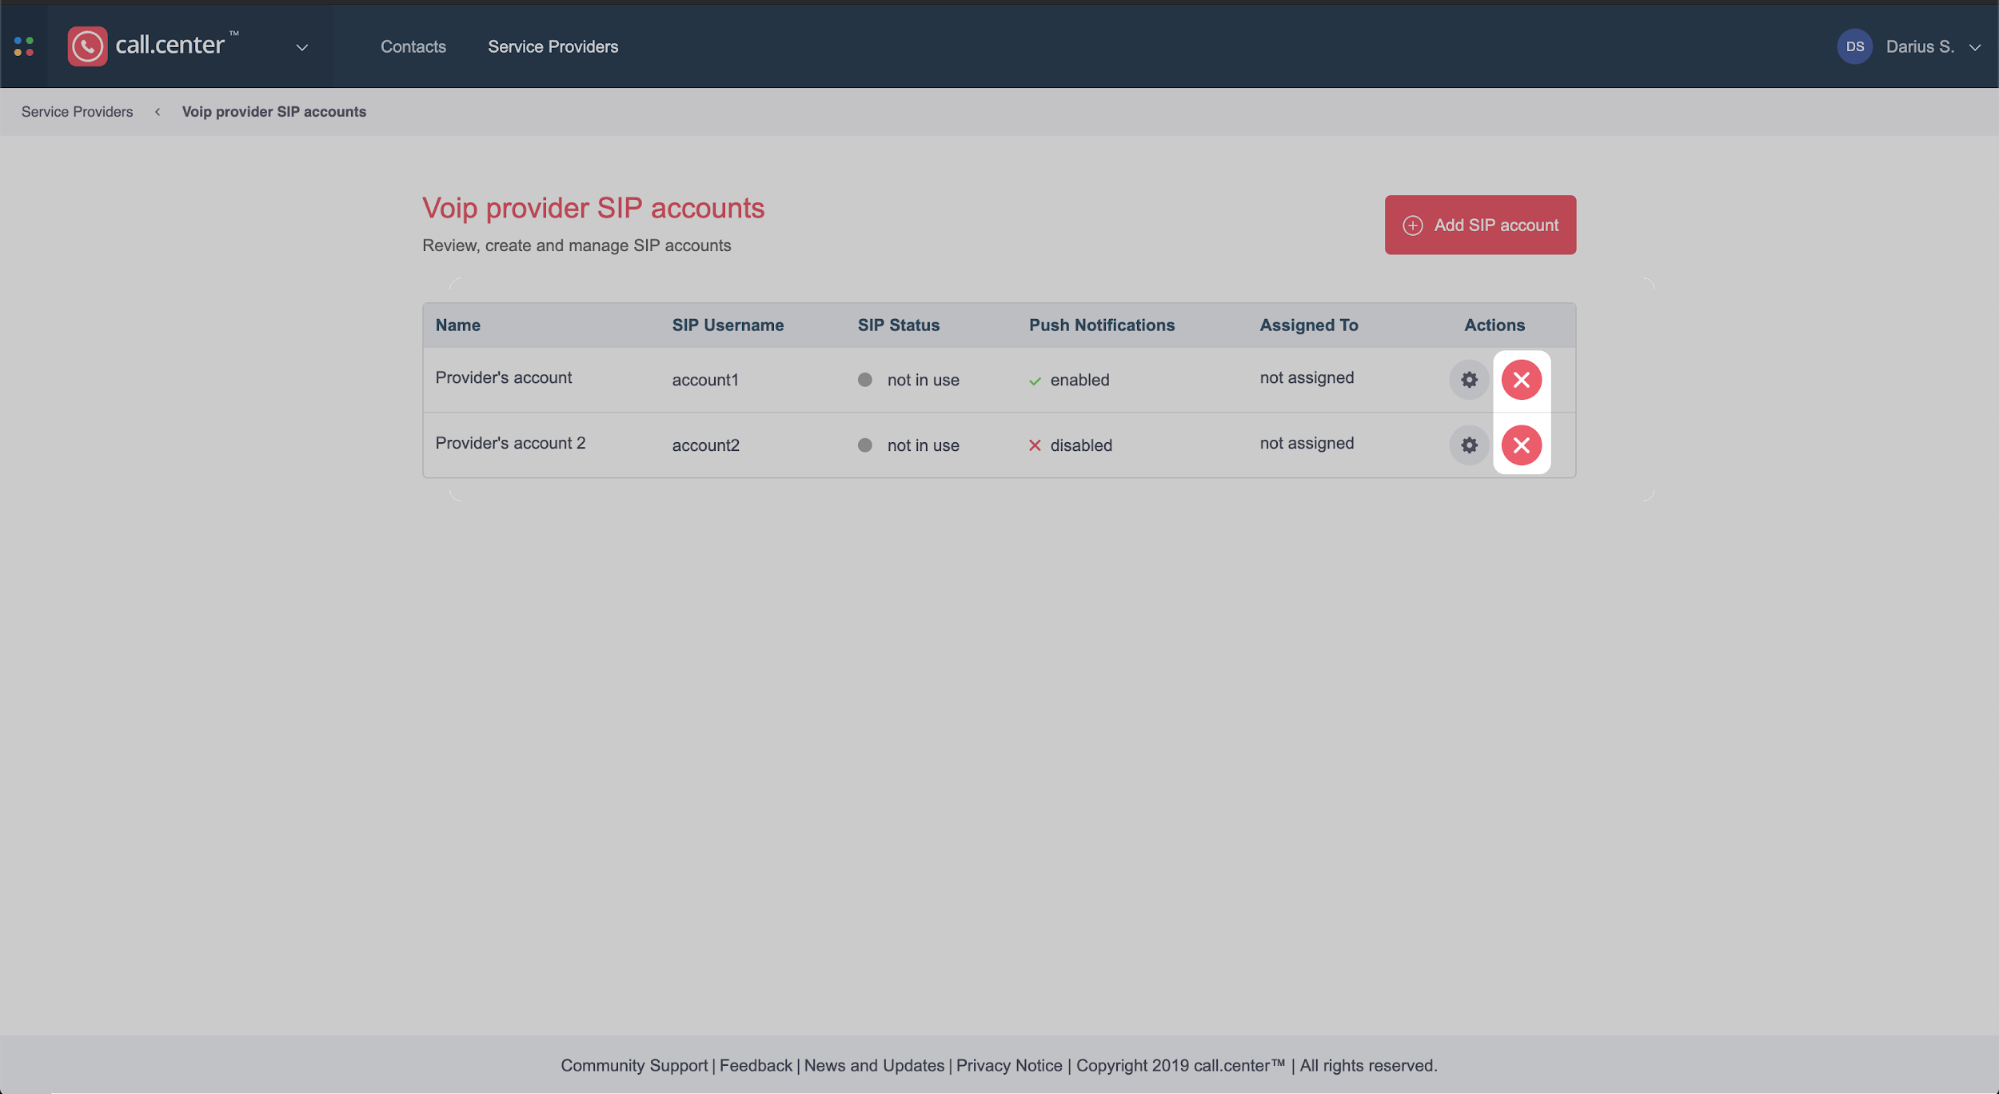
 icon to delete the SIP account.
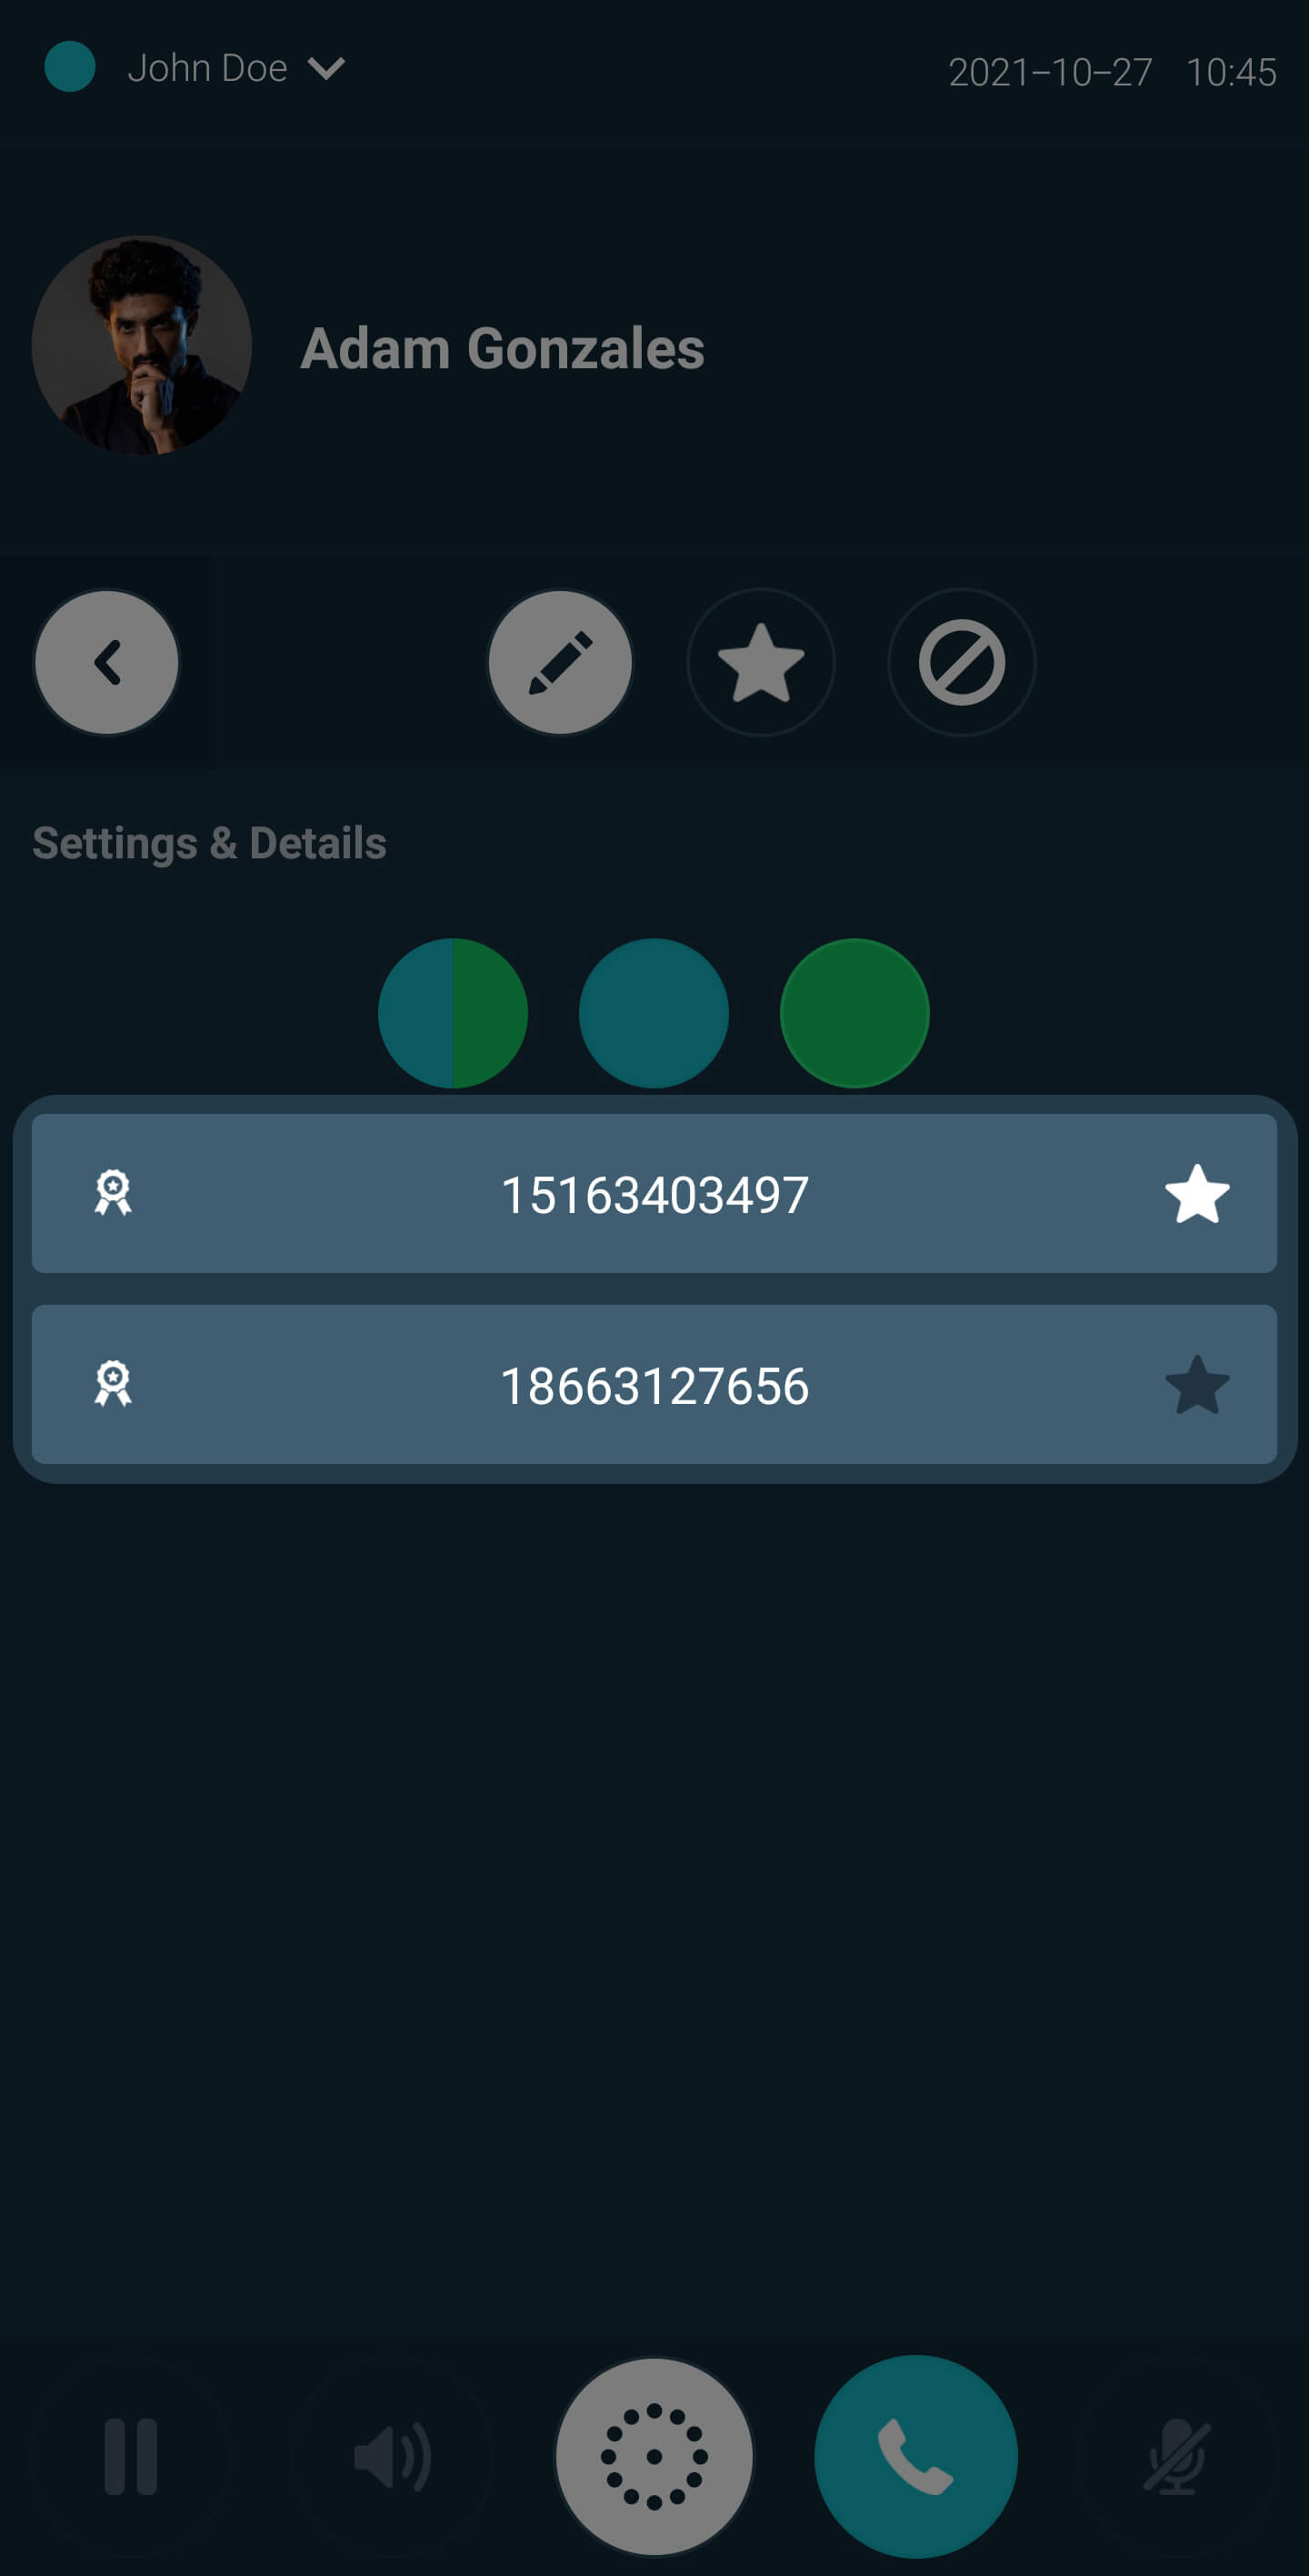
The following SIP statuses are available:
Editing a SIP account
- Select the Service Provider for the SIP account that you wish to re-configure.
- Select the Gear icon associated with the SIP Account to which changes should be made.
- Make the appropriate changes according to your requirements.
- Click on the Save button to confirm the changes.
Deleting a SIP Account
- Select the Service Provider for the SIP Account that you wish to delete.
- Click the Delete icon of the SIP account you want to delete.
- Confirm that you wish to delete the SIP Account.
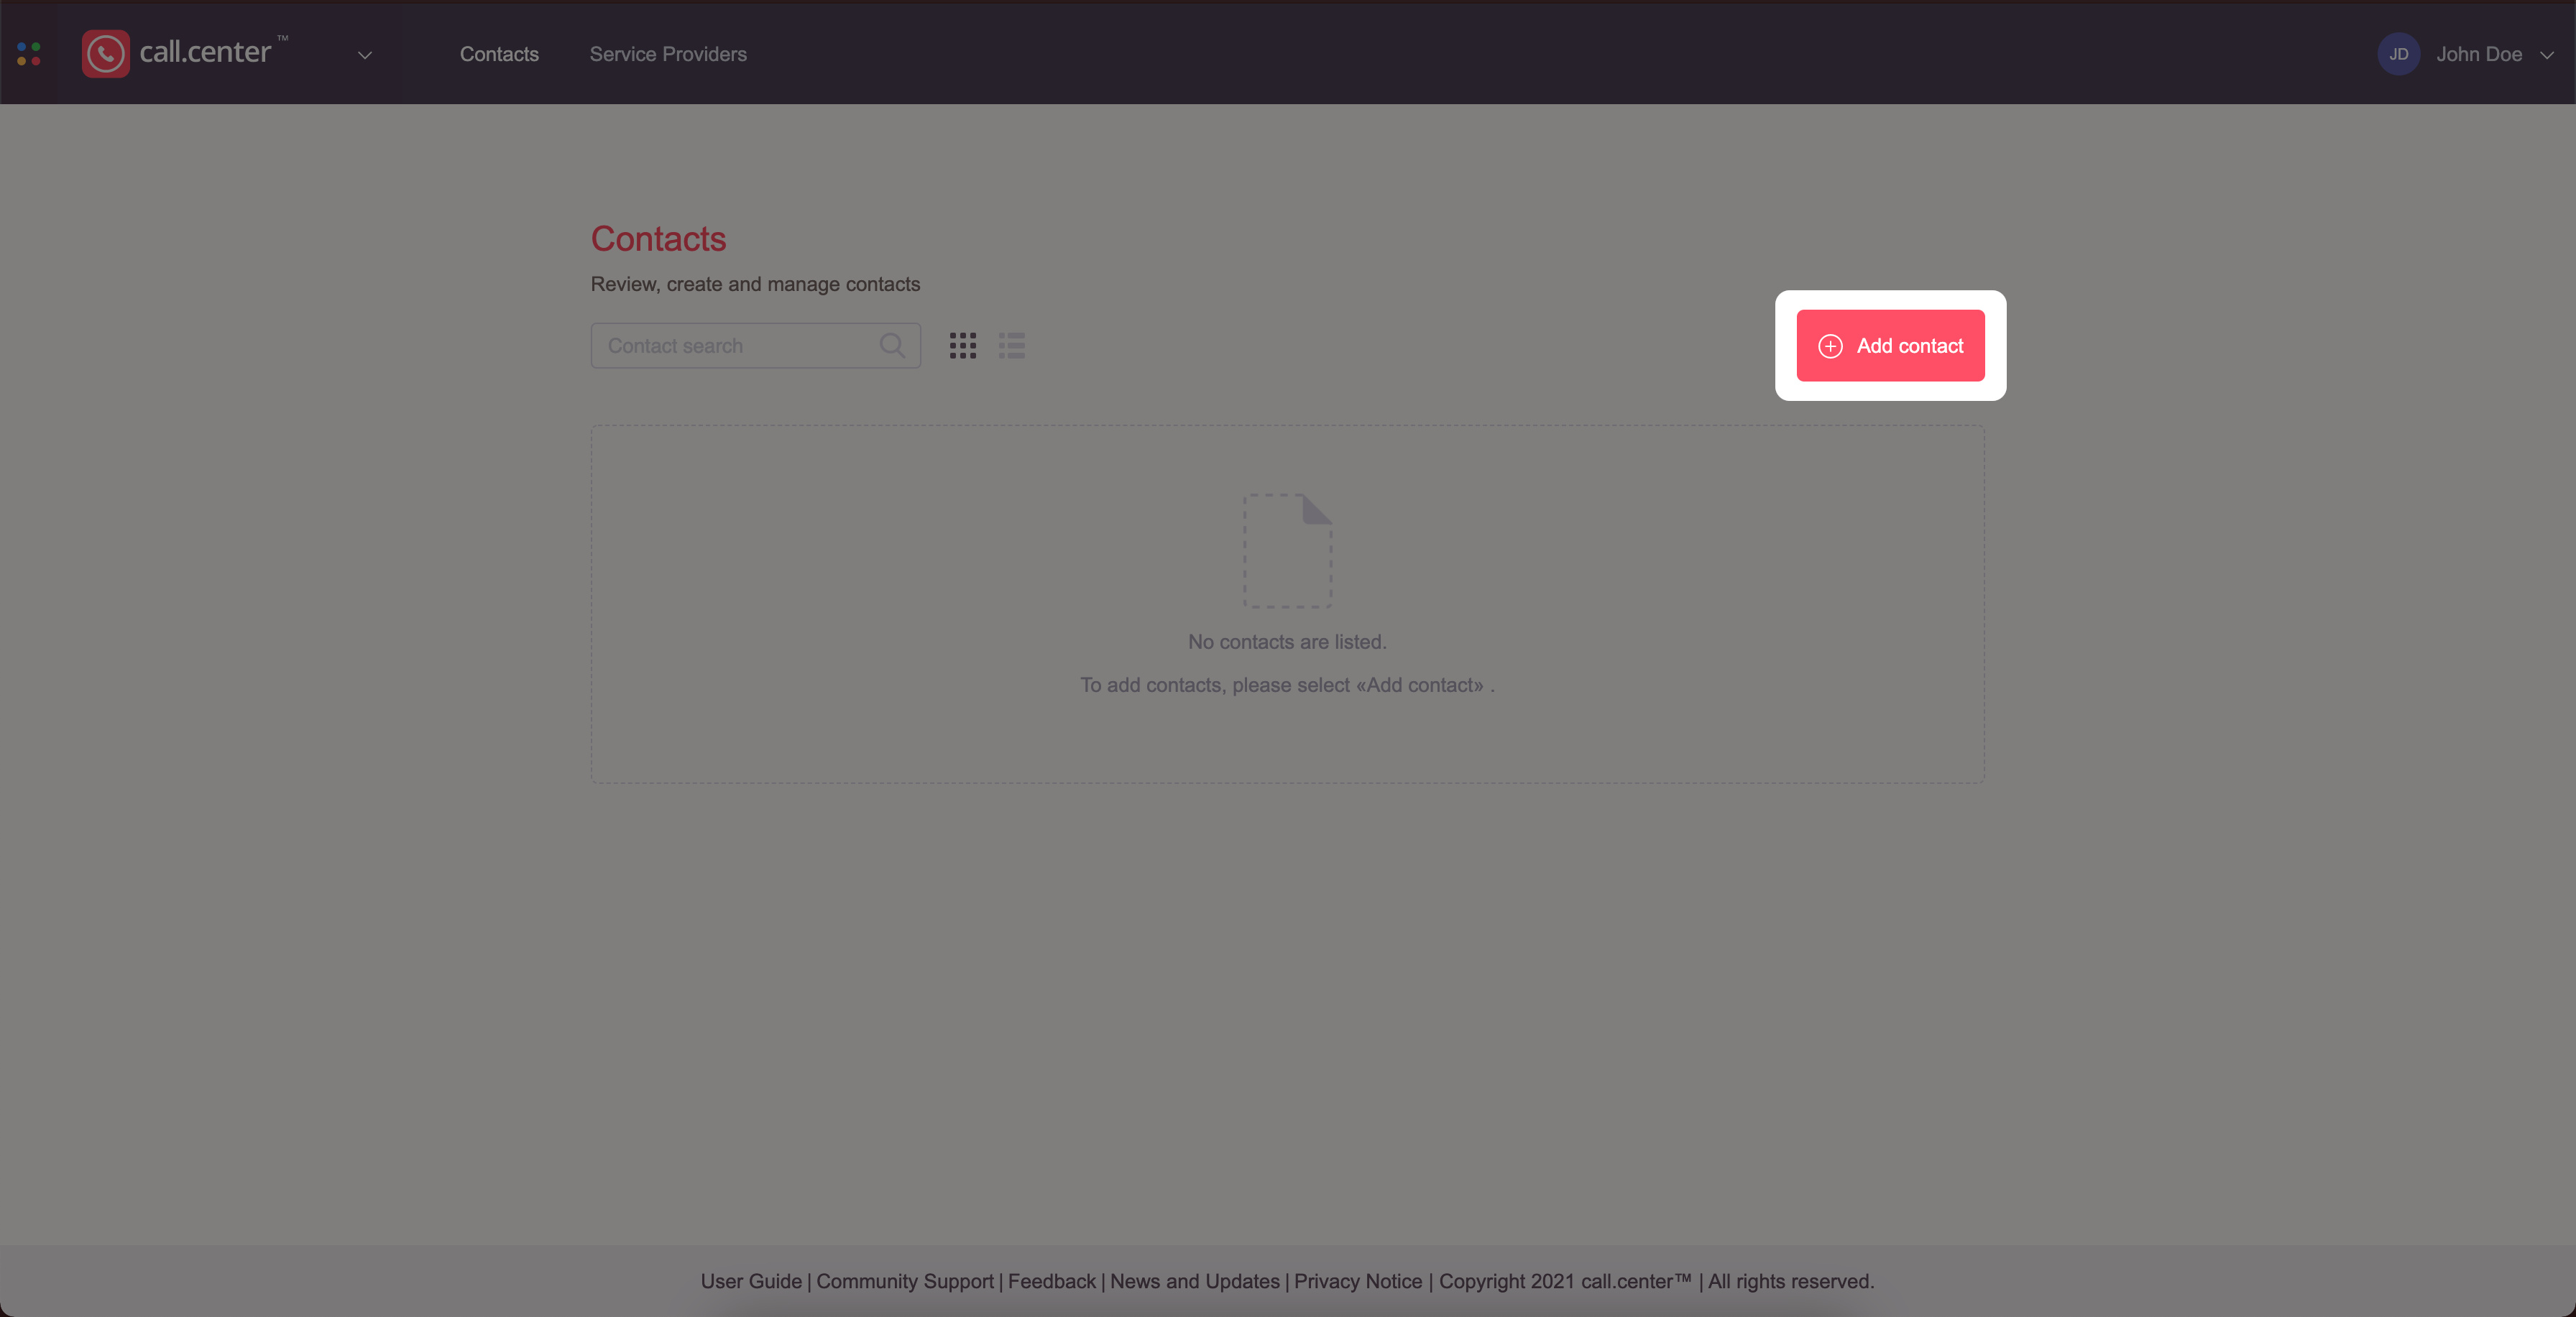
Adding a Contact
Contacts may be added, edited or deleted on the Contacts page. Note that single or multiple devices (call.center™ end-user apps) may be allocated to each contact as described in the Architecture section.
To add a new contact:
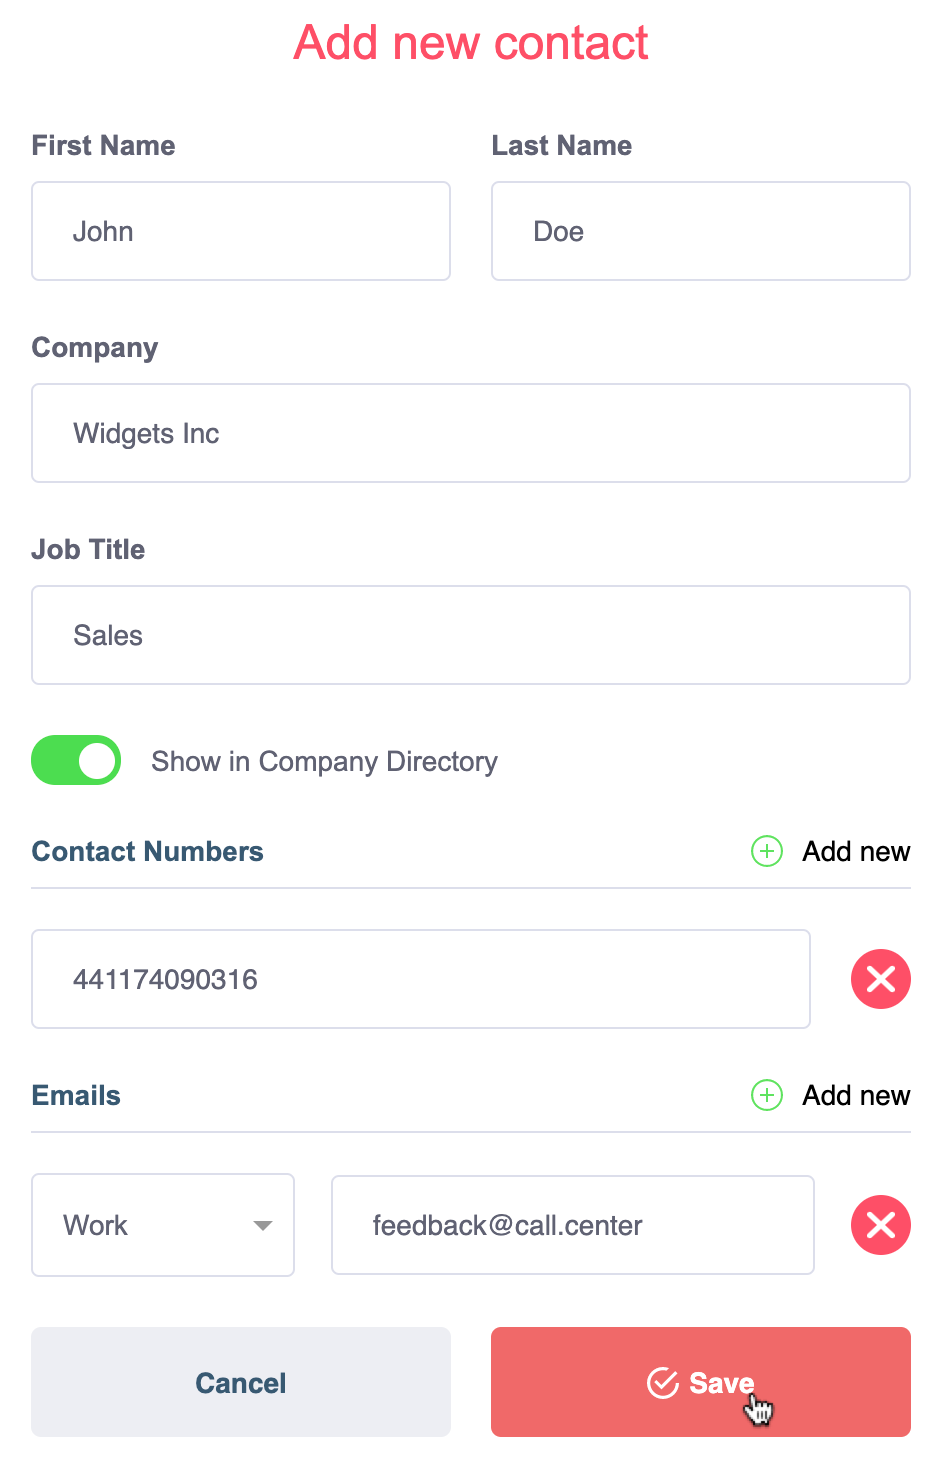
- Click on the Add contact button.
- Specify the required contact details
- First Name (required) - The first name of the contact using the call.center™ app.
- Last Name (required) - The last name of the contact using the call.center™ app.
- Company (optional) - The company name for the contact.
- Job Title (optional) - The job title for the contact.
- Show in Company Directory (by default is enabled) - Contacts that have the company directory feature enabled will be provisioned in the call.center™ application and are updated/synchronised automatically.
- Contact Numbers (optional) - The Phone Number (Landline Or Mobile) For The Contact. Phone Numbers Are In E.164 Format: <Country Code> <City/Area Code> <Local Number>. The numbers will be used as the main contact number within the Company Directory.
- Emails (required) - The email address(es) to which the call.center™ application download and activation instructions should be sent. An email label is also required, with the "Work" or "Home" options available for selection from a drop-down menu. Multiple email addresses may be added by clicking on the Add new button.
- The configuration of the contact is completed by clicking the Save button.
Contact details are:

After a new contact has been created, the new device may be added to the contact. See Adding a Device to a Contact for further details.
Contact details are:
Company - The company name for the contact
Job Title - The job title for the contact
Internal Caller ID - The internal number configured in phone.systems™ for facilitating internal calls by the contact
External Caller ID - The phone number configured in phone.systems™ for facilitating external calls by the contact
Click on the ![]() icon to copy the contact information
icon to copy the contact information
Click on the ![]() icon to open the contact details in phone.systems™
icon to open the contact details in phone.systems™
Managing Contacts
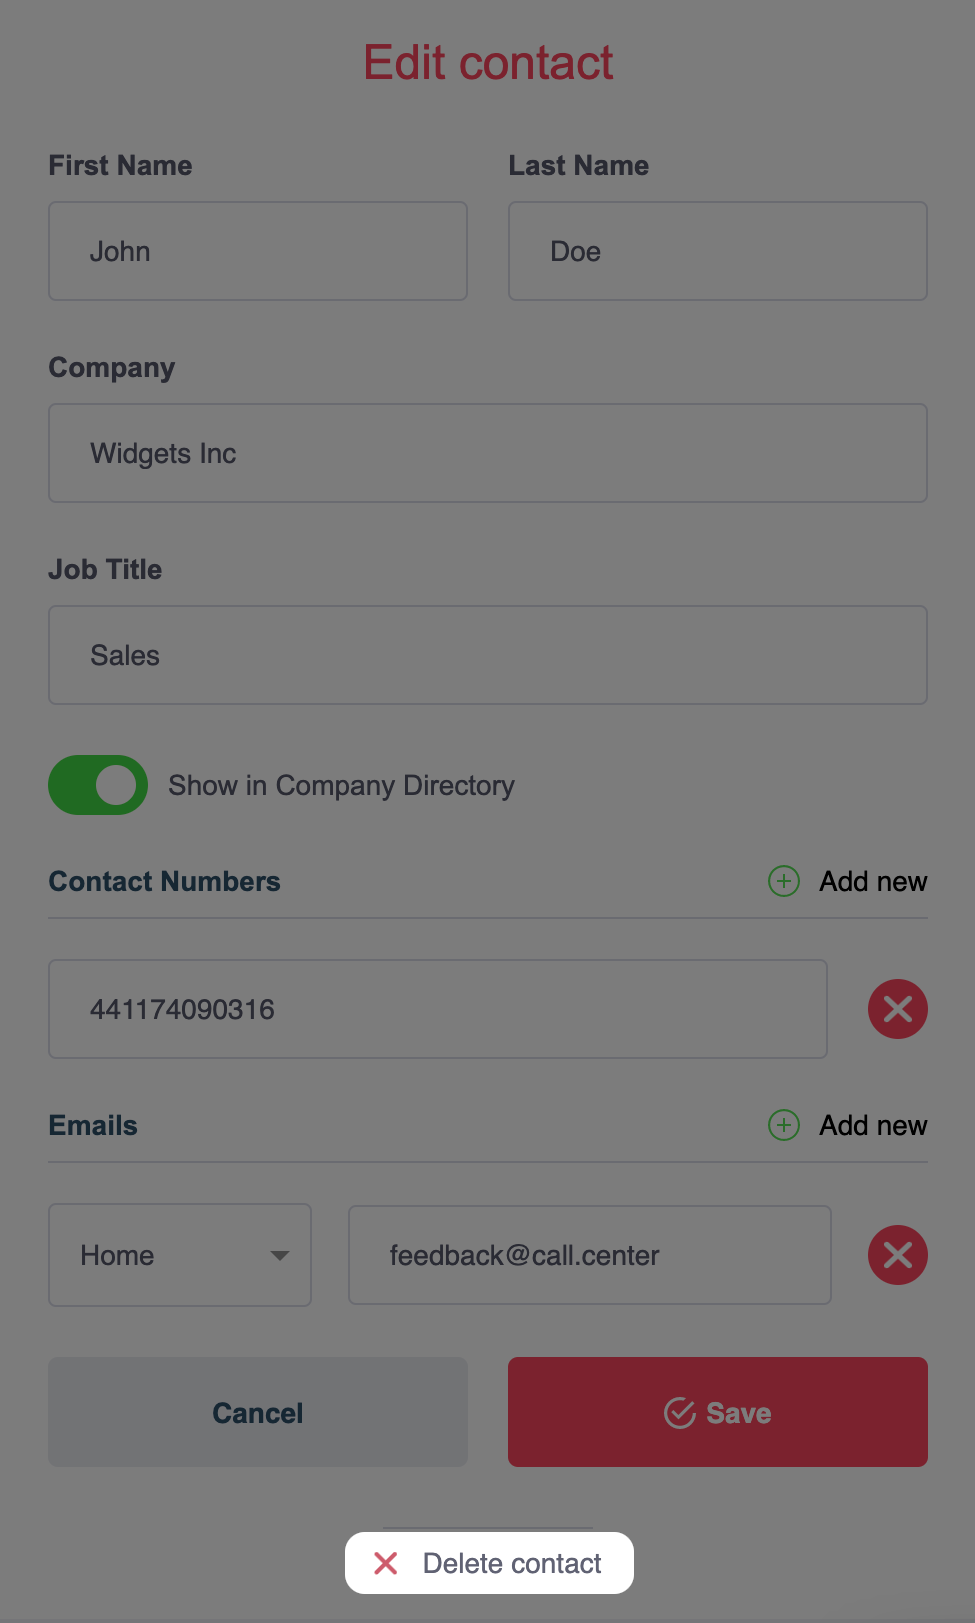
Editing a Contact
- To edit a Contact, select the Gear icon associated with that Contact.
- Make the changes required.
- Click on the Save button to confirm the changes.
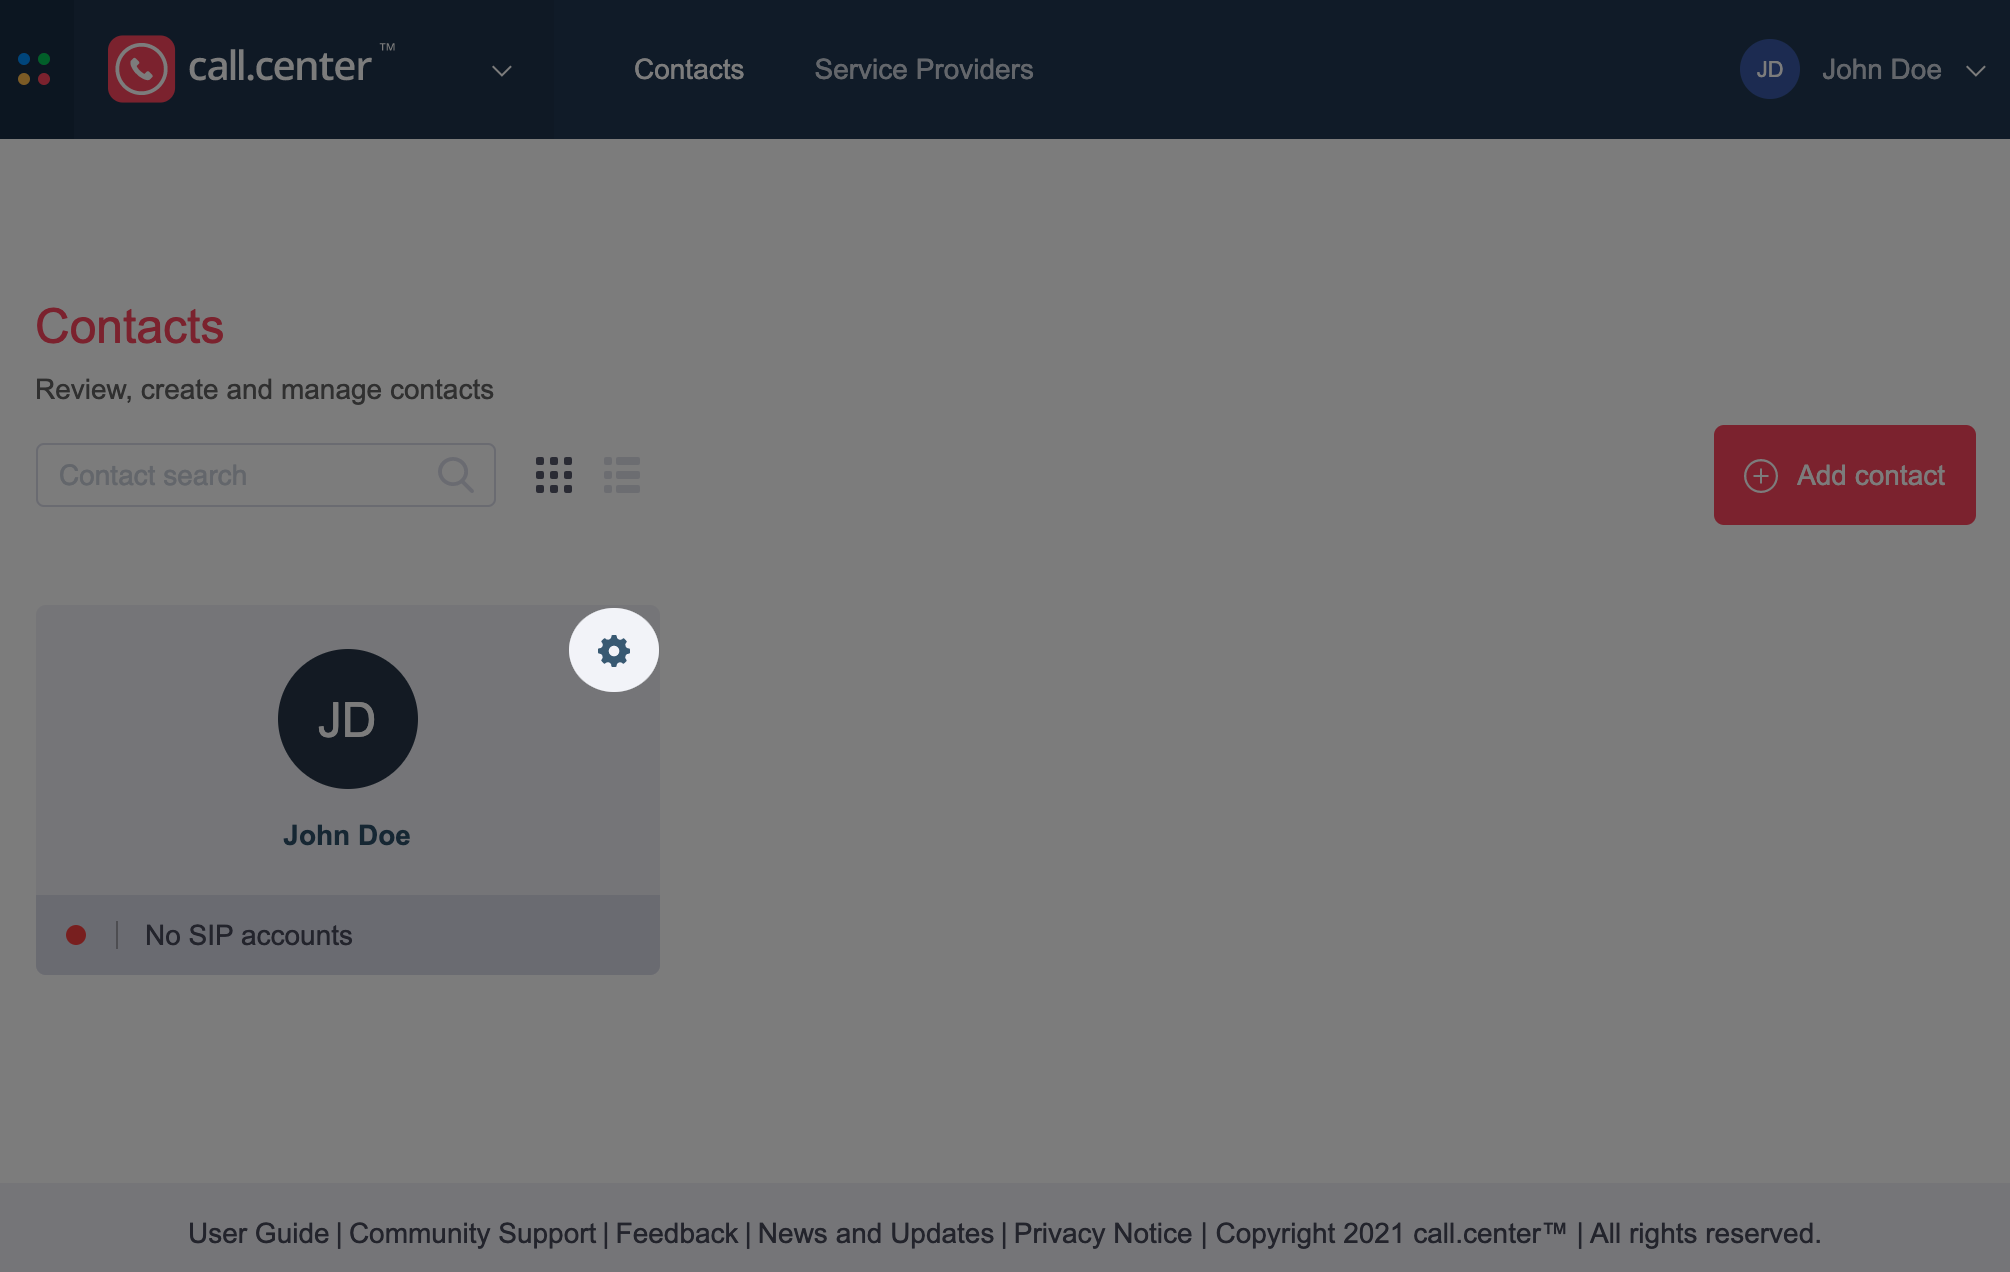
Deleting a Contact
- Click the Gear icon associated with the Contact to be deleted.
- Click “Delete contact”.
- Confirm that the Contact should be deleted.
Adding a Device to a Contact
Devices, or call.center™ end-user apps, are allocated to contacts, and each device is supported by a single or multiple SIP account(s).
To add a new device:
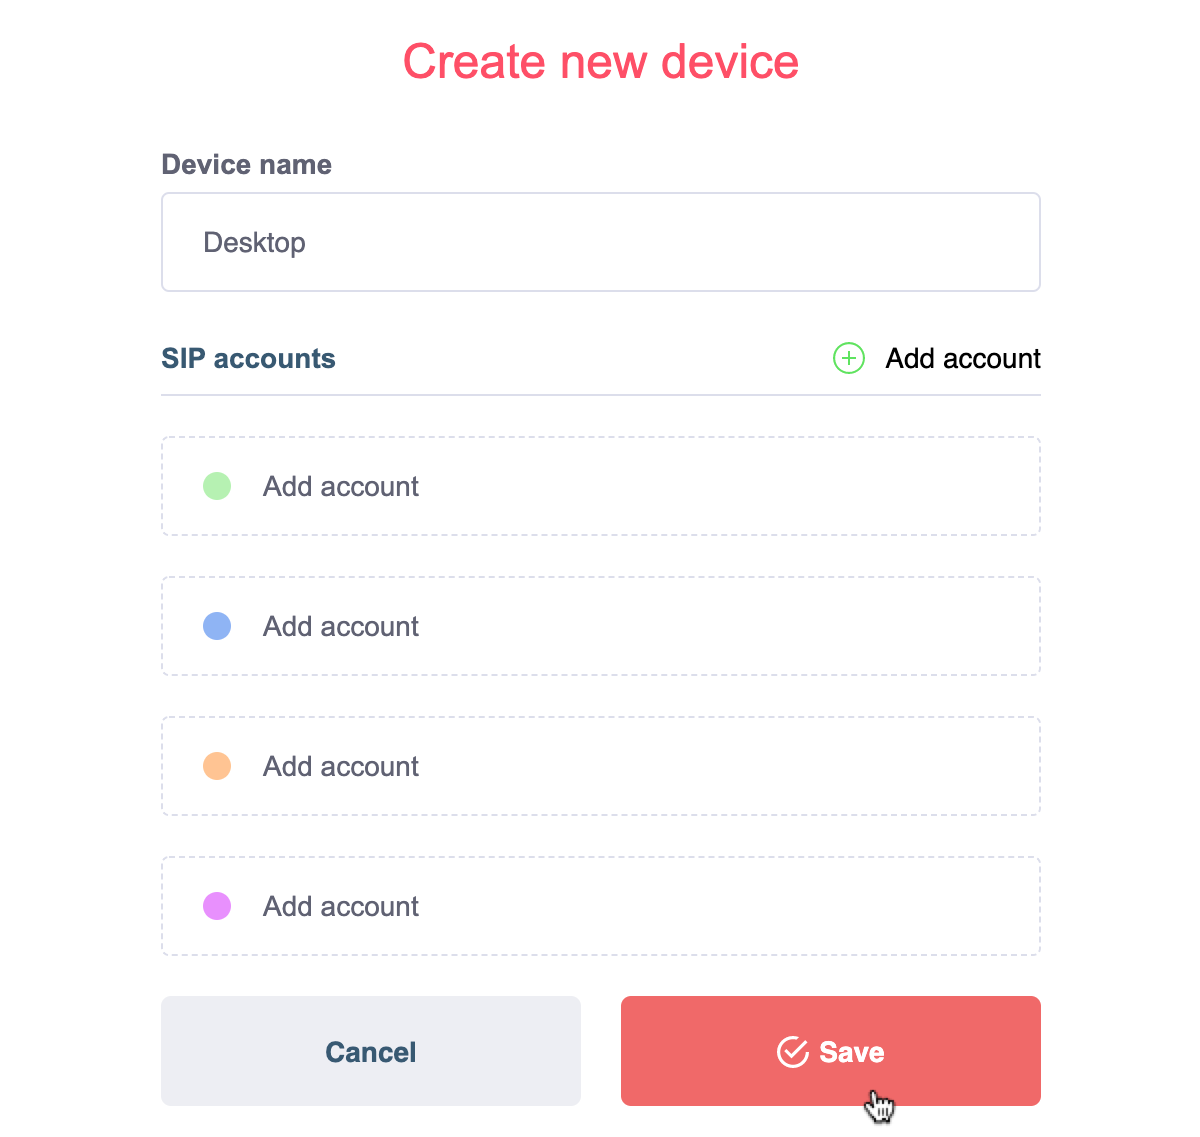
- Click on the Add device button.
- Specify the required parameters.
-
Device parameters are:
- Device Name (required) - A friendly name for the device.
-
SIP accounts (required) - The SIP account(s) used to support this device. This
parameter is selected from a drop-down menu that lists all of the SIP accounts previously
configured for each service provider. Each call.center™ device may use up to four separate
SIP accounts. Use the Add account button to add SIP accounts.
A SIP account may be deleted from a device by clicking on the
icon next
to the account name.
- Click the Save button to complete the configuration of the device.

Once a new device has been configured and saved, the end-user app may be installed and activated with the appropriate device credentials. See Activating the call.center™ app for further details.
Back to the topManaging devices
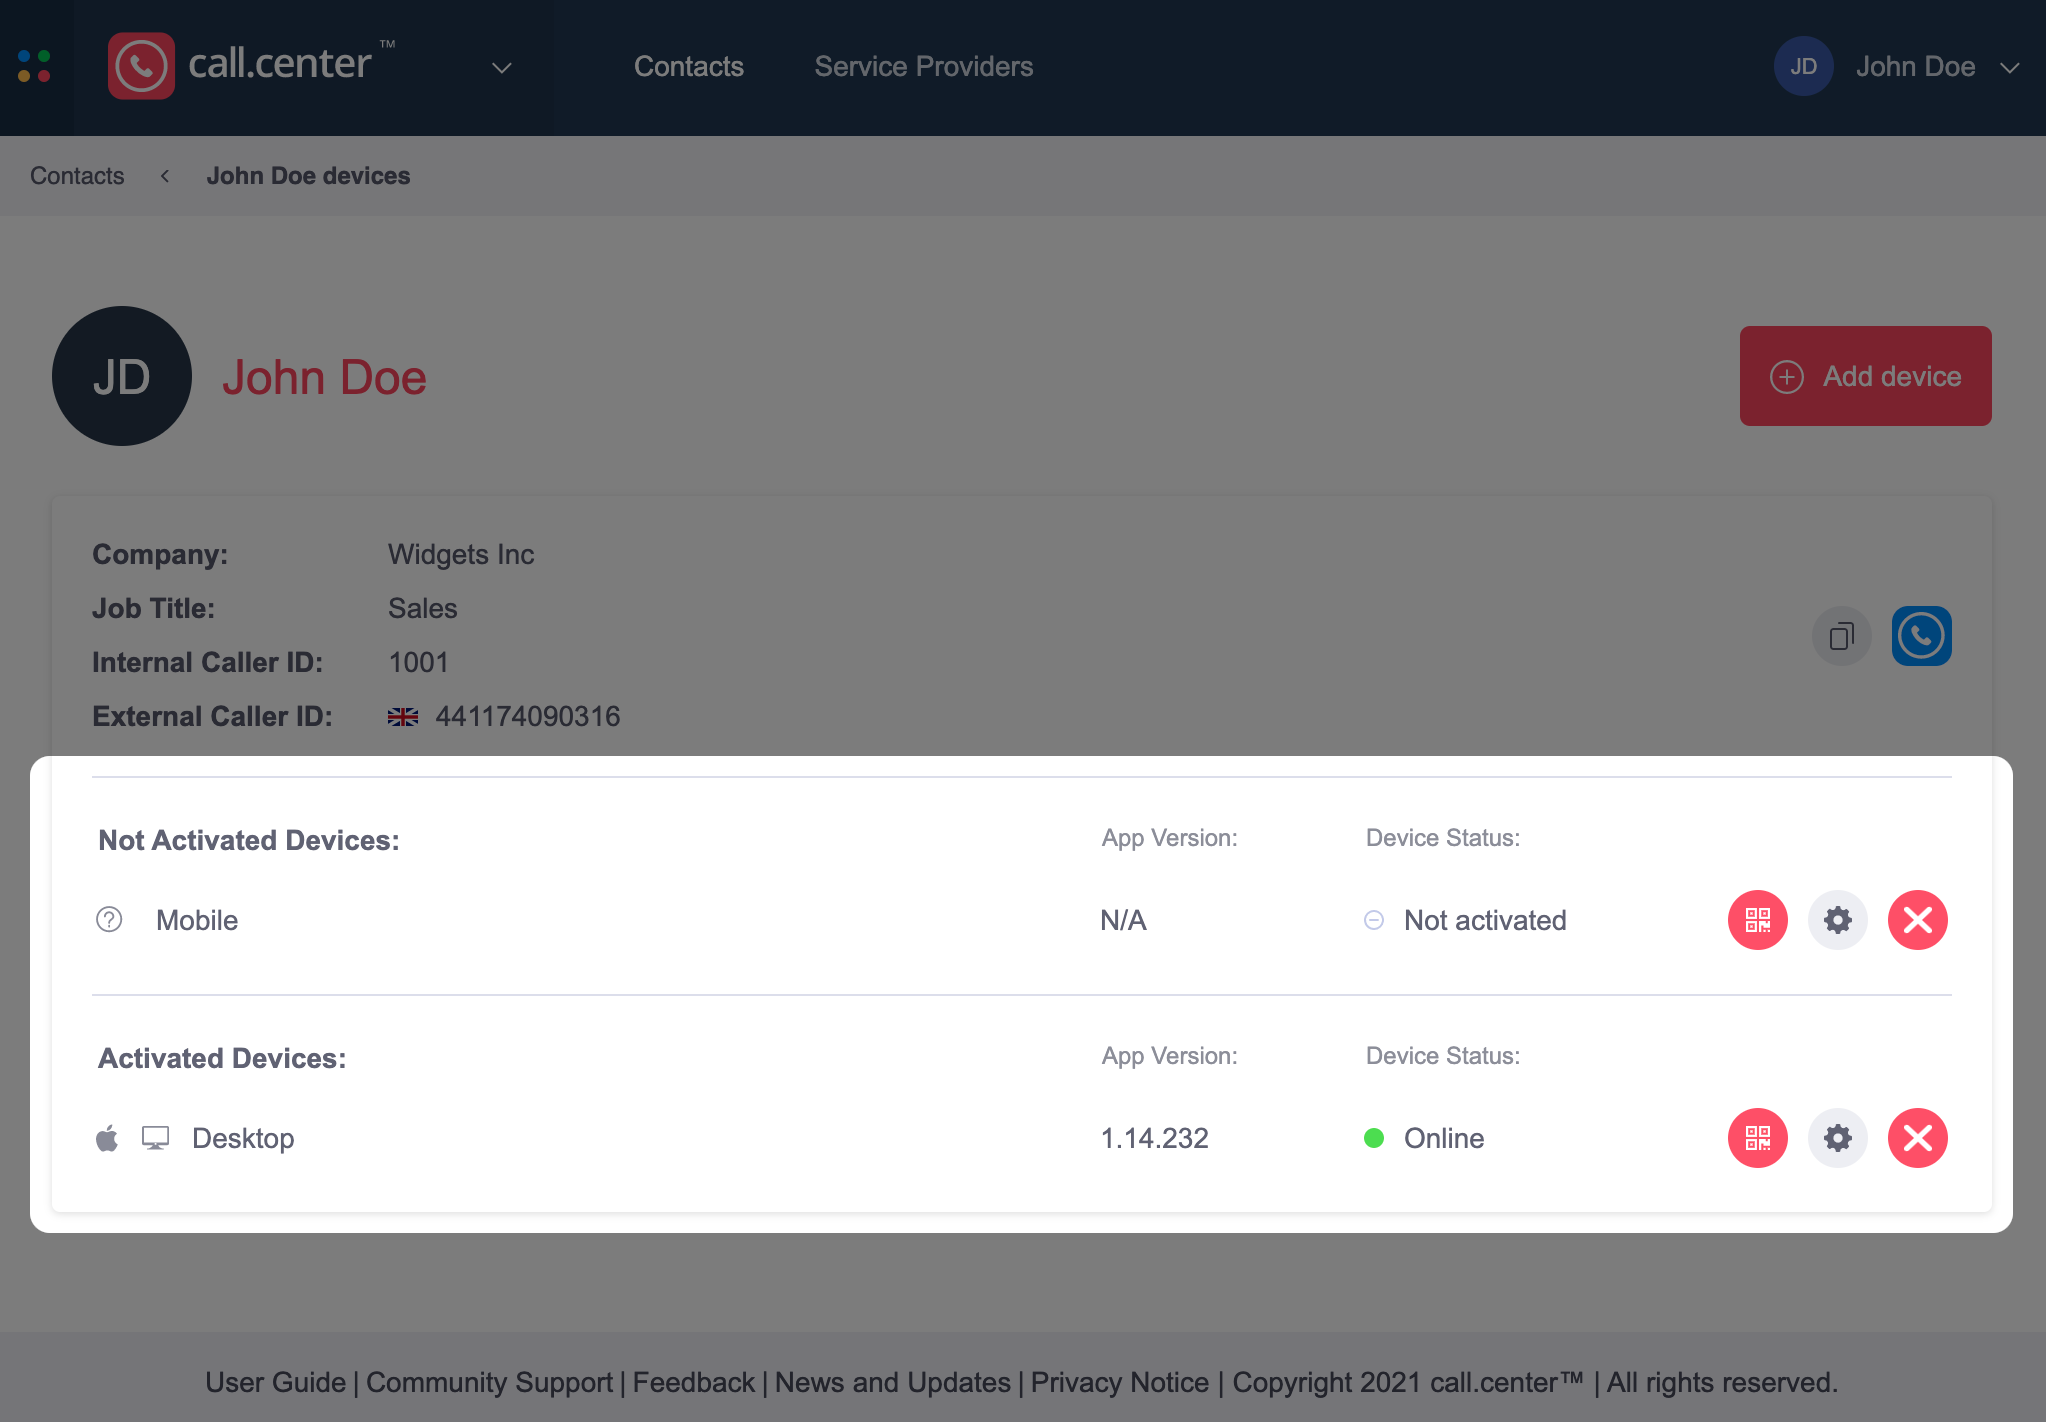
Devices may be added, edited or deleted from contacts by accessing the Contacts page, and then clicking on the relevant contact.
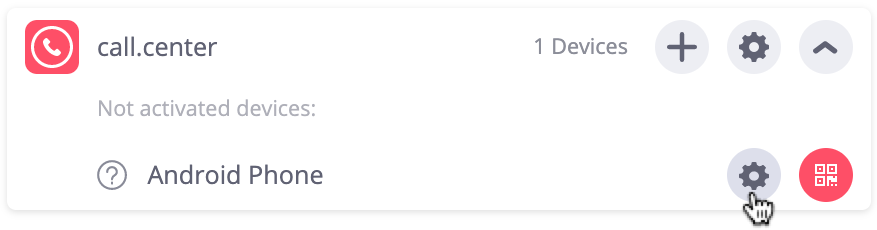
The Contact device page displays the following parameters:
- Not Activated Devices – The name and type of the device that have not been activated
- Activated Devices – The name and type of the device that have been activated
- App Version – The call.center™ app’s version number
- Device Status – The status of the device as follows:
- Not activated - When the device is Not activated, the Activation Instructions page displays comprehensive activation instructions. The page also includes the ability to send activation instructions via email to the app user.
- Online – The device is activated and online
- Offline – The device is activated, but offline
- The device status may also have a sub-status, which provides additional information regarding pending actions for a specific device as follows:
- Instructions sent - Device activation instructions have been sent to the specified email address, but the activation key included in that email has not yet been used to complete the activation.
- Pending update – The device has previously been activated and configured. However, configuration changes were since made, and the device has not yet been updated with the new configuration parameters.
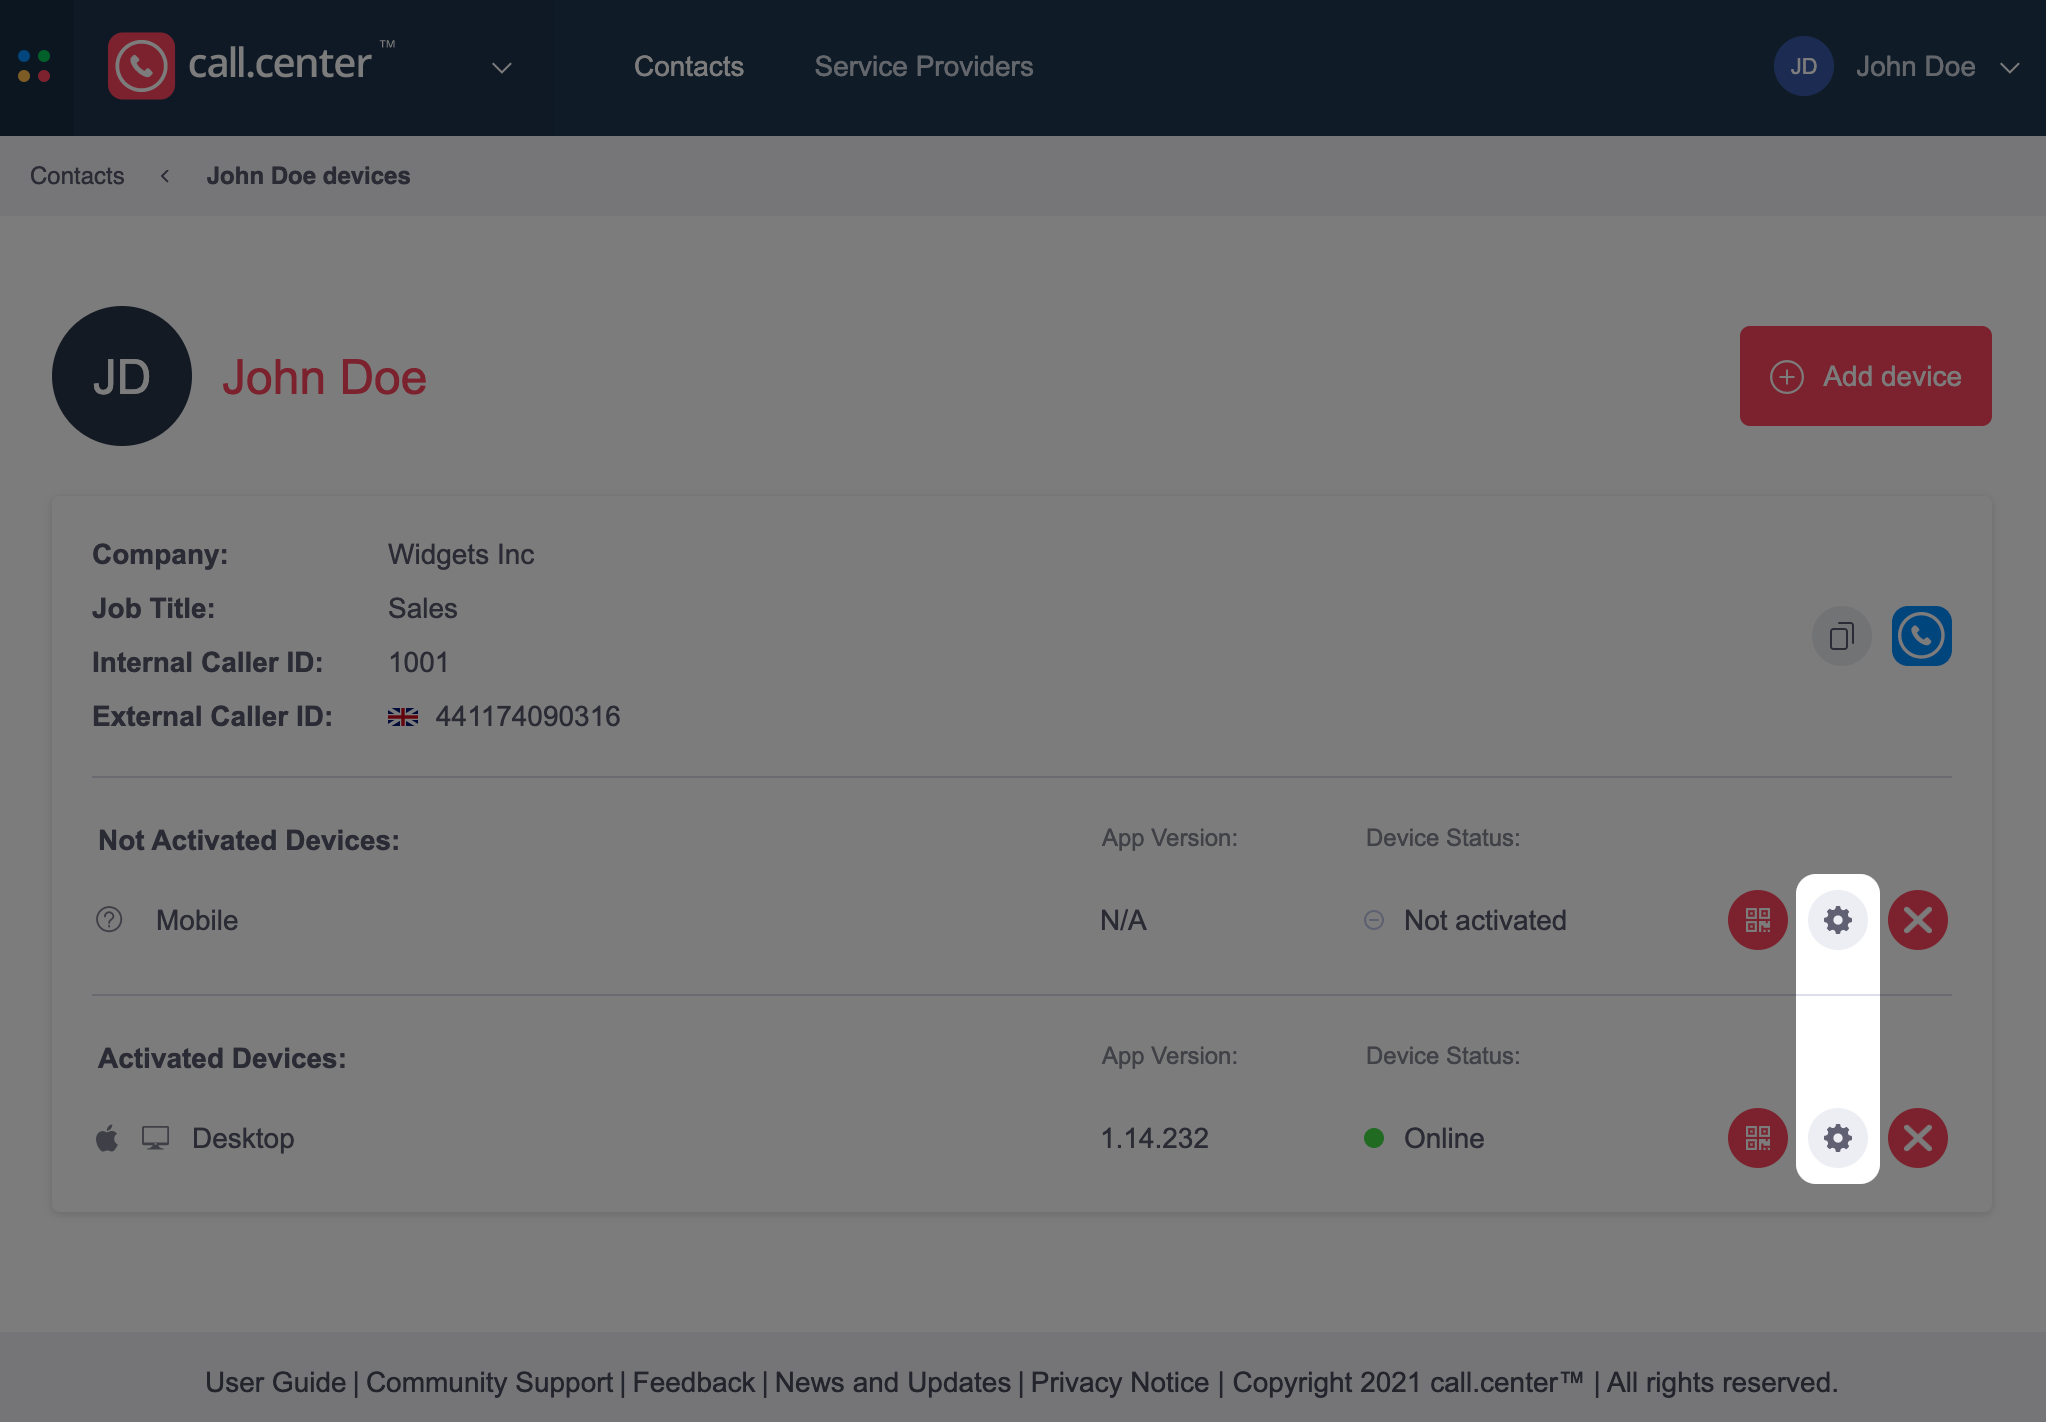
- Actions – Allows the user to perform the following actions:
Click on the  icon to access the Activation Instructions page.
Click on the  icon to edit the device.
Click on the icon to delete the device.
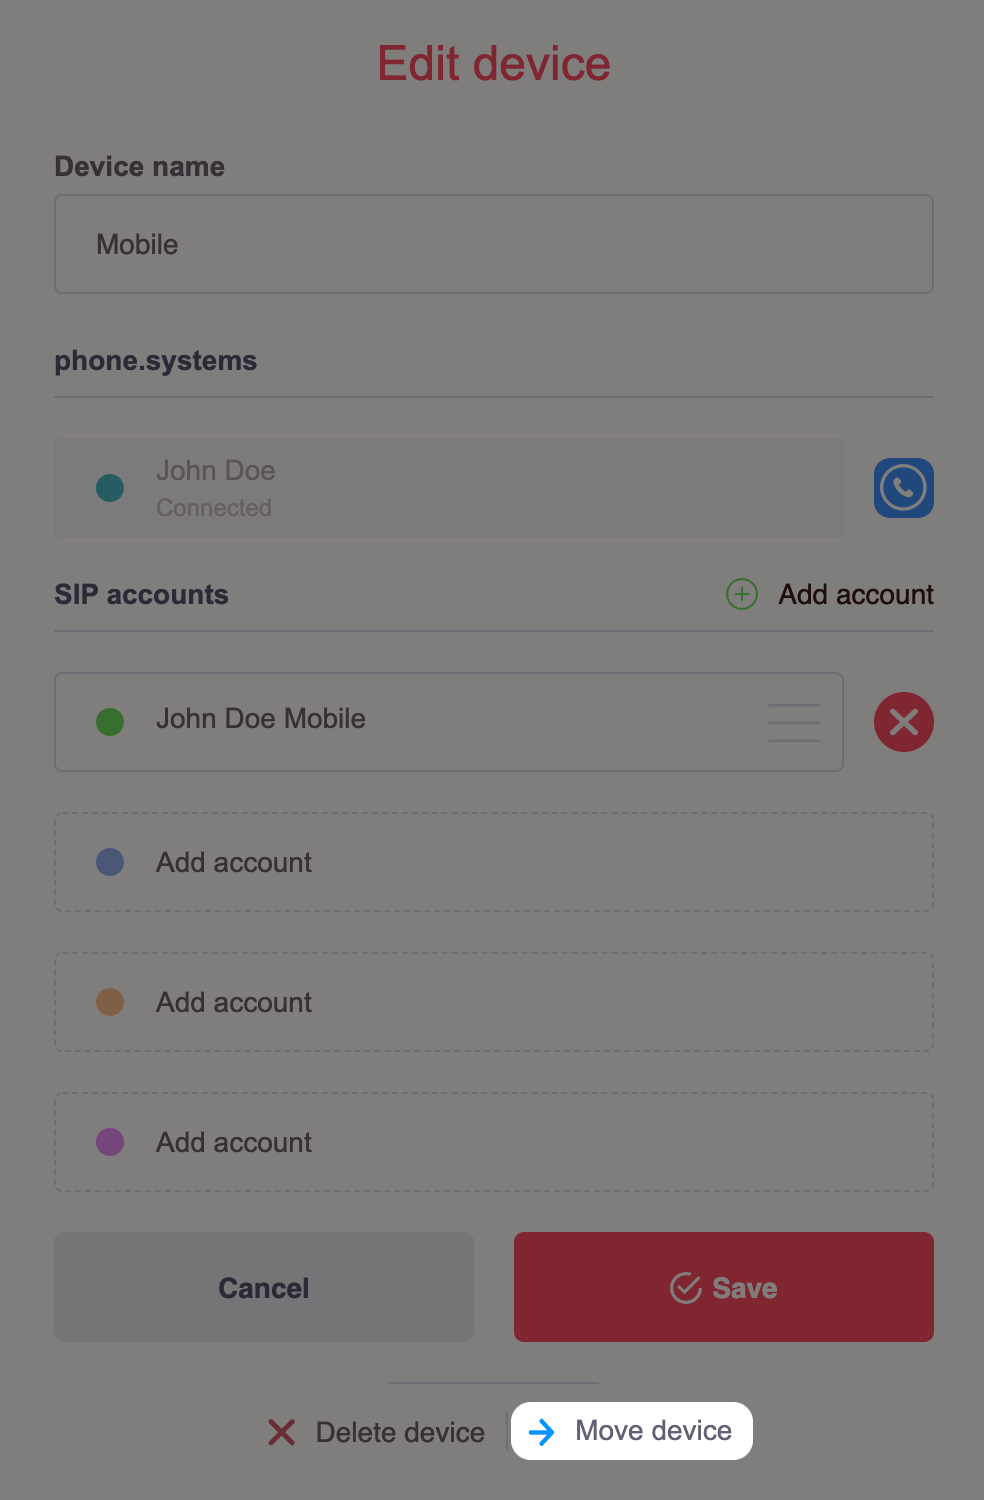
Editing a Device
The SIP accounts used to support devices may be added or removed as follows:
- Select the Gear icon associated with the device to which changes must be made.
- Make changes according to the requirements, such as changing the device name, or adding or removing SIP accounts used to support the device.
- Click the Save button to apply the changes.
Deleting a Device
- Select the Gear icon associated with the device to be deleted.
- Click on the “Delete device” button.
- Confirm that the device should be deleted.
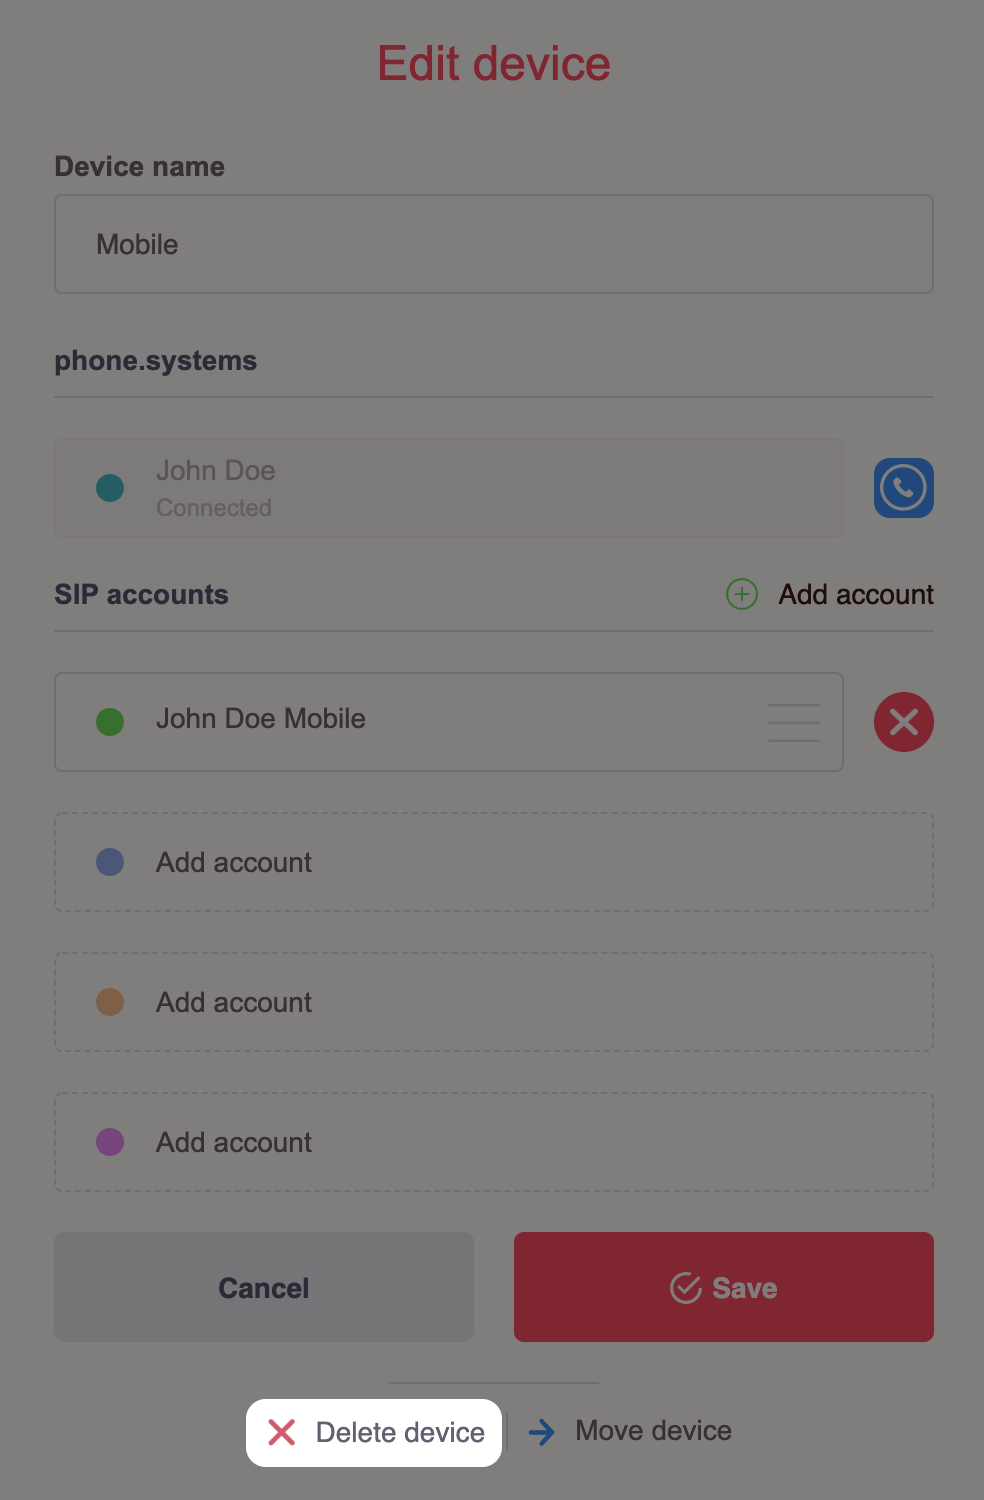
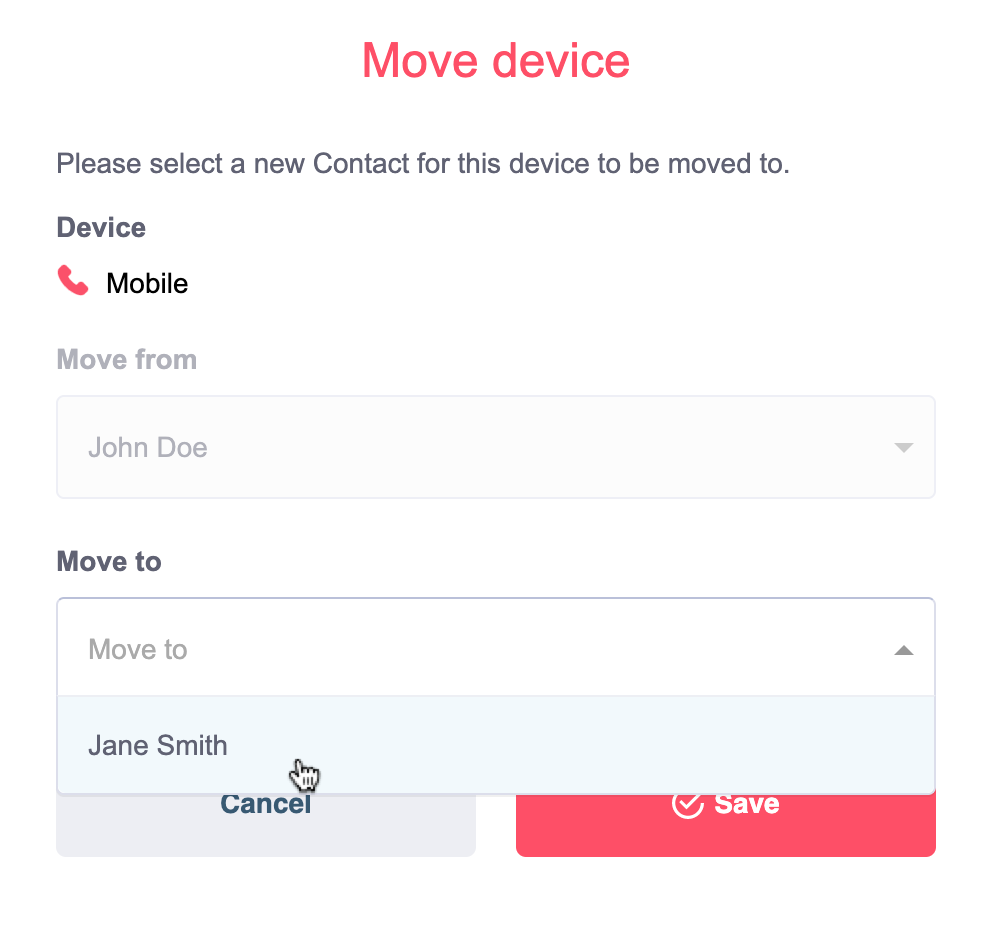
Moving a Device to a different Contact
Devices may be reassigned to any other configured contacts as follows:
- Select the Gear icon of the device that should be transferred to another contact.
- Click on the “Move device” button.
- From the drop-down menu, select the contact to which this device should be transferred.
- Click the Save button to apply the changes.
Configuring call.center™ in the phone.systems™ environment
If you are using the combination of call.center™ and phone.systems™ as a complete telecom.center™ solution, it is important to note that these two platforms share the same data such as Contacts, Contact methods (contact email and SIP Accounts) and call.center™ devices. Therefore, you may create, remove and manage call.center™ Contacts, SIP Accounts and devices directly from the phone.systems™ interface.
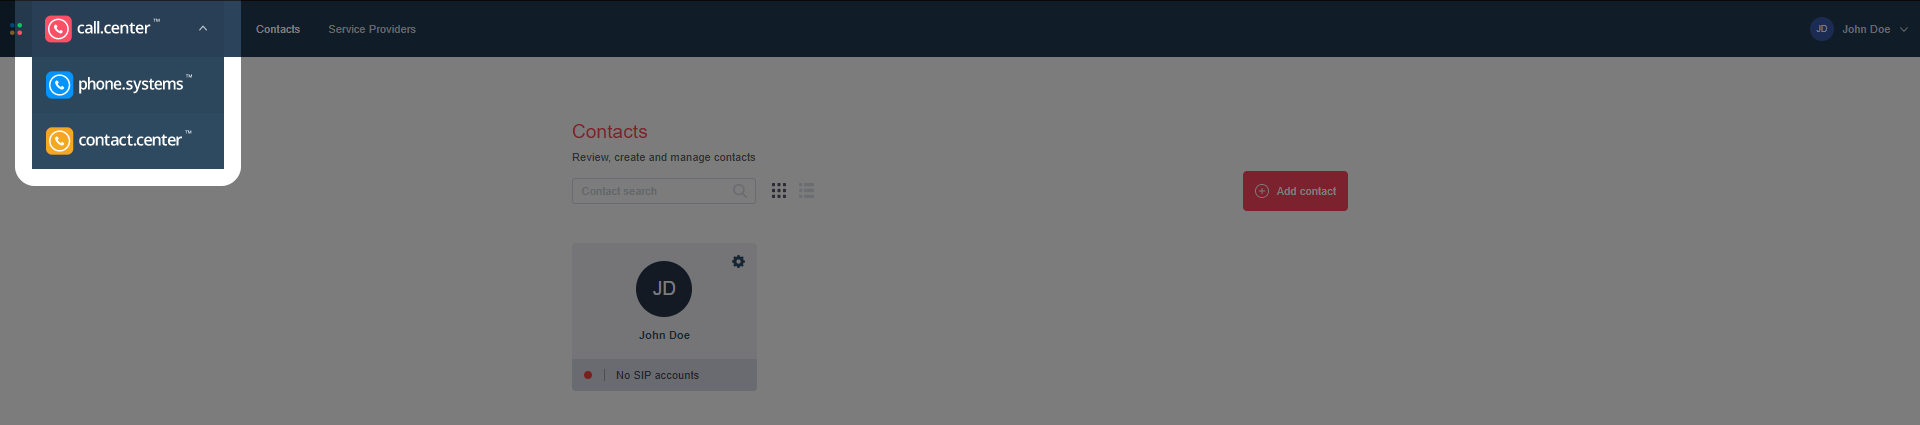
You may access the phone.systems™ environment from any of the telecom.center™ domains (call.center™, contact.center™) by selecting the phone.systems™ option from the dropdown menu at the top left of the web page.
 Back to the top
Setting Up a Contact Using a Wizard
The contact Setup Wizard will guide users through the main steps in configuring a Contact for internal and external calls, and automatically preconfigure numbers, and call.center™ contact method with a device. The required objects will also be created on the phone.systems™ workspace.
IMPORTANT - The phone number and internal number listed are selected from those previously configured in phone.systems™.
To use this feature, enable Setup using Wizard and click Save.
Note: By default, the Setup using Wizard feature is disabled.
To Setup a contact using the Wizard, specify the required parameters:
-
Select the Internal Number (optional) from the drop-down menu and click Next
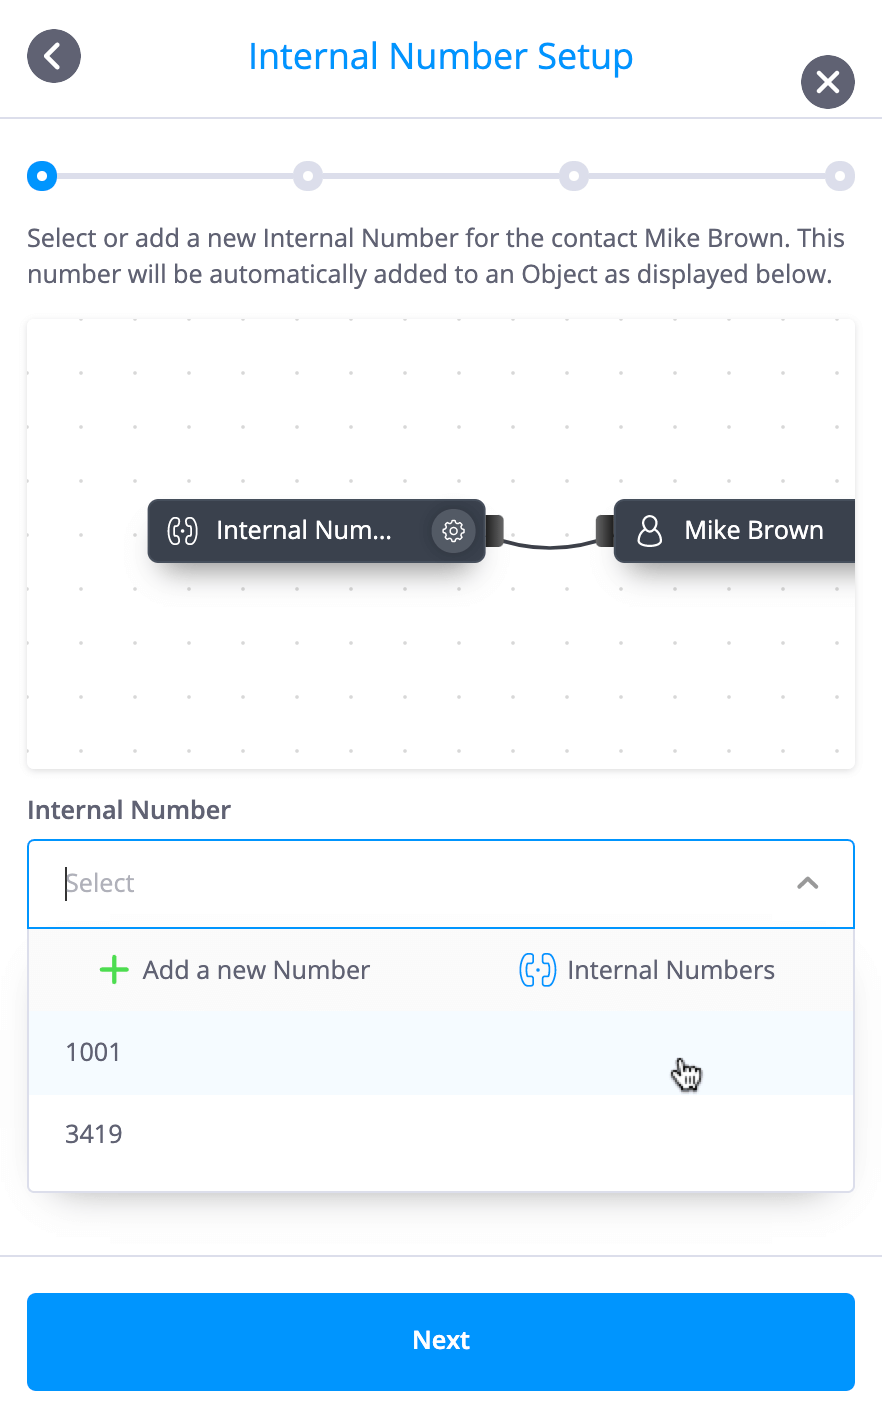
If an internal number is required but has not yet been configured, click
 to add a new Internal Number for the contact.
Note: The Internal number will be reachable internally and will be used as the main contact number within the Company Directory.
-
Select the Phone Number from drop-down menu and click Next
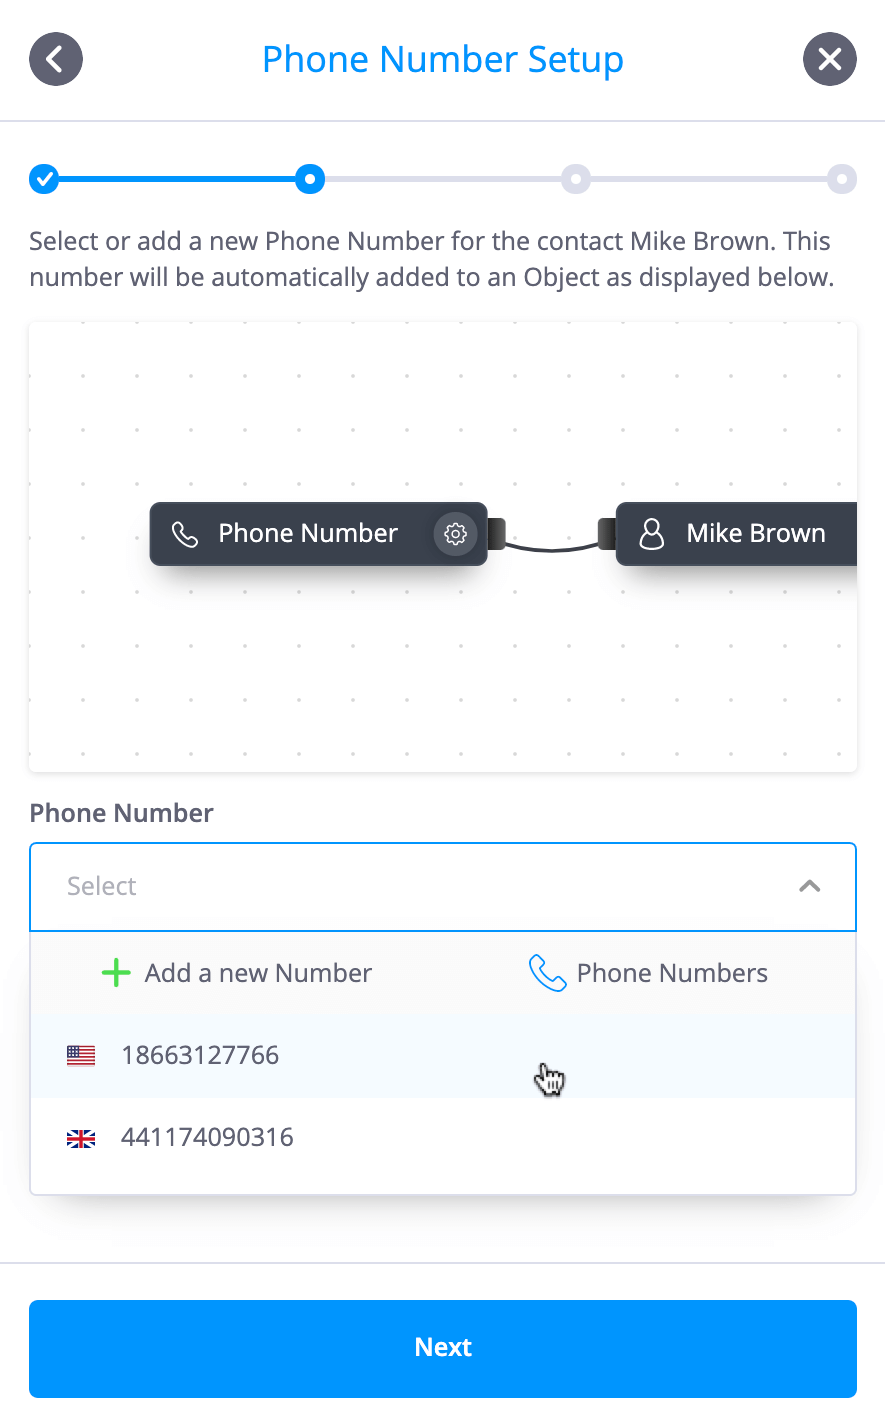
If the phone number has not yet been added, click
to add a new Phone Number for the contact.
Note: The Phone Number will be used for external inbound calls, will be visible in the Company Directory, and will be used as an optional external caller-ID for outbound calls.
-
Select the workspace tab from the drop down menu that will be populated with the objects referred to in the previous steps, and click Next.
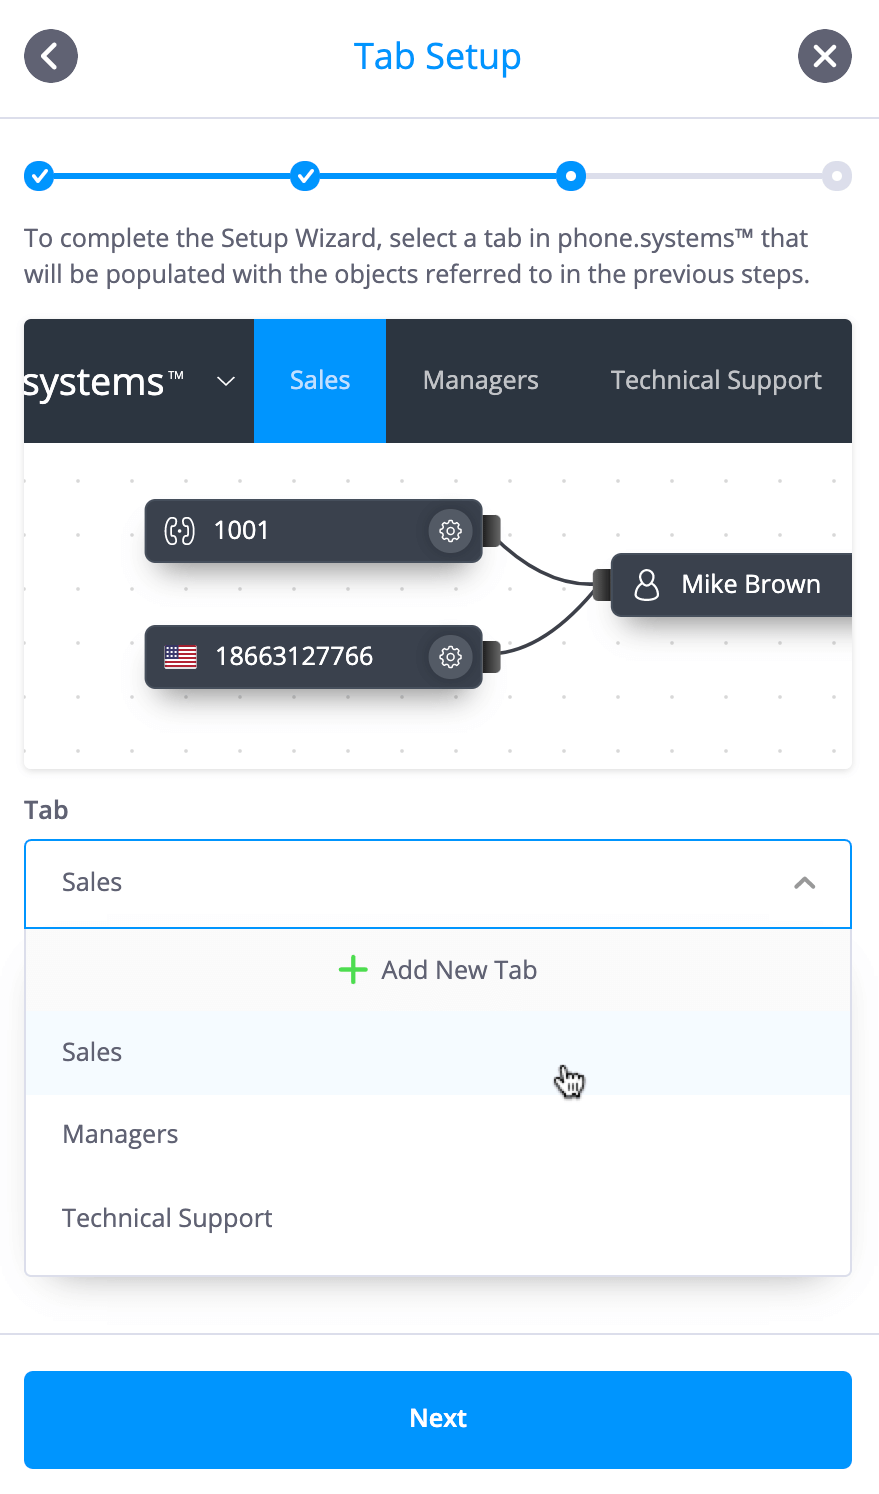
If there is only one workspace tab and an additional tab is required, click
 to
add a tab for the additional objects.
to
add a tab for the additional objects.
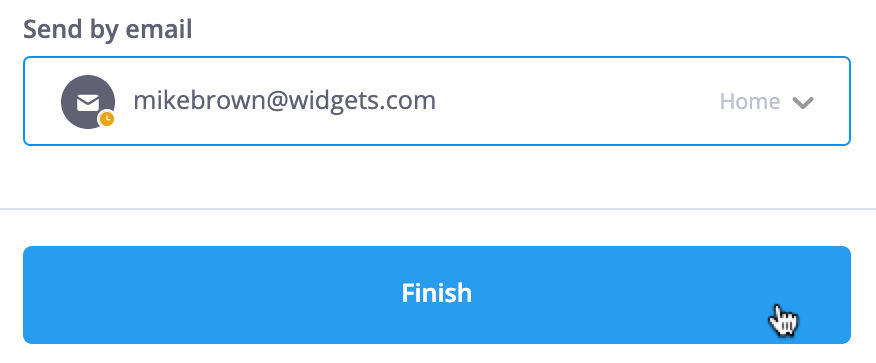
-
After the Contact Setup has been completed, the call.center™ device preconfigured with previously selected numbers may be activated. This may be achieved by selecting
 or by sending the activation instructions to the user via email.

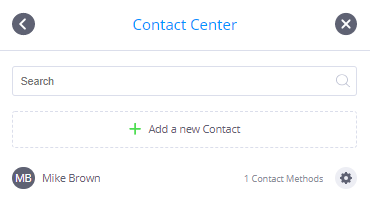
Creating a Contact in the Contact Center
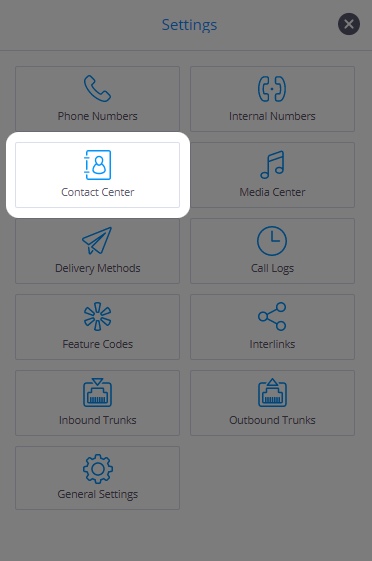
Within the phone.systems™ environment, the Contact Center manages the contacts and contact methods used by this platform. Specifically, the entries in the Contact Center serve to list the destinations (such as people and departments) to which incoming calls are redirected, and also the methods (such as landline/mobile phones or SIP Accounts) by which these destinations are contacted.
The Contact Center is accessed by clicking on the
![]() button in the upper right-hand corner of the phone.systems™ workspace.
button in the upper right-hand corner of the phone.systems™ workspace.

This opens the Settings menu, which includes the
 option.
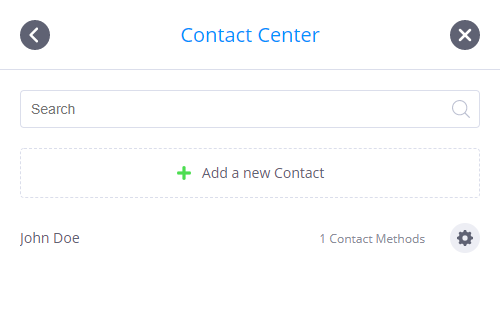
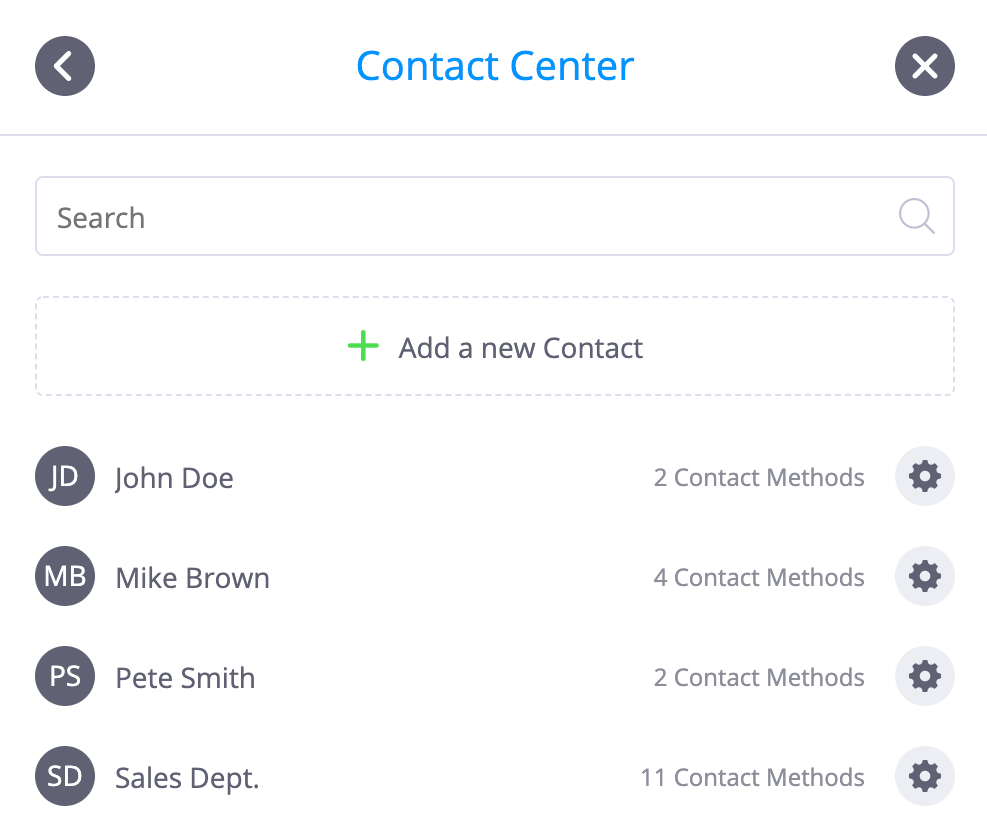
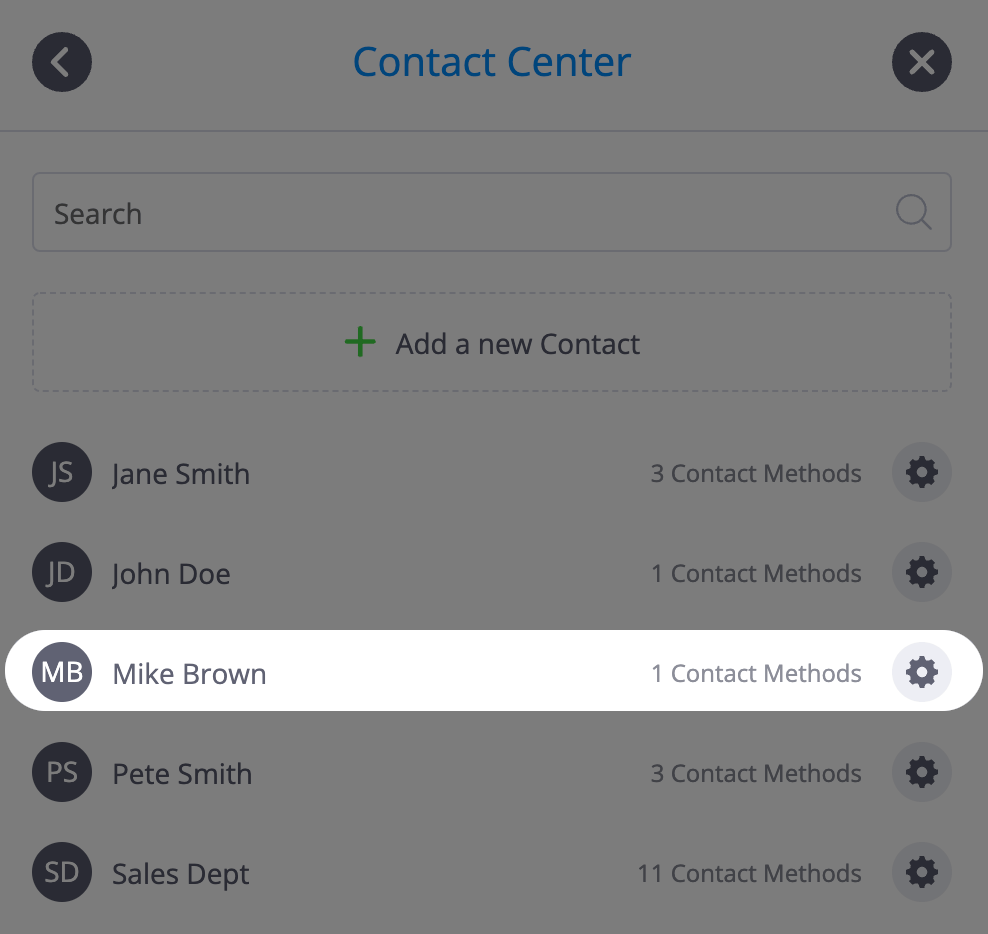
A typical list of contacts is shown below, together with the number of contact methods configured
for each contact. Each configured contact and their contact methods may be edited by clicking on
the
![]() icon next to that contact, and new contacts may be added by selecting the
icon next to that contact, and new contacts may be added by selecting the
 option.
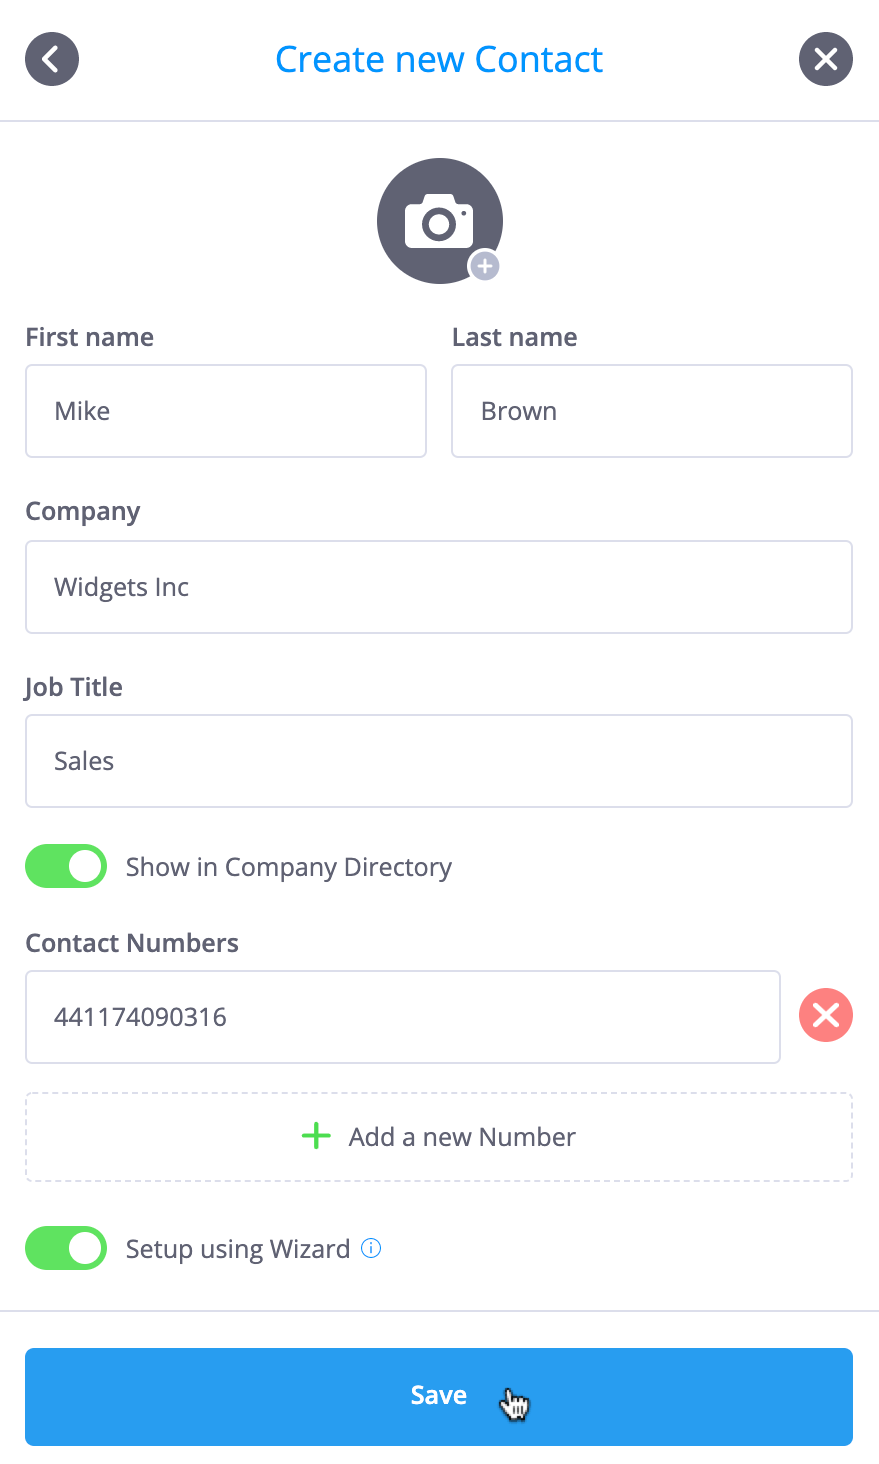
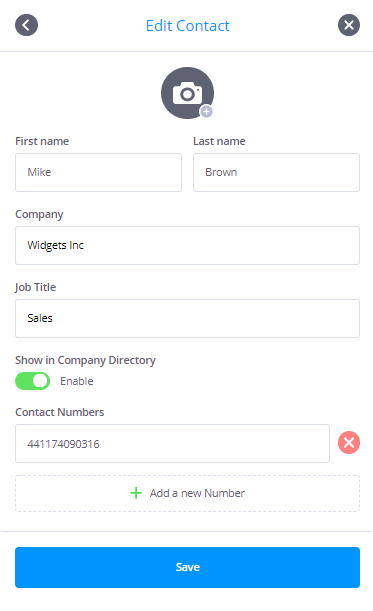
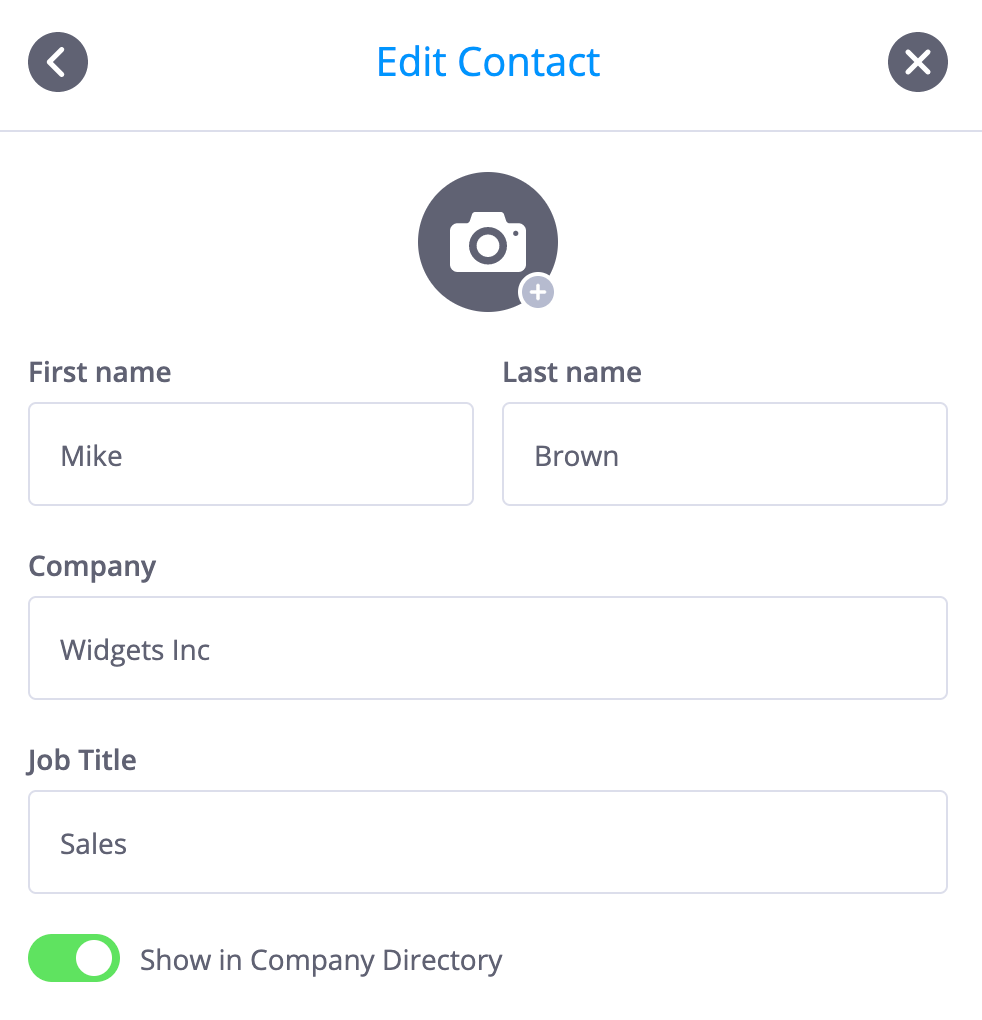
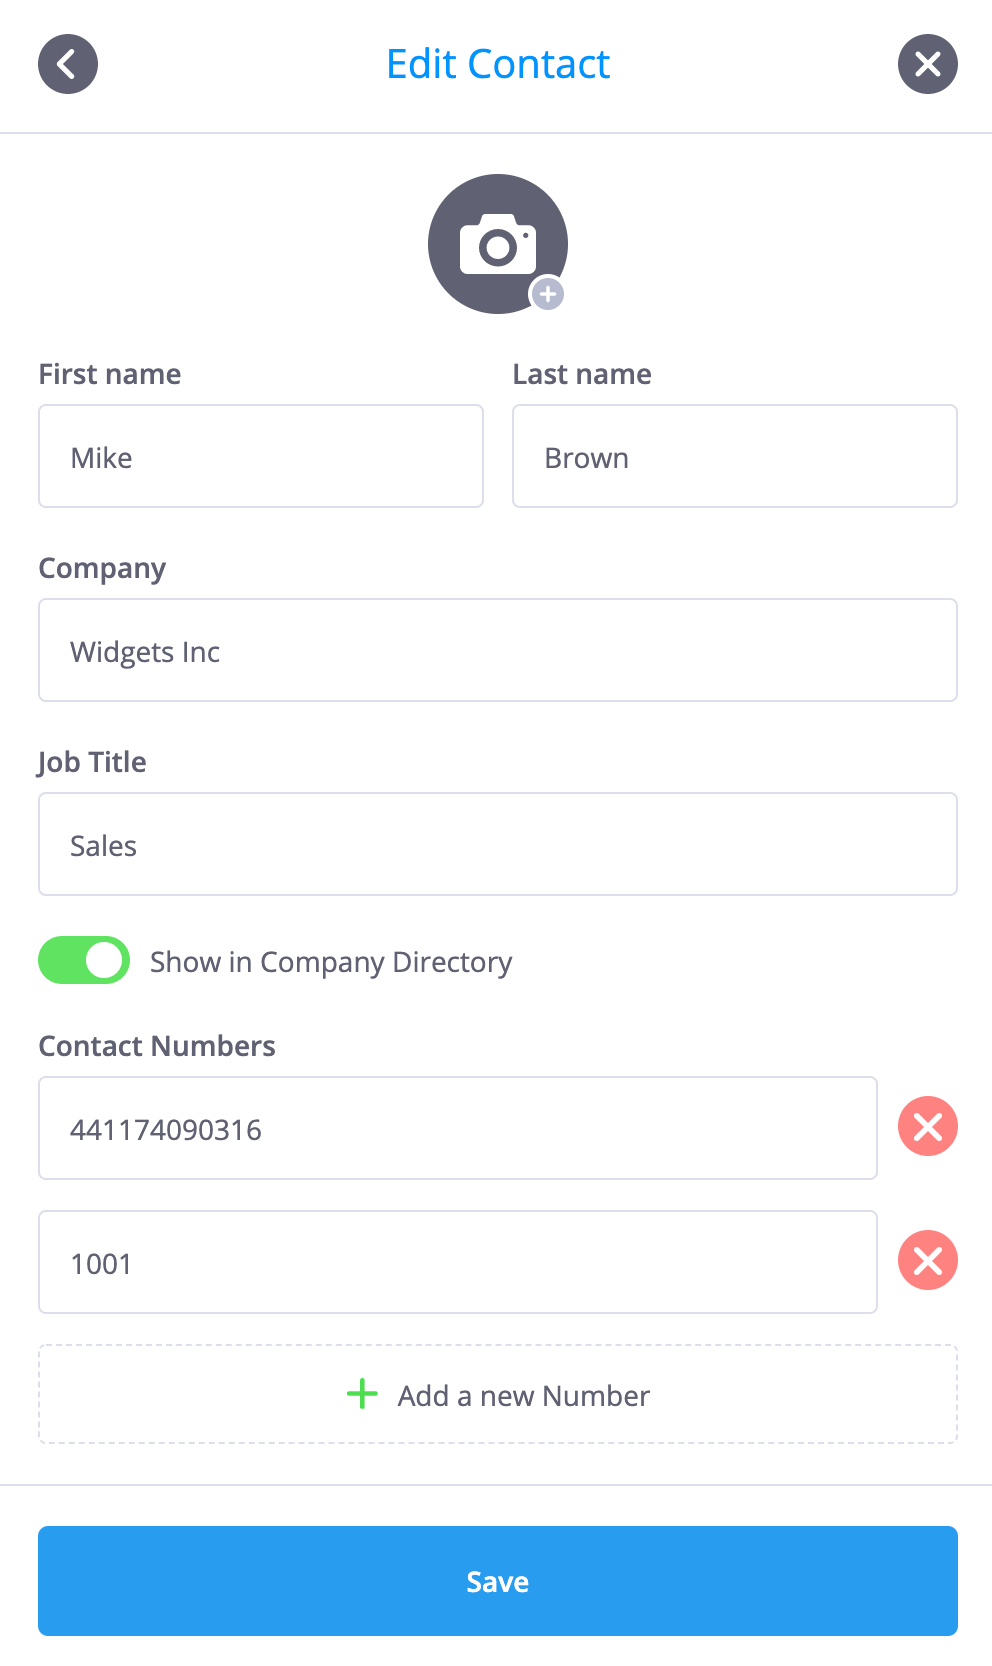
Selecting the option
within the Contact Center window opens a form for creating a new contact. There is an
option to include this Contact in the company directory (Show in Company Directory) which
is enabled by default. The first and last names for the contact must be entered, and optional
details for the fields Company, Job Title and Contact Numbers may be entered. It is
not required to create a dedicated Sip-Account for each call.center device, as this can be
replaced by the automatically created call.center contact method. However, if needed, additional
SIP-Accounts may be added to each call.center device. Contacts that have the company directory
feature enabled will be provisioned to the call.center application and are updated/synchronised
automatically. The call.center contact method may be used with Ring Groups and
Queues directly.
Note: Contact numbers will be used when calling the contact from call.center’s company directory.
By selecting the
 option, you can enter an internal number or phone number (landline or mobile) for the contact.
Phone numbers are in E.164 format:
option, you can enter an internal number or phone number (landline or mobile) for the contact.
Phone numbers are in E.164 format:
<CountryCode> <City/AreaCode> <LocalNumber>
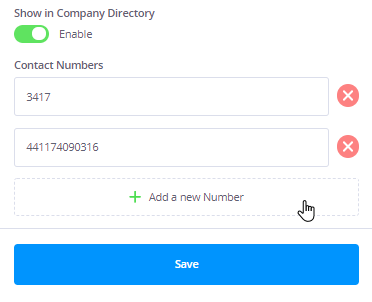
After entering the Company Directory number click Save.
 Back to the top
Company Directory
The Company Directory stores the names and contact numbers of employees across the phone.systems™ and call.center™ ecosystem. The Company Directory can be set up and managed through the phone.systems™ interface.
A phone.systems™ account administrator may disable the Company Directory feature for a specific Contact at any time in the Contacts Center settings. The Company Directory only contains contacts created on that specific phone.systems™ account.
The toggle option

 Show in Company Directory is used to manually enable or disable
the visibility of that contact in Company Directory.
Show in Company Directory is used to manually enable or disable
the visibility of that contact in Company Directory.
An Internal contact can be added by specifying their first and last names and optional details for the fields Company, Job Title and Contact Numbers may be entered. See the section Creating a new contact for further details. Contact numbers will be used when calling the contact from the call.center™ app’s company directory. The Contact Number listed should be the number that would allow a call to be delivered to the required destination, and could be an actual phone number (landline or mobile) or a pre-configured DID/Extension number in phone.systems™.

Users can quickly and easily access the directory and find the appropriate contact information for colleagues. The contacts created in the phone.systems™ and have the Company Directory feature enabled will be reflected in the call.center™ softphone Company Directory Tab.
 Back to the top
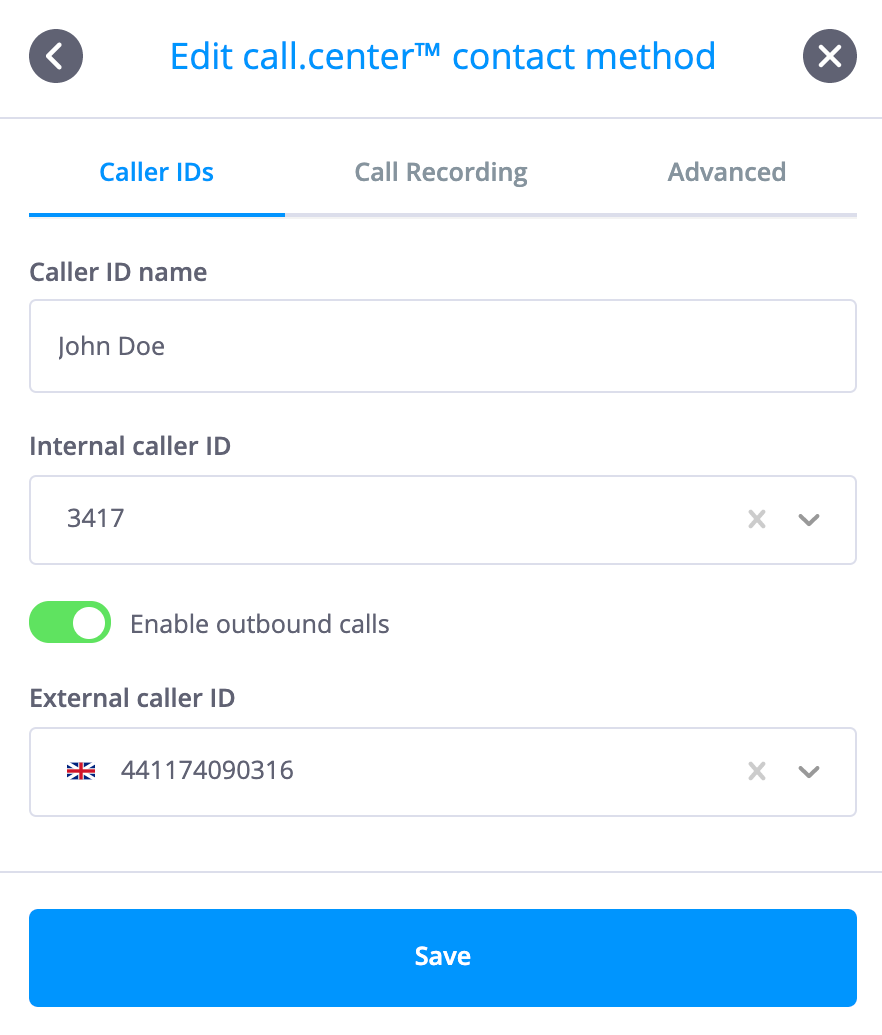
Contact method: call.center™
A call.center™ contact method is automatically linked to all call.center™ devices. The call.center™ Contact Method allows users to assign an available Internal and Phone Number numbers, that may be used as caller IDs for outbound calling. From the UI point of view, the call.center™ contact method will act as the main group for call.center™ devices within that Contact. All call.center™ devices that belong to this contact will appear “under” the call.center contact method.

Selecting the option in the “Contact Details”
window opens up a form to edit the call.center™ contact method for the selected contact.
The information to be entered is:
-
A caller ID name - The caller ID name, which will be displayed on end-user devices that support this feature. By default, this name is the same as the actual contact name to which this contact method is attributed.
-
Internal caller ID - This number will be displayed as the Caller ID when making outbound calls to other extensions within the phone.systems™ network. An optional Internal caller ID number may be selected from the dropdown menu of the extensions configured for Internal Number objects that are currently on the workspace.
Note: The dropdown list of internal numbers that is displayed consists of numbers (or extensions) allocated to configured Internal Number objects. Therefore it is recommended that Internal Number objects should be configured and placed on the phone.systems™ workspace prior to adding SIP Account contact methods. -
An option to enable outbound calling from this device. By default, outbound calling is disabled.
-
External caller ID - If outbound calling is enabled, an external caller ID must be selected that defines the phone number to be displayed as the Caller ID when making outbound calls. This Caller ID may be chosen from the dropdown menu that lists phone numbers previously added to phone.systems™.
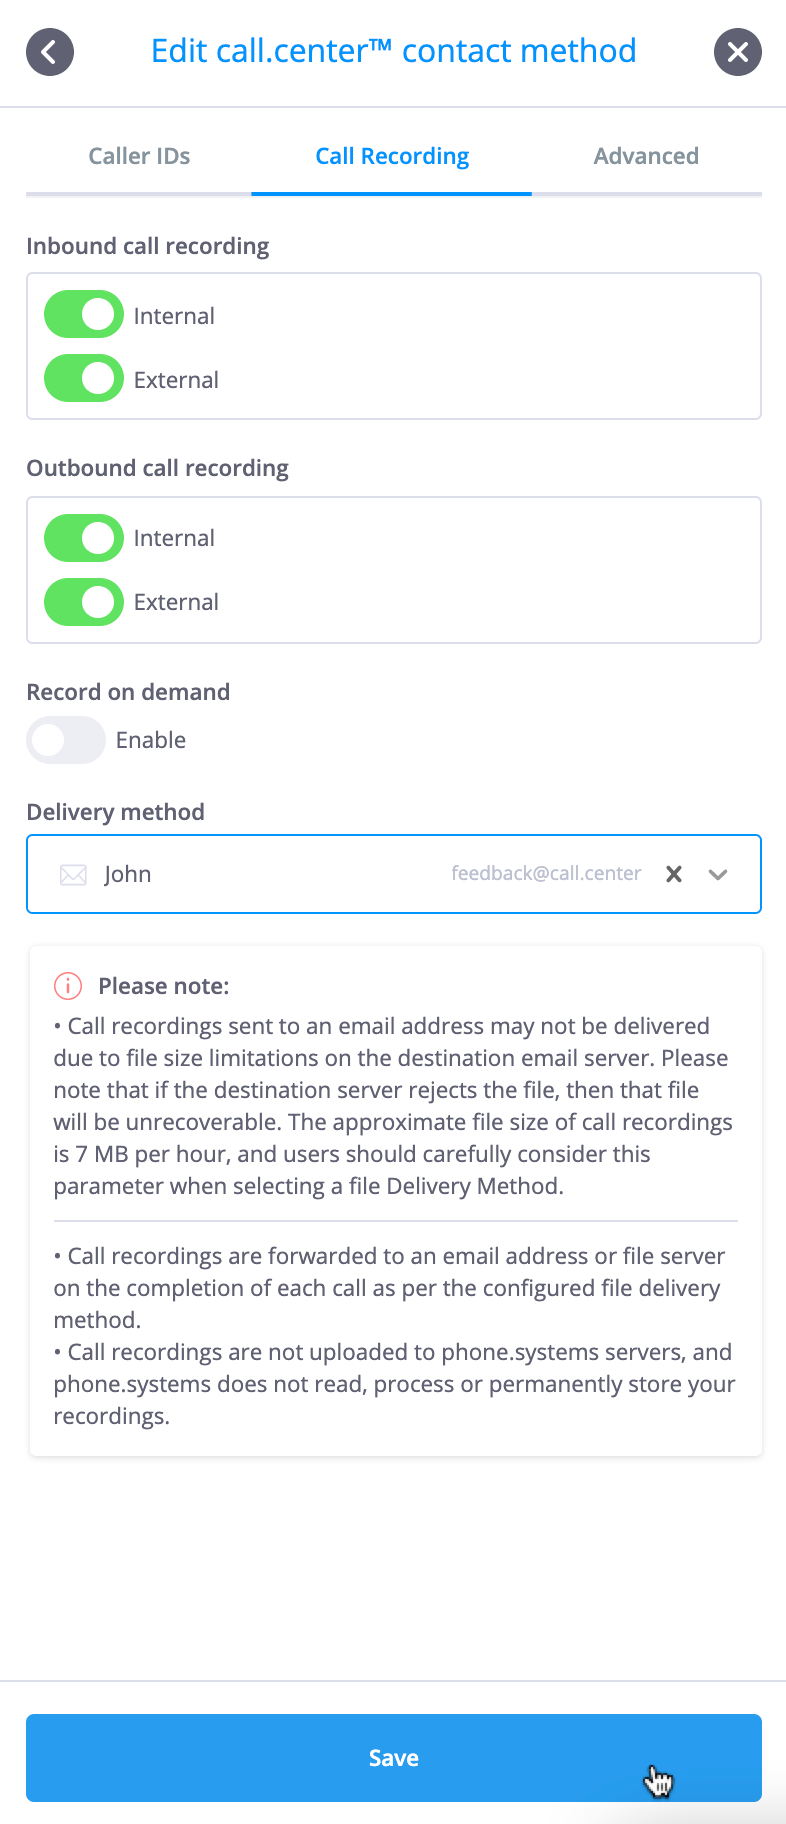
The call.center™ contact method provides users with the option of enabling call recording, including the ability to define the recording direction (inbound and/or outbound) and to record internal and/or external calls. In addition, a "record on demand" feature is available, where the user may dial a predefined feature code to activate call recording.
Note: By default, call recording is disabled.
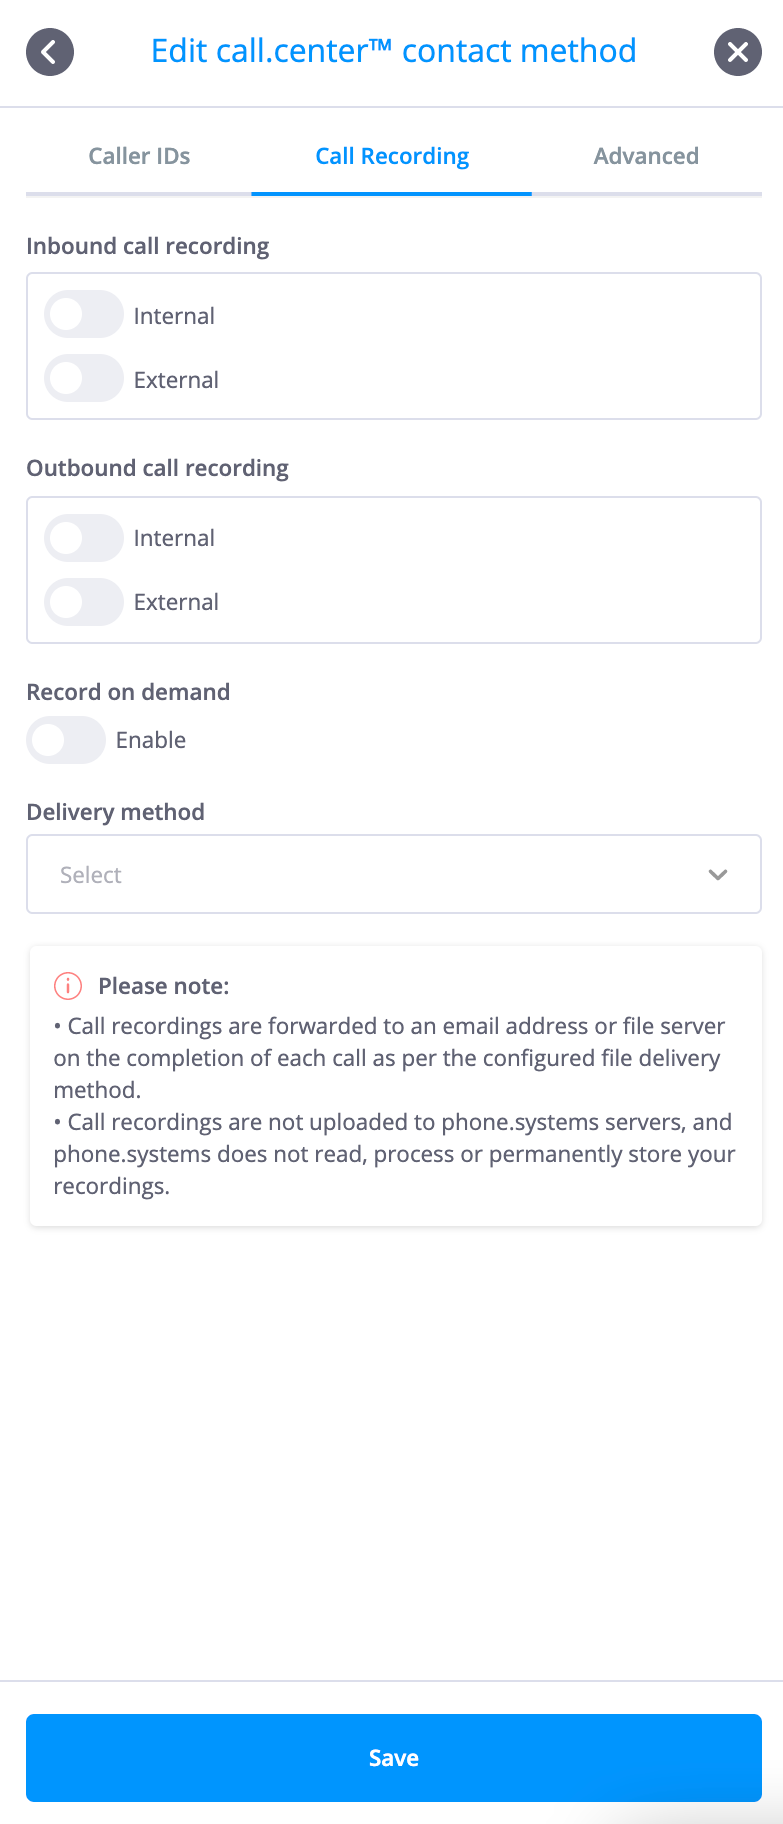
If call recording is enabled, then the delivery method for the file containing the contents of the
recorded call must be selected, with the options being Email, Dropbox, FTP, SFTP, Google Drive or
OneDrive. If the required delivery method has not previously been configured by using the Delivery
Methods option listed under the "Settings" menu, a delivery method may be added by
selecting the  option
from the dropdown menu. See the section
Delivery Methods
for further details.
option
from the dropdown menu. See the section
Delivery Methods
for further details.
If the "record on demand" feature is enabled, then a dialing feature code must be defined in order to activate call recording.
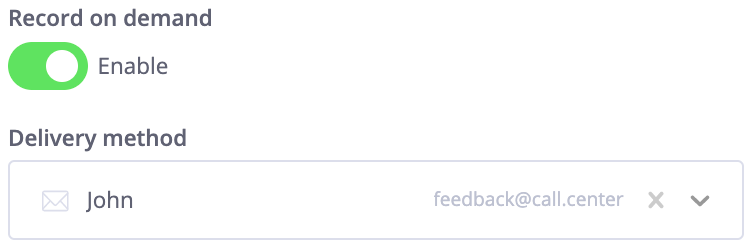
Feature codes are configured by selecting the
 option under the Settings menu (See the section Feature Codes for further details).
The call.center™ contact method provides users with the option of enabling an outbound call announcement, with the announcement being played to the operator once the call has been connected with the end point. Users may configure an outbound call announcement for both internal and external calls. When using this feature, the caller will hear on hold music and the end point will hear the selected announcement. To enable this feature, click on the “Internal/External outbound call announcement” section in the dropdown menu and select the relevant audio file for the announcement.
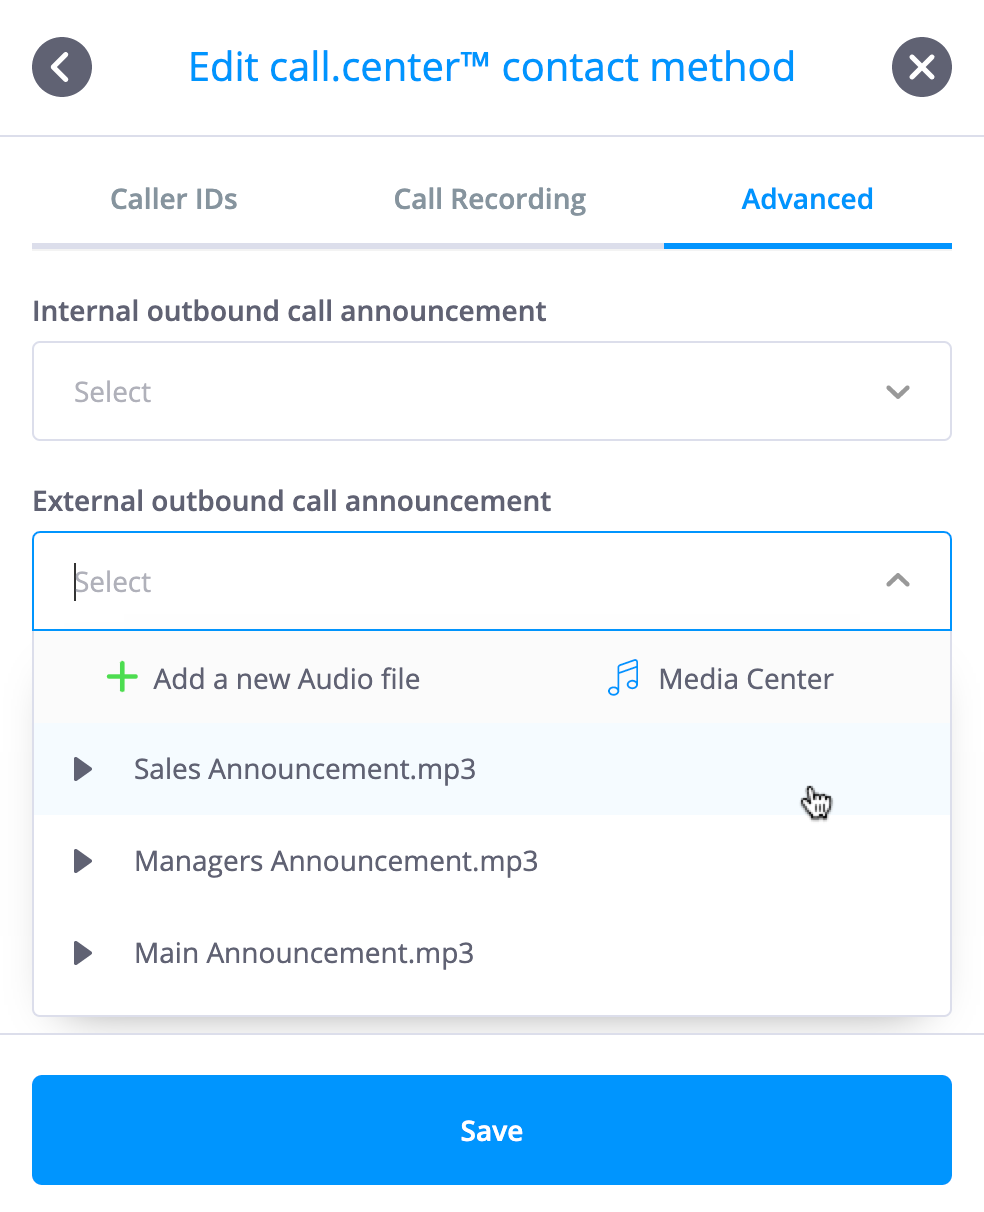
Note: By default, the outbound call announcement feature is disabled.
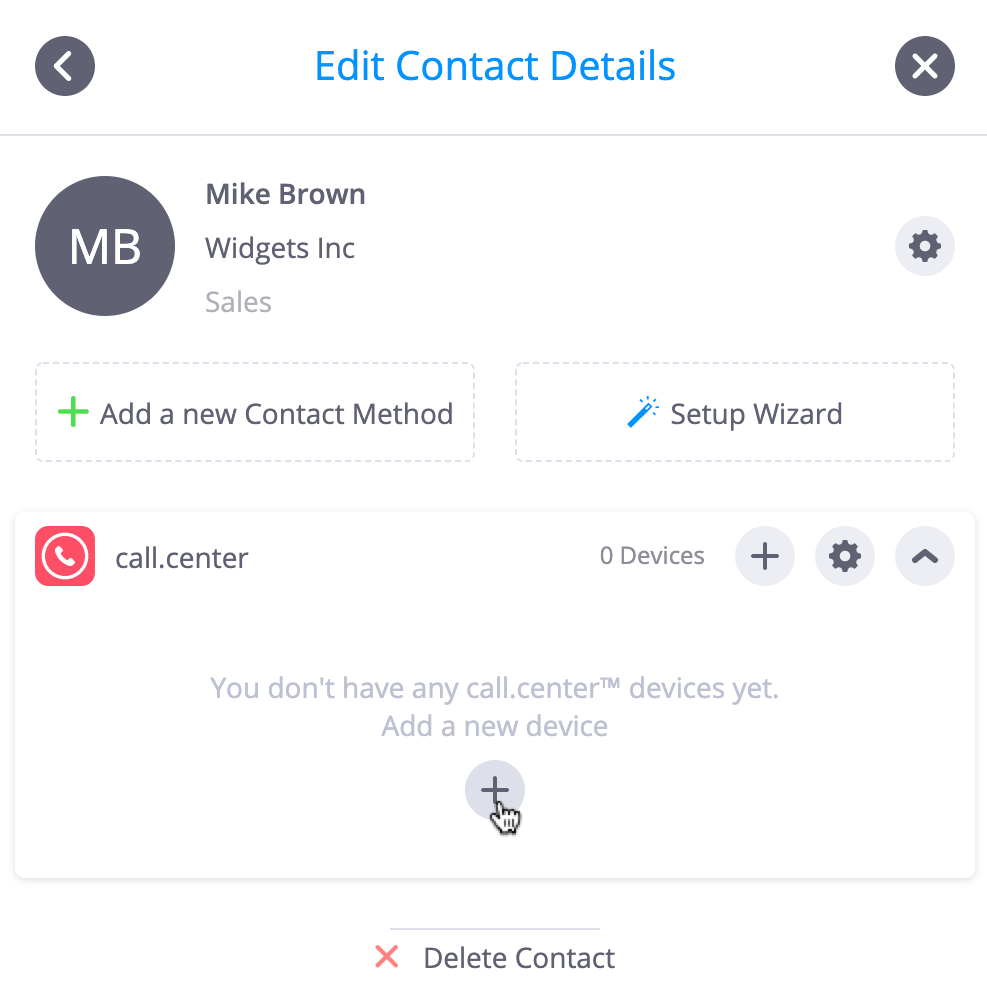
Back to the topAdding a call.center™ device
Selecting the  option in the “Contact Details” window opens up a form for adding a new device to the selected
contact.
option in the “Contact Details” window opens up a form for adding a new device to the selected
contact.
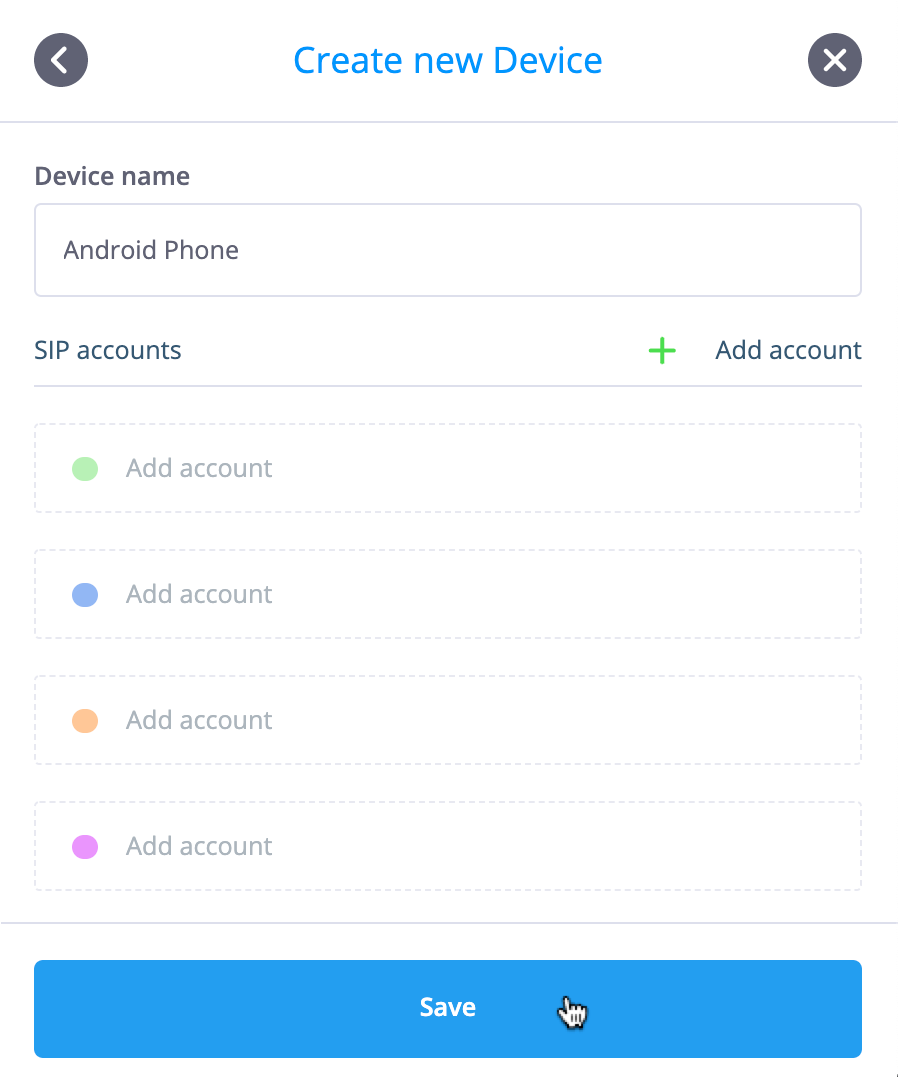
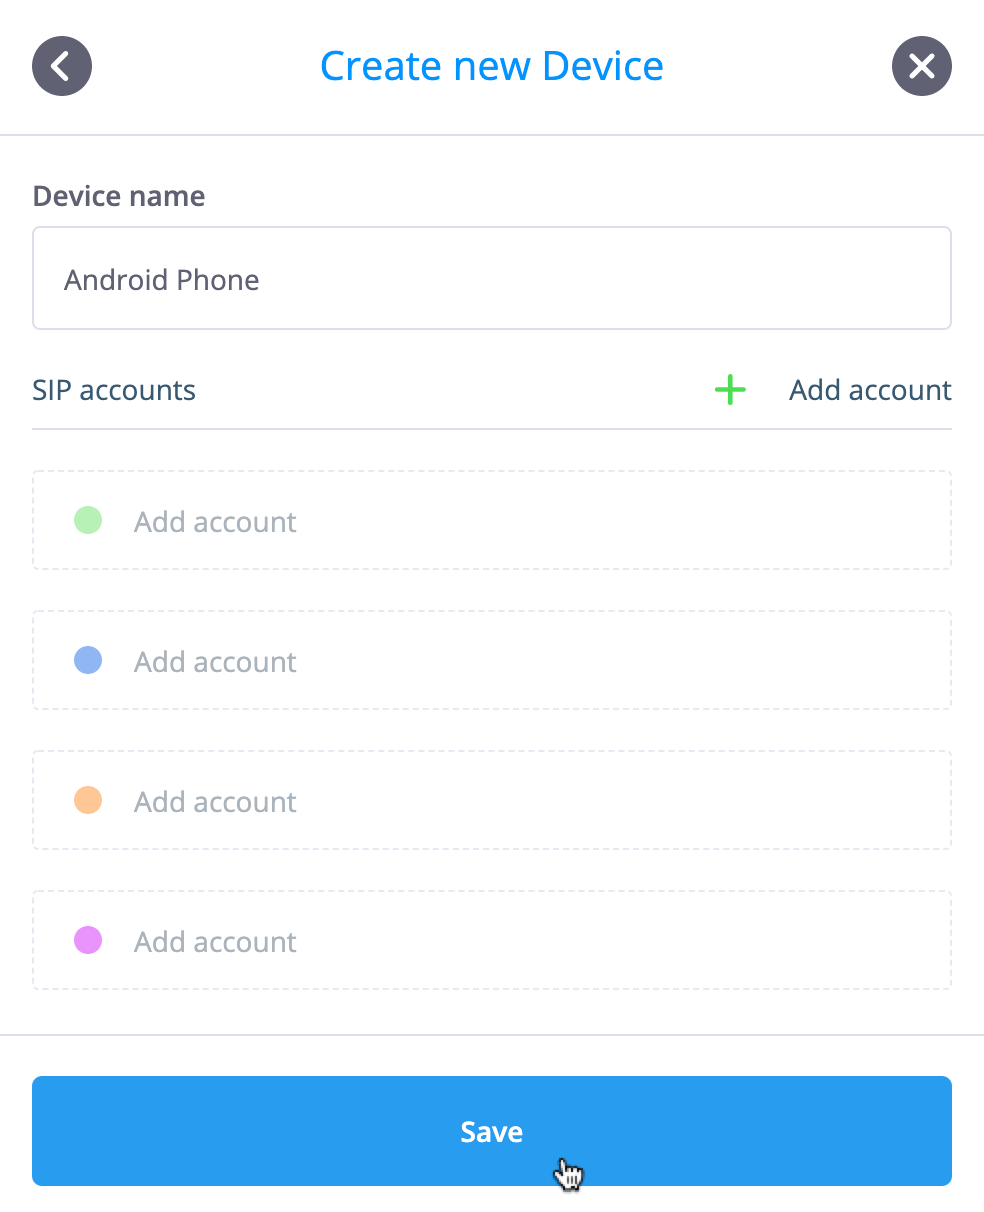
The information to be entered is:
A friendly device name (or identifier), for example, "Android Phone".
-
Up to four SIP accounts to support this call.center™ device. These SIP accounts may be added on device creation, or configured at a later time.
IMPORTANT - The SIP accounts listed for use by the call.center™ device are SIP Account contact methods that were previously configured in phone.systems™.

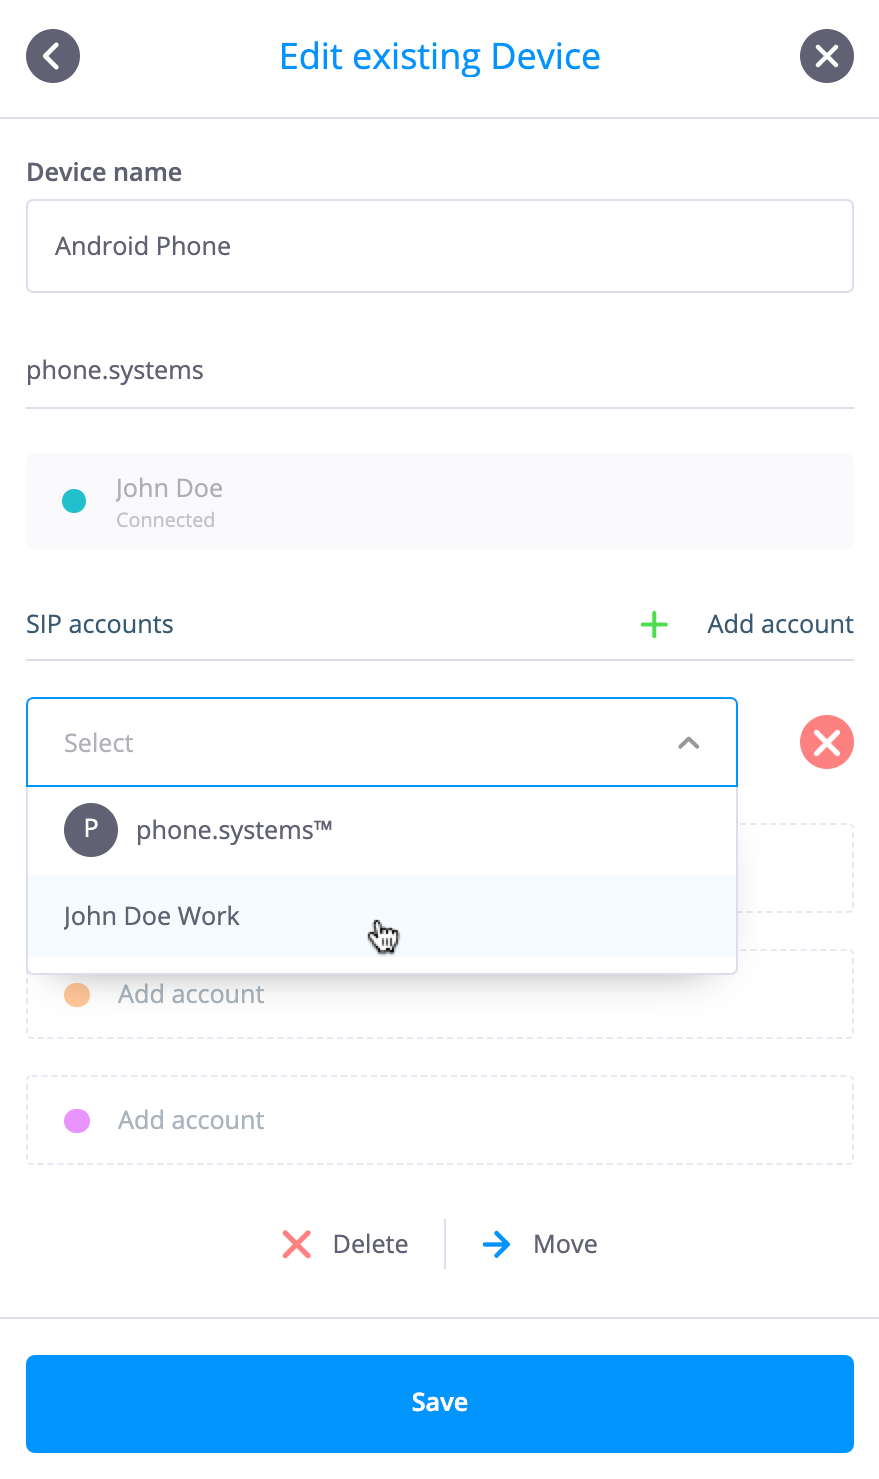
After selecting the call.center™ device option from the drop-down menu, the same window as previously detailed will be opened. However, in this case, the SIP Account(s) must be manually assigned.
To assign the SIP Account(s), select the
![]() option in the “Contact Details” window to open up a list of existing call.center™ devices that are
configured for the selected contact.
option in the “Contact Details” window to open up a list of existing call.center™ devices that are
configured for the selected contact.
Choose any of the four visible “Add account” fields, and select which SIP Account to add from the drop-down menu. Up to four different SIP Accounts may be assigned to a single call.center™ device.
A phone.systems™ line is automatically linked to all call.center™ devices, allowing users to assign an available Internal Number and DID numbers that may be used as caller IDs for outbound calling. From the UI point of view, the phone.systems™ line will act as the main group for call.center™ devices within that Contact. All call.center™ devices that belong to this contact will appear “under” the phone.systems™ line.
Back to the topActivating the call.center™ device
After the new call.center™ has been added and saved, a window will open to display the device activation instructions. Refer to the Activating the call.center™ app section in the phone.systems™ user guide to learn about the different methods for activating a call.center™ device.
Selecting the option ![]() displays
instructions to activate the call.center™ app. The call.center application should already be
installed on your phone, tablet or computer. If the call.center app is installed on a device other
than the one that is being used to configure call.center, you may use that device to scan the
displayed QR Code and the call.center™ application will be activated.
displays
instructions to activate the call.center™ app. The call.center application should already be
installed on your phone, tablet or computer. If the call.center app is installed on a device other
than the one that is being used to configure call.center, you may use that device to scan the
displayed QR Code and the call.center™ application will be activated.
There is an additional option to send the “Activation Instructions” to an end-user. At the bottom of the window, you will find the “Recipient’s email” field where you can select the Contact’s email address. The “Activation Instructions” may be sent by clicking on the “Send Instructions” button.
 Back to the top
Simple Call Flow Setup
The following example explains how to create a contact and set up a company directory on the system that can receive and place calls in phone.systems™ and call.center™.
Before configuring, the DID number needs to be pre-configured in the phone.systems™ environment.
-
Add a Contact - go to settings menu
 , Contact Center
 , and add a new Contact
 . The First name and Last name for the contact must be entered, and optional
Company Directory details for the fields Company, Job Title and
Contact Numbers may be entered.
. The First name and Last name for the contact must be entered, and optional
Company Directory details for the fields Company, Job Title and
Contact Numbers may be entered.
-
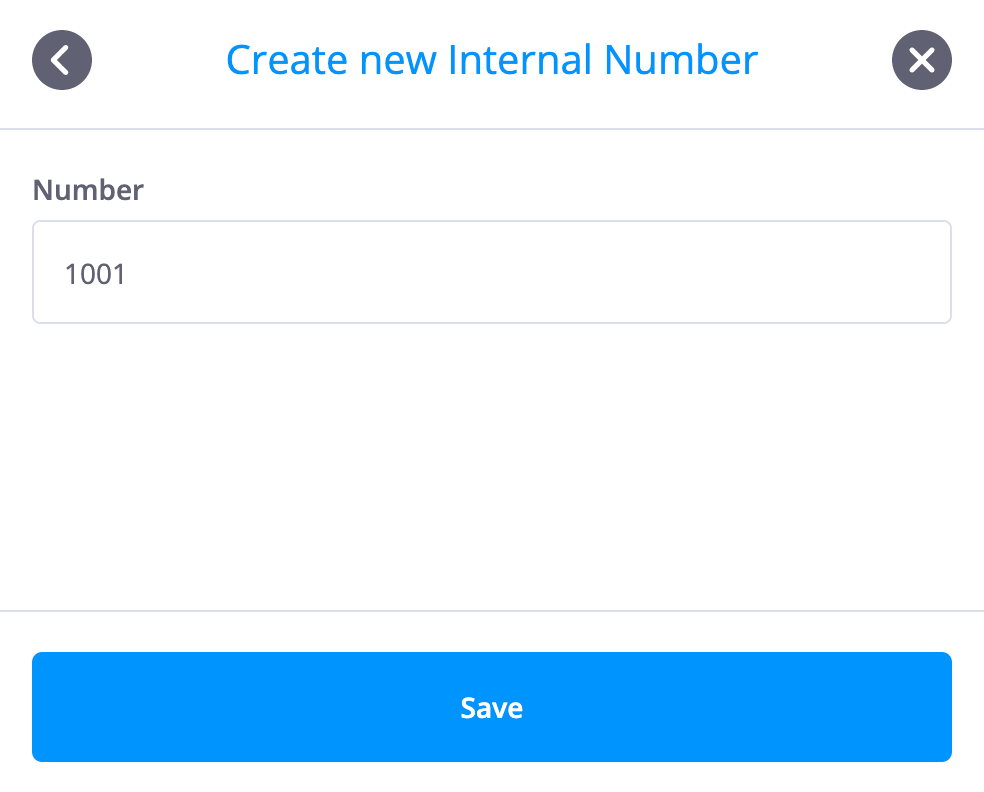
Create an Internal Number for the contact - go to settings menu
, Internal Numbers
 and add a new Internal Number
 . Enter the number and click Save.
-
Add a call.center™ device for a contact - go to settings menu
, Contact Center
. Click on the
 icon next to the contact to open the Contact Details.
Selecting the option
in the “Contact Details” window allows a new device to be added and configured for the
selected contact.
The information to be entered is:
-
Device name - A friendly device name (or identifier), for example, "Android Phone".
-
SIP accounts - Up to four SIP accounts may be added to support this call.center™ device. These SIP accounts may be added on device creation, or configured at a later time.
IMPORTANT - The SIP accounts are listed for use by the call.center™ device are SIP Account contact methods that were previously configured in phone.systems™.
A phone.systems™ line is automatically linked to all call.center™ devices. The phone.systems line allows users to assign an available Internal Number and DID numbers that may be used as caller IDs for outbound calling. Once the call.center™ device is added for a contact, the call.center™ contact method must be configured in order to make and receive calls. Please refer to the Contact method: call.center™ section in the User Guide for more details regarding call.center™ contact method configuration.
After completing the call.center™ contact method configuration, the call.center™ device must be activated. Please refer to the Activating the call.center™ app section in the call.center™ user guide for more details regarding device activation.
-
-
Add a “Phone Number” object - From the Object Menu, drag a “Phone Number” object onto the workspace. Once this object is released, a new configuration window will appear.
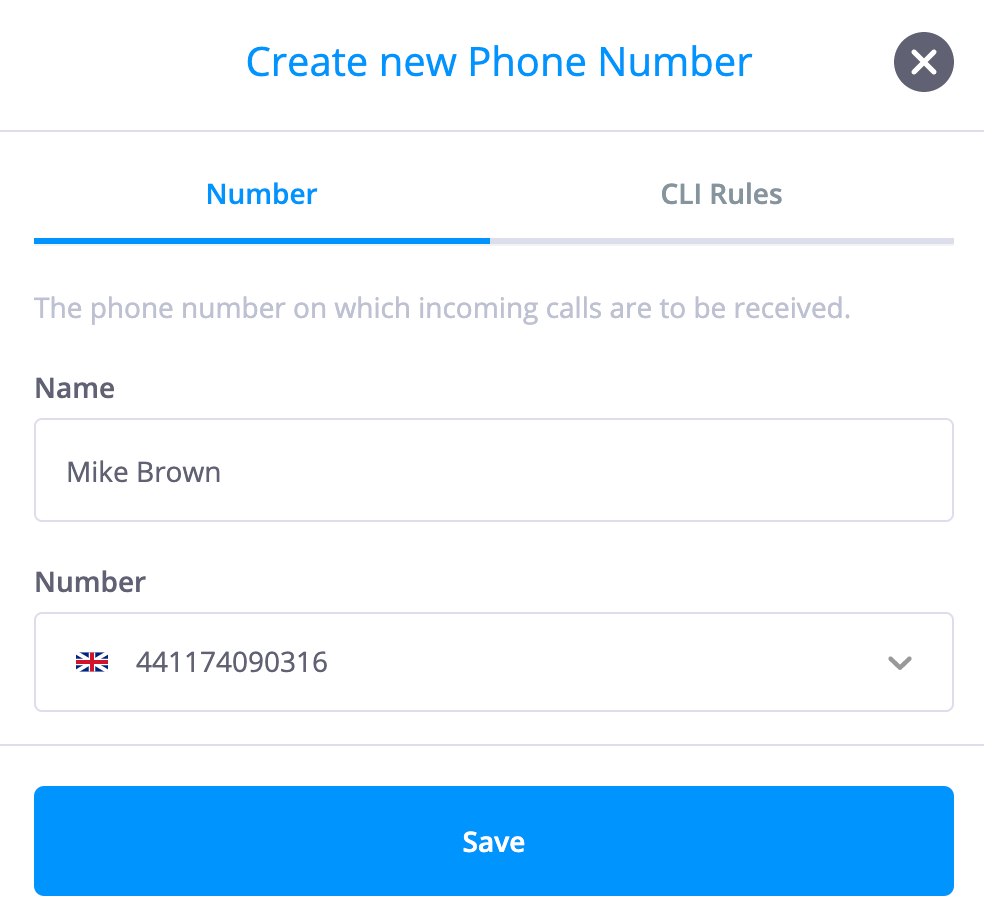
Enter the name of the Phone Number object, then in the “Number” section, select a Phone Number from the drop-down menu. Click the
 button.
-
Add an “Internal Number” object - From the Object Menu, drag an “Internal Number” object onto the workspace. Once this object is released, a new configuration window will appear.
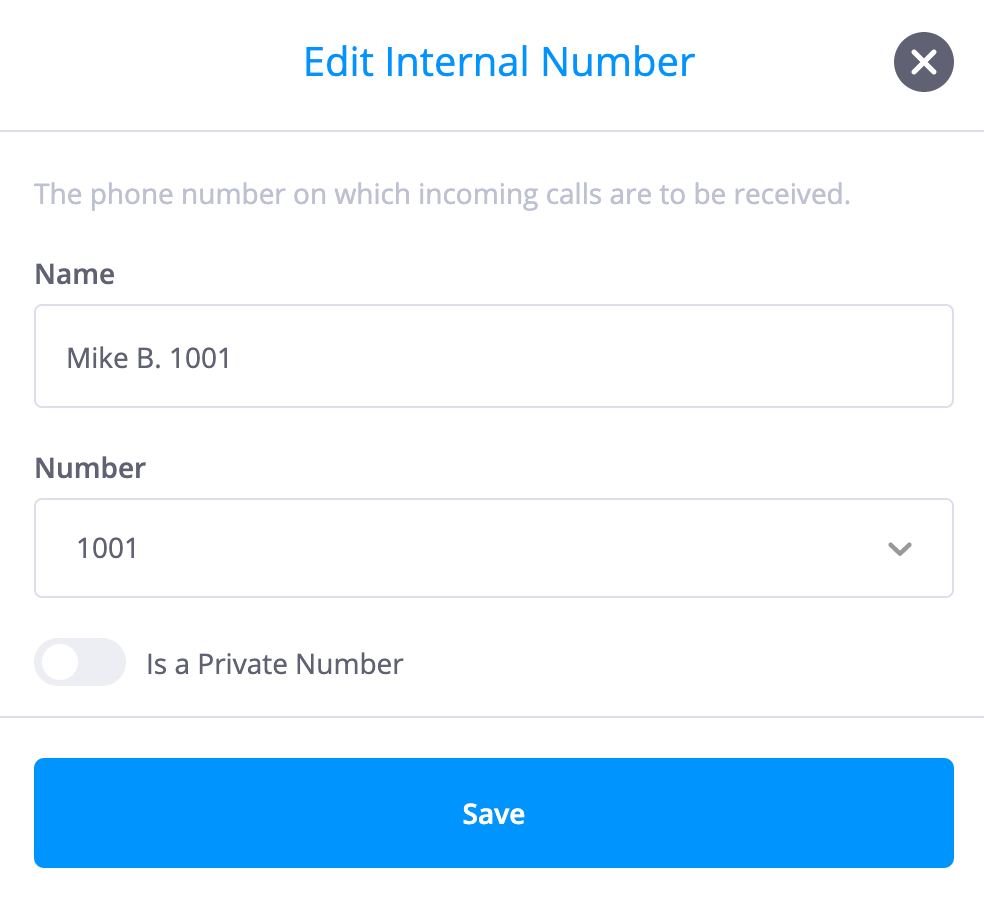
Enter the name of the Internal Number object, then in the “Number” section, select an Internal Number from the drop-down menu. Click the
button.
-
Add a “Ring Group” Object - From the Object Menu drag a “Ring Group” object onto the workspace. Once this object is released, a new Configuration window will appear. Enter the name of the Ring Group object and then click on
 to select the configured call.center™ contact method from the drop-down menu.
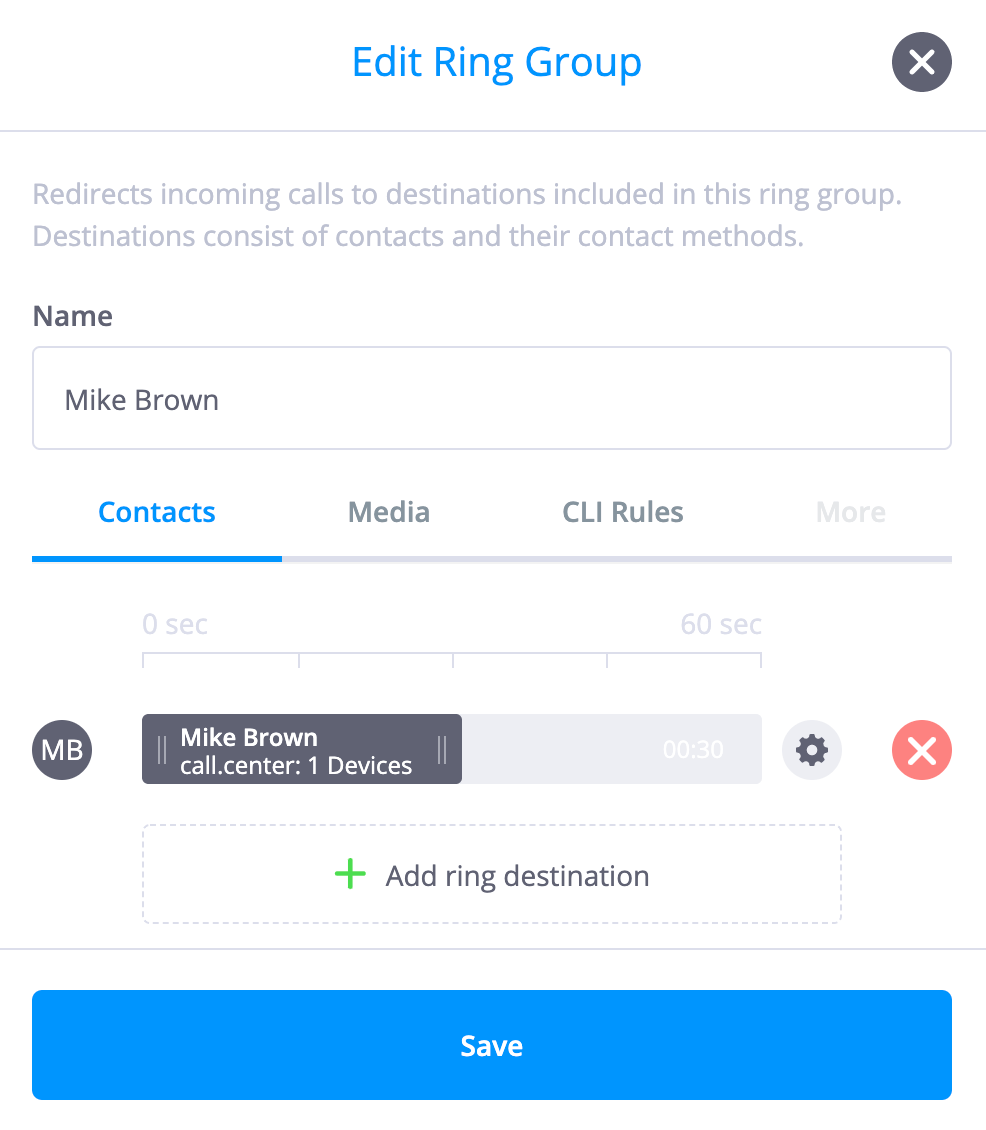
Click on the
button.
-
Connect objects with a “Cable” - Drag “Cables” from the “Phone Number” and “Internal Number” objects and connect them to the “Ring Group Object.
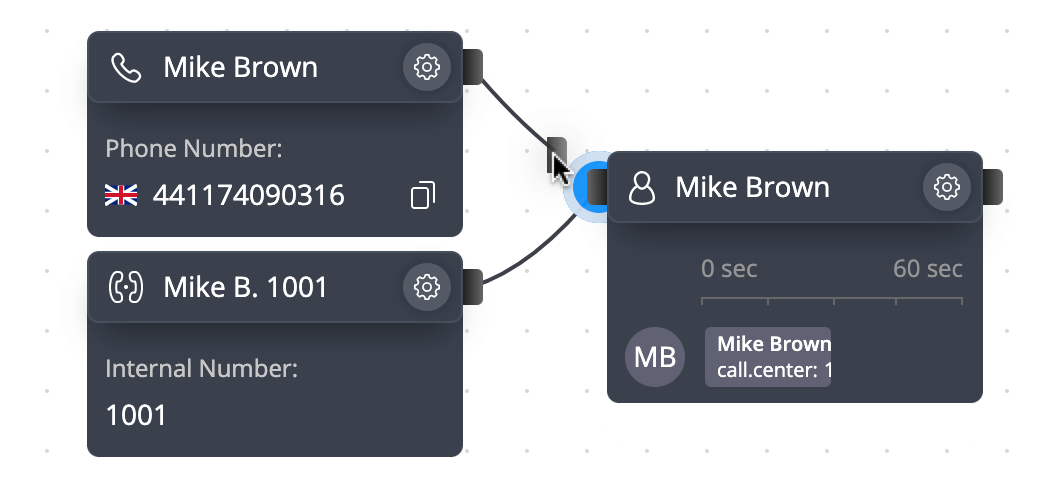
The setup is now complete on the phone.systems™ environment and the contact “Mike Brown” is able to make and receive calls using the call.center™ device.
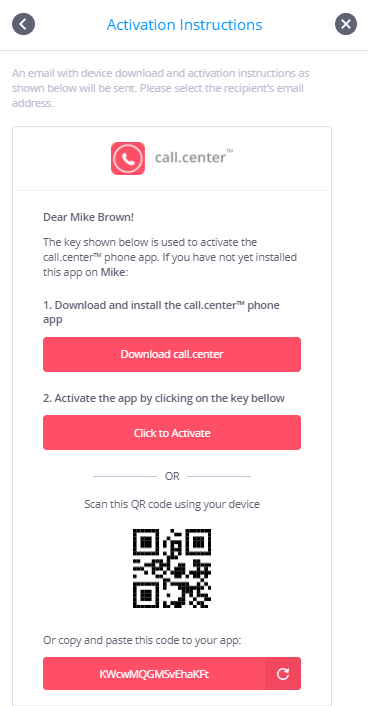
Activating the call.center™ app
Once the service provider, contact and device were configured using the call.center™ management portal, the app on the end-user device may be installed and activated.
Click the icon to open the device activation instructions.
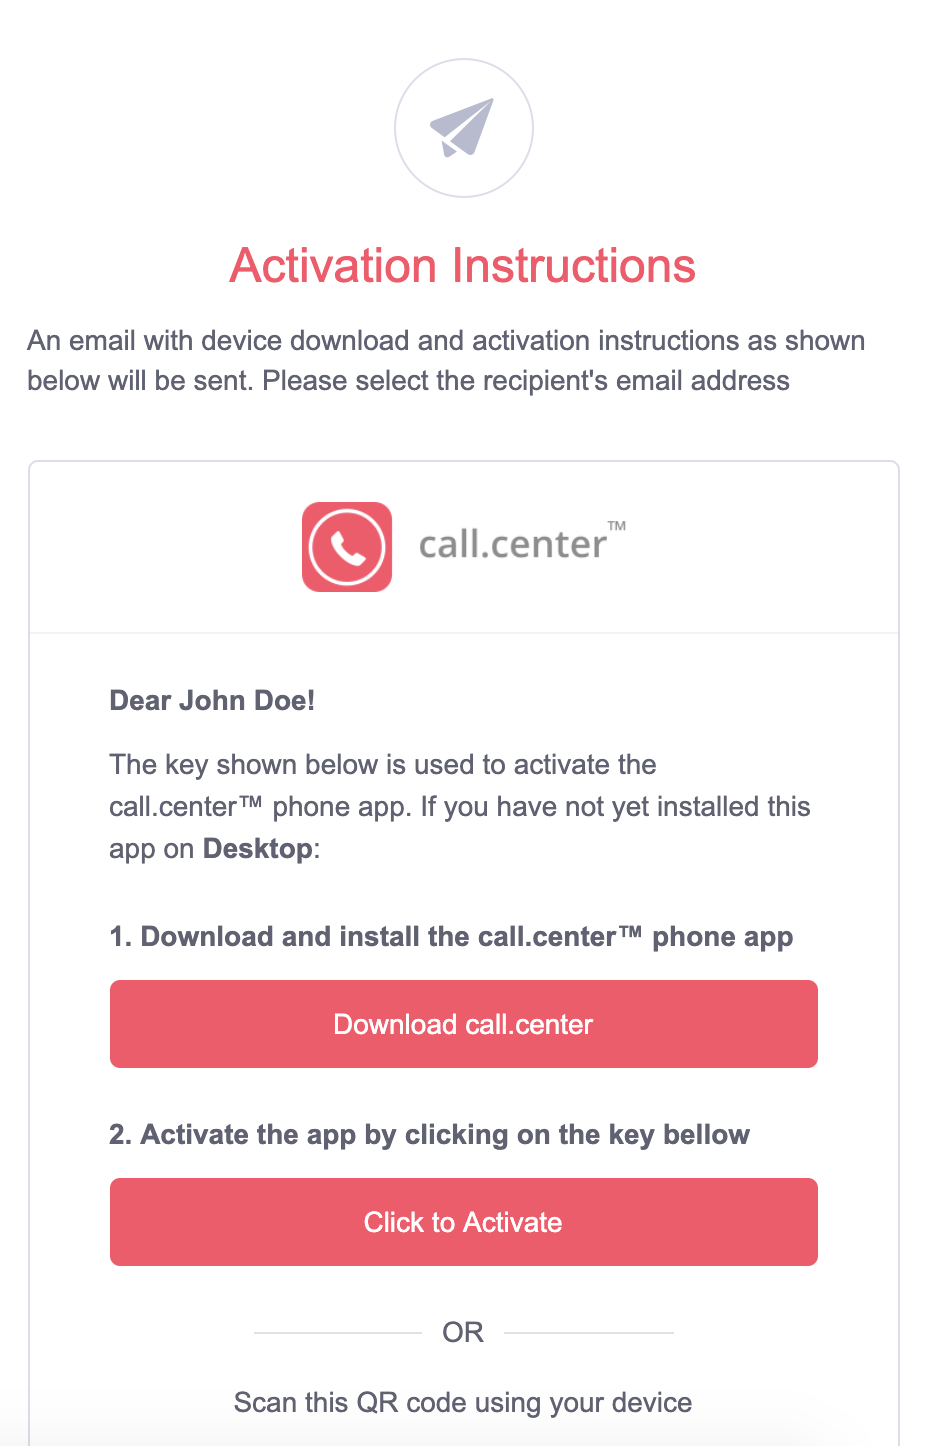
The displayed instructions include a number of device activation options:
- Click to Activate action
- Scanning the QR code
- Entering the activation code manually
The activation depends on whether the call.center™ app has to be installed on the same device where the management portal is running, or on another (remote) device.
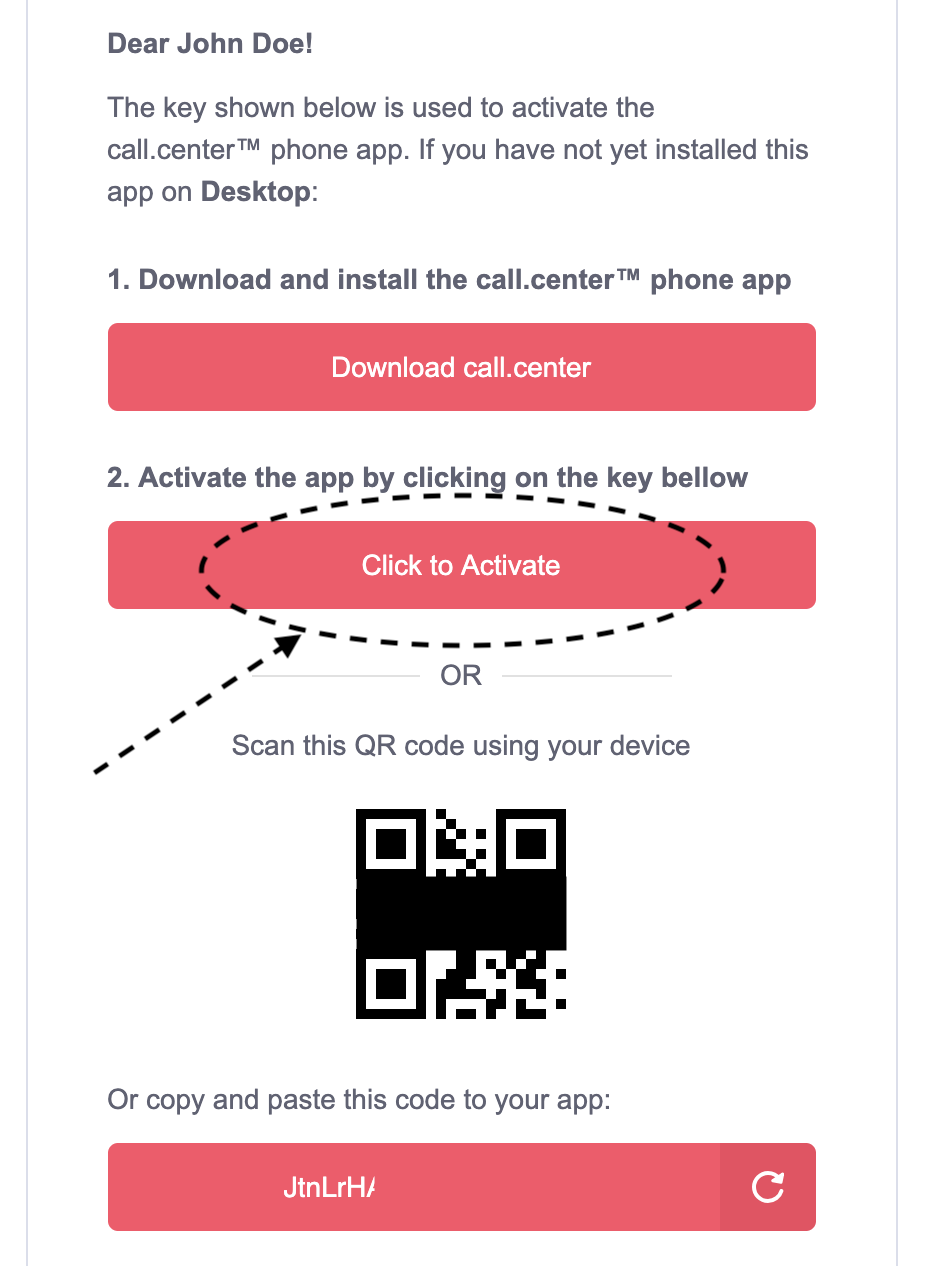
Back to the topUsing the Click to Activate option to activate a device
If the call.center™ app is installed on the same device where the management portal is running, it is recommended to use the Click to Activate option to activate the device.
- Click
 button that is available in the activation instructions.
This action will launch the call.center™ application on the current device and complete the app activation automatically.
 Back to the top
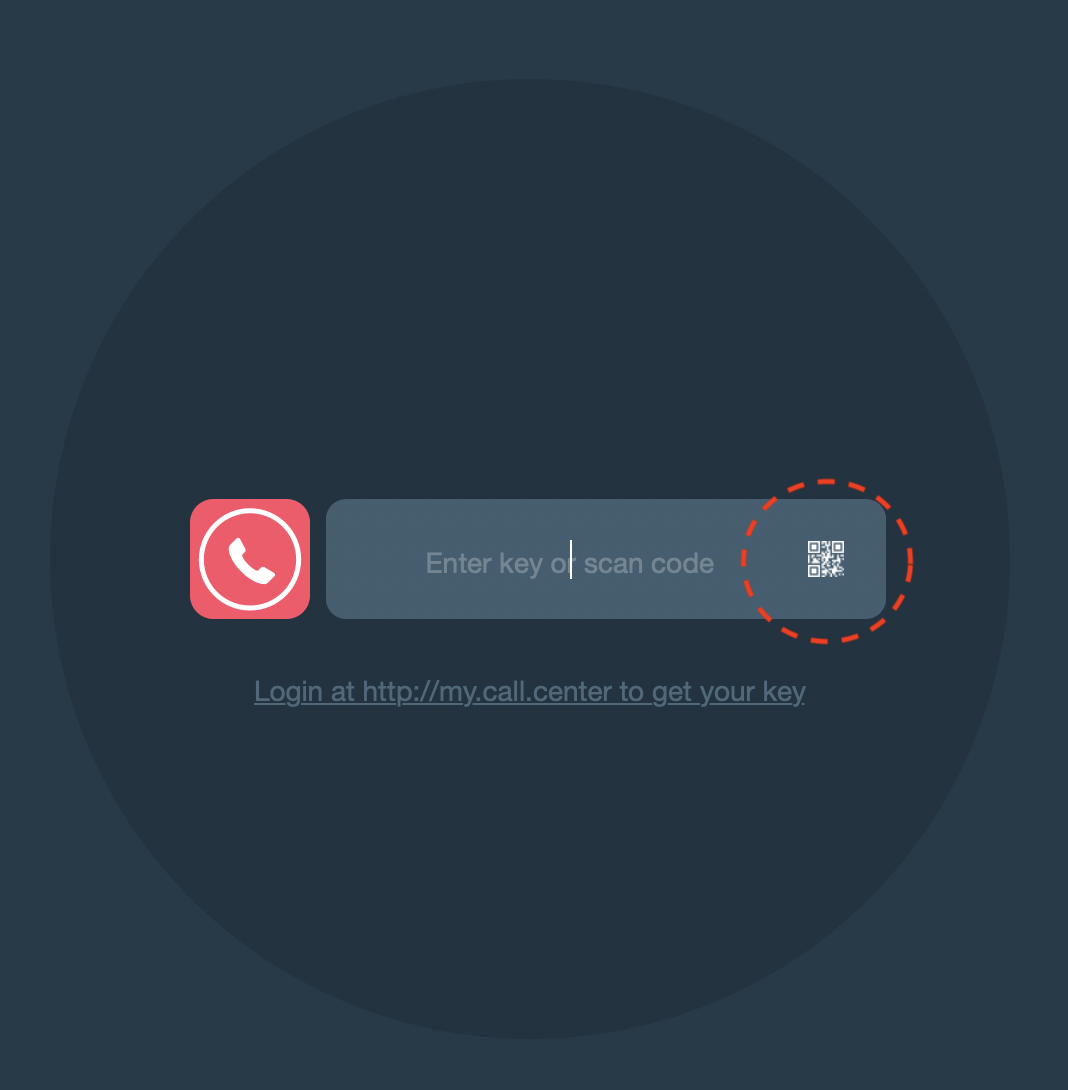
Using the QR code to activate a device
When the call.center™ app needs to be activated on a handheld device, but the received Activation instructions are displayed on another screen, it is recommended to use the QR Scanner option to complete the app activation.
- Access your call.center™ app on the device
- Press the
 icon to scan the QR code that was received.
 - Mac OS
- Android
- Windows
The QR Scanner feature is available on the following operating system platforms:
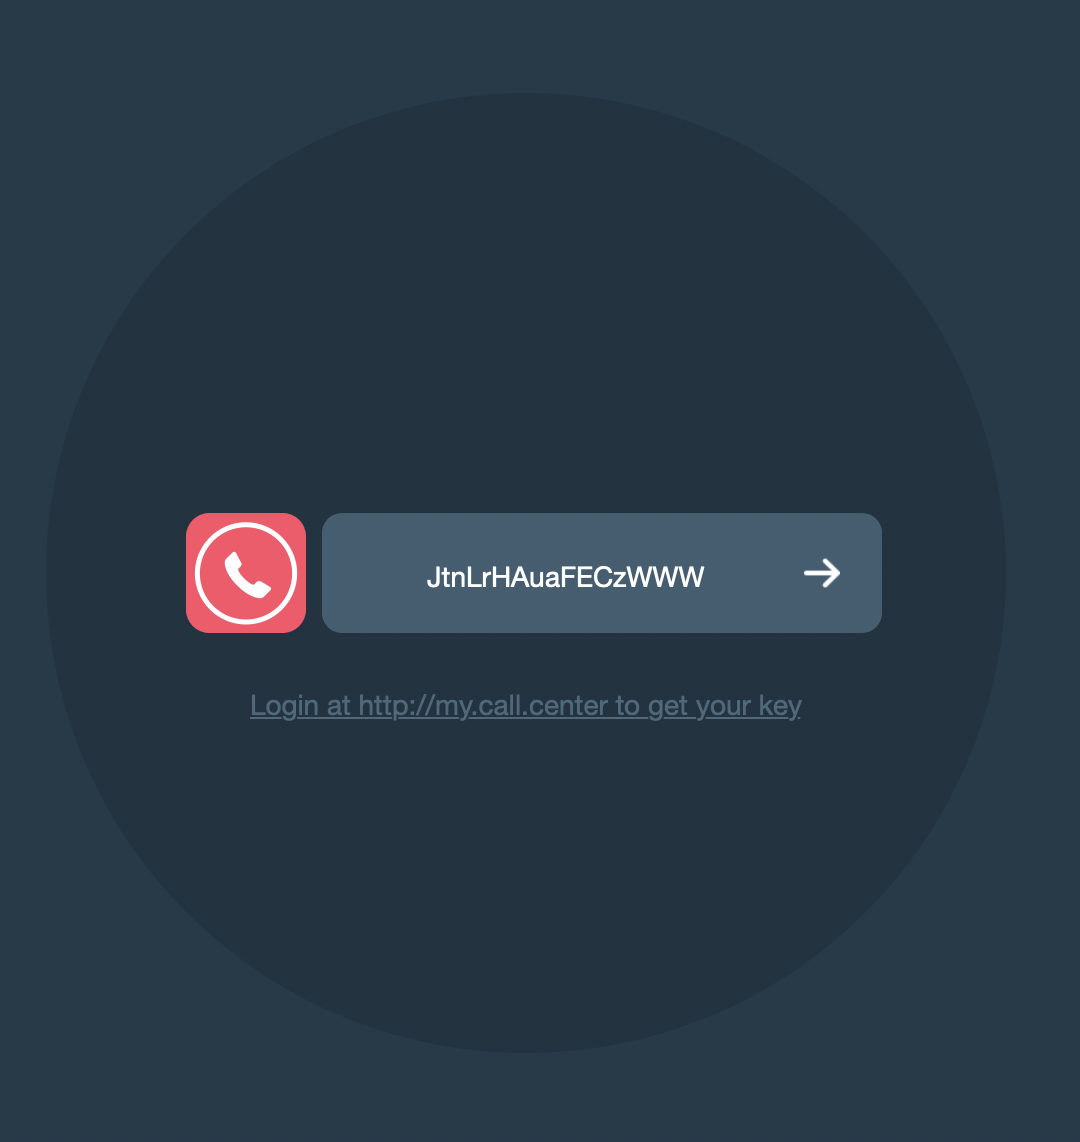
Using the activation code to activate a device
When other available activation options cannot be used, the activation code may be manually entered to activate the call.center™ app.
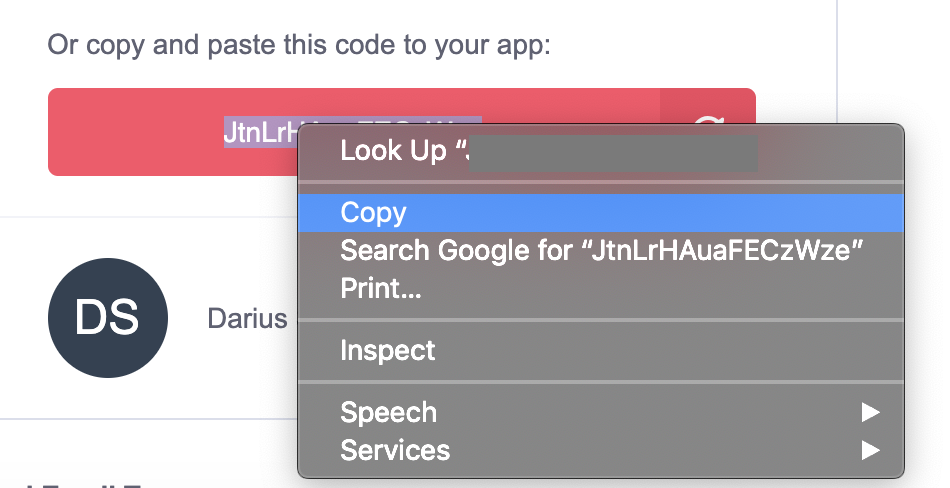
- Enter the activation code included in the activation instructions email or the management portal. This activation code may be simply copied from Activation Instructions, and pasted to the app.
- Click
 to complete the activation.
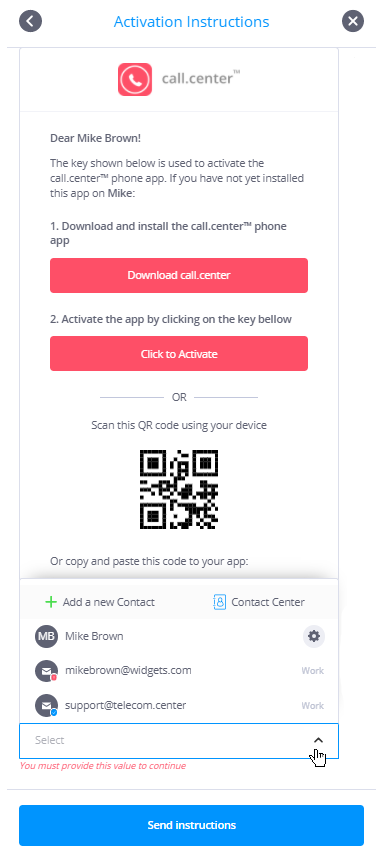
Sending Activation Instructions to a remote device
If the call.center™ app was installed on another (remote) device, the activation code as well as all the displayed instructions can be sent to a Contact’s email address.
To send the Activation Instructions:
- Click the
icon to display the device Activation Instructions.
- Select the recipient’s email address in the Send Email To field
- Click the
 icon to display the device Activation Instructions.
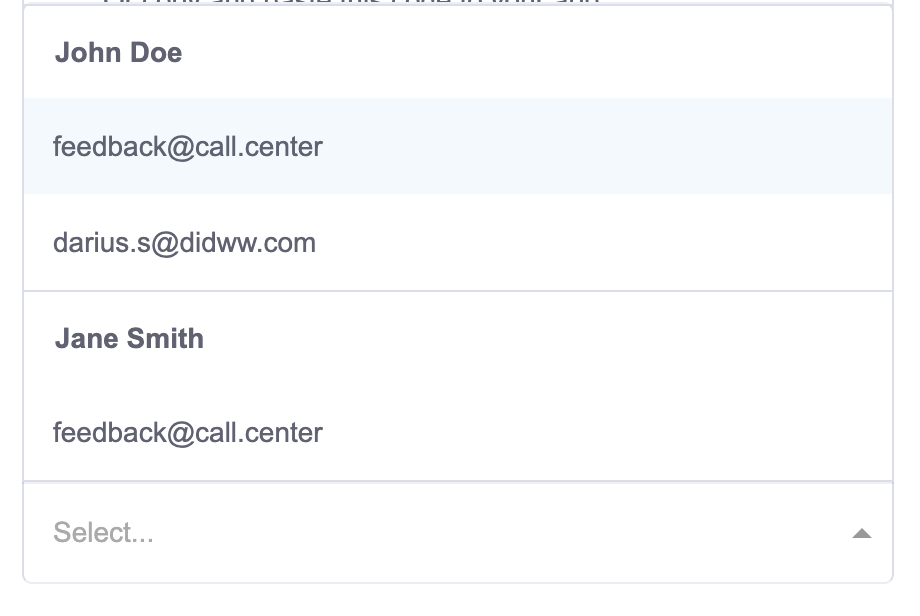
Important – The dropdown to select the recipient of the email will contain email addresses that are added to Contacts.
The recipient of the Activation Instructions email may use all available device activation options.
After the instructions are sent, the related device receives “Instructions sent” sub-status and the activation code is then hidden from the Activation Instructions page to prevent unintended use of the code.
Back to the topResetting the activation code
The activation code may be reset to perform the following actions:
- Deactivating a device
- Canceling a pending call.center™ app activation
- Resetting the code due to security reasons
- Click the
icon to display the device Activation Instructions.
- Click the
 button. The sent activation code will be replaced with a new one that can be resent again.
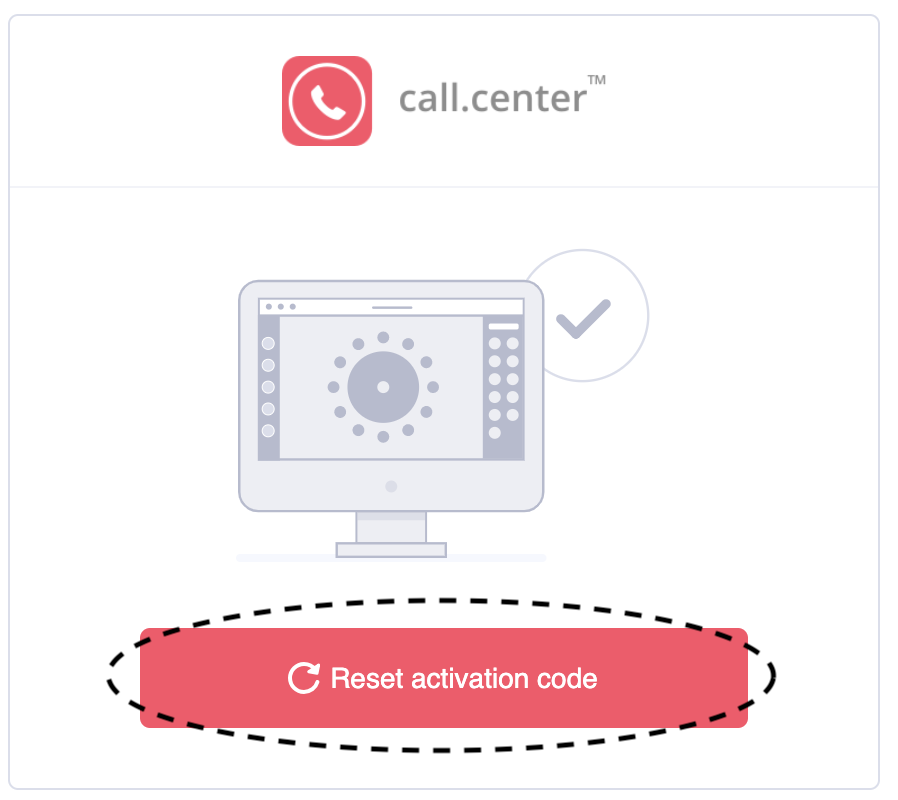
Important – Resetting the activation code for an already activated device will deactivate it.
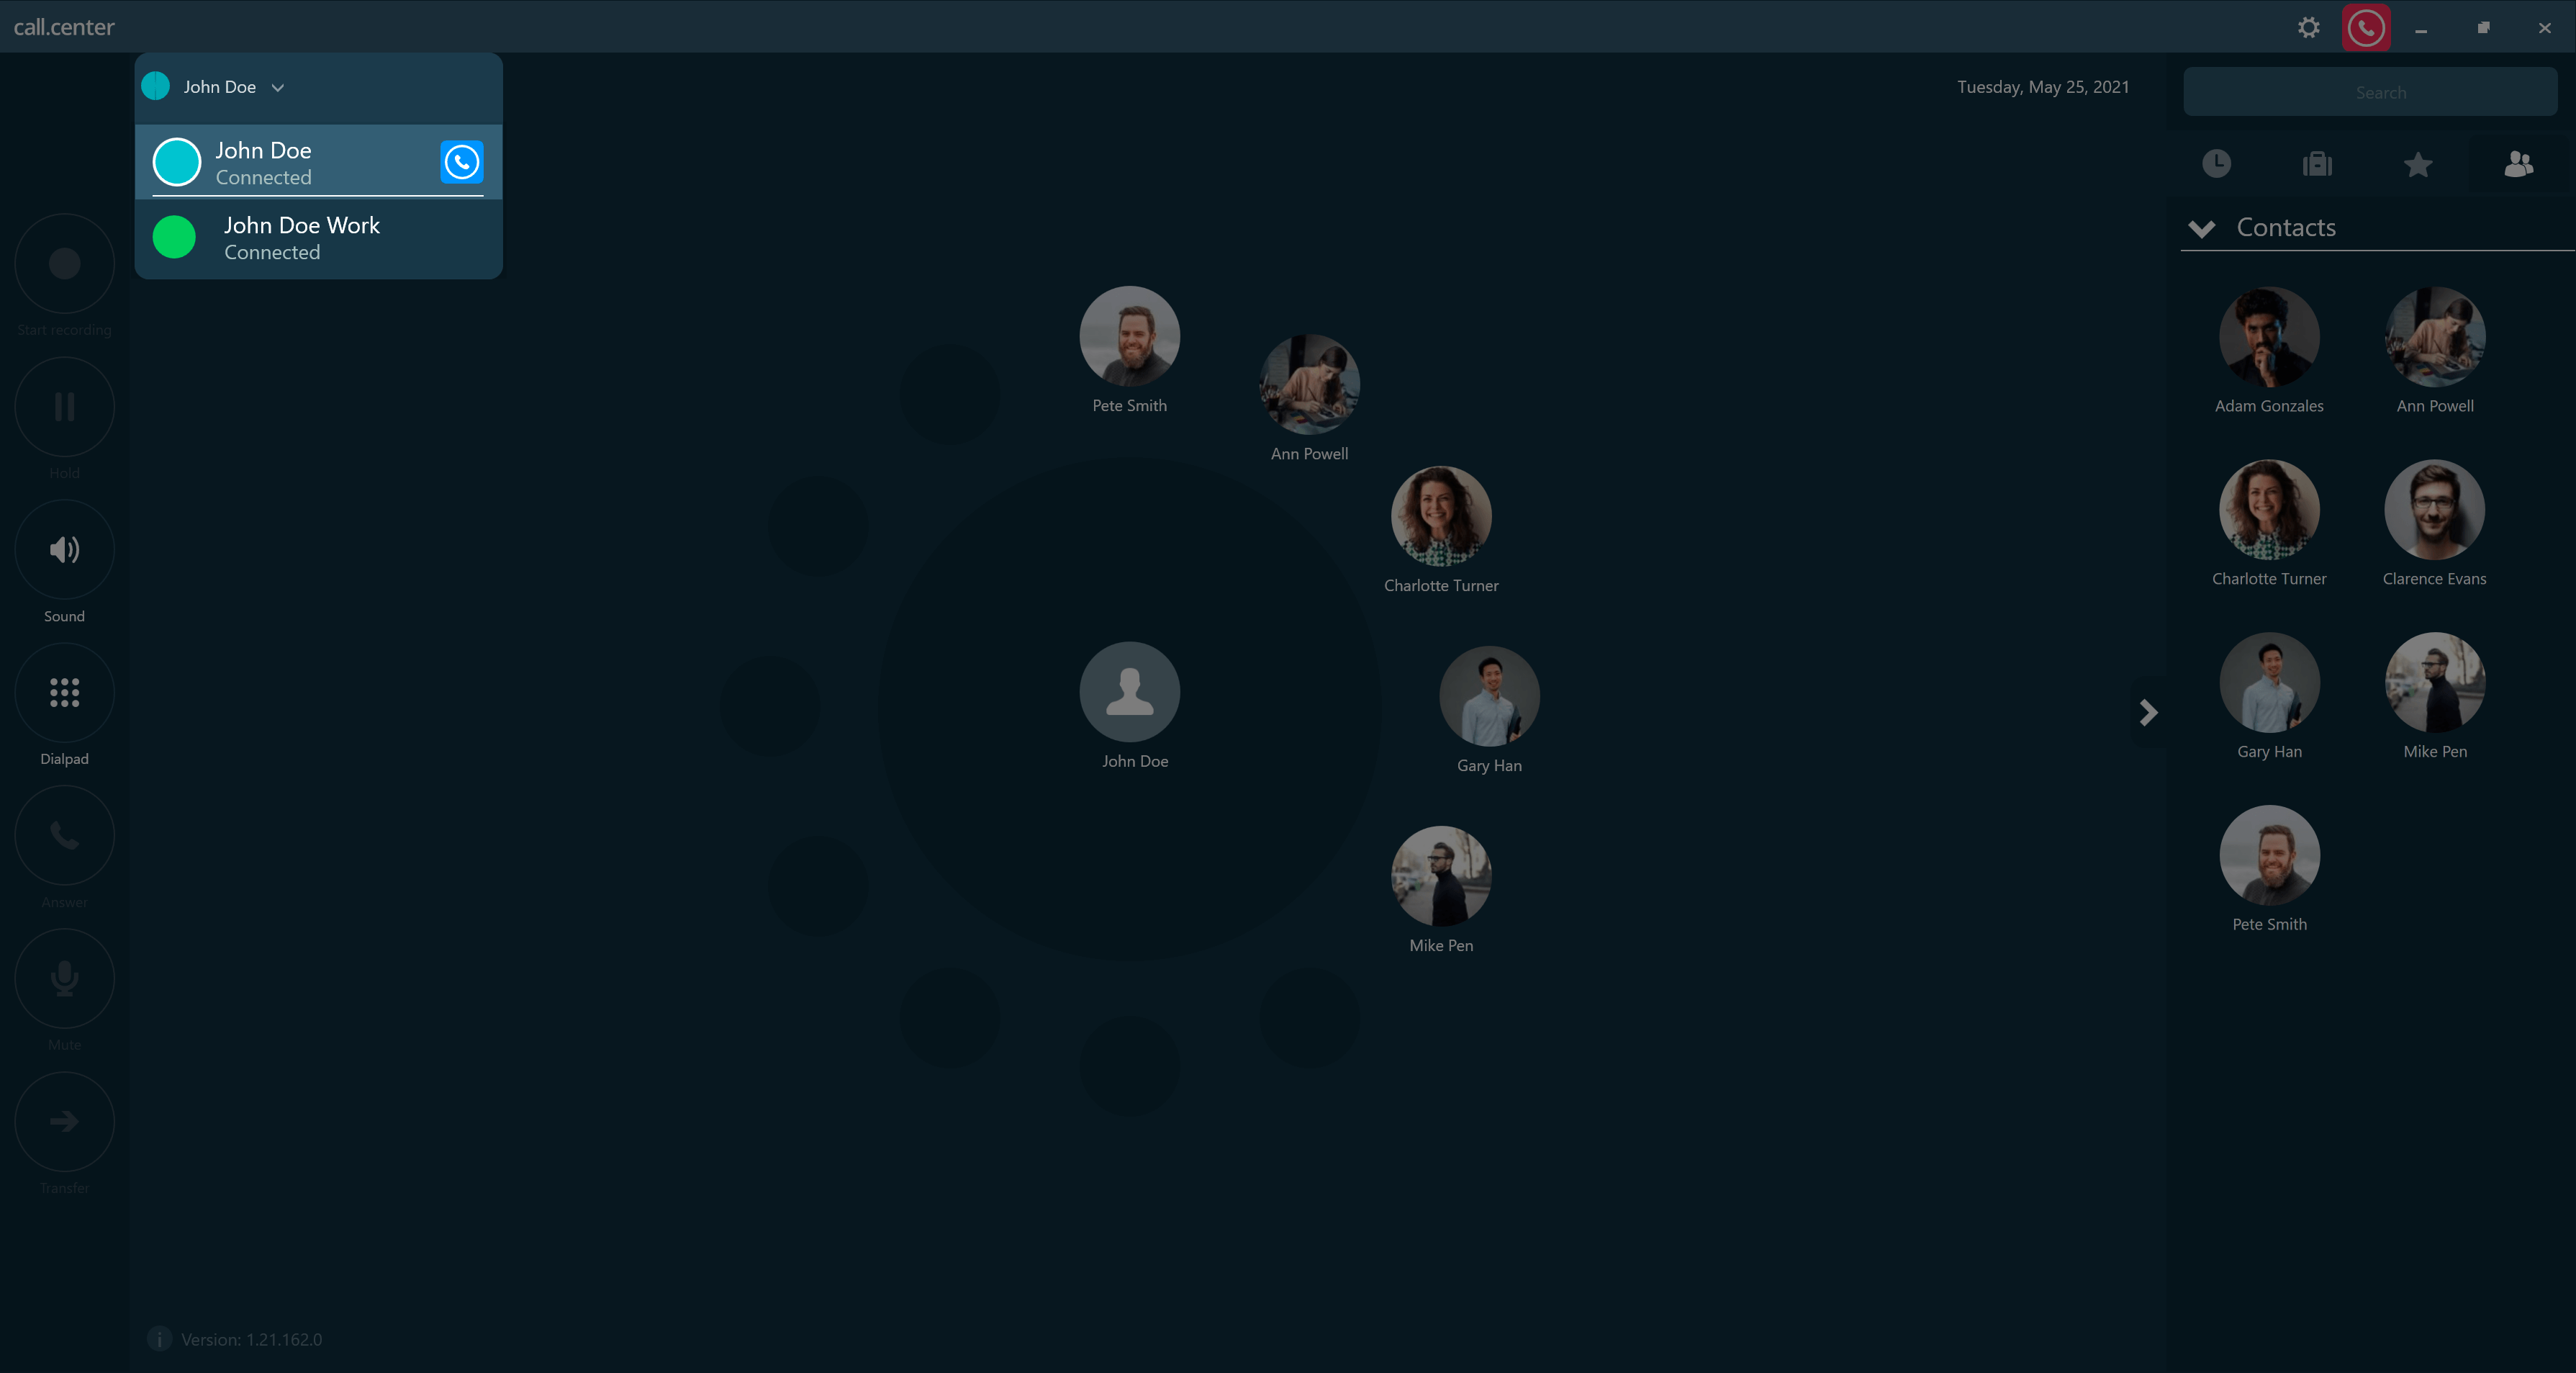
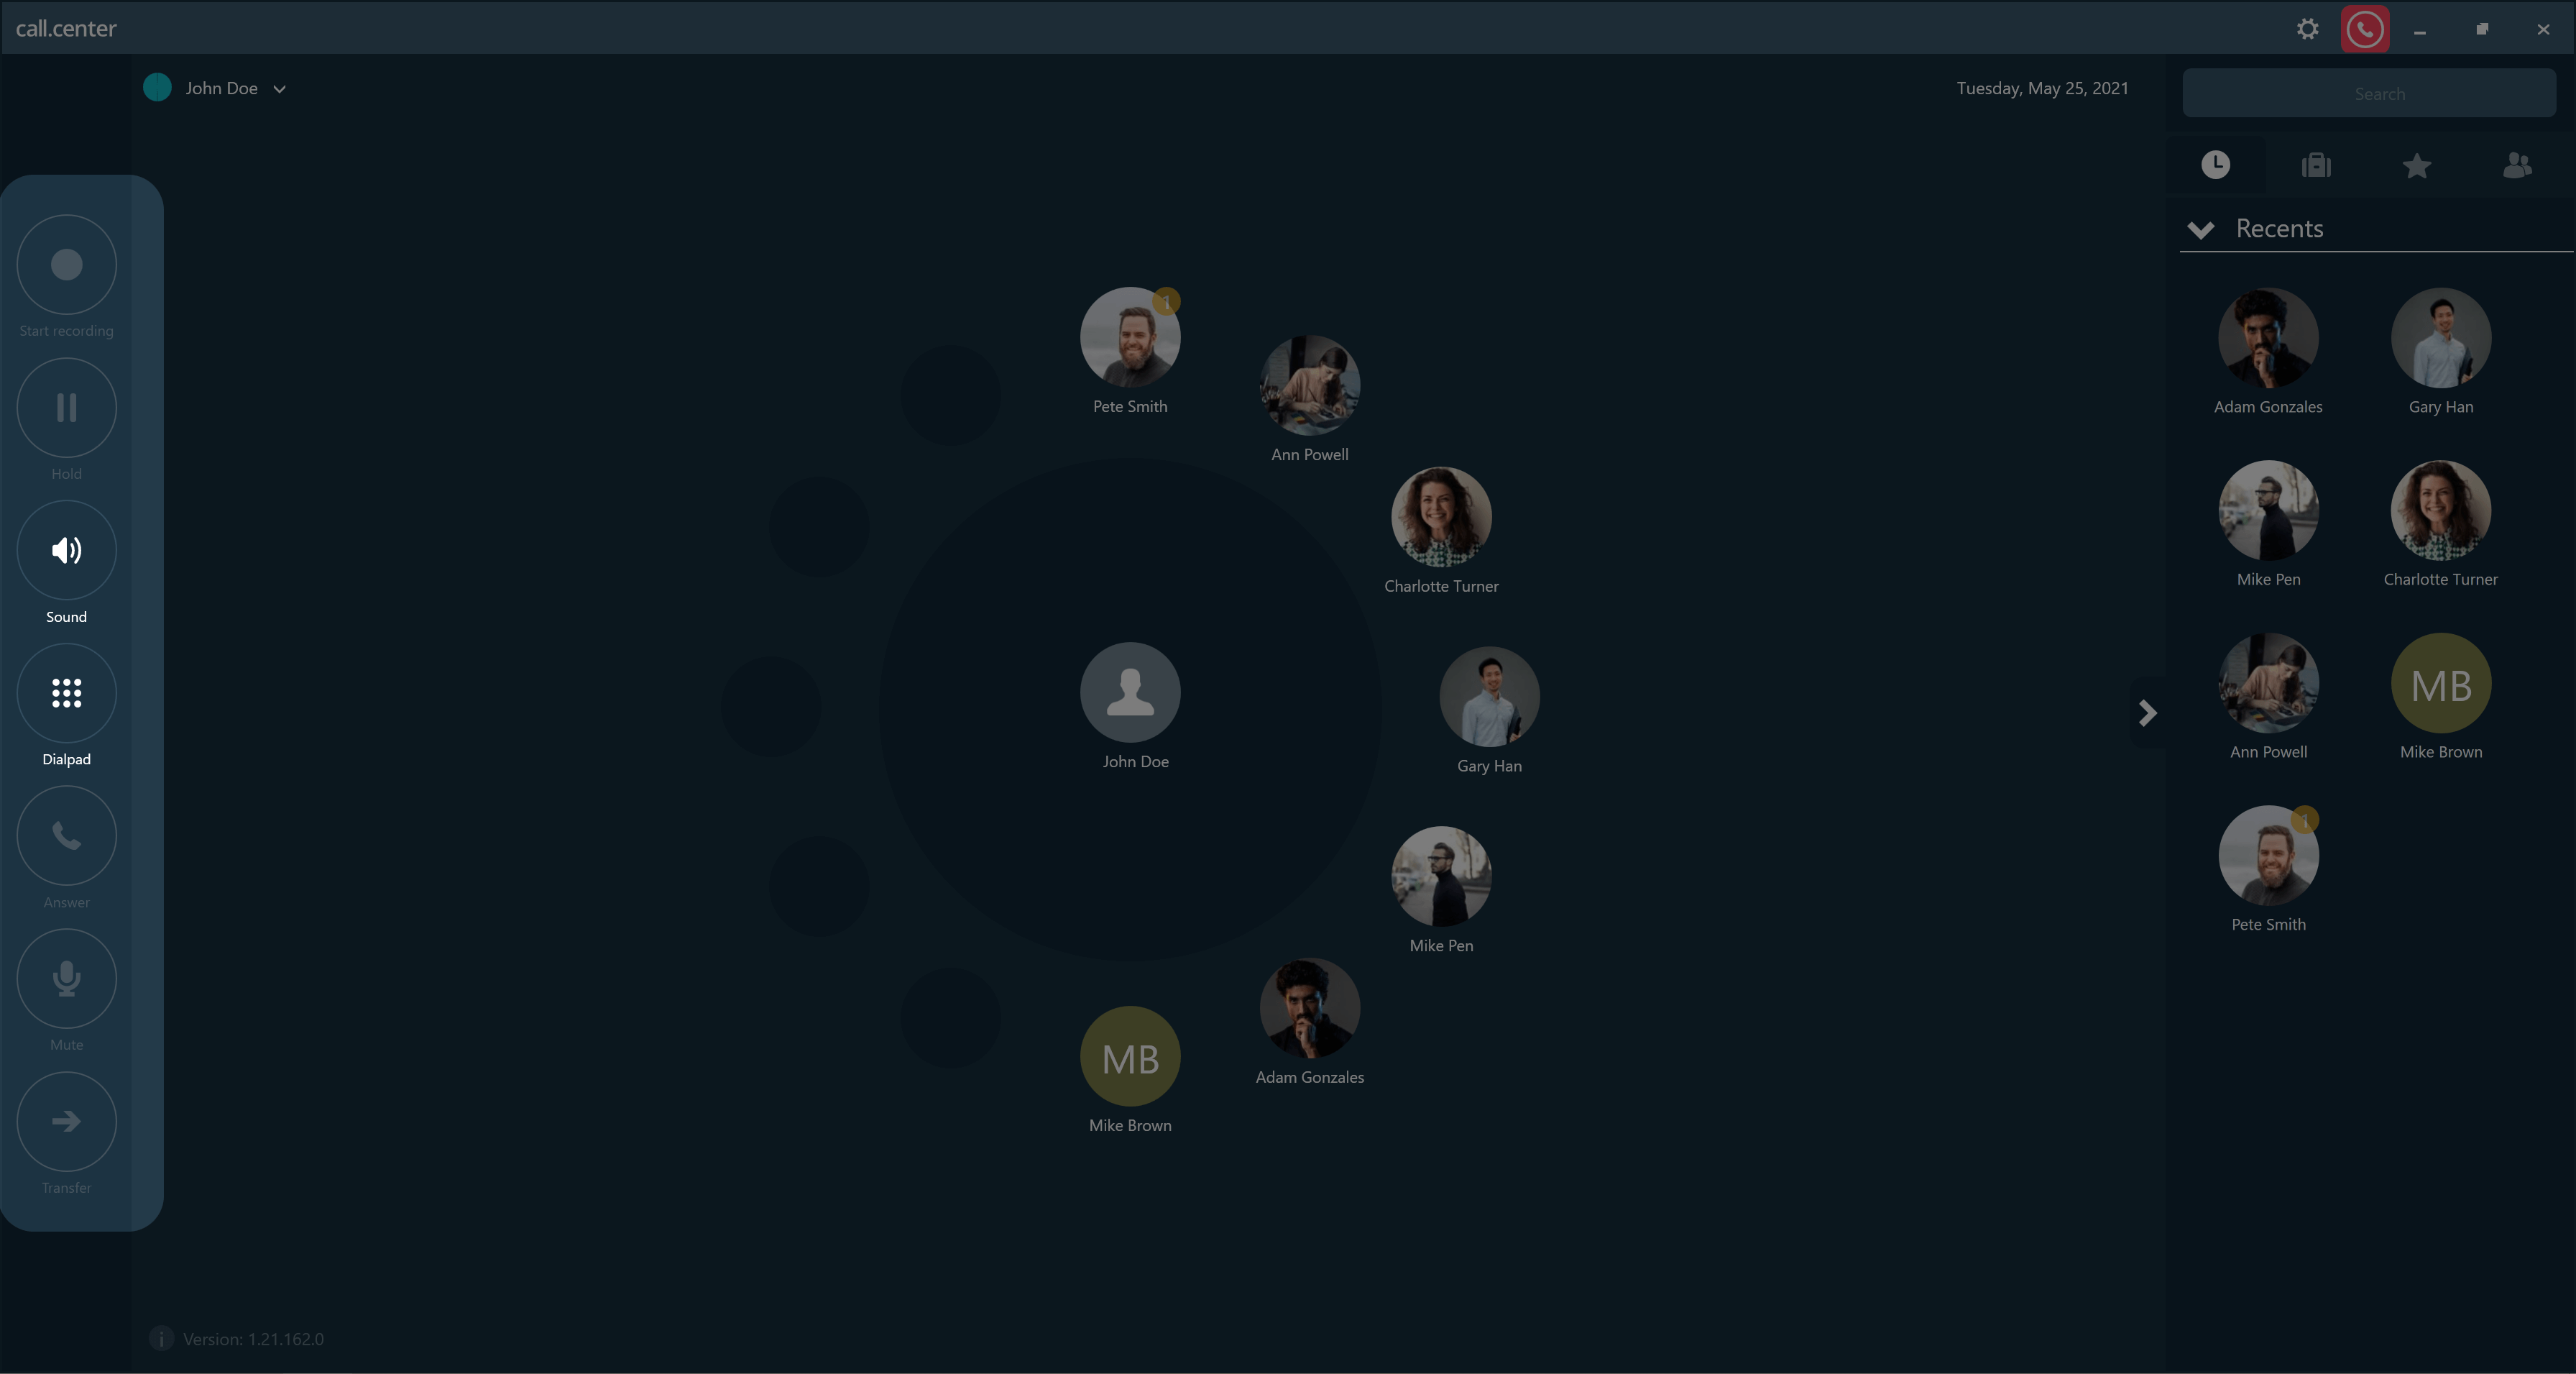
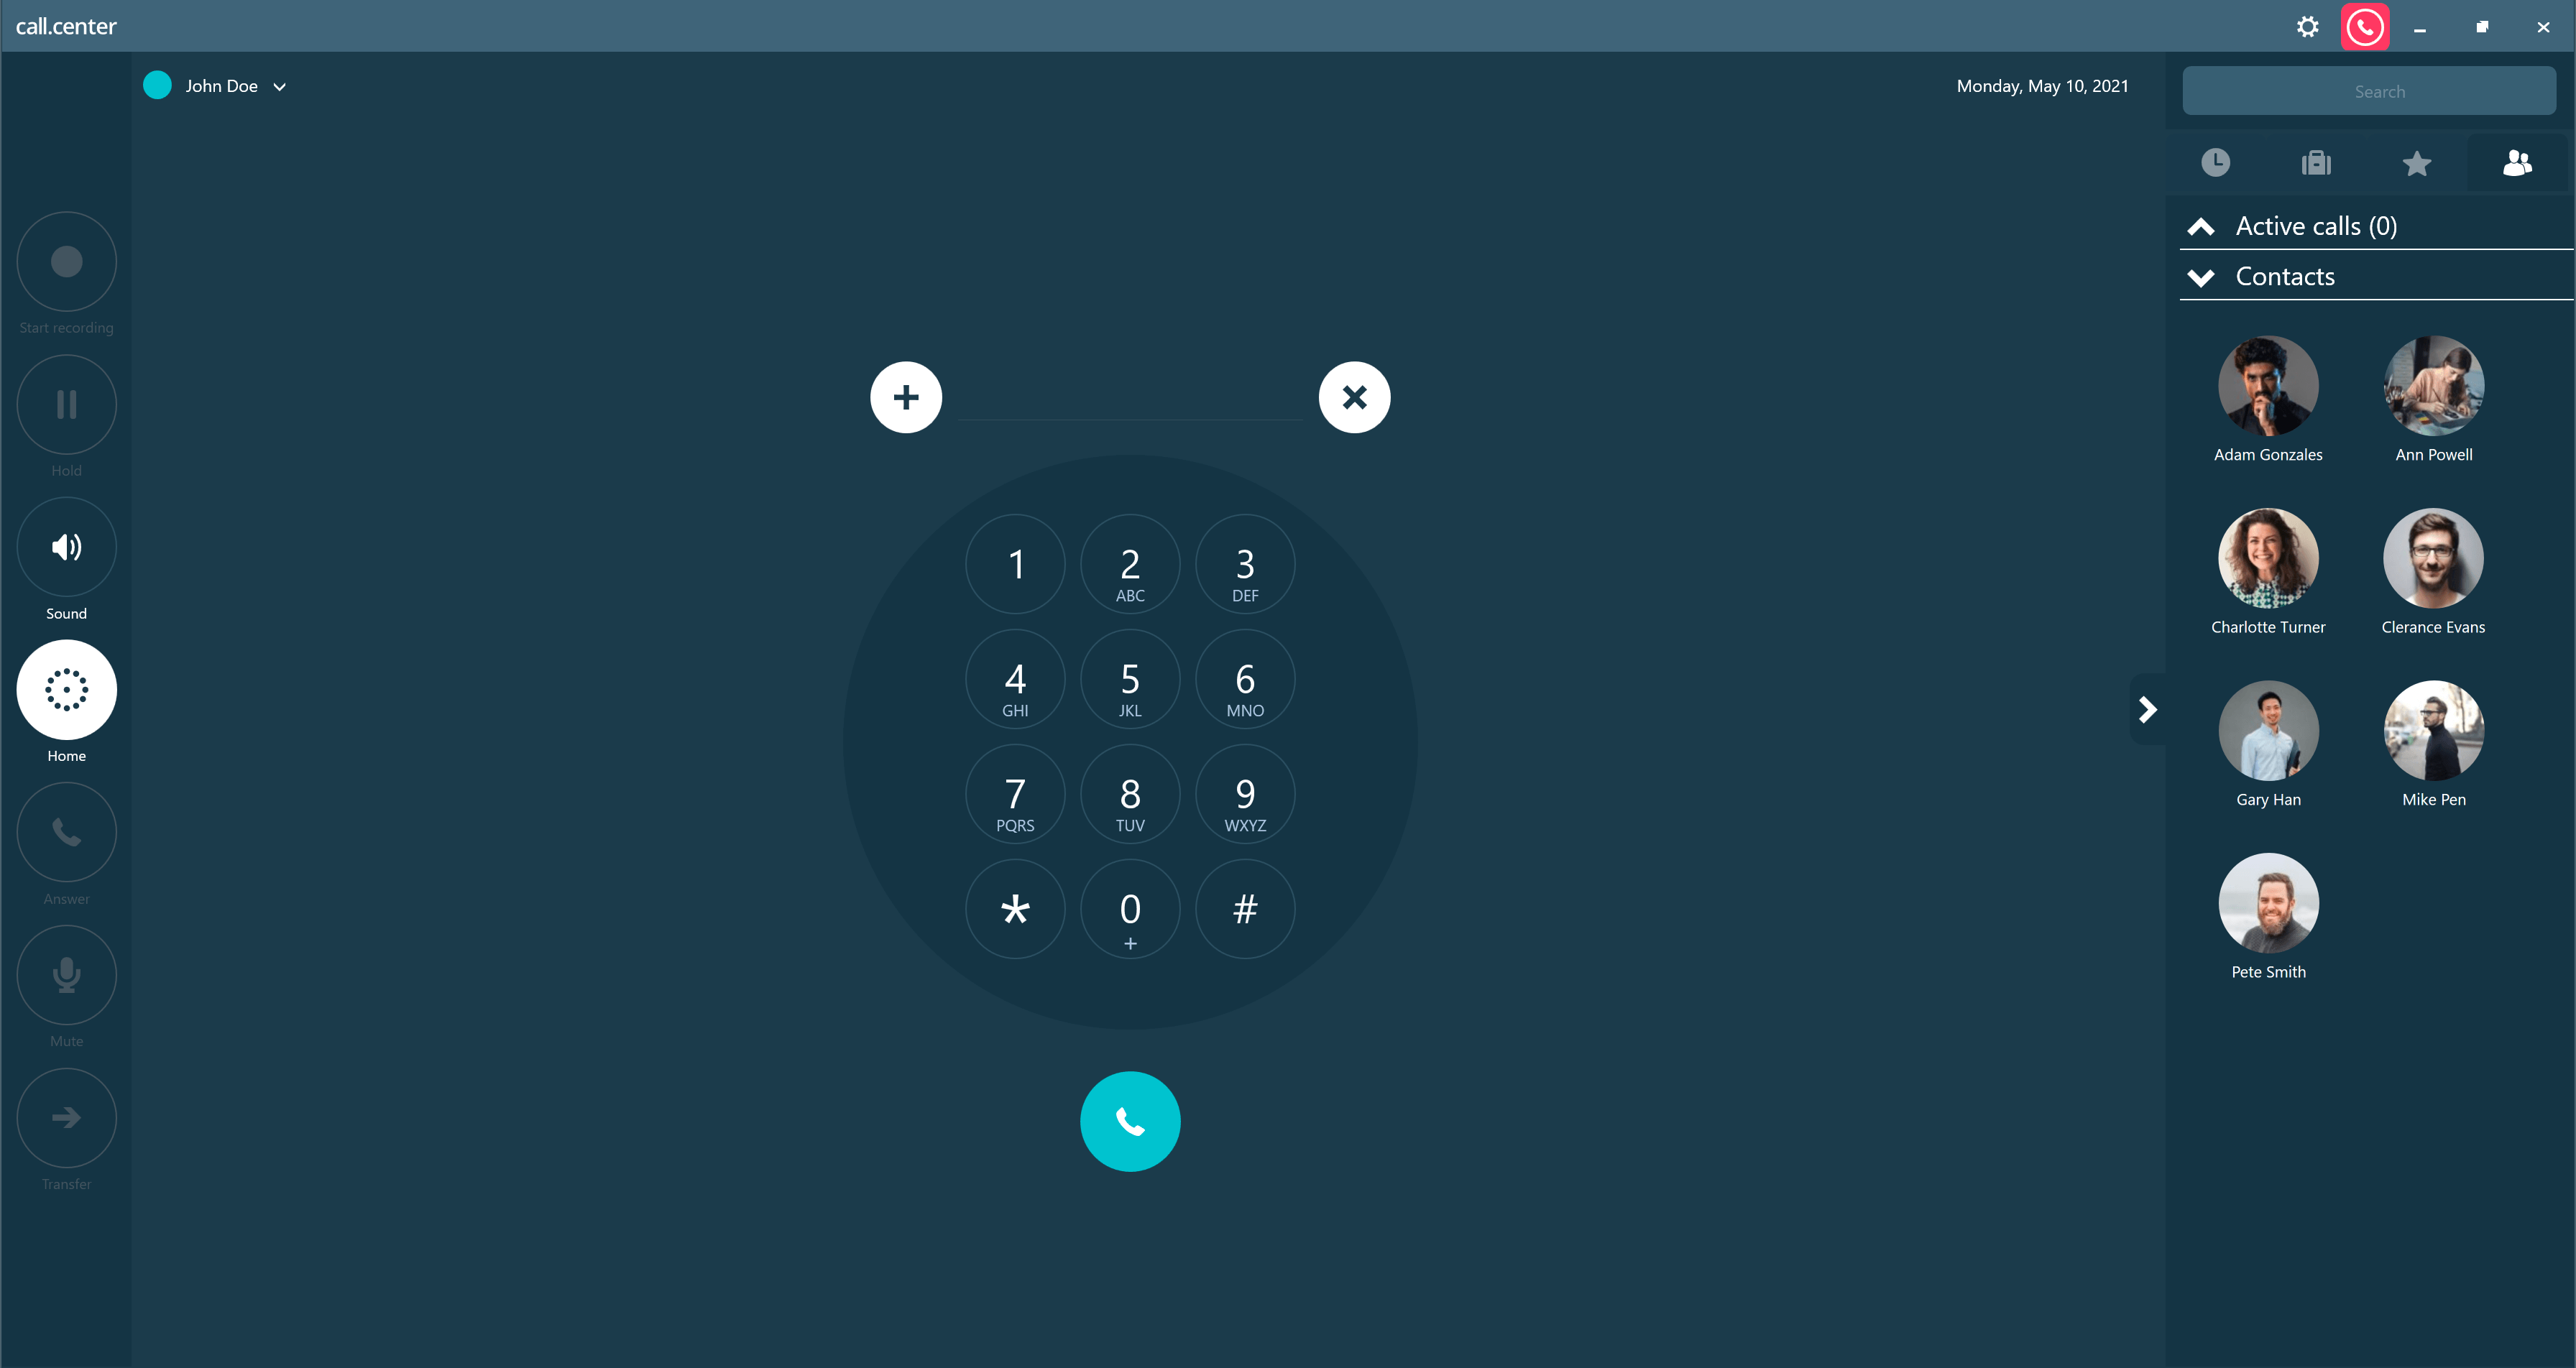
Back to the topThe call.center™ app Home Screen Desktop
The Home screen consists of various areas, windows and menus that fulfill different functions.
The appearance, layout and functionality of the main (or Home) screen is dependent on the operating system and device used. However, the information provided below is general to all call.center™ apps.
 Back to the top
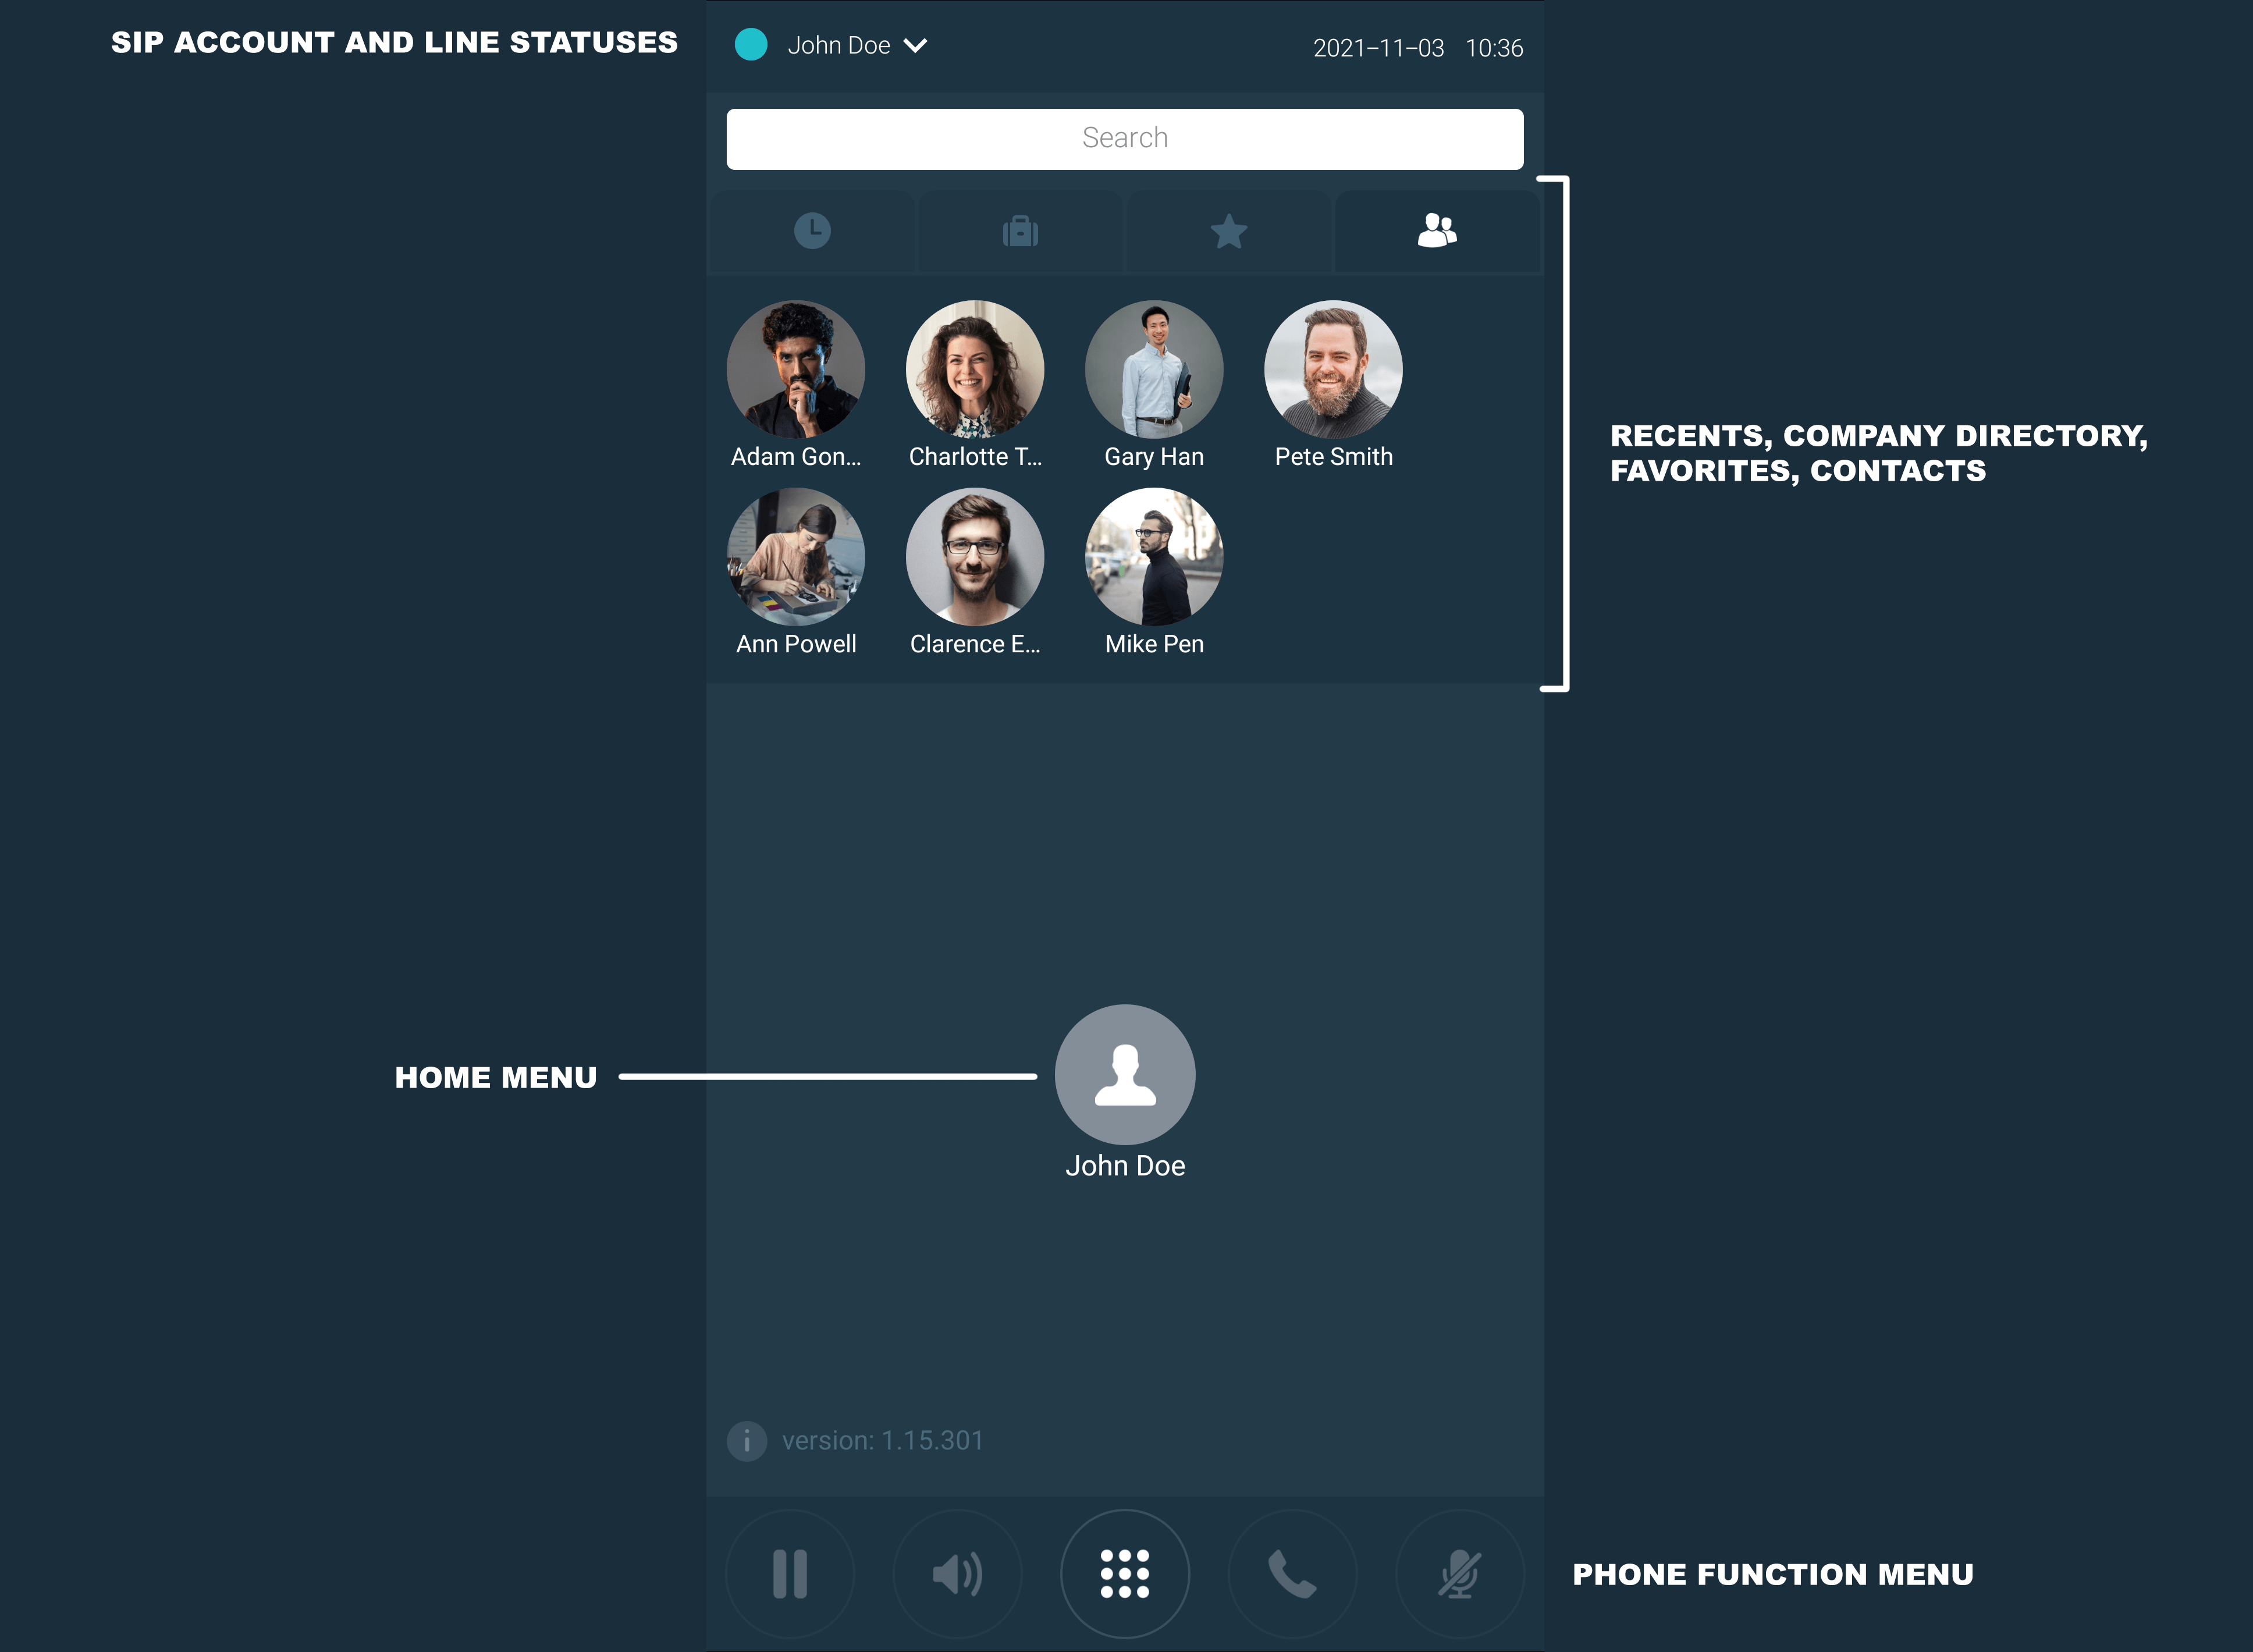
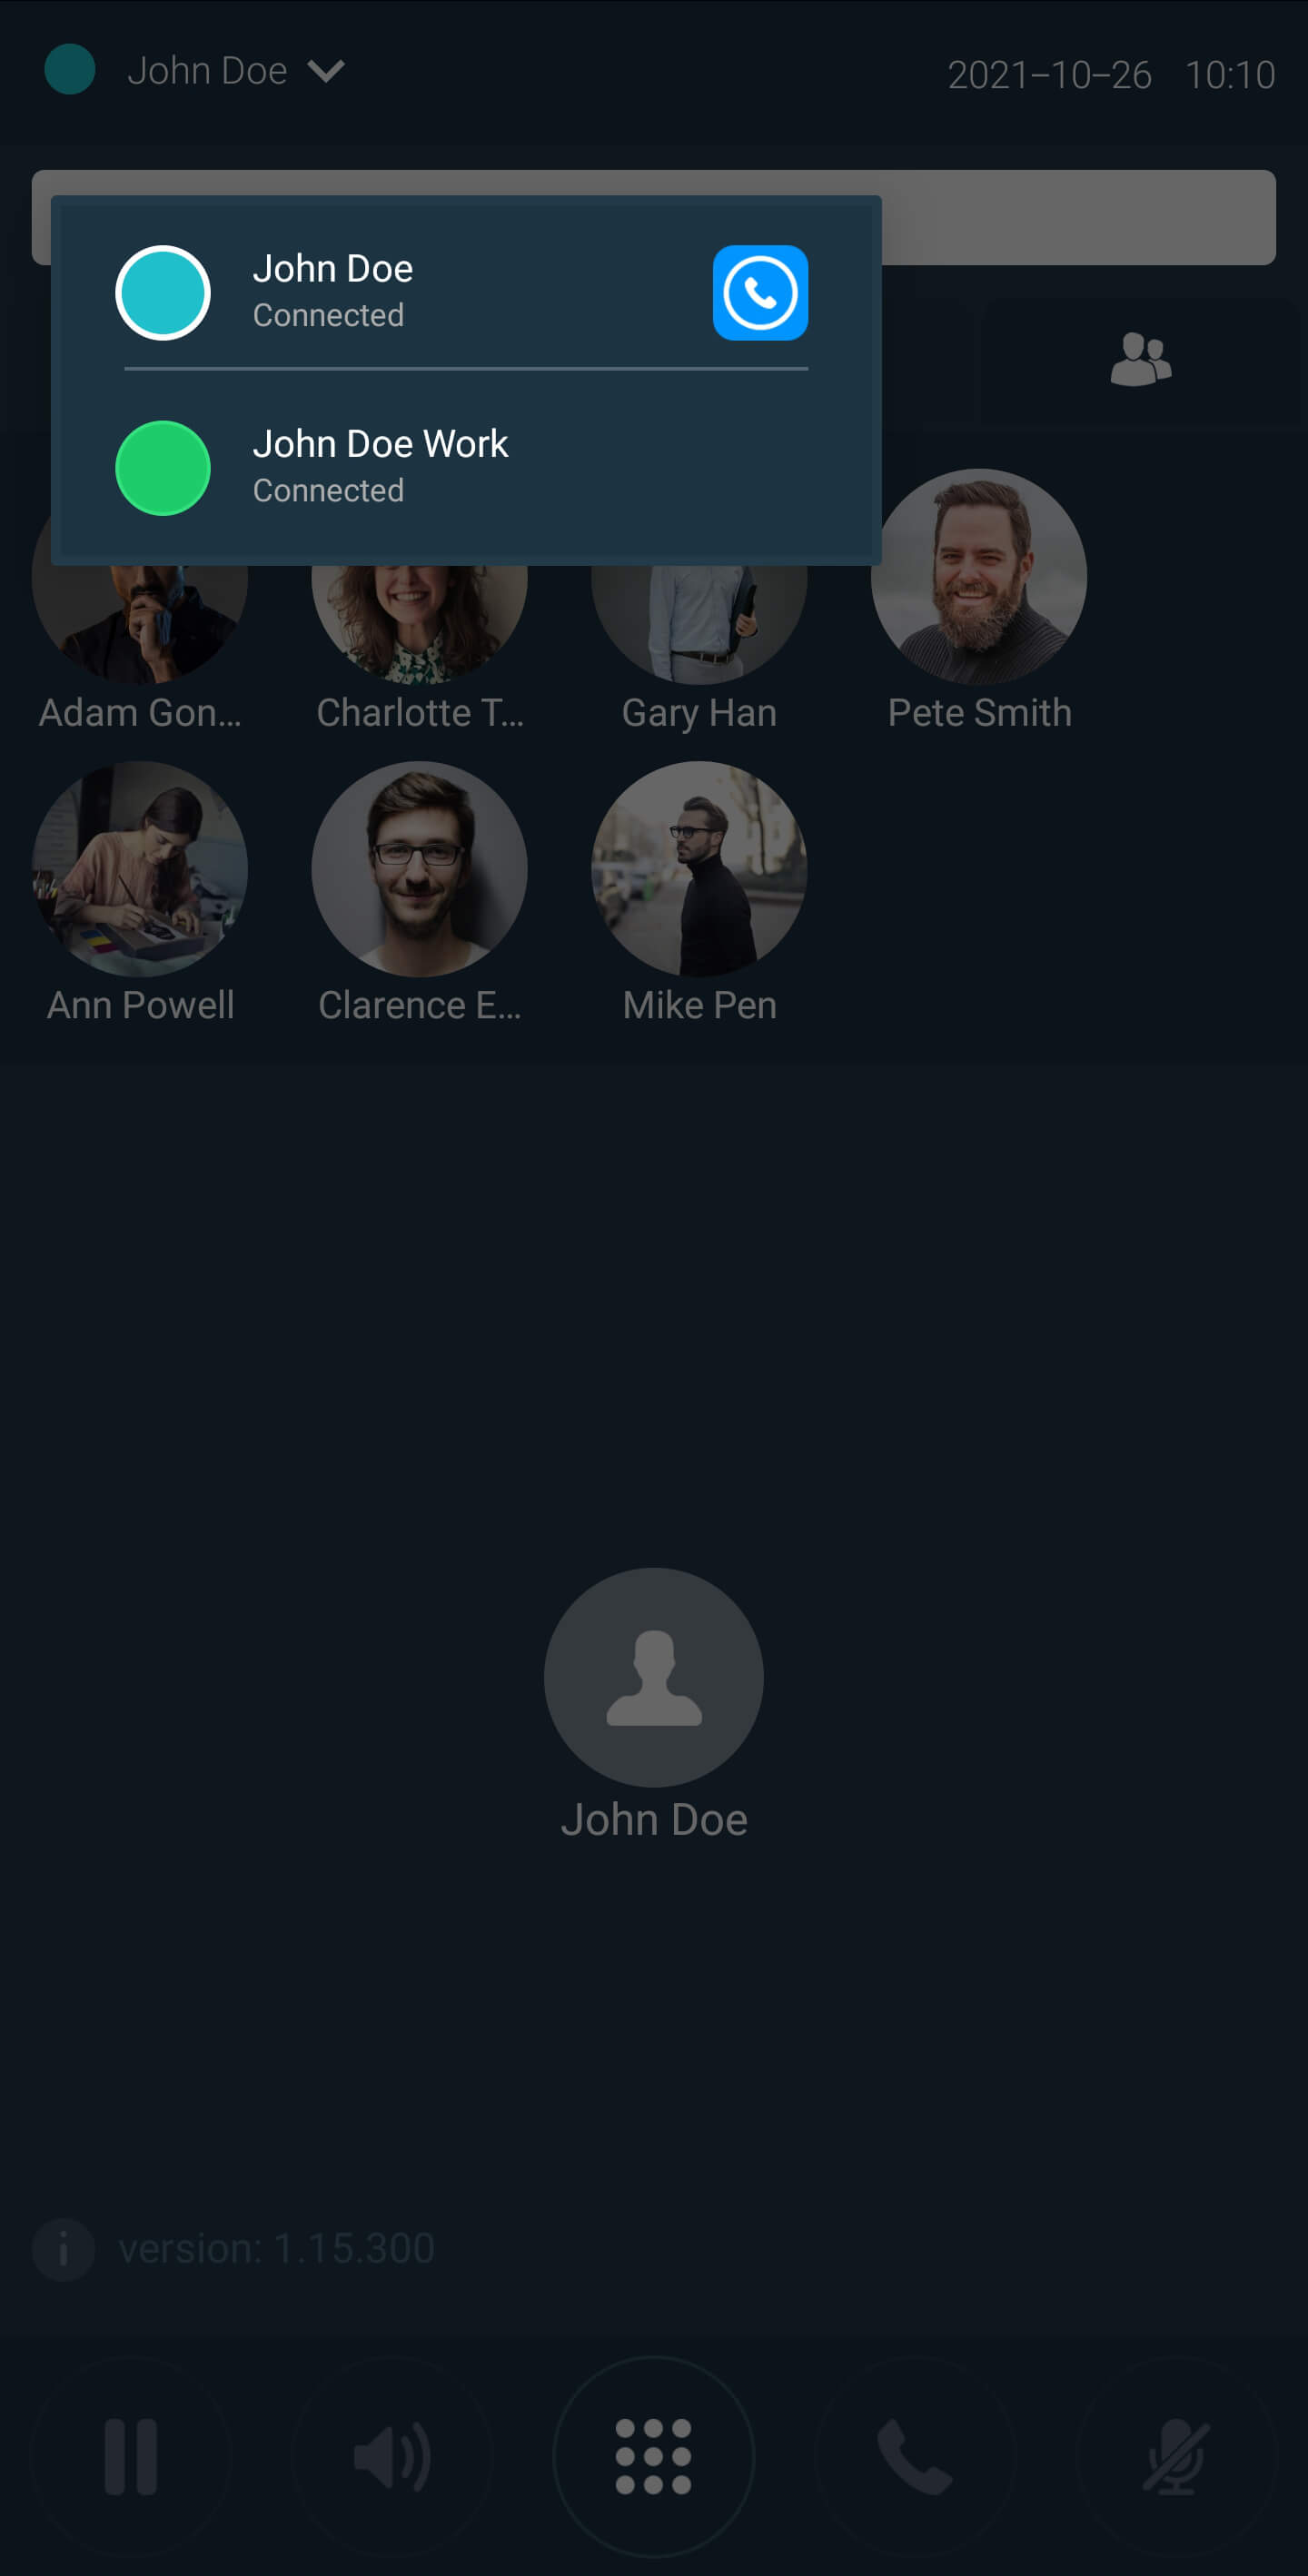
SIP Accounts and Line Status
This information is located in the top left-hand corner of the screen and displays the SIP account name as well as the current status of thatSIP connection (Not Connected, Connecting or Connected). Note that if multiple SIP accounts are configured for this app, then the name and status of the account currently selected is displayed.
Important - If your device’s SIP Accounts were configured for the user to manually enter their passwords during the device activation, these passwords may be edited later by accessing the Account Info window. For more information, see the section Account Info.
 Back to the top
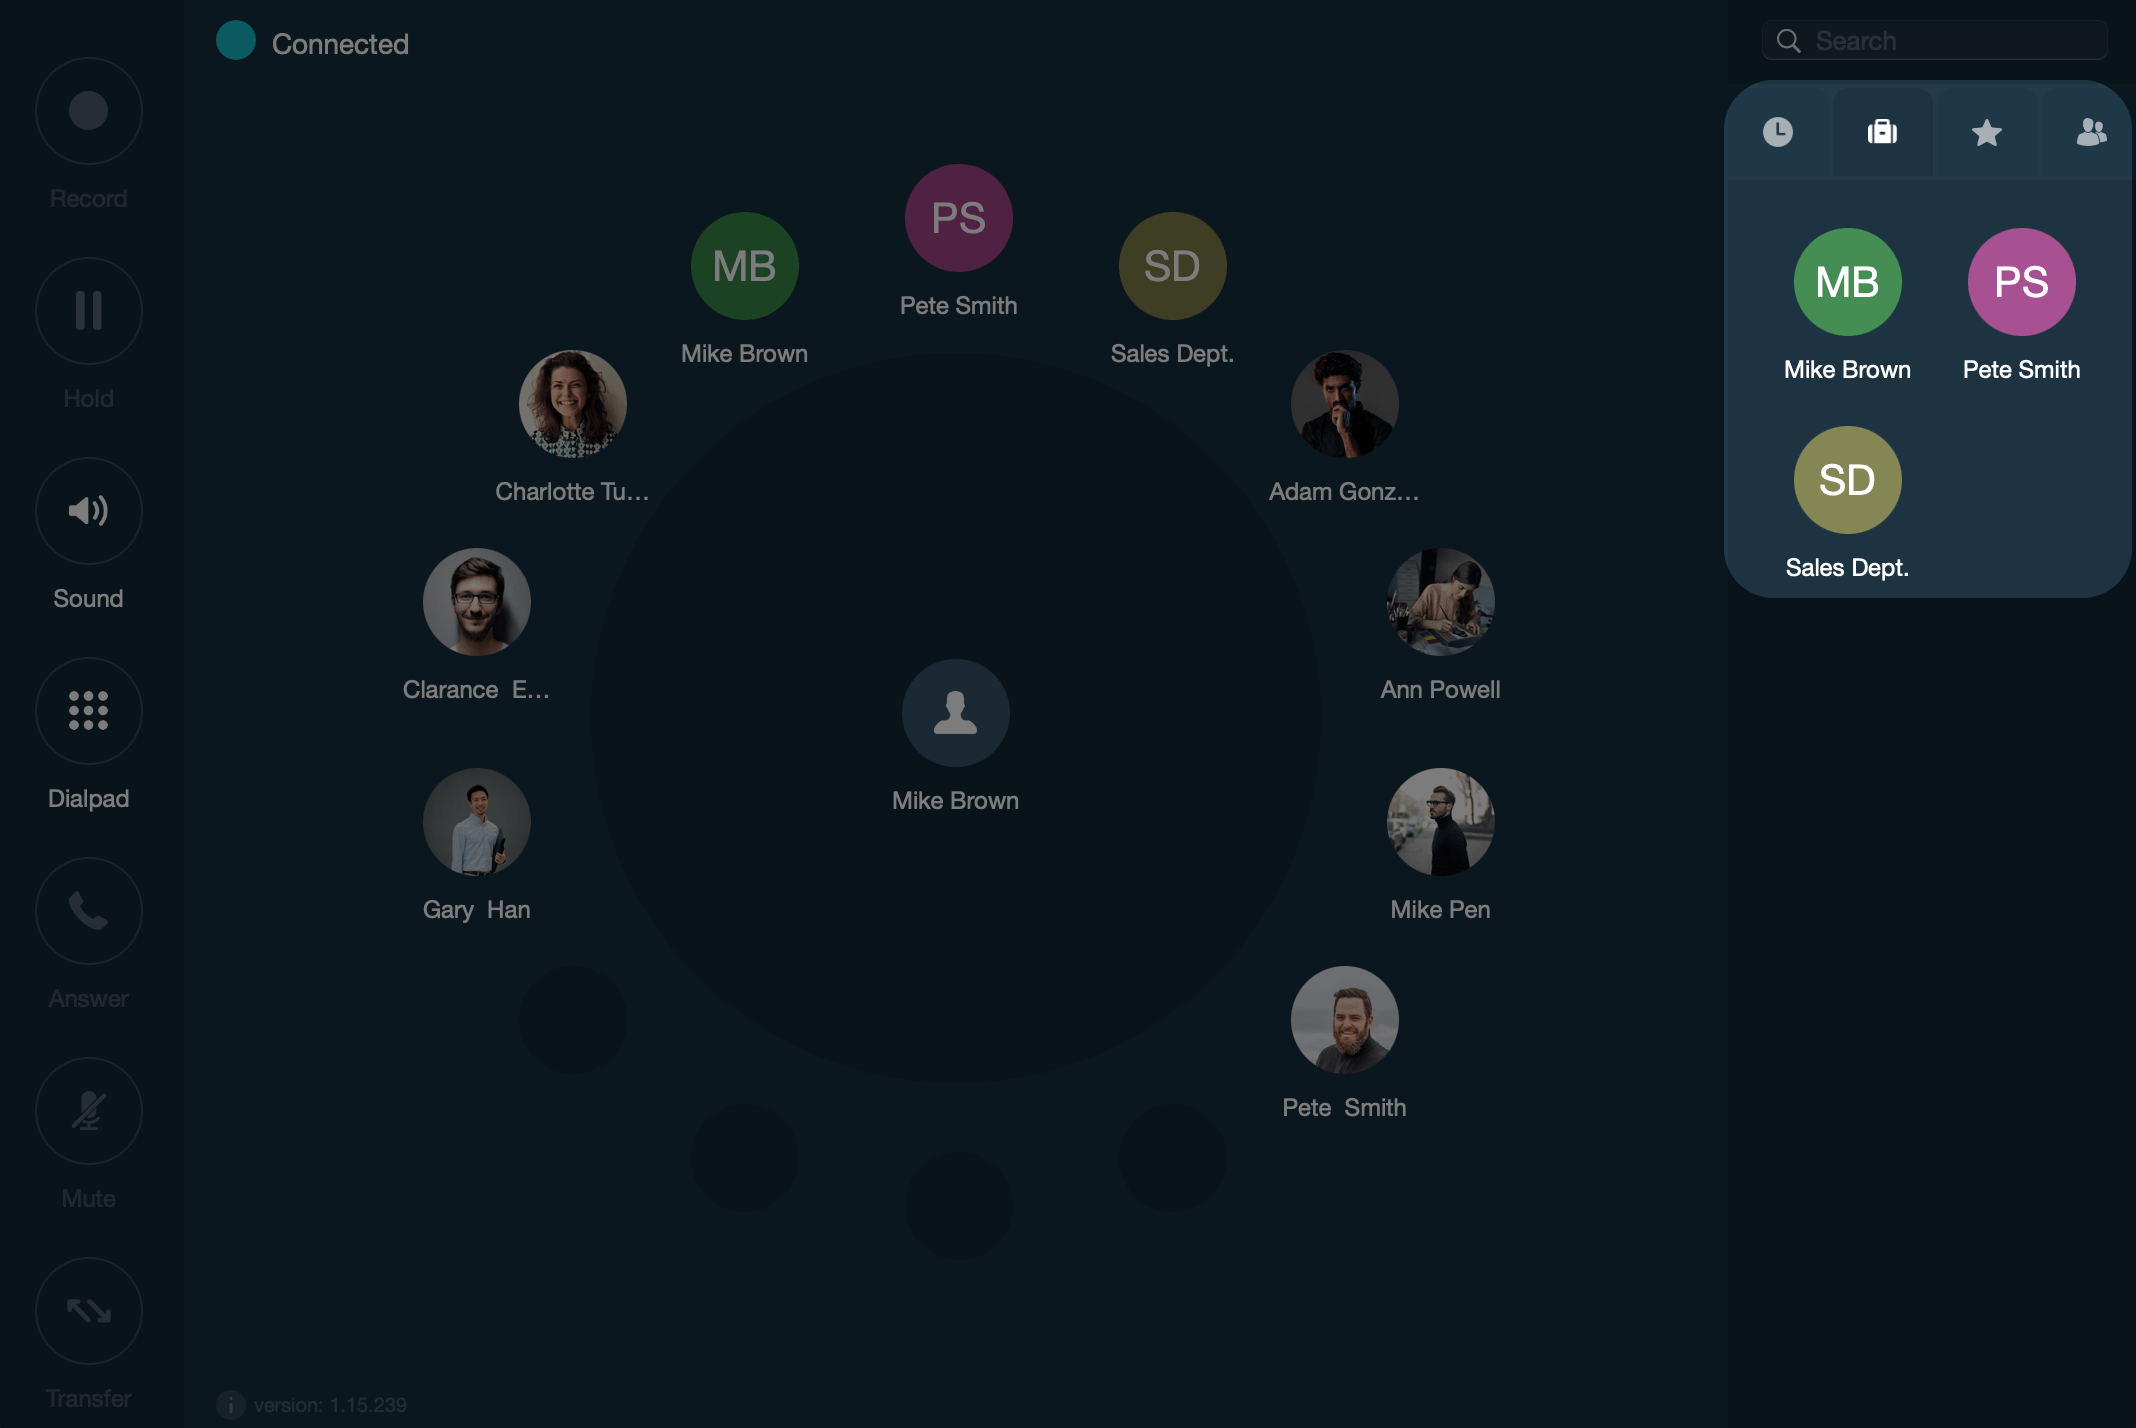
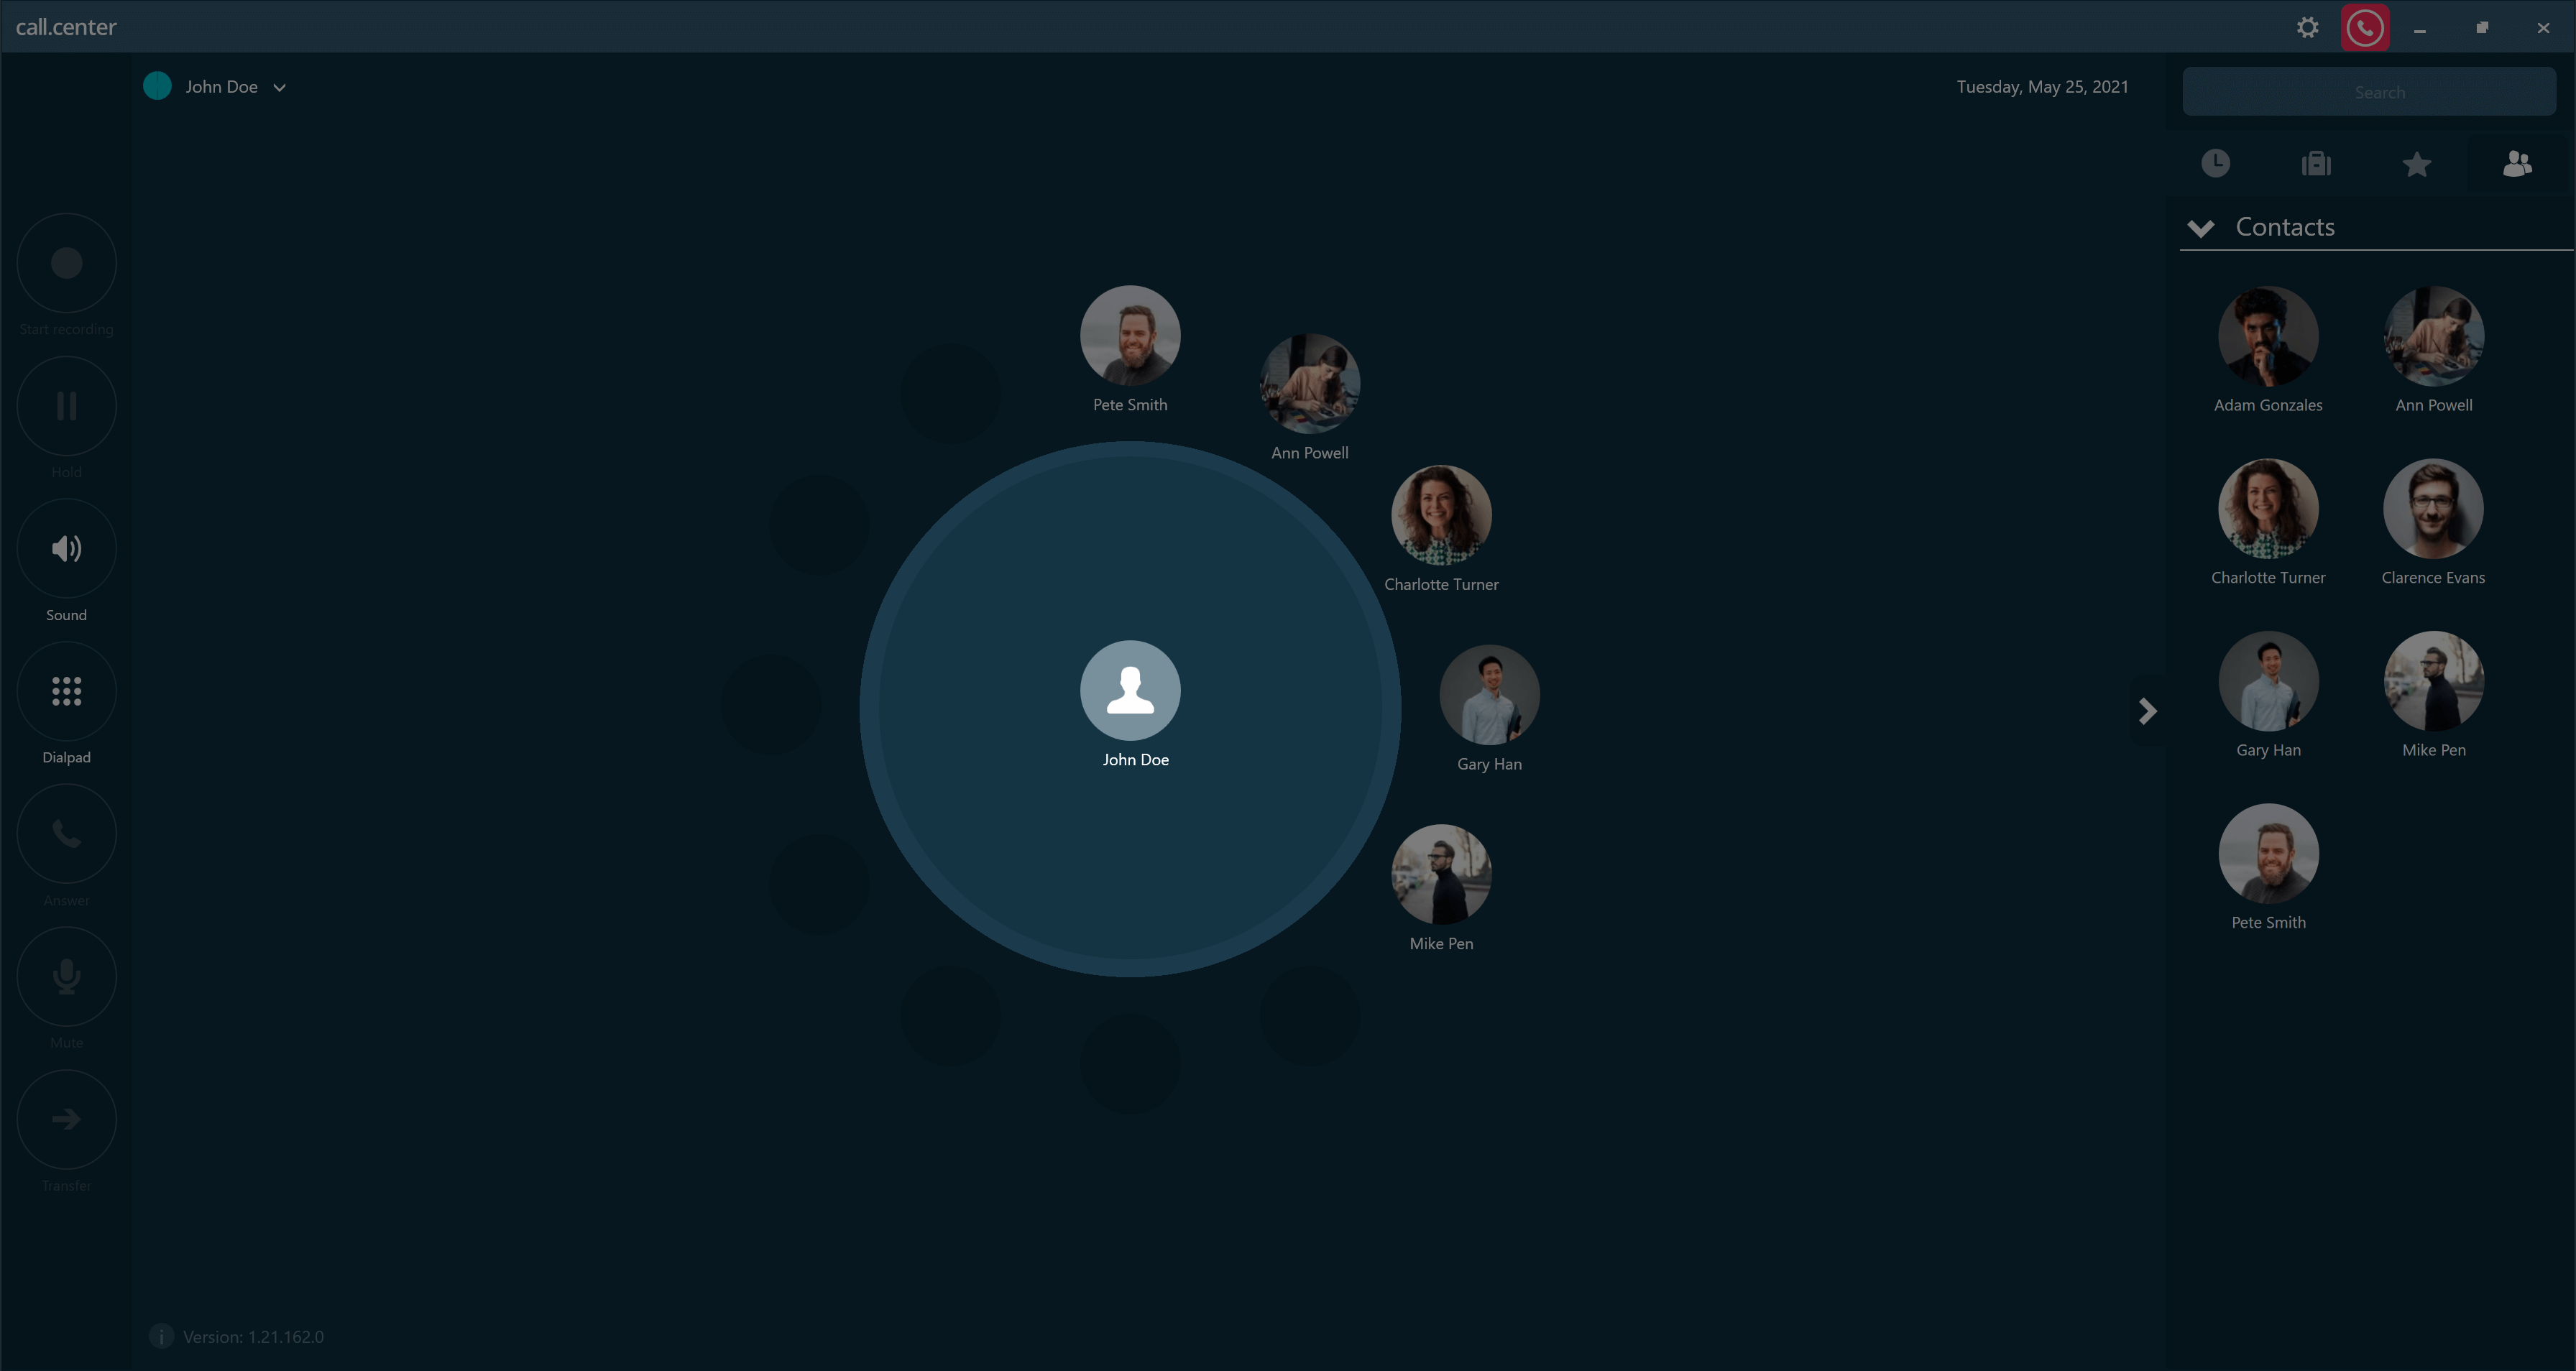
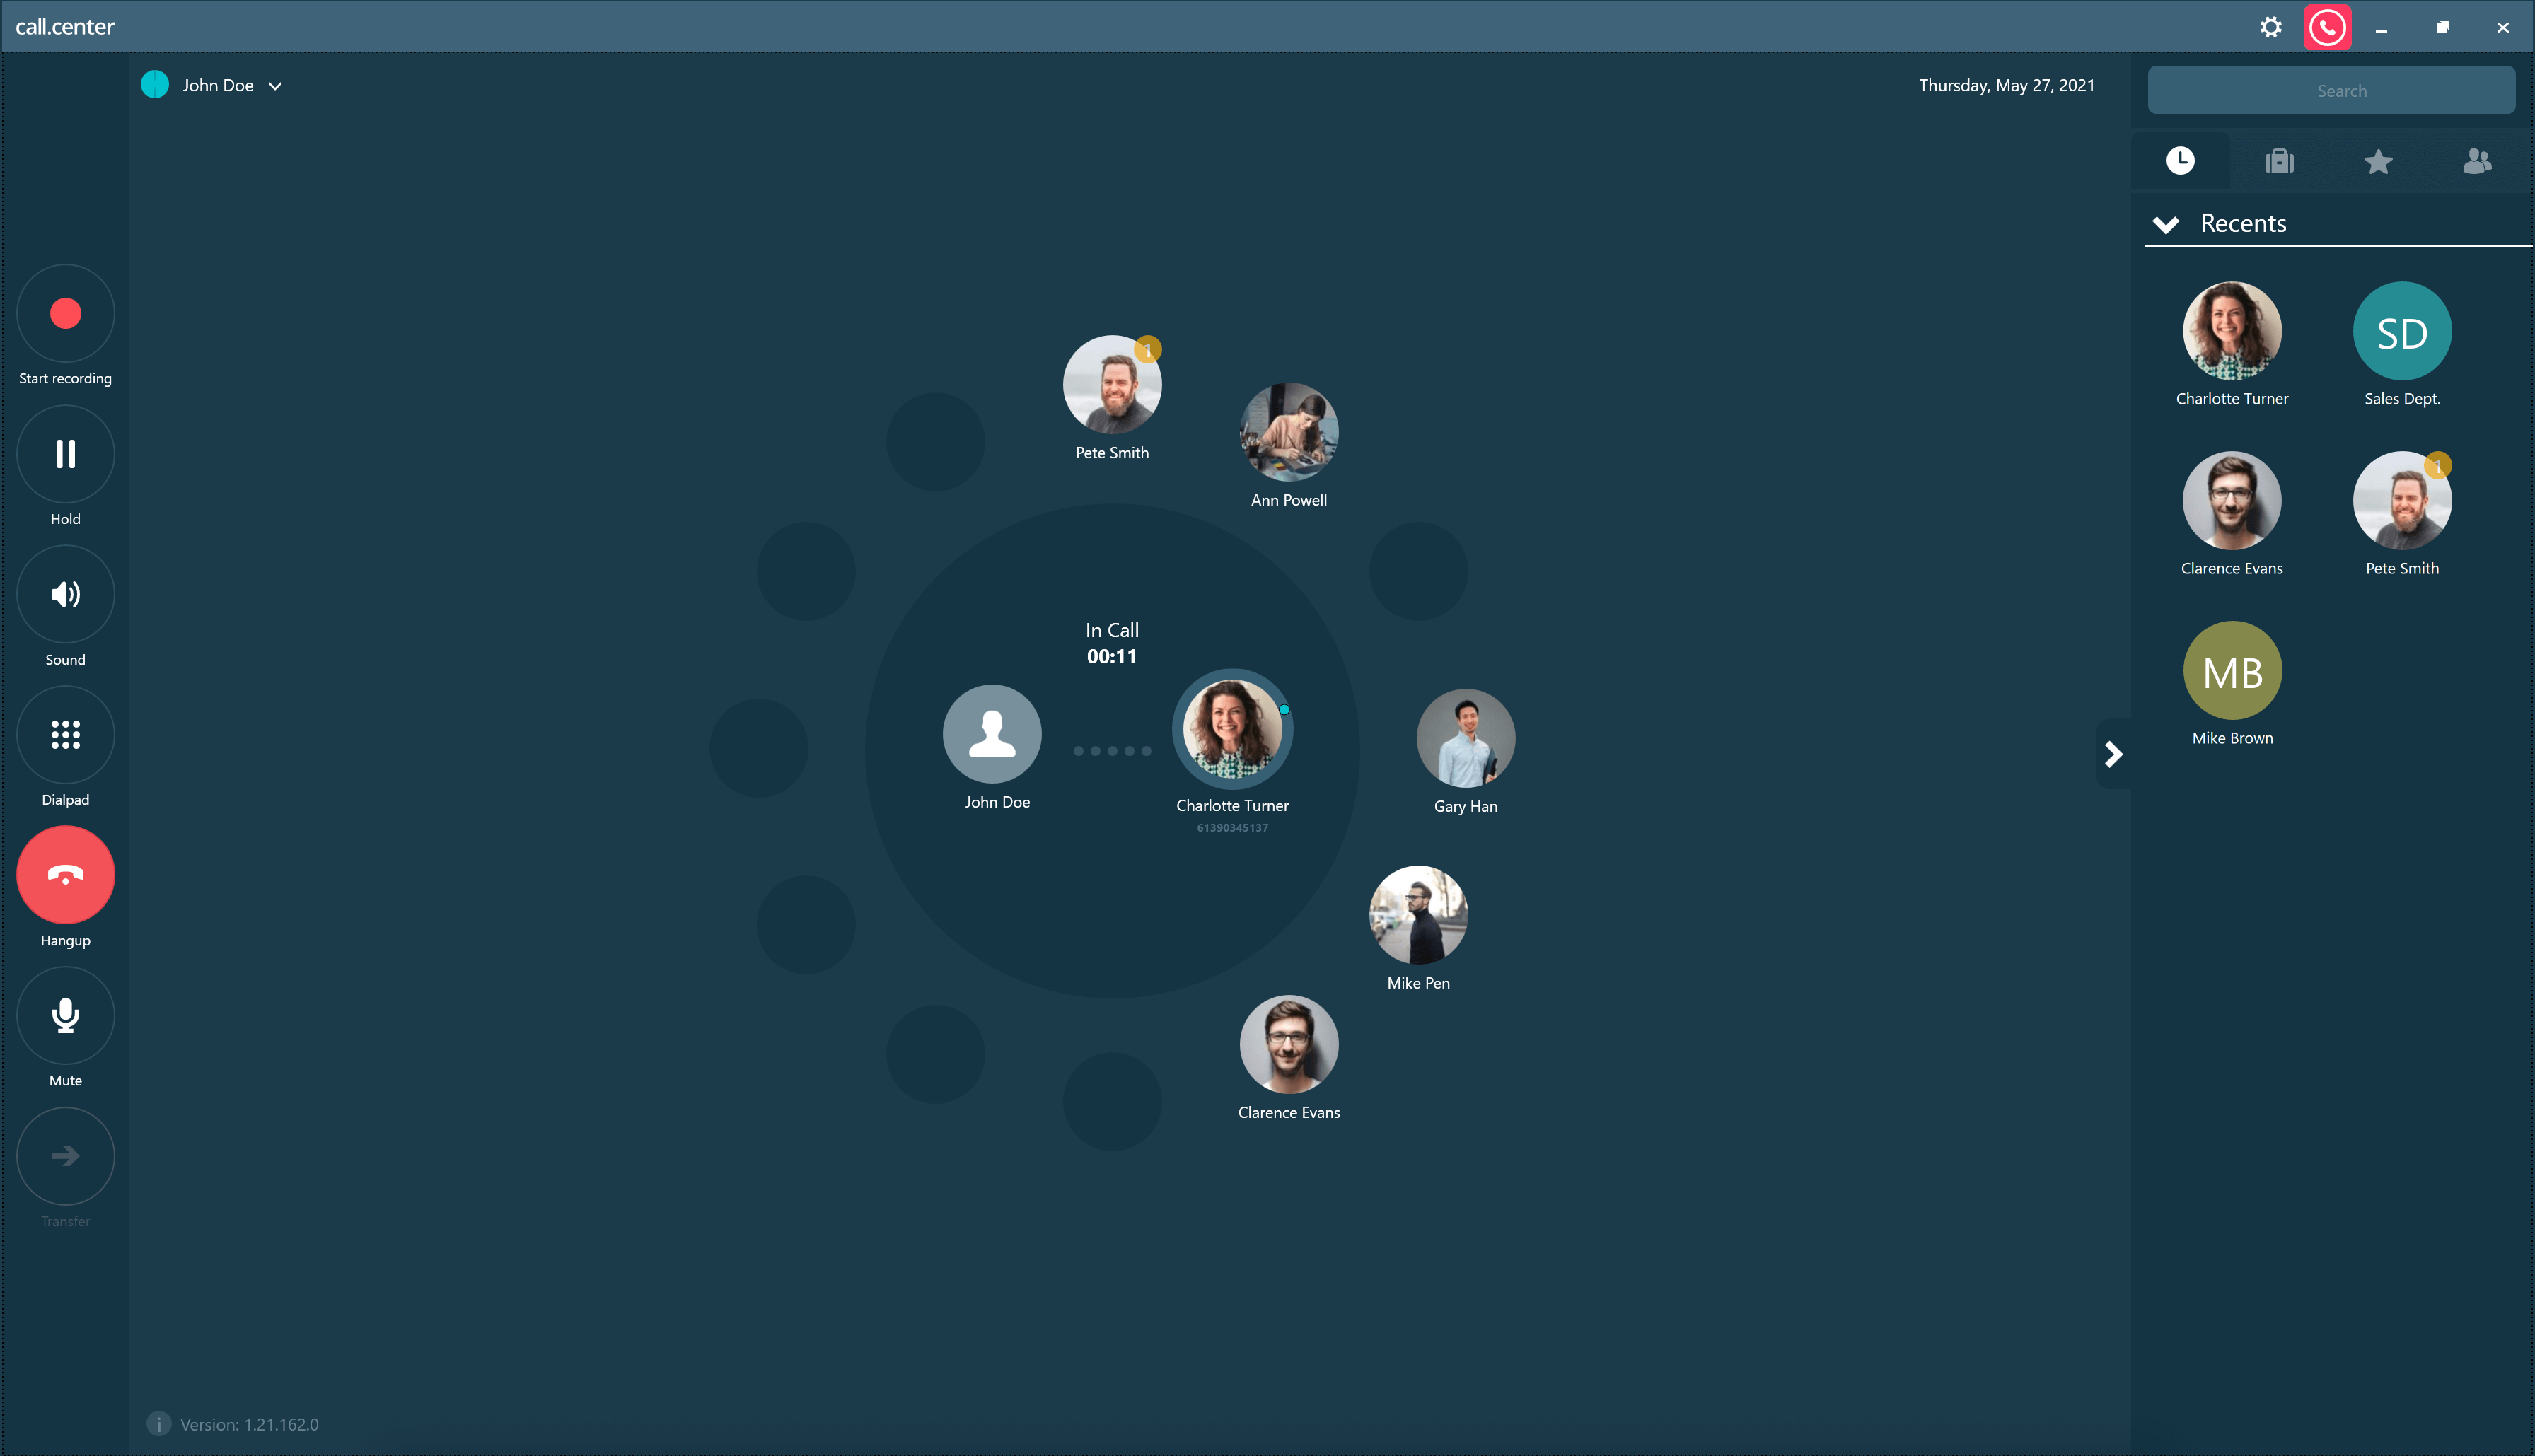
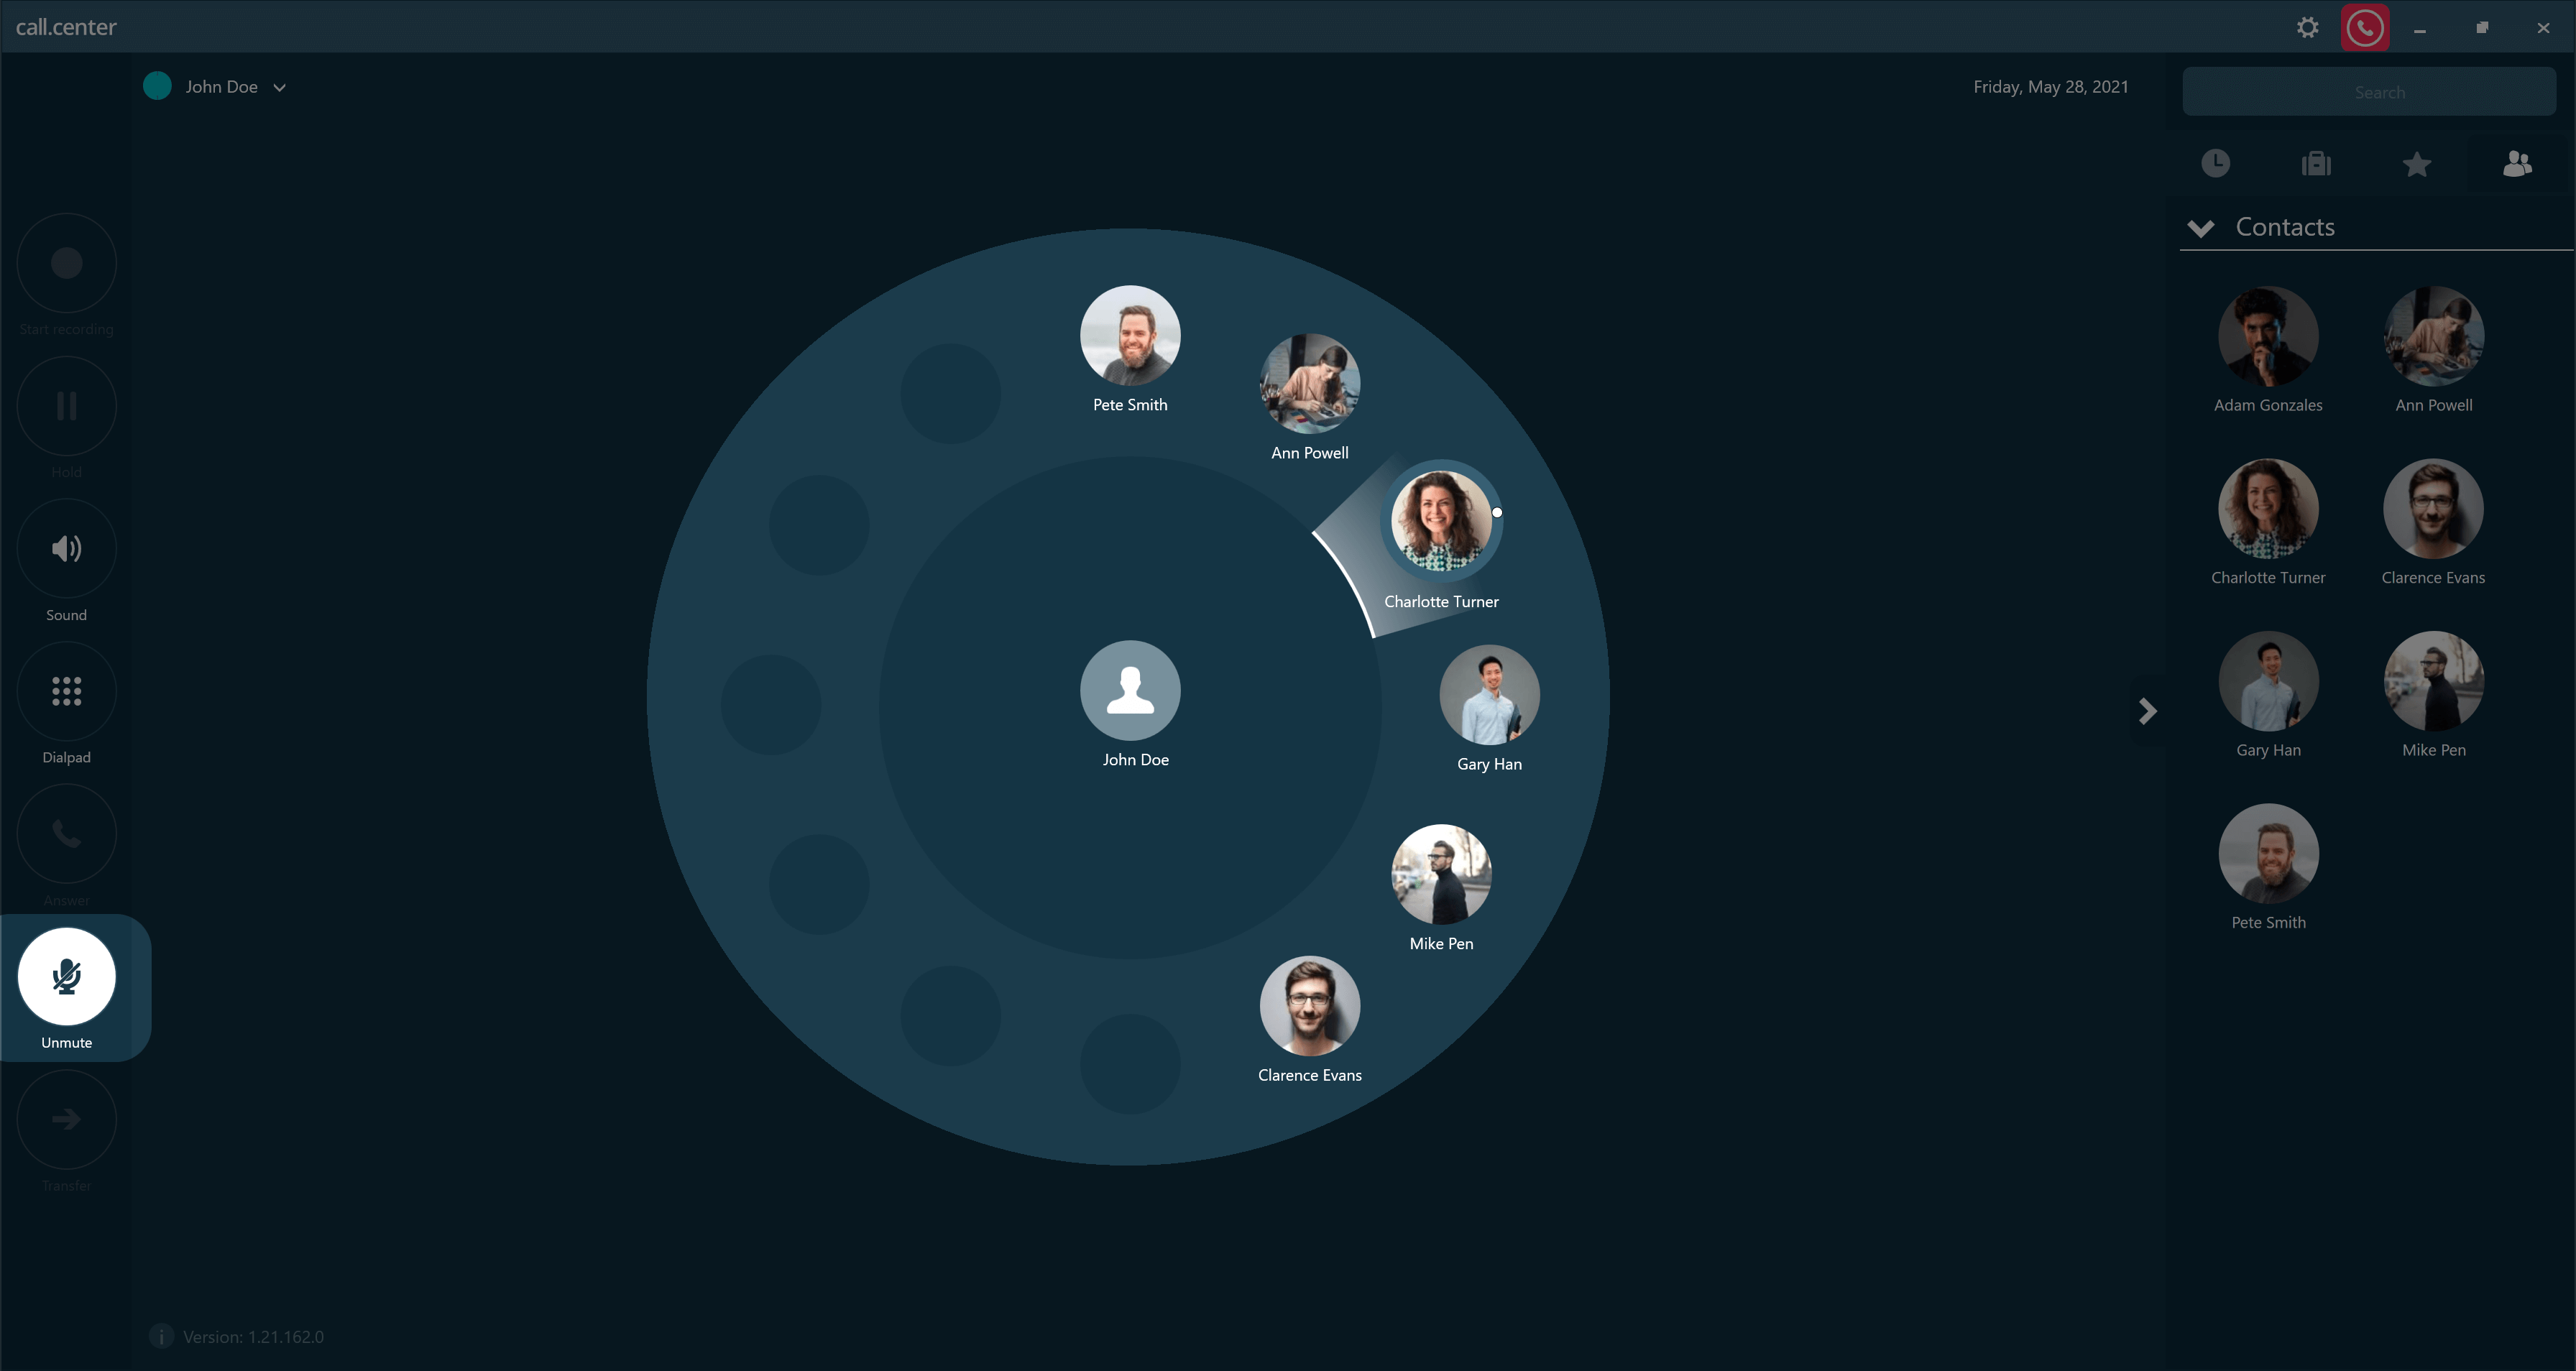
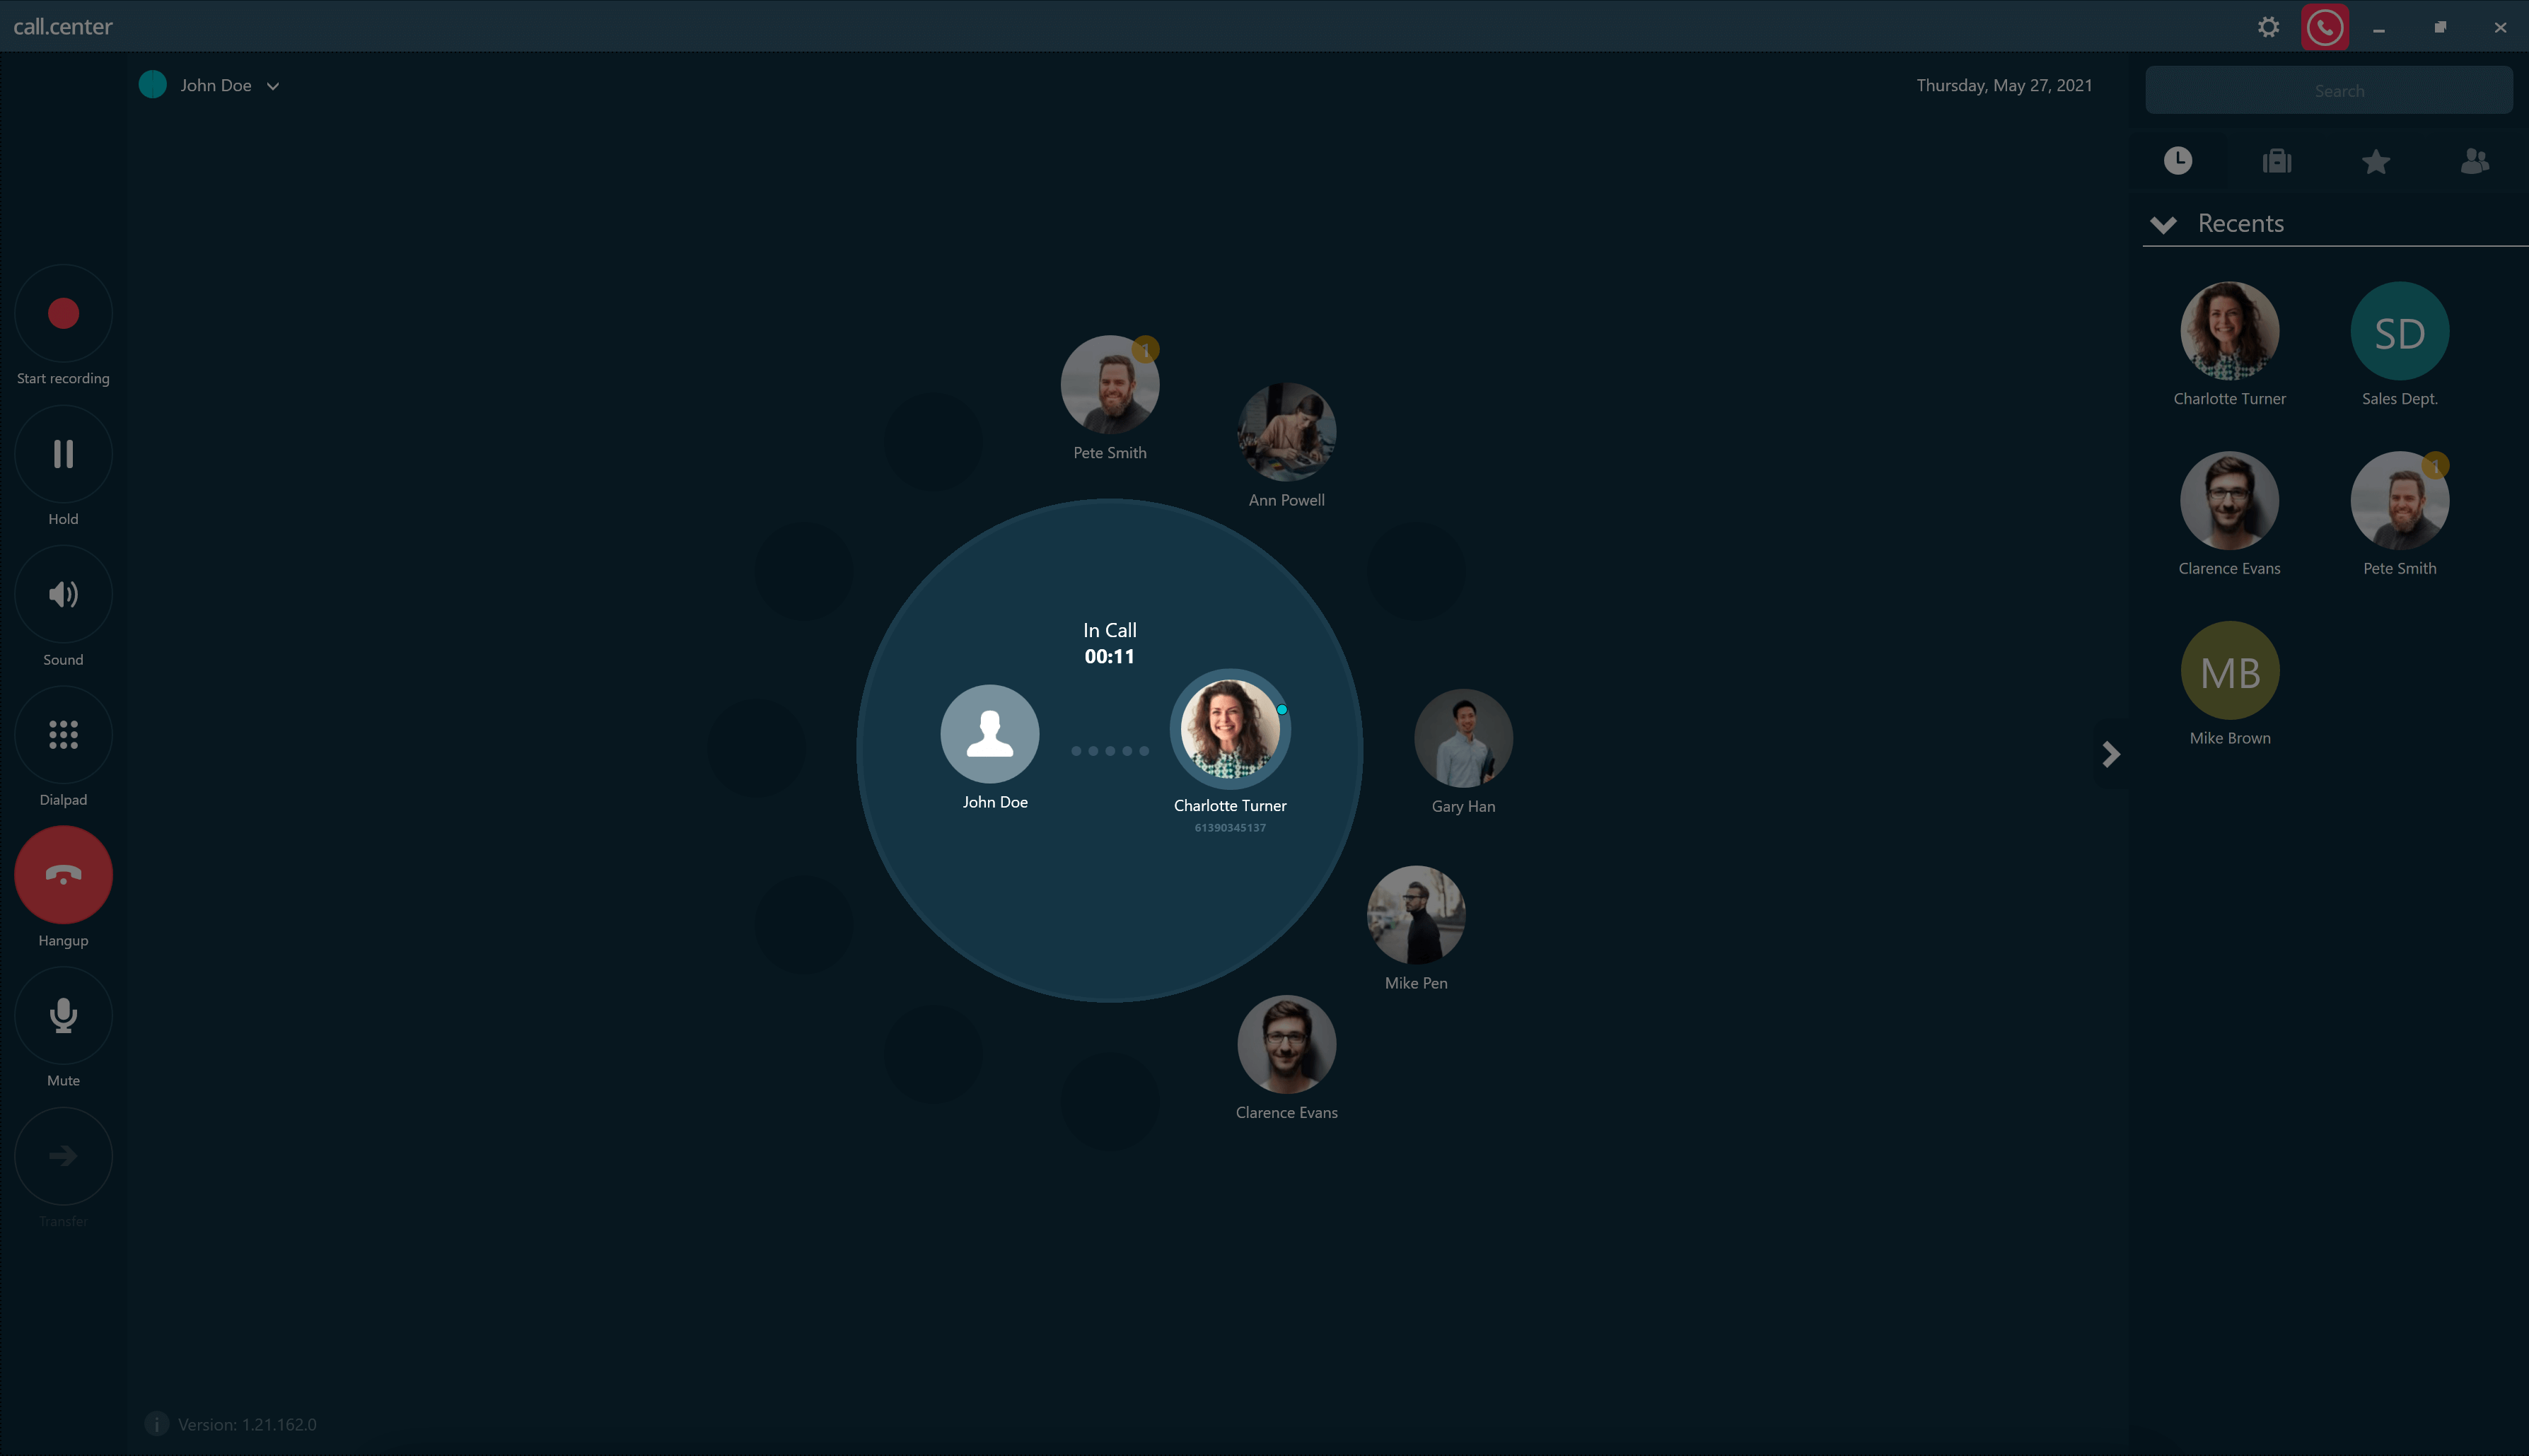
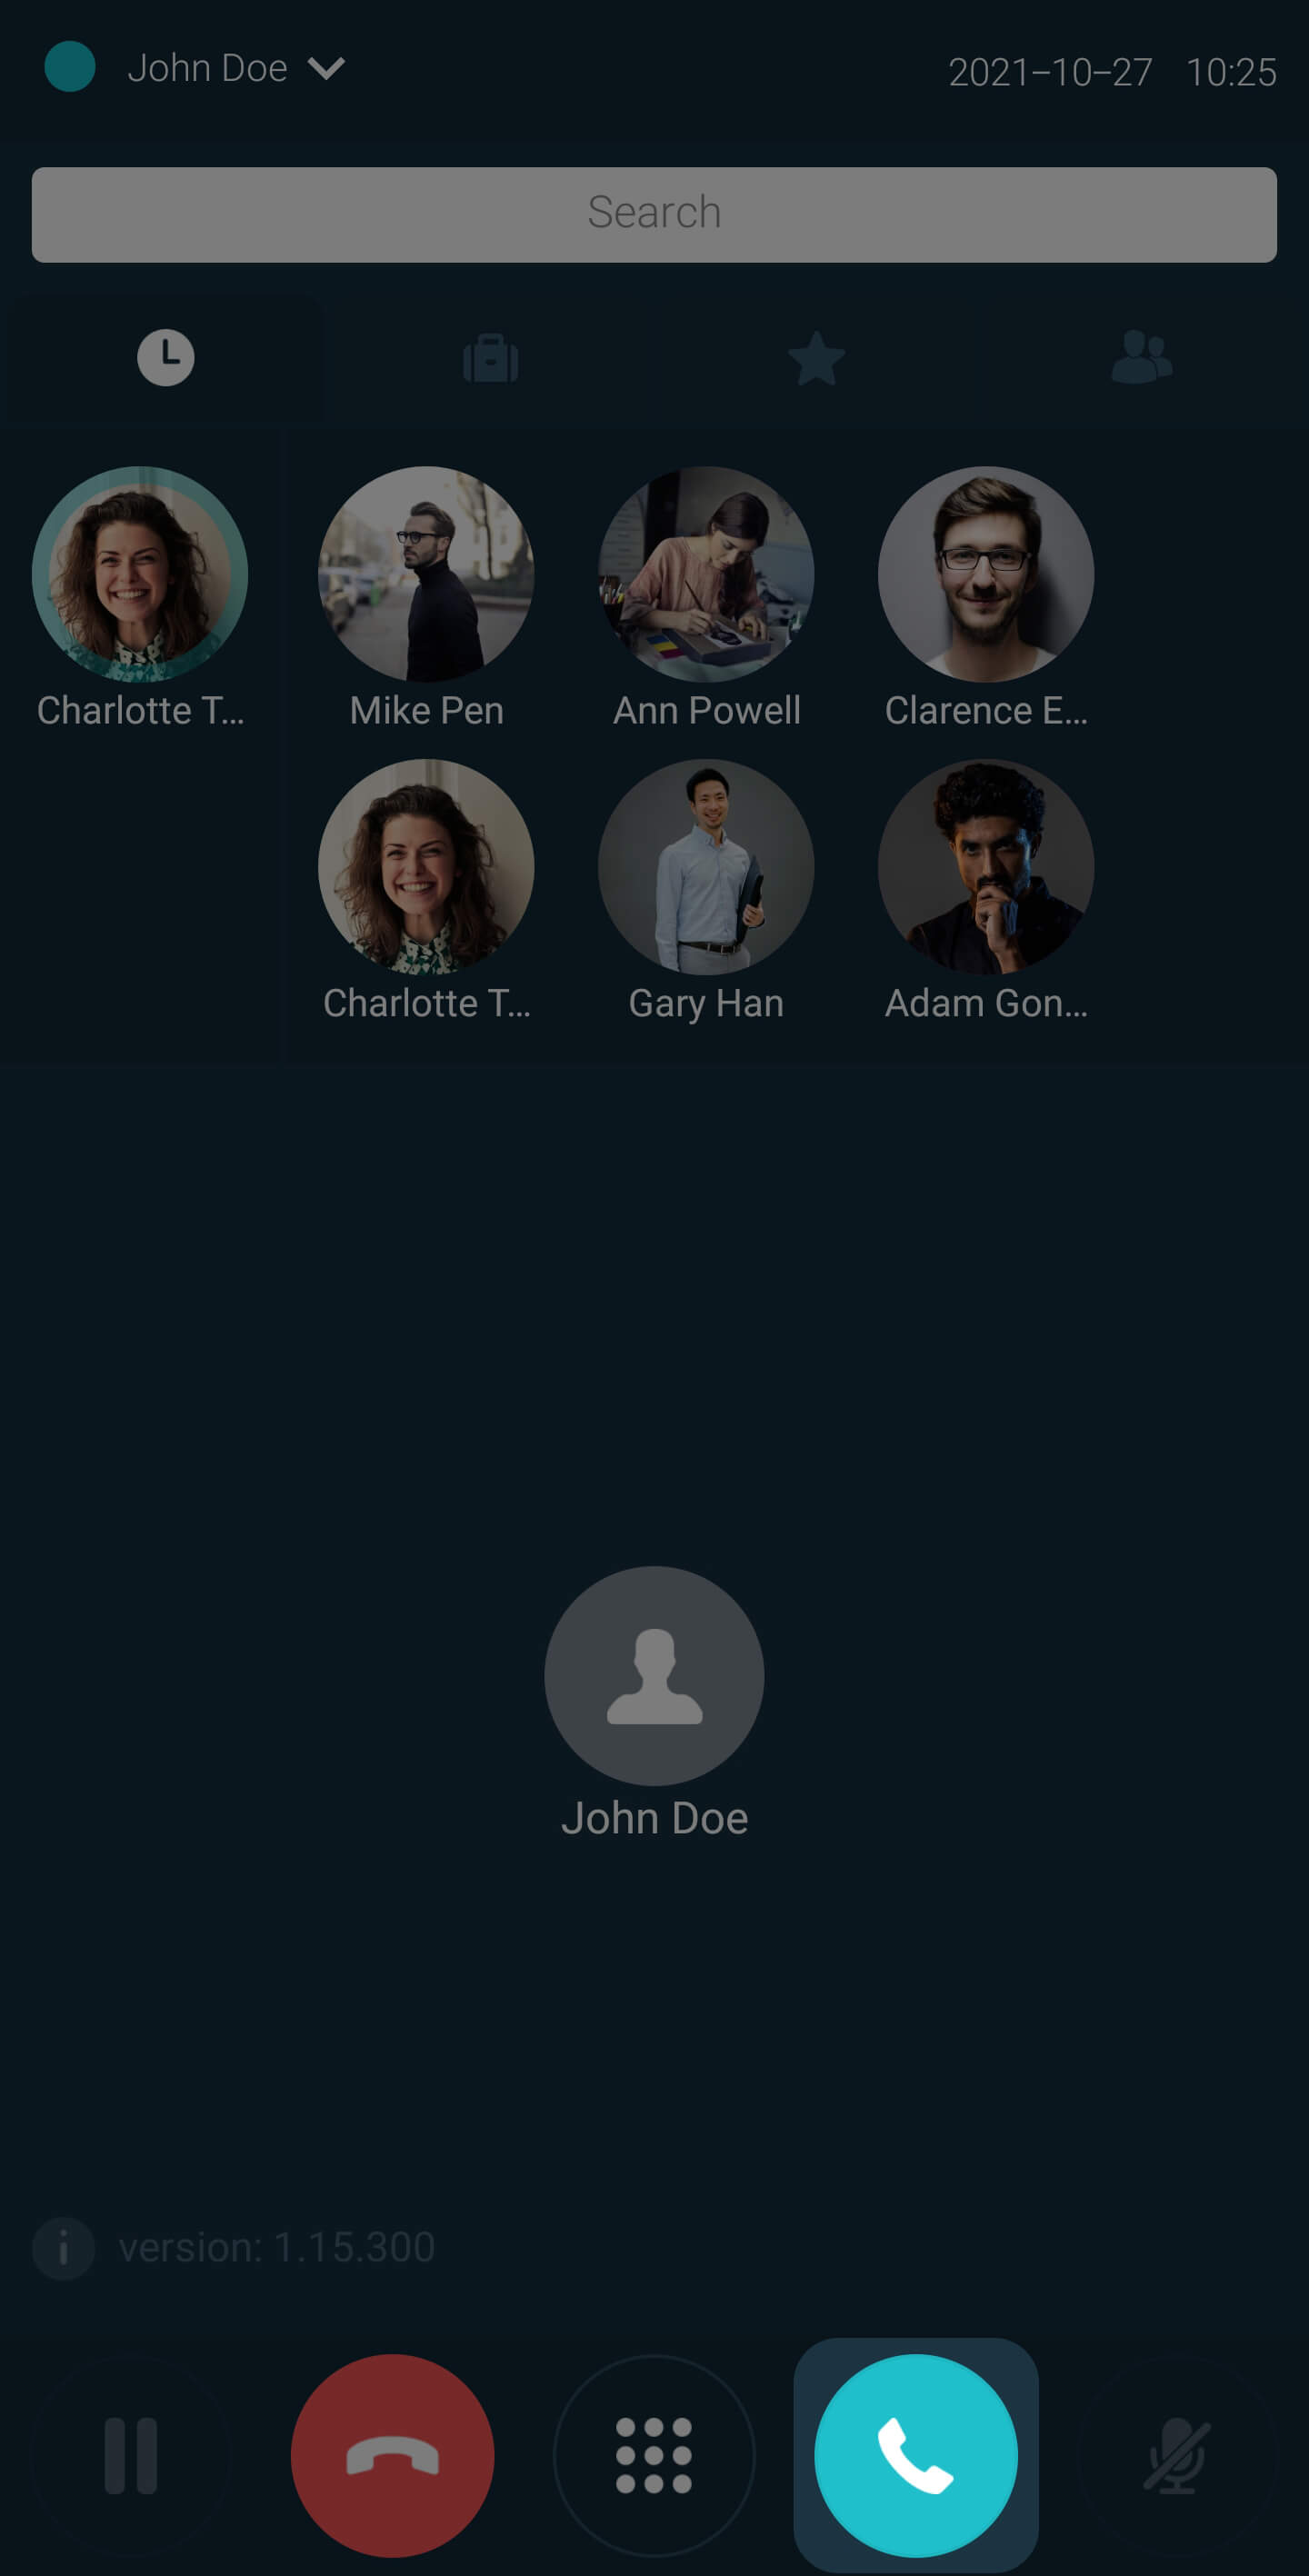
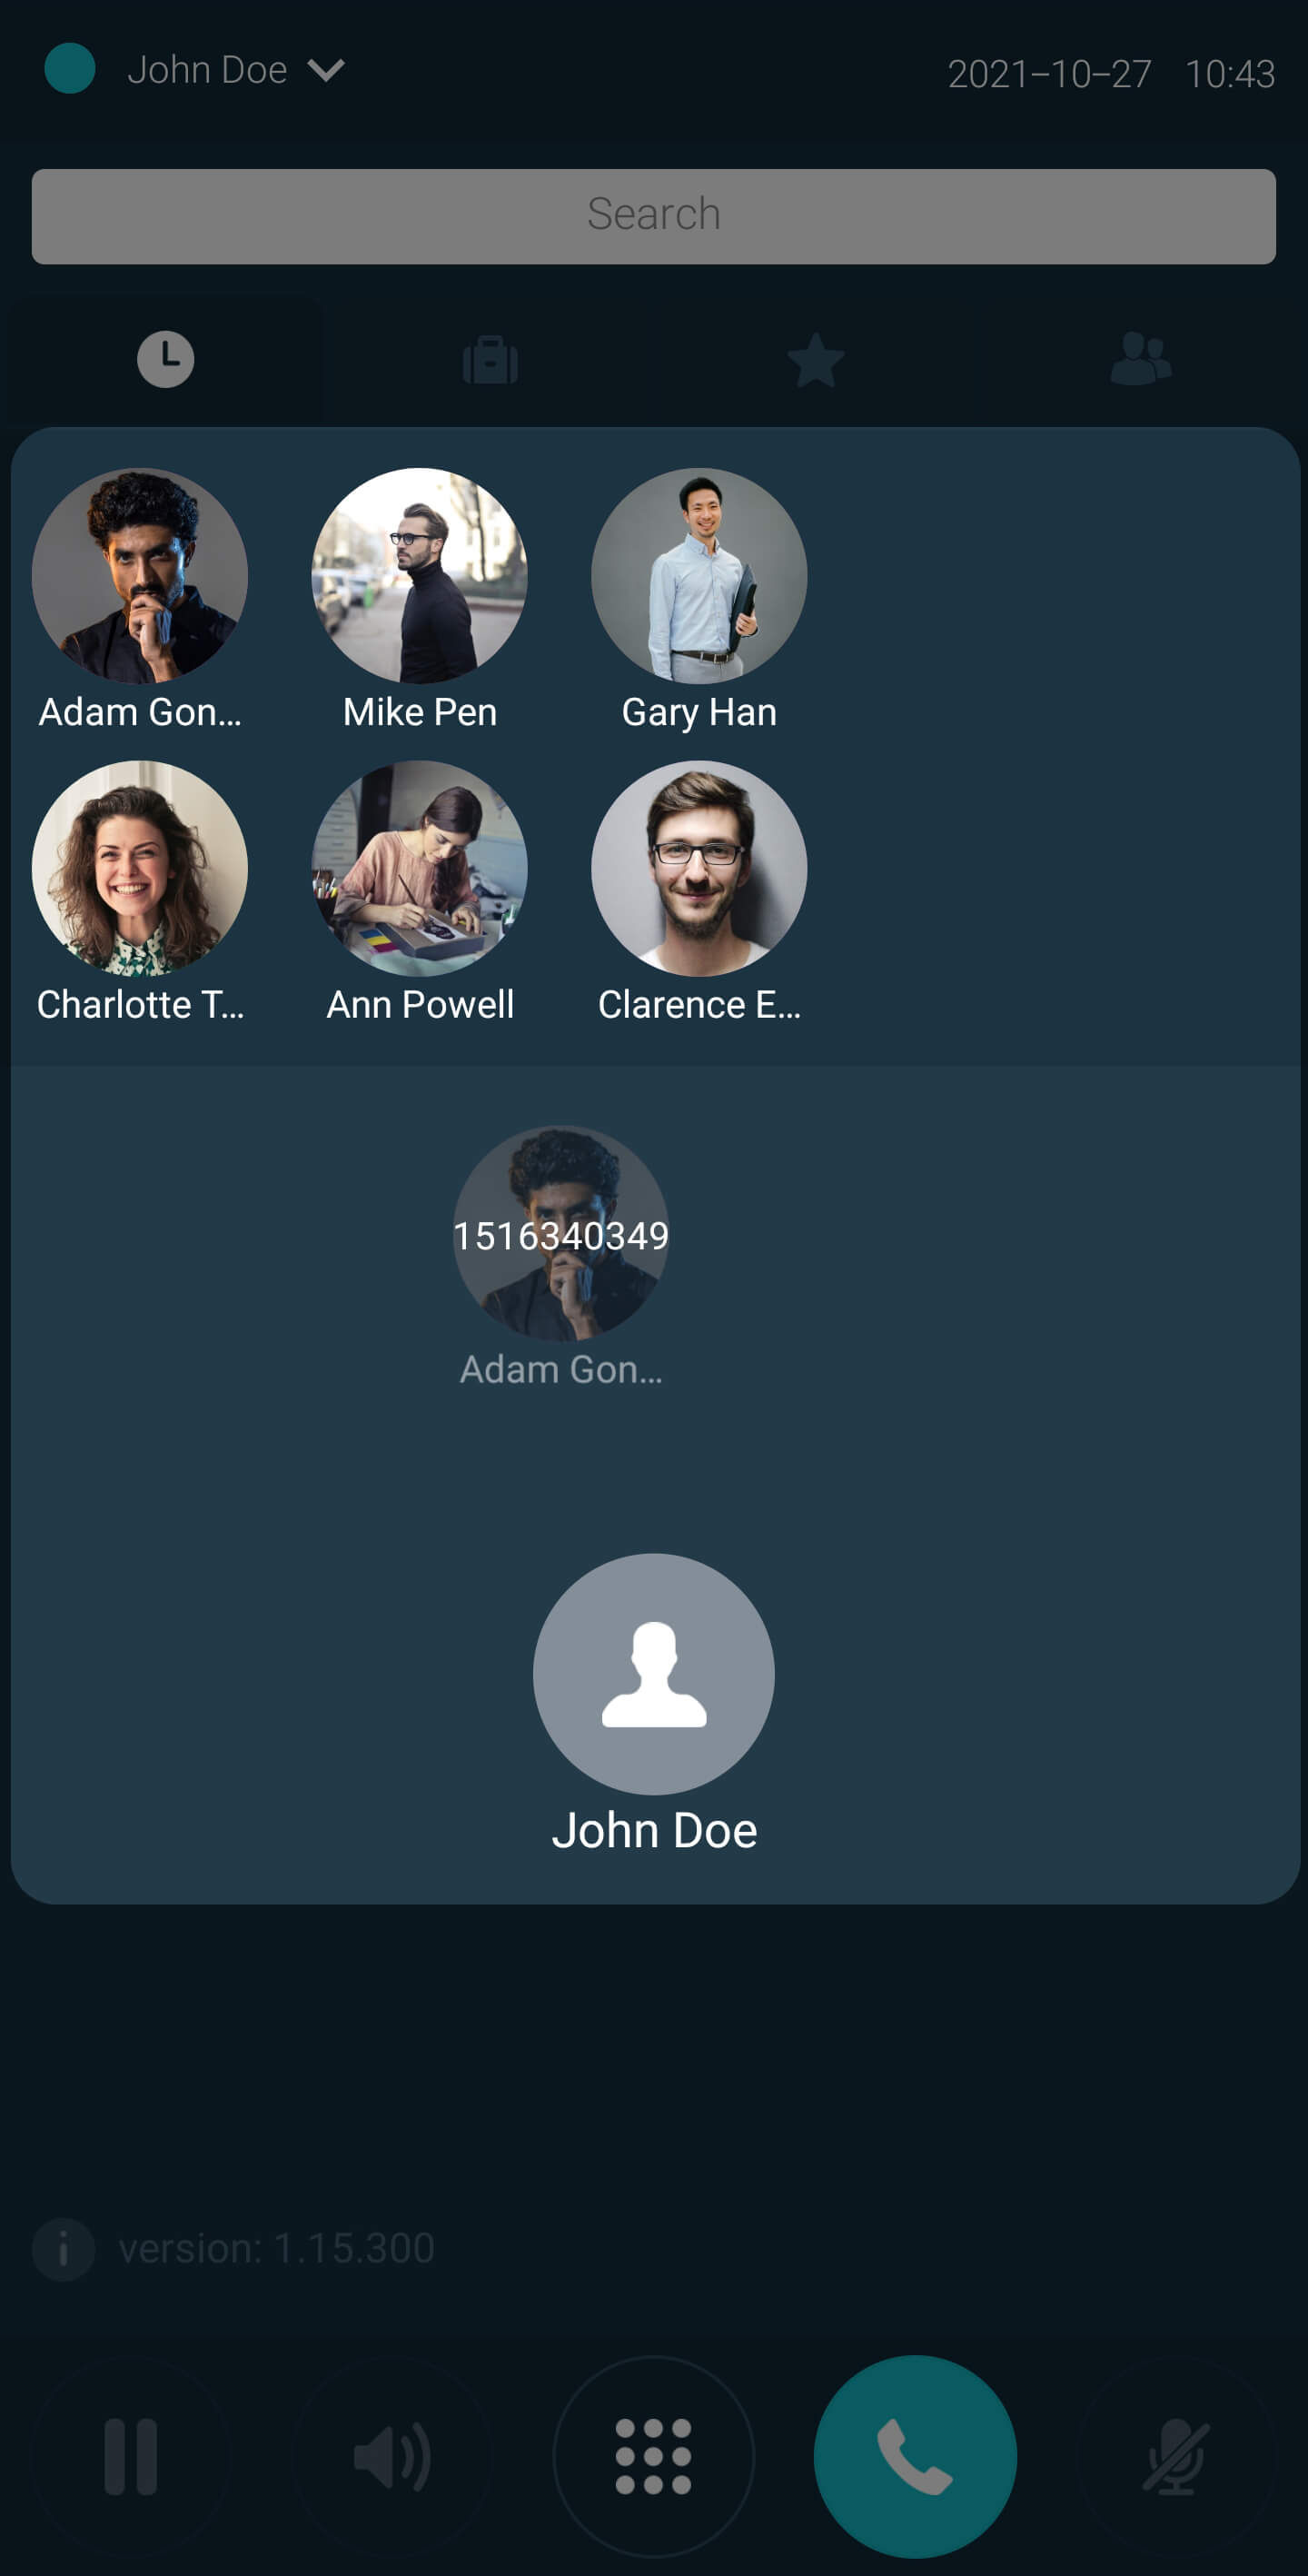
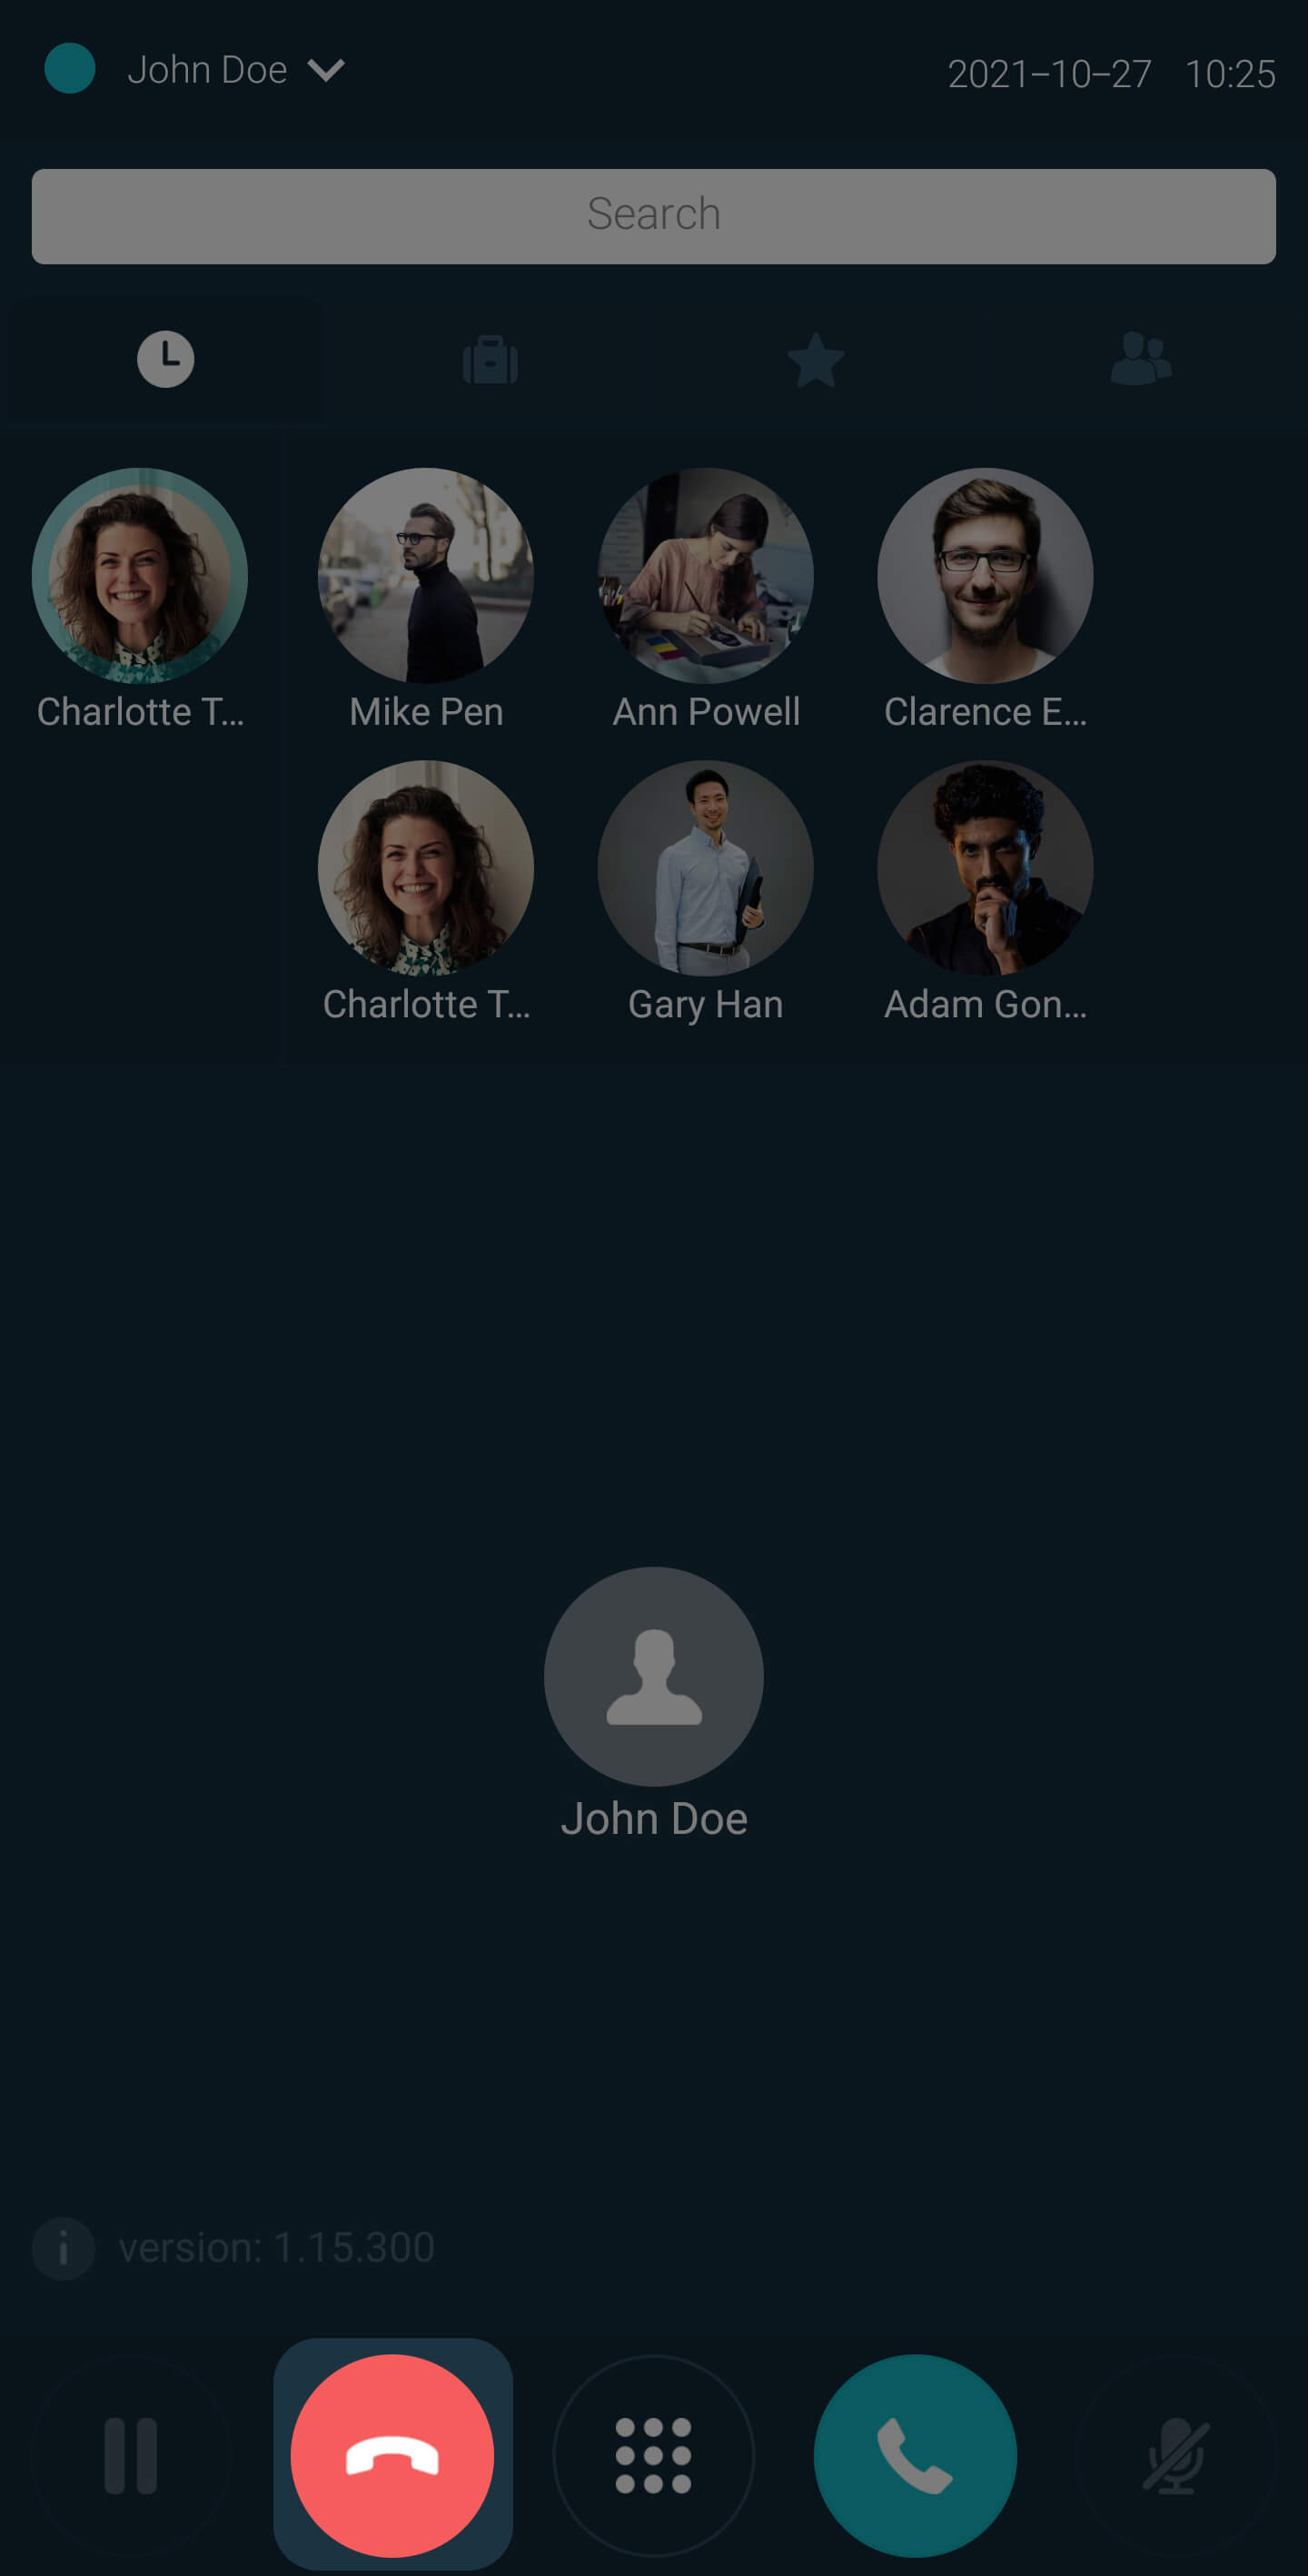
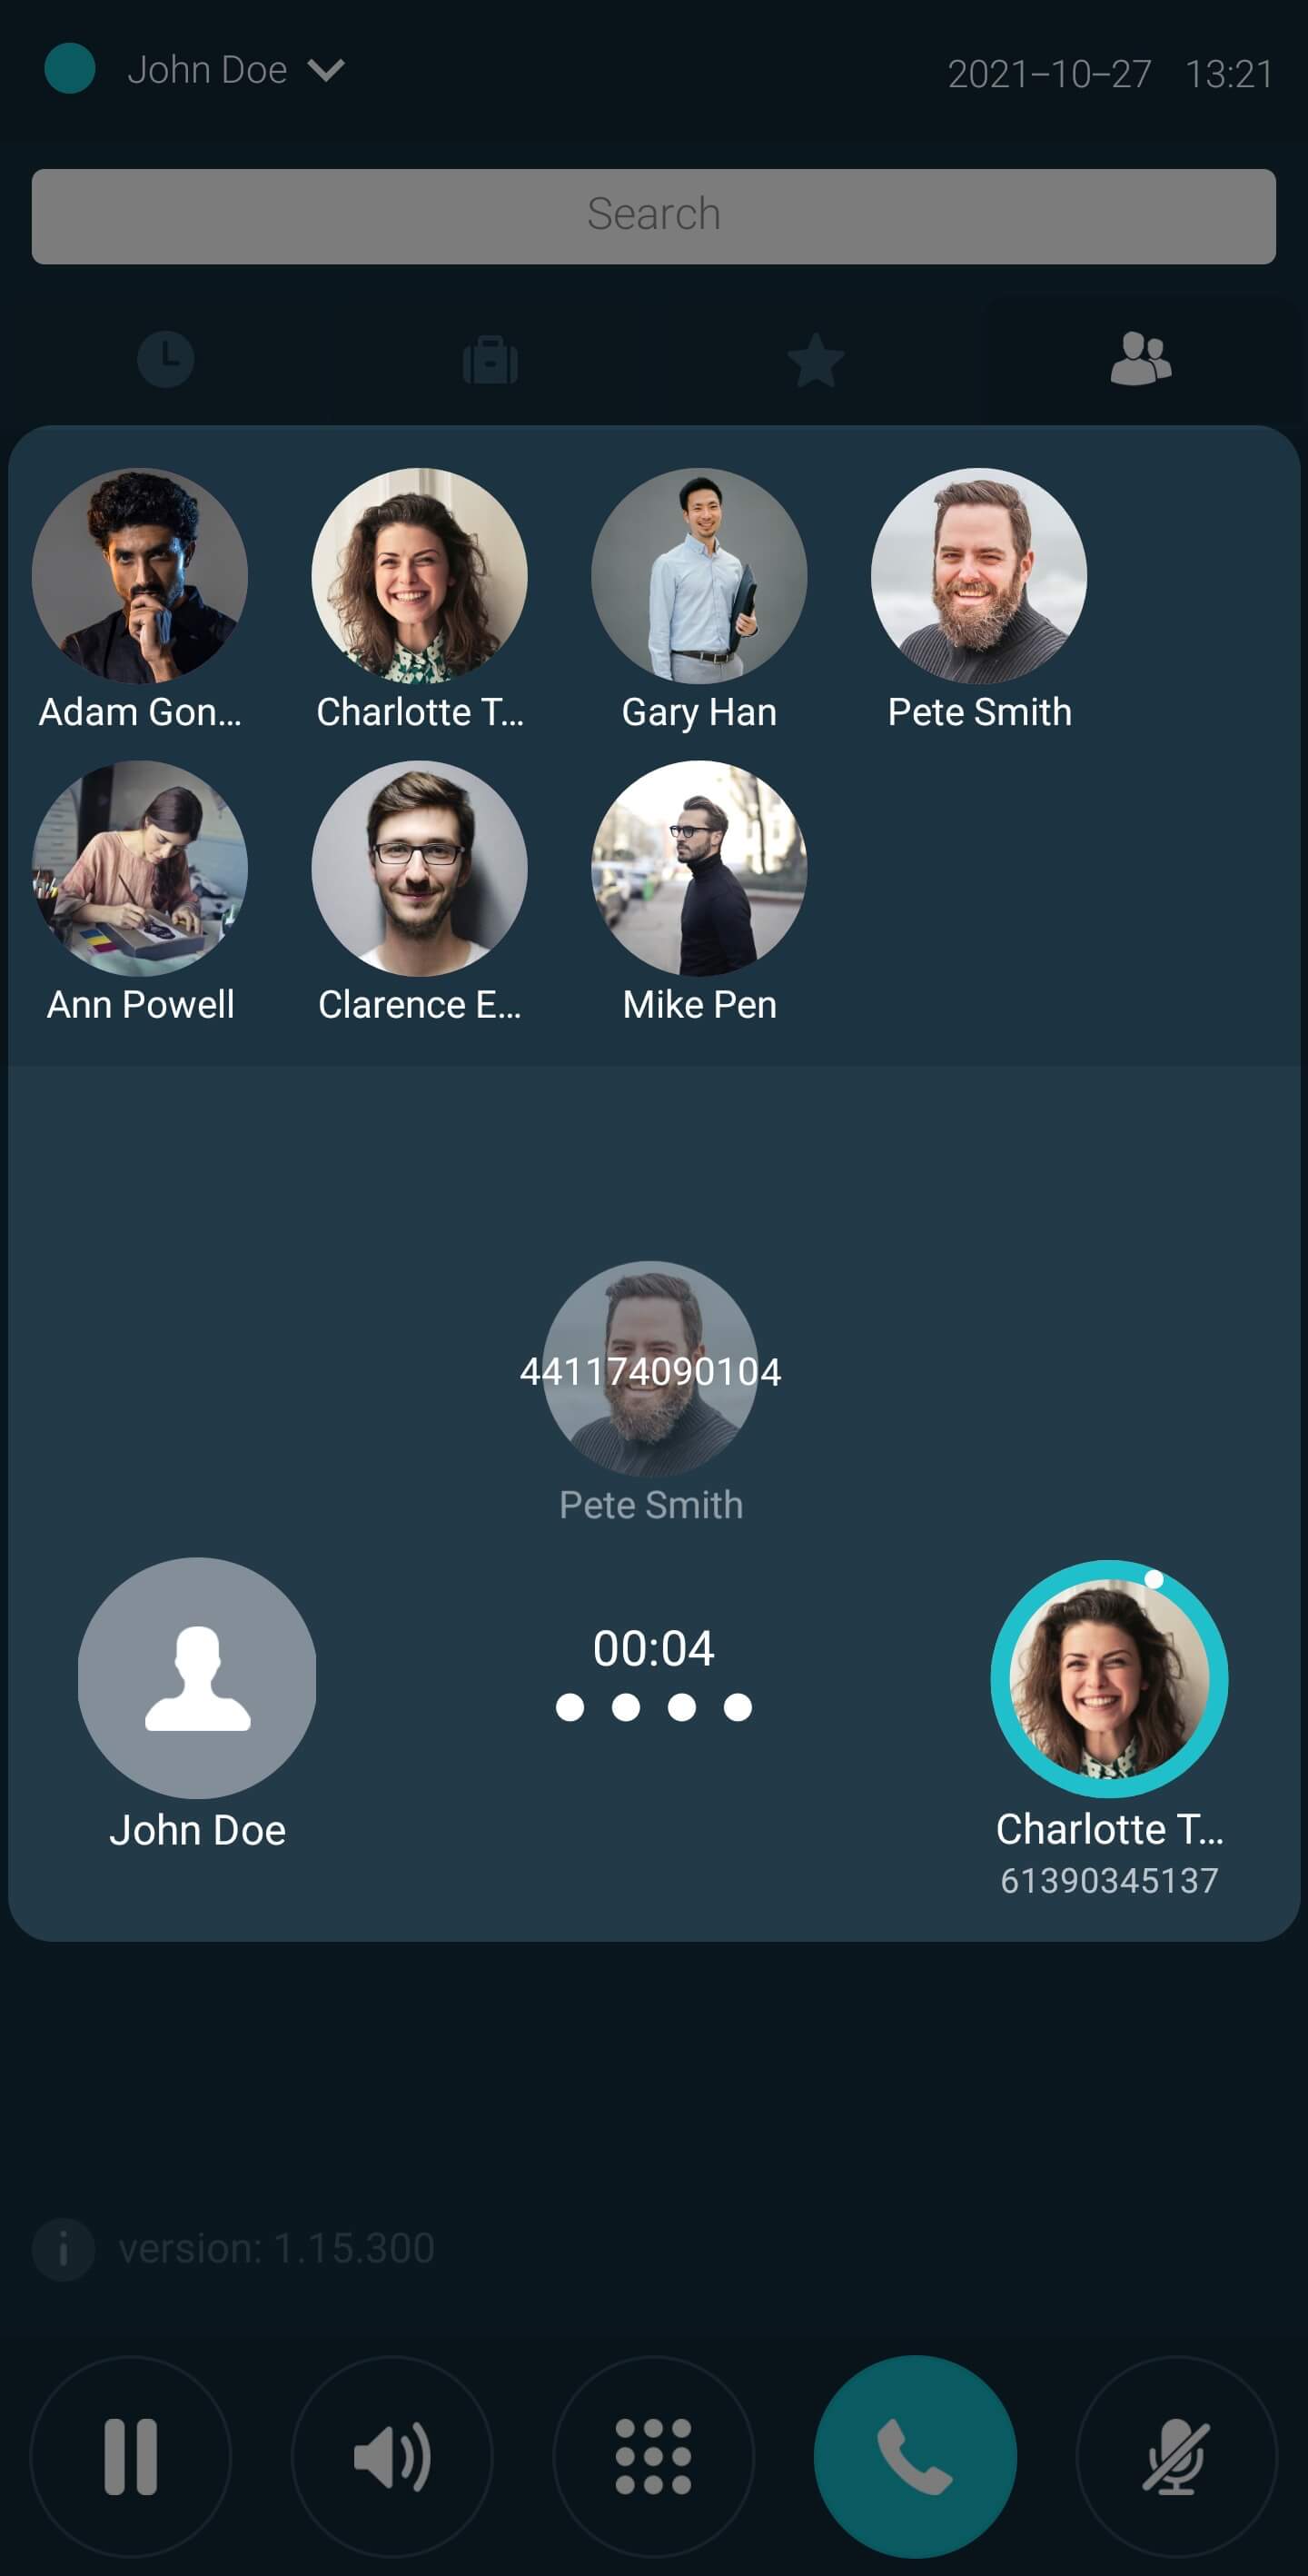
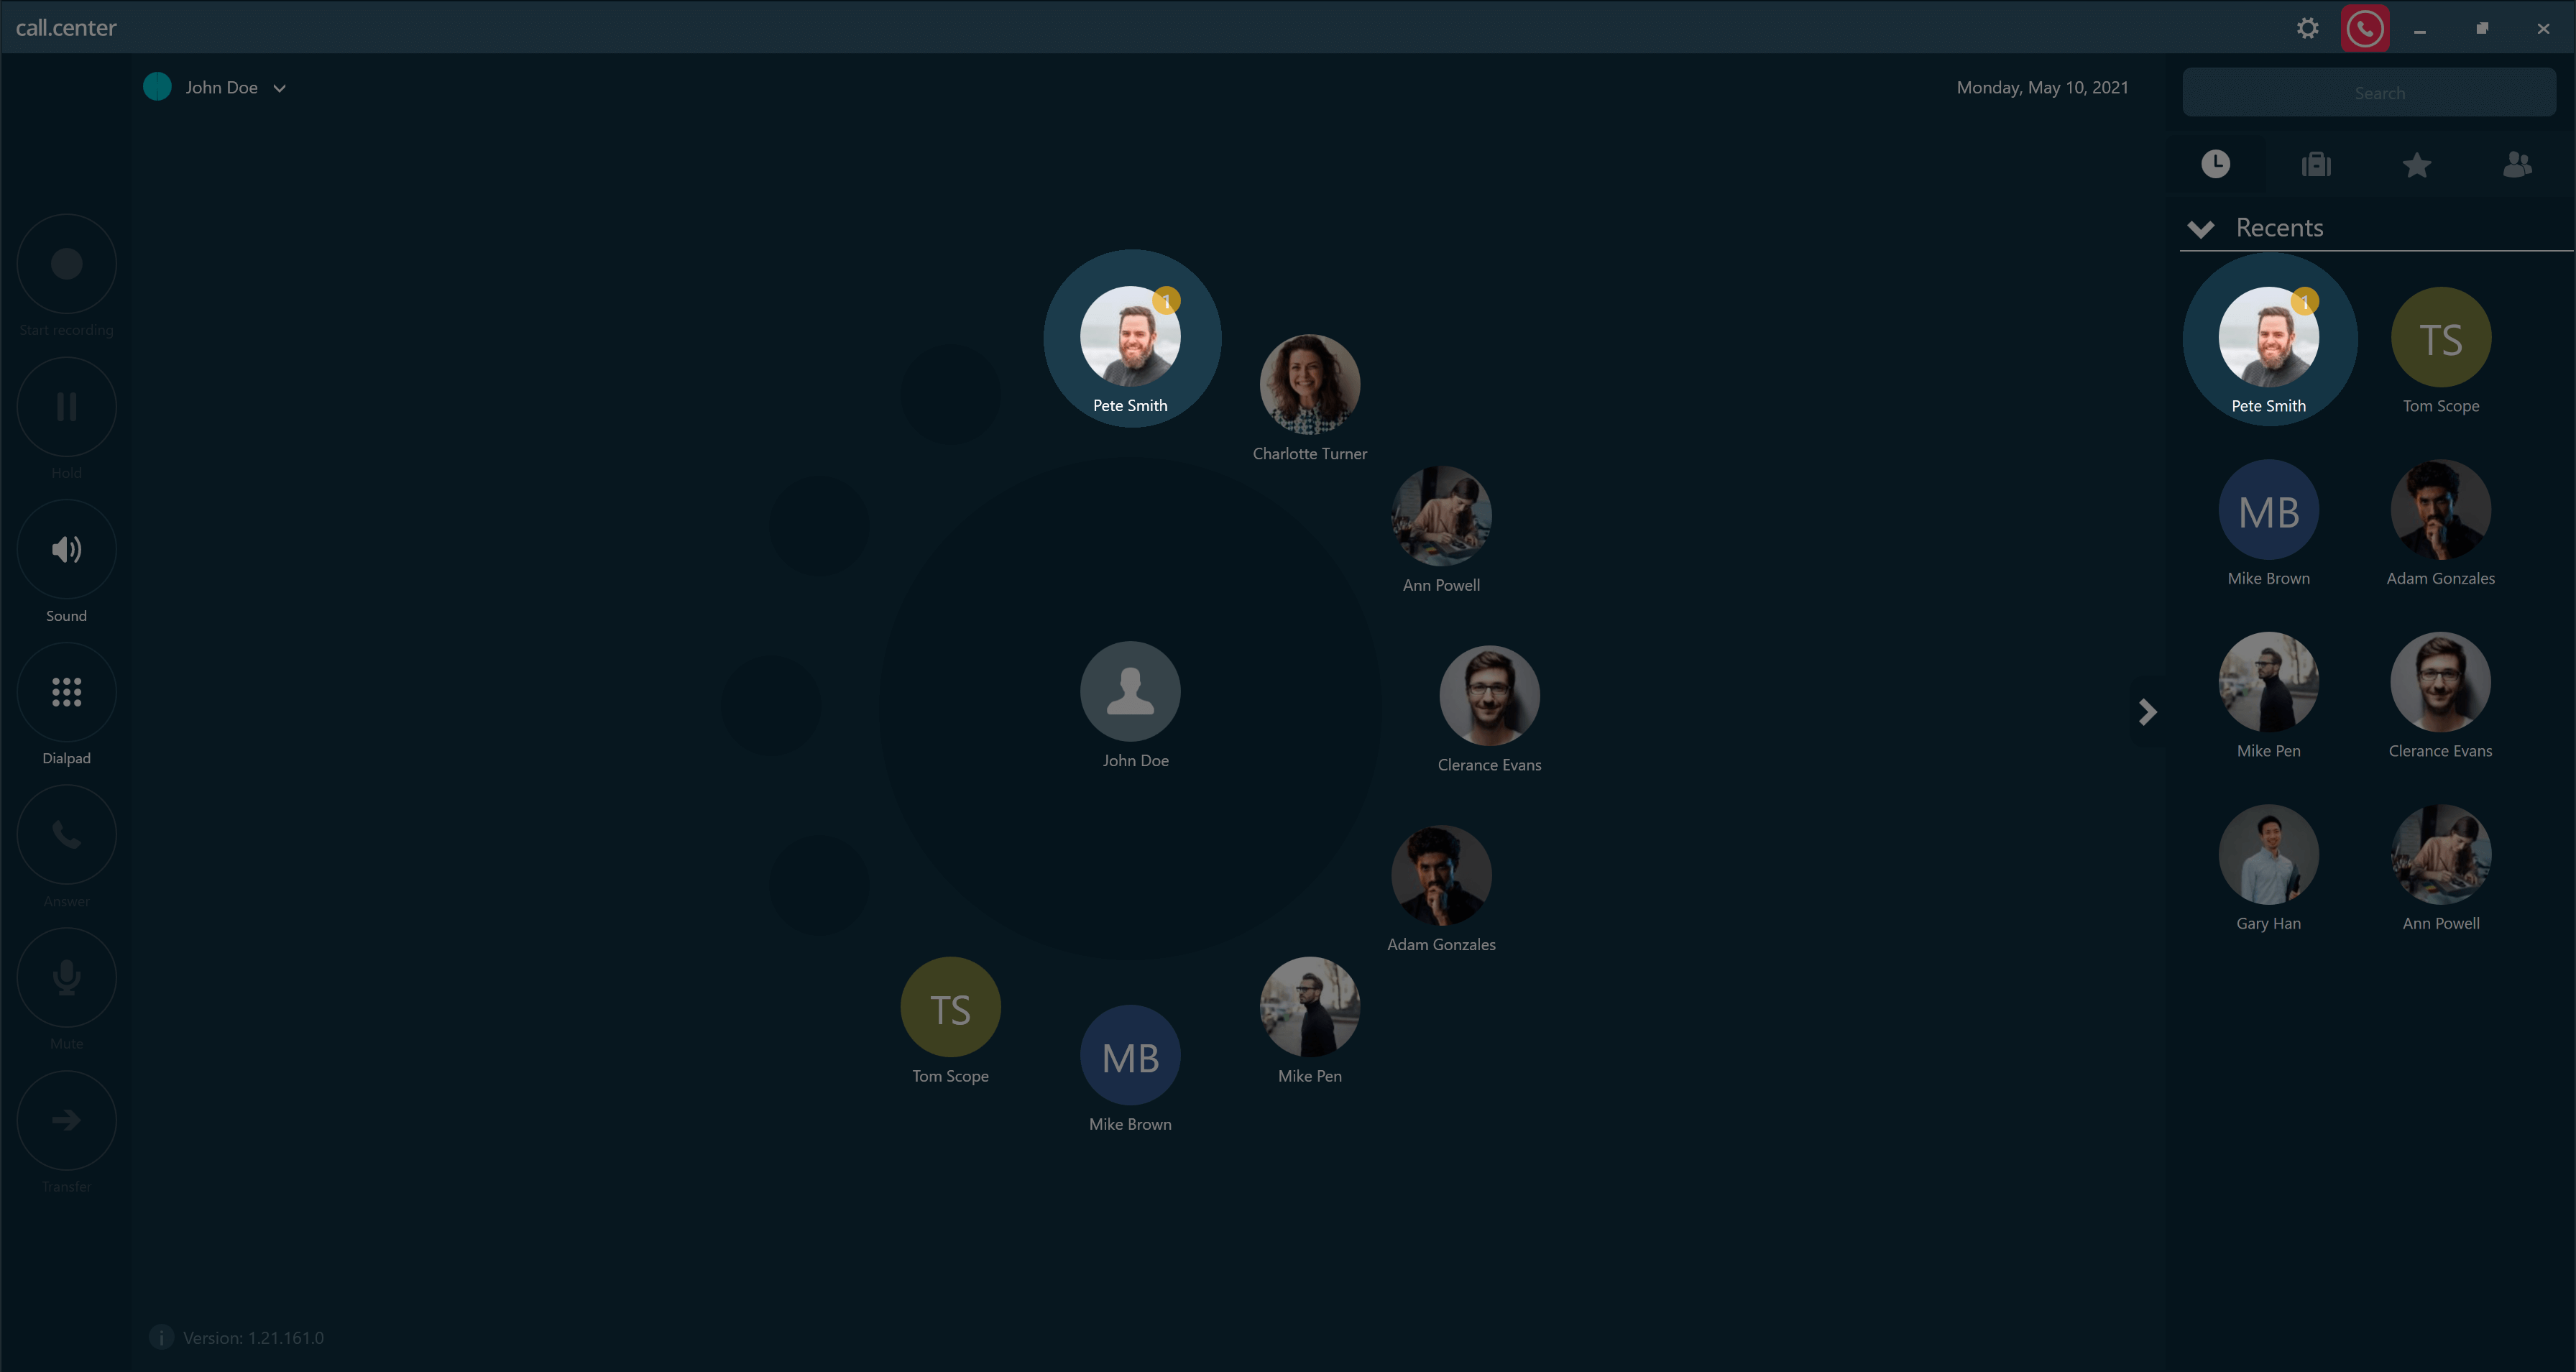
Home Circle
This area serves as the main "workspace" for the call.center™ app, and indicates the current call status of the softphone. The central "contact" displayed belongs to the user to whom this app is registered, and clicking on this contact provides access to the Account Info window, as well as to call history and notes relevant to the owner of this app.
 Back to the top
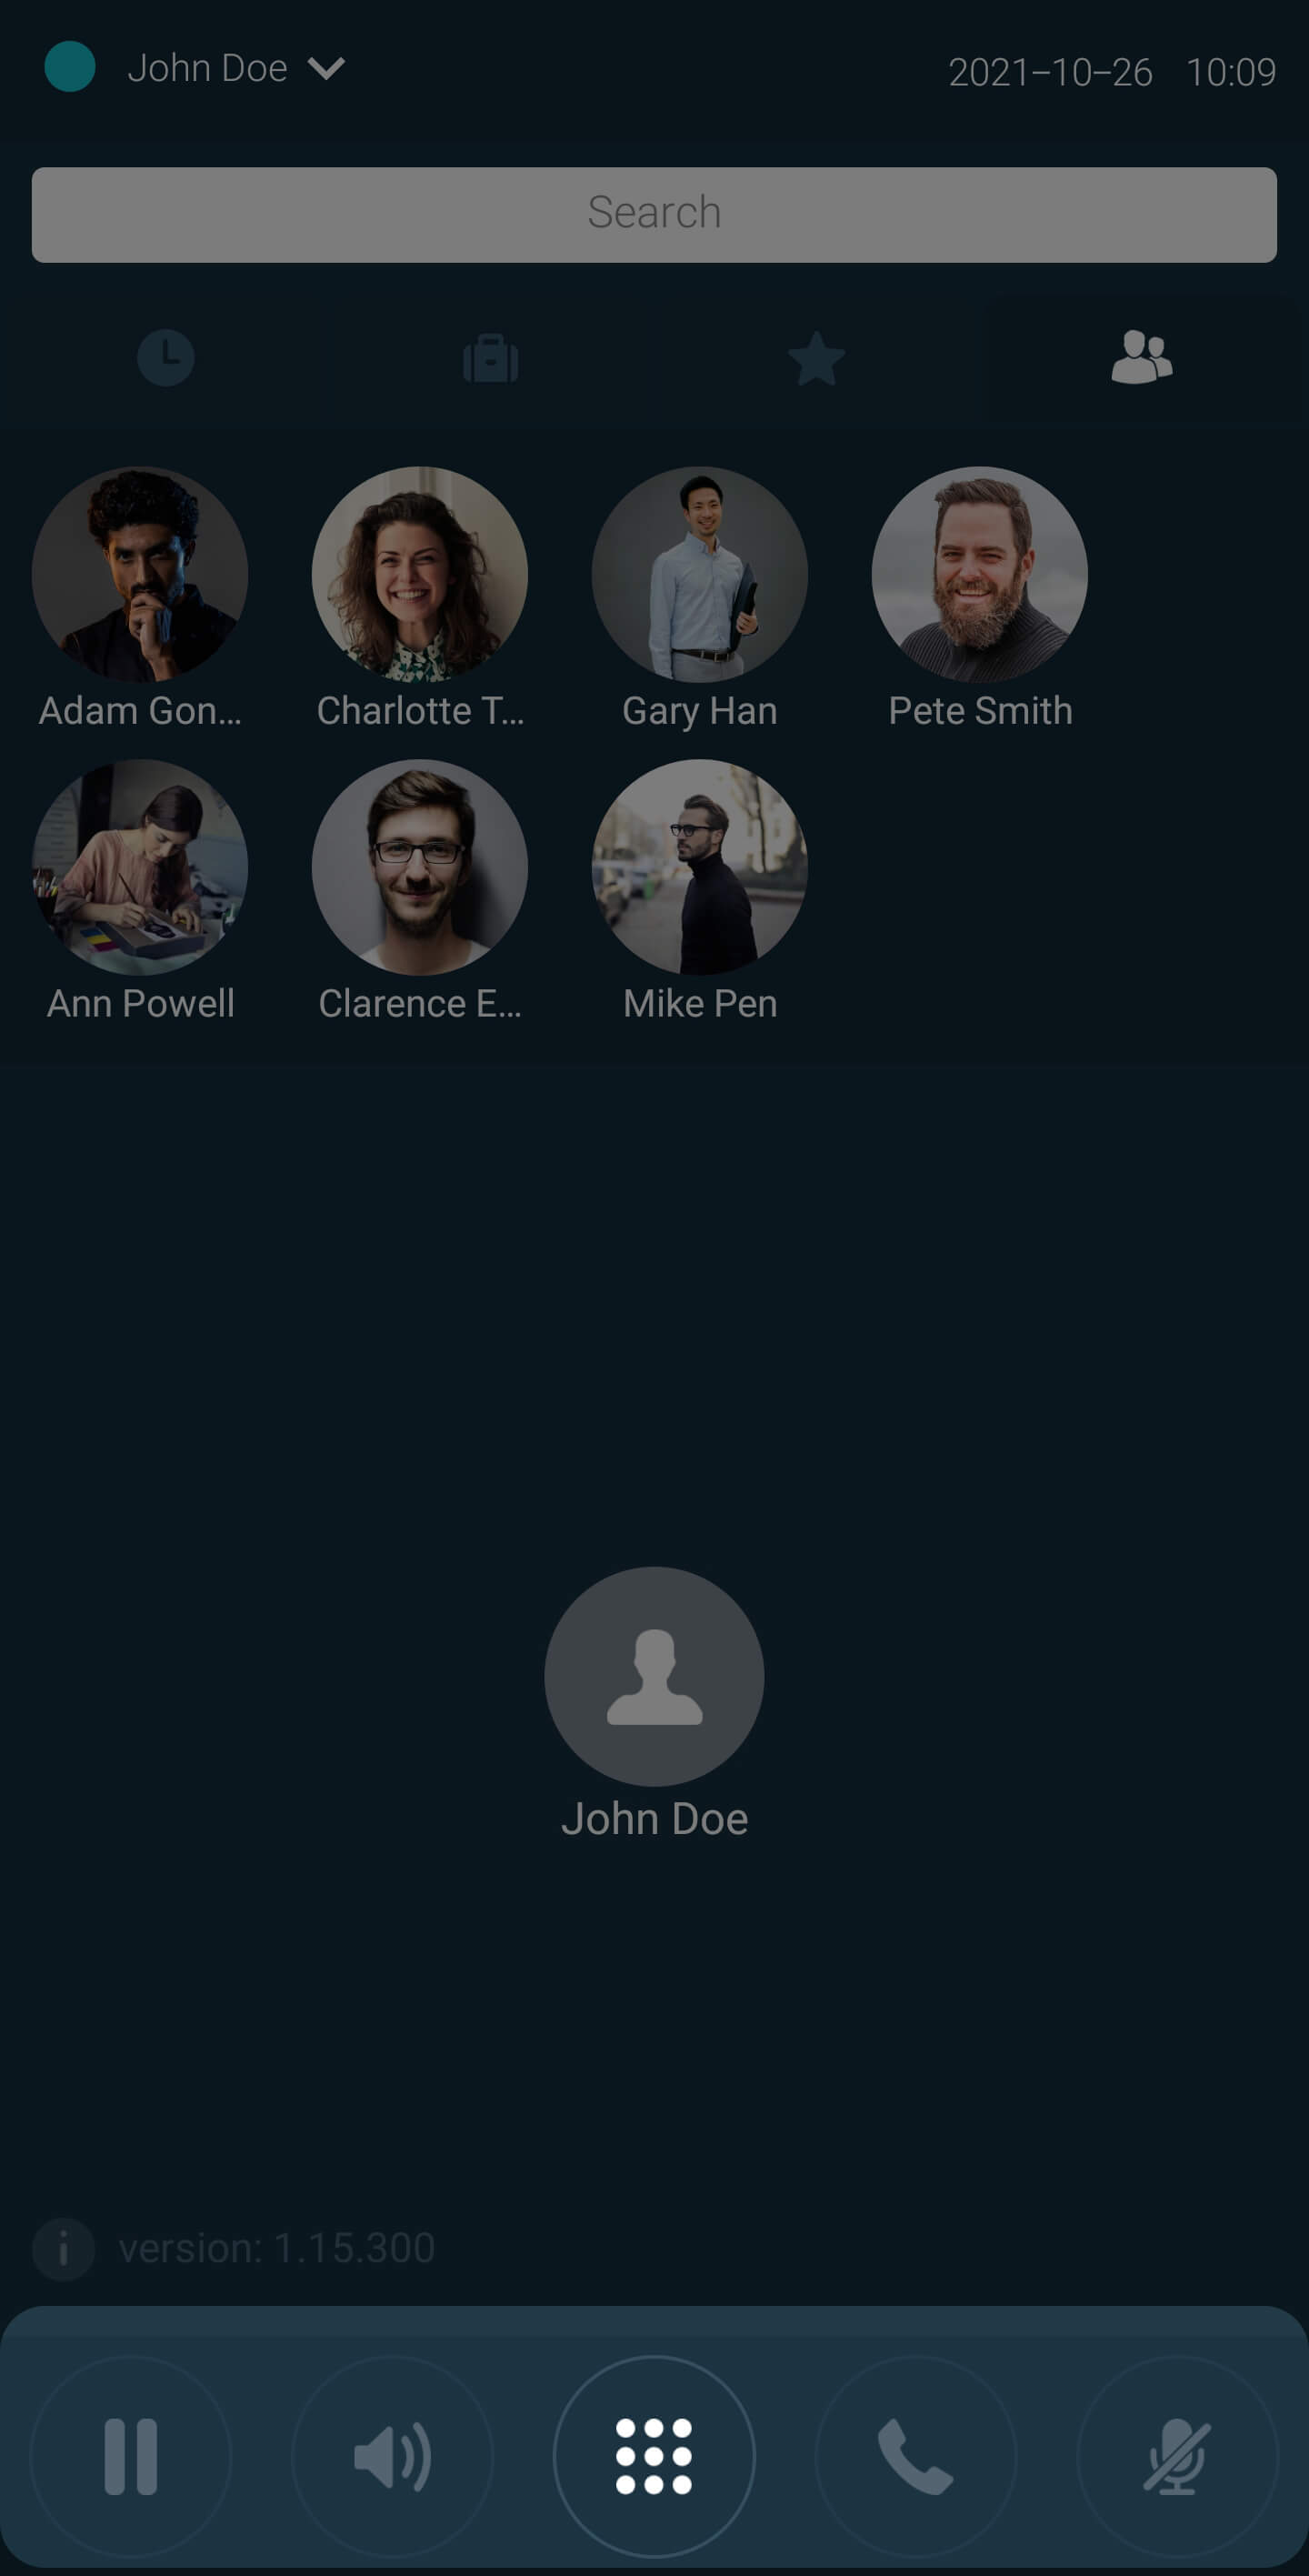
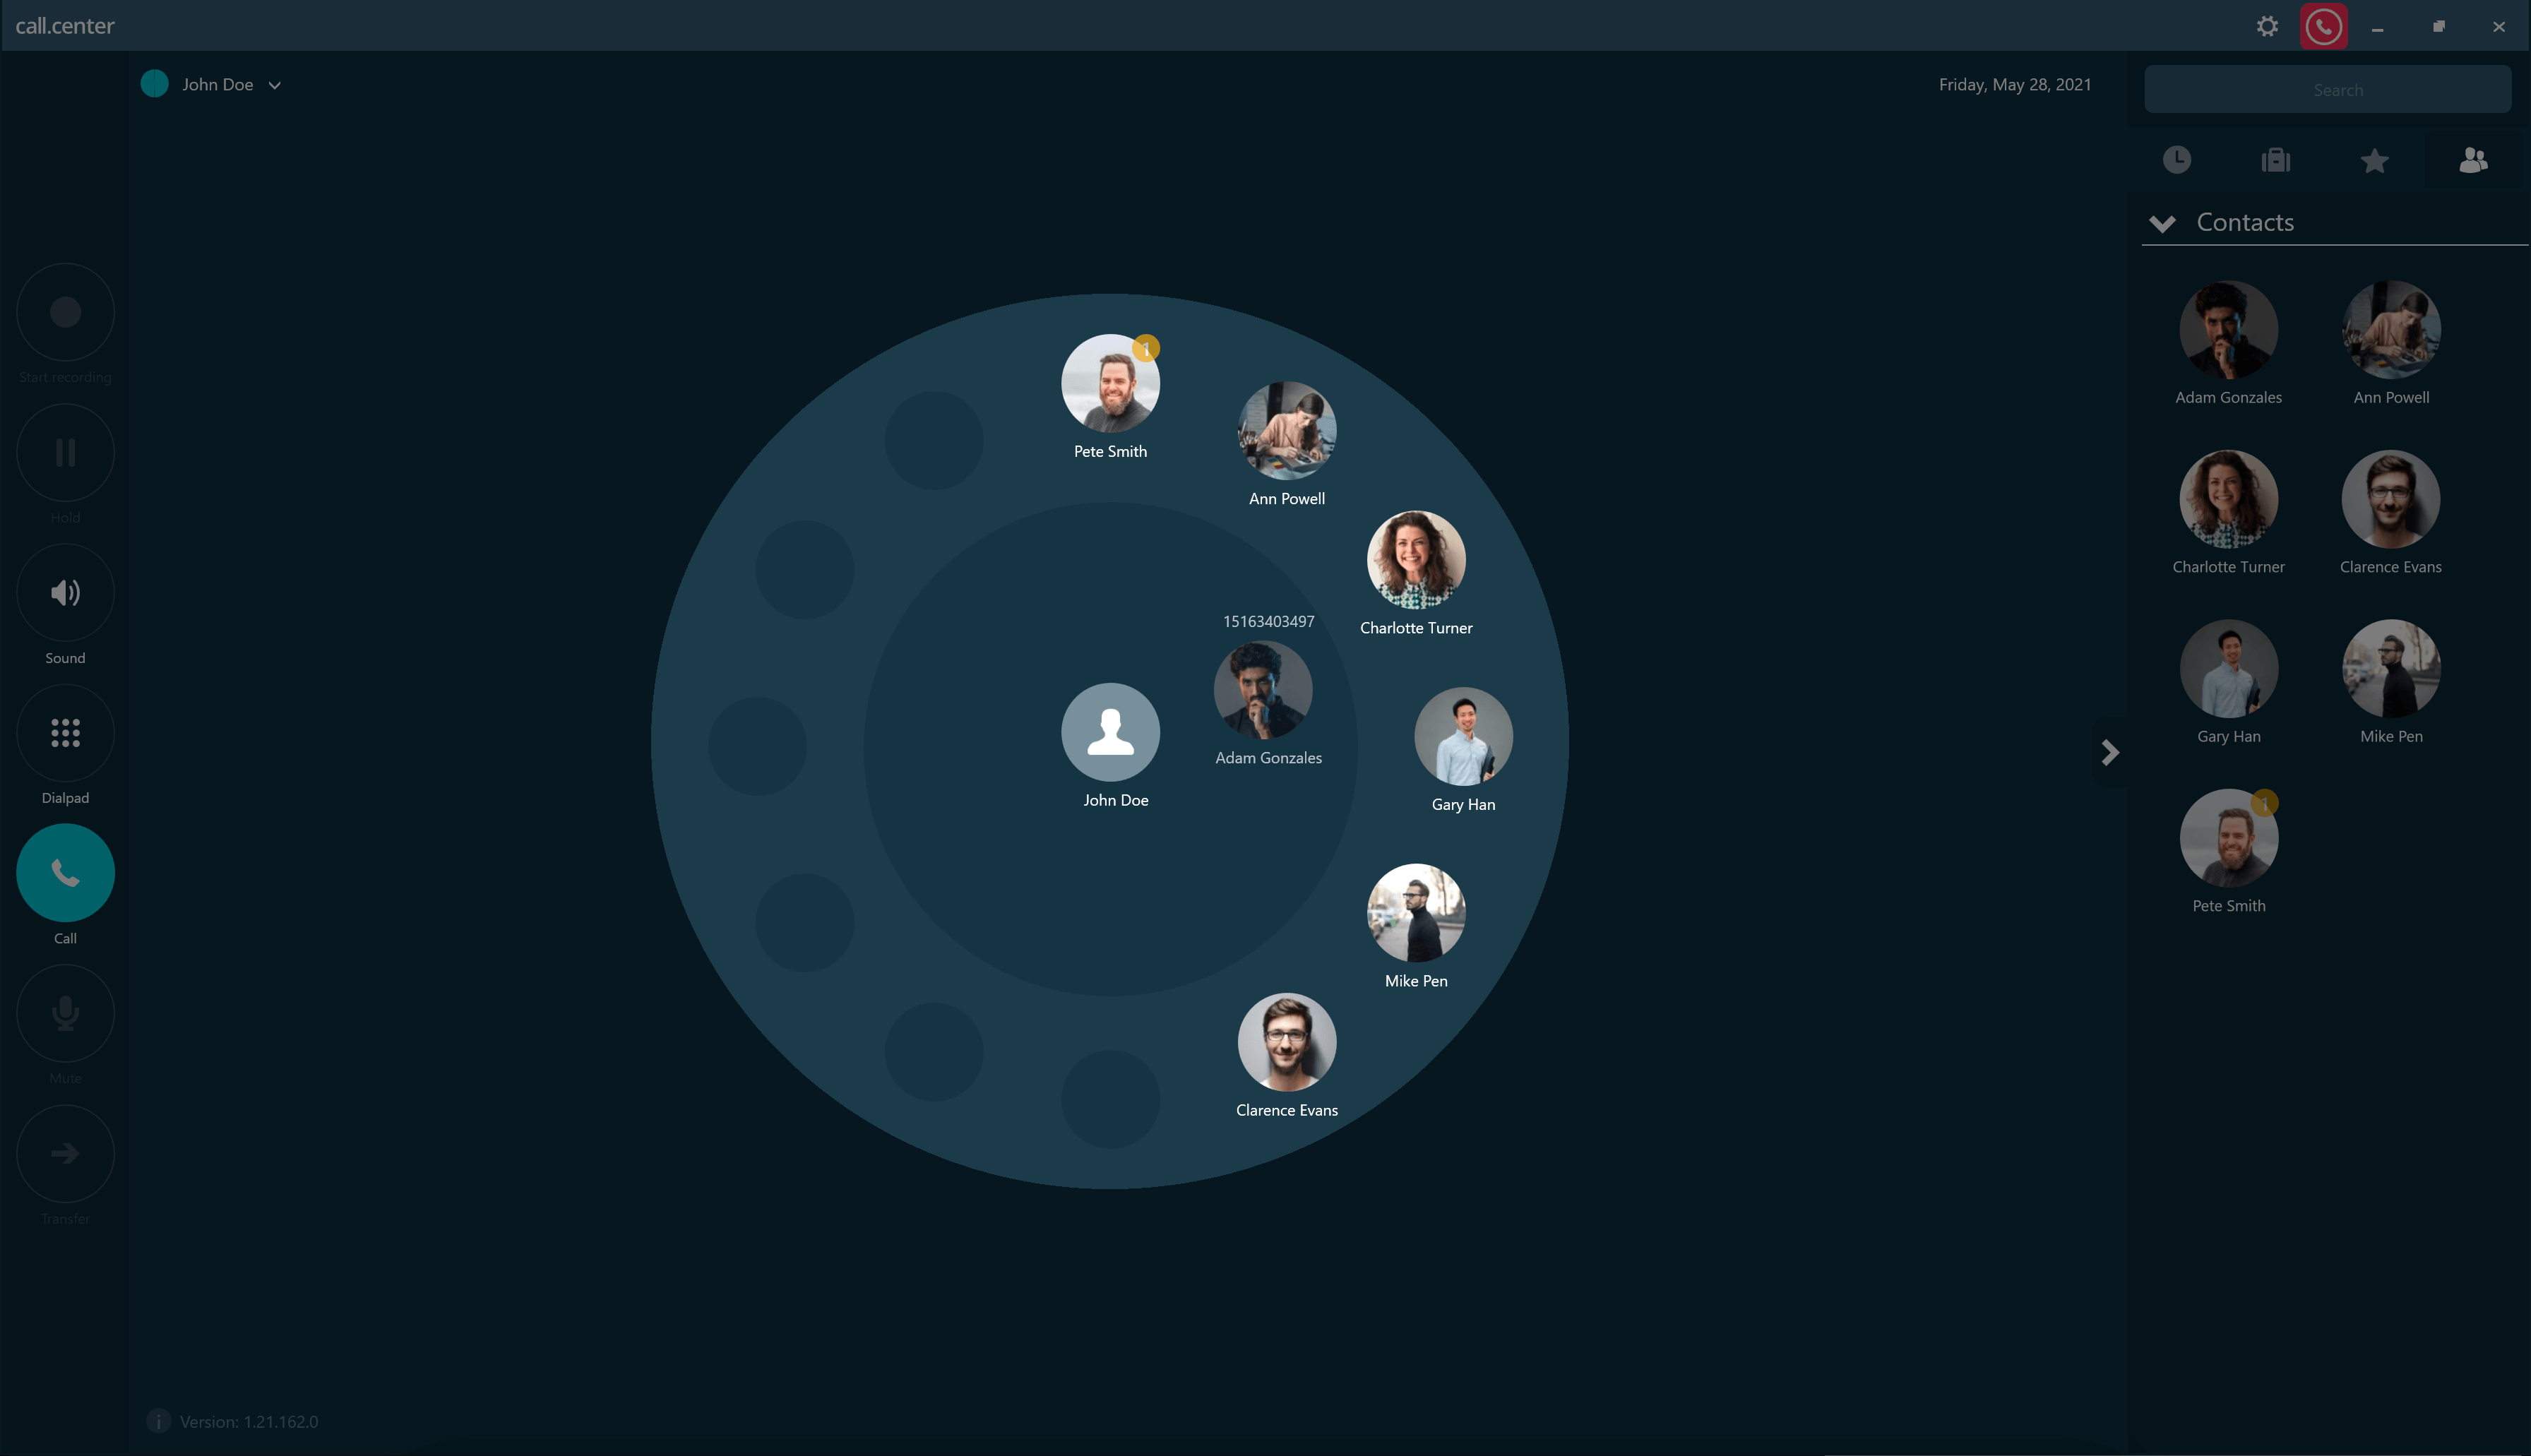
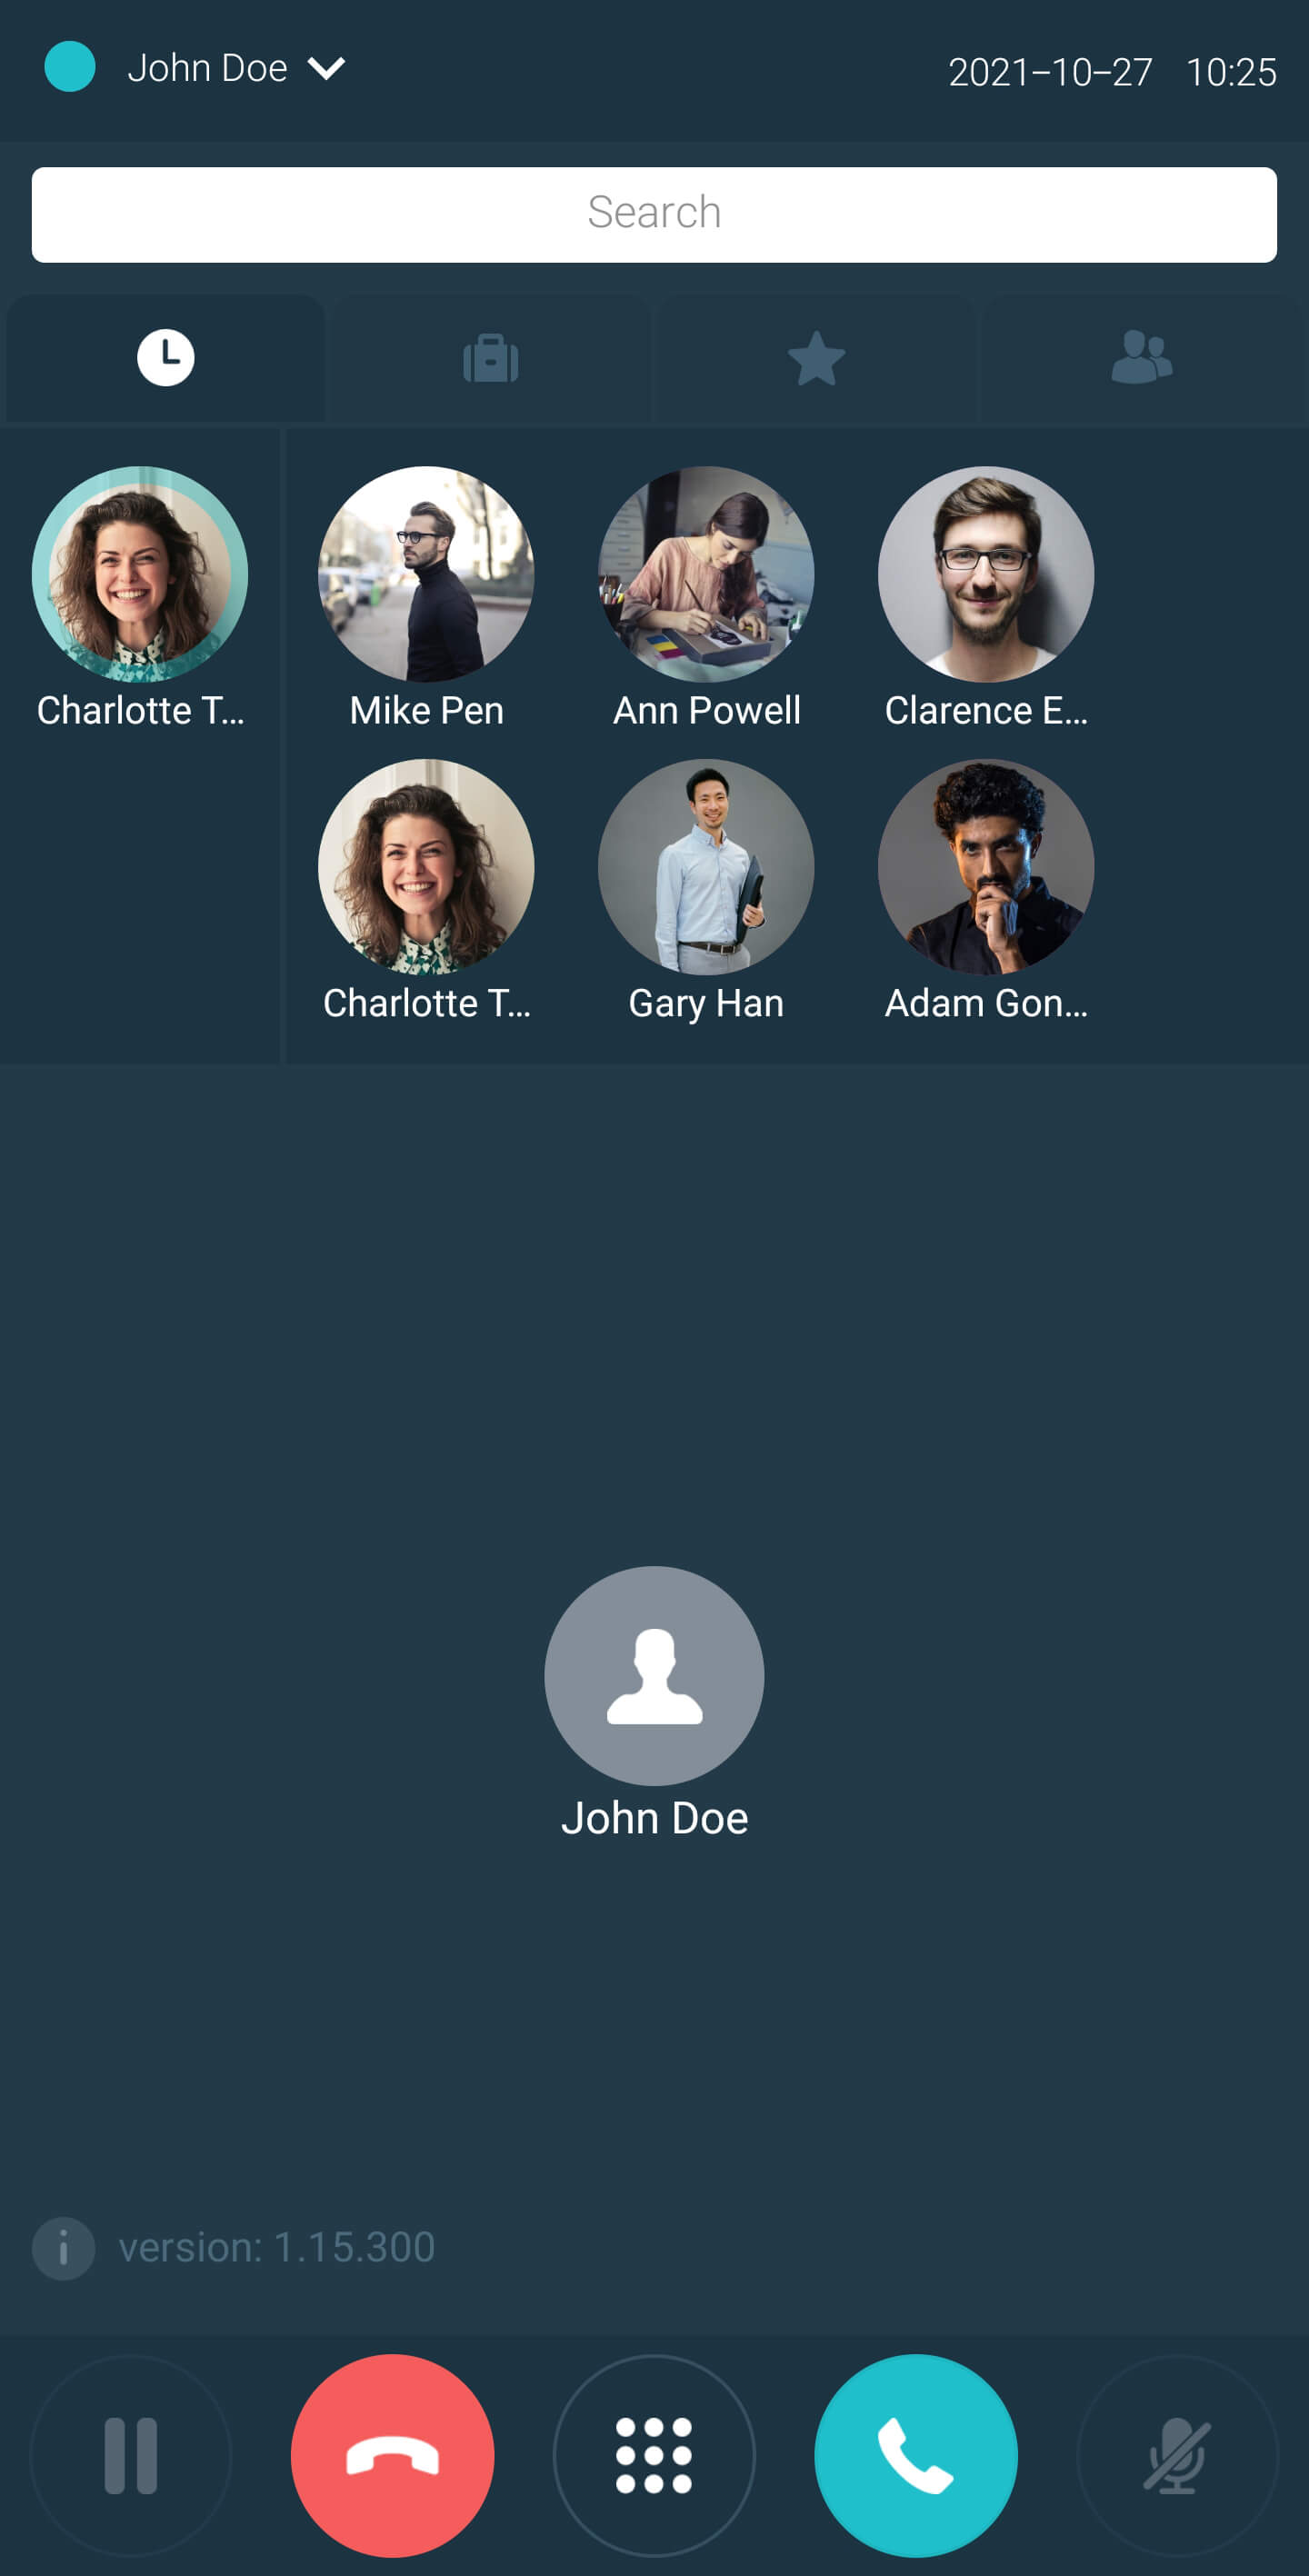
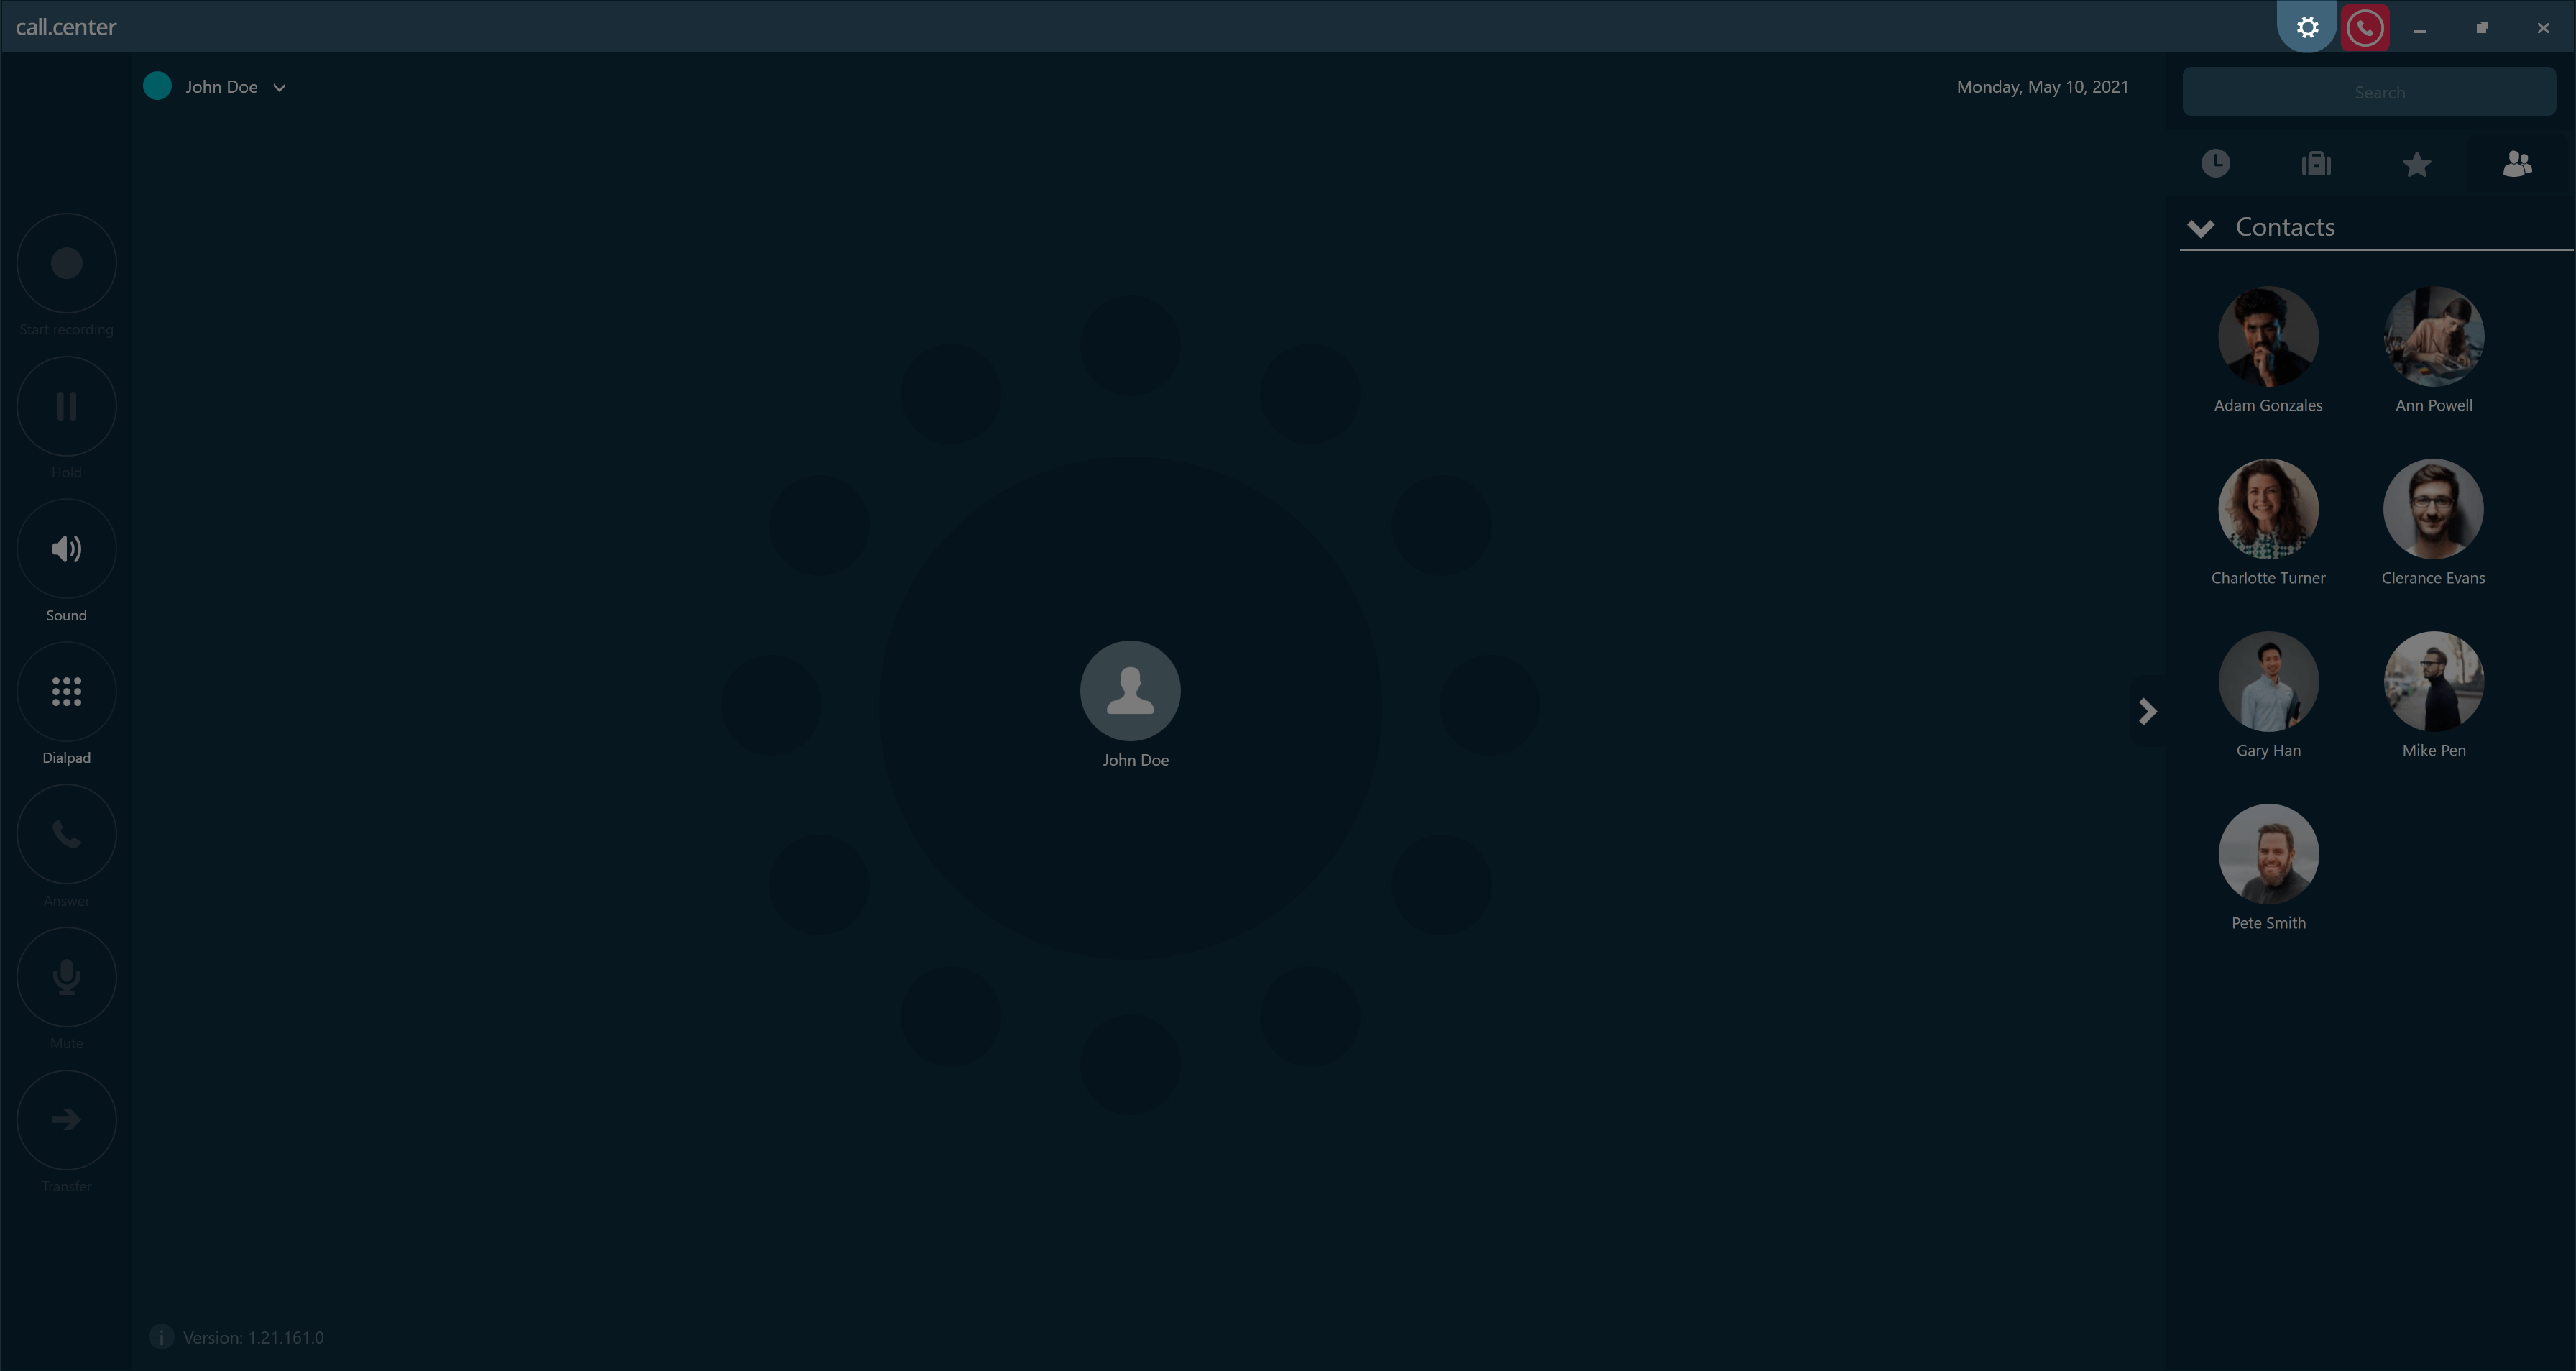
Recents, Favorites and Contacts Tabs
 Displays the recent call history
 Displays a list of company directory contacts
 Displays the favorite contacts
 Displays a list of local and imported contacts
Activities Wheel
The Activities Wheel area provides easy and convenient access to your most important Contacts. It is populated with contacts:
- To whom calls were recently placed, or from whom calls were recently received.
- Which were recently interacted with.
- That were pinned by the user from the Recents, Company Directory, Favorites or Contacts onto the Activities Wheel.
 Back to the top
Clearing the Activities Wheel
Contacts in the Activities Wheel area may be cleared individually or collectively, depending on the operating system platform and device being used.
In order to remove a single contact from the Activities Wheel, "drag" the selected contact avatar from its location in the Activities Wheel area and release the avatar outside that area.
If collective clearing of the contact is supported by your operating system platform, right-click anywhere in the area outside of the Activities Wheel. A menu will be displayed, from which you may select the required "clearing" option (Clear all, Clear all visible or Clear all except pinned) from the drop-down menu.
For iOS and Android, in order to clean the Activities Wheel, press and hold your avatar located in the Home Circle. A menu will appear with options for clearing the Activities Wheel area.
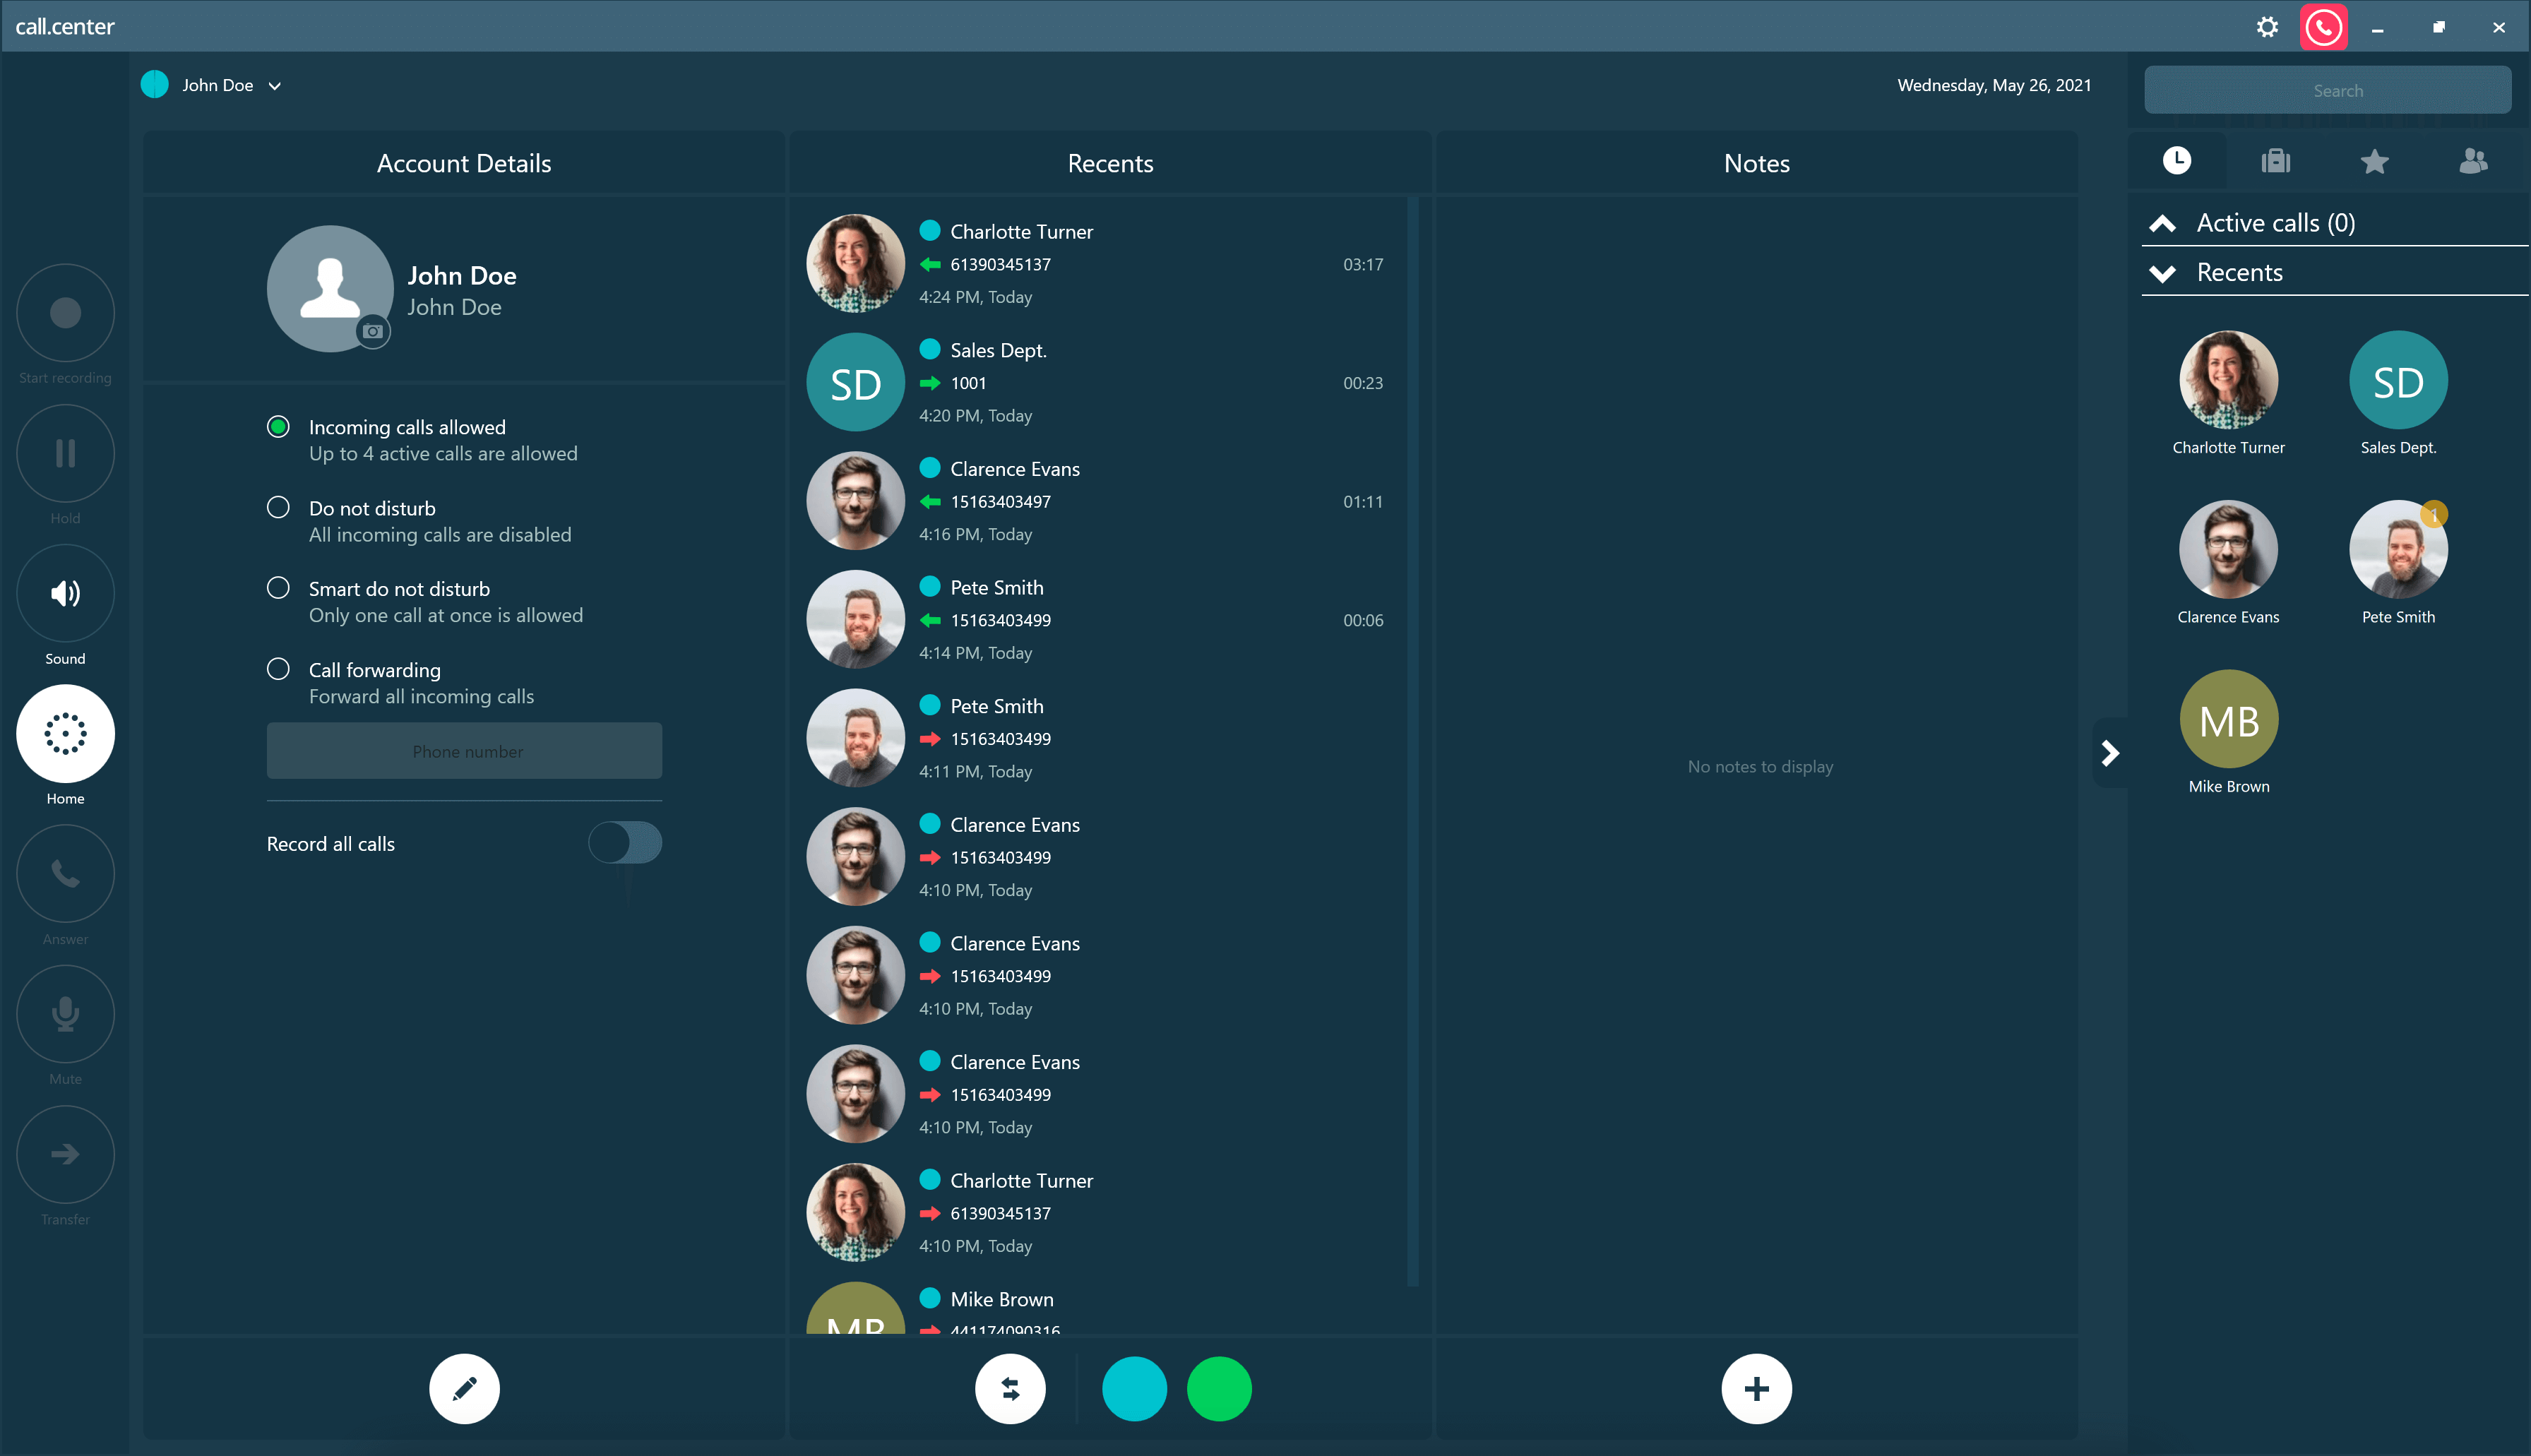
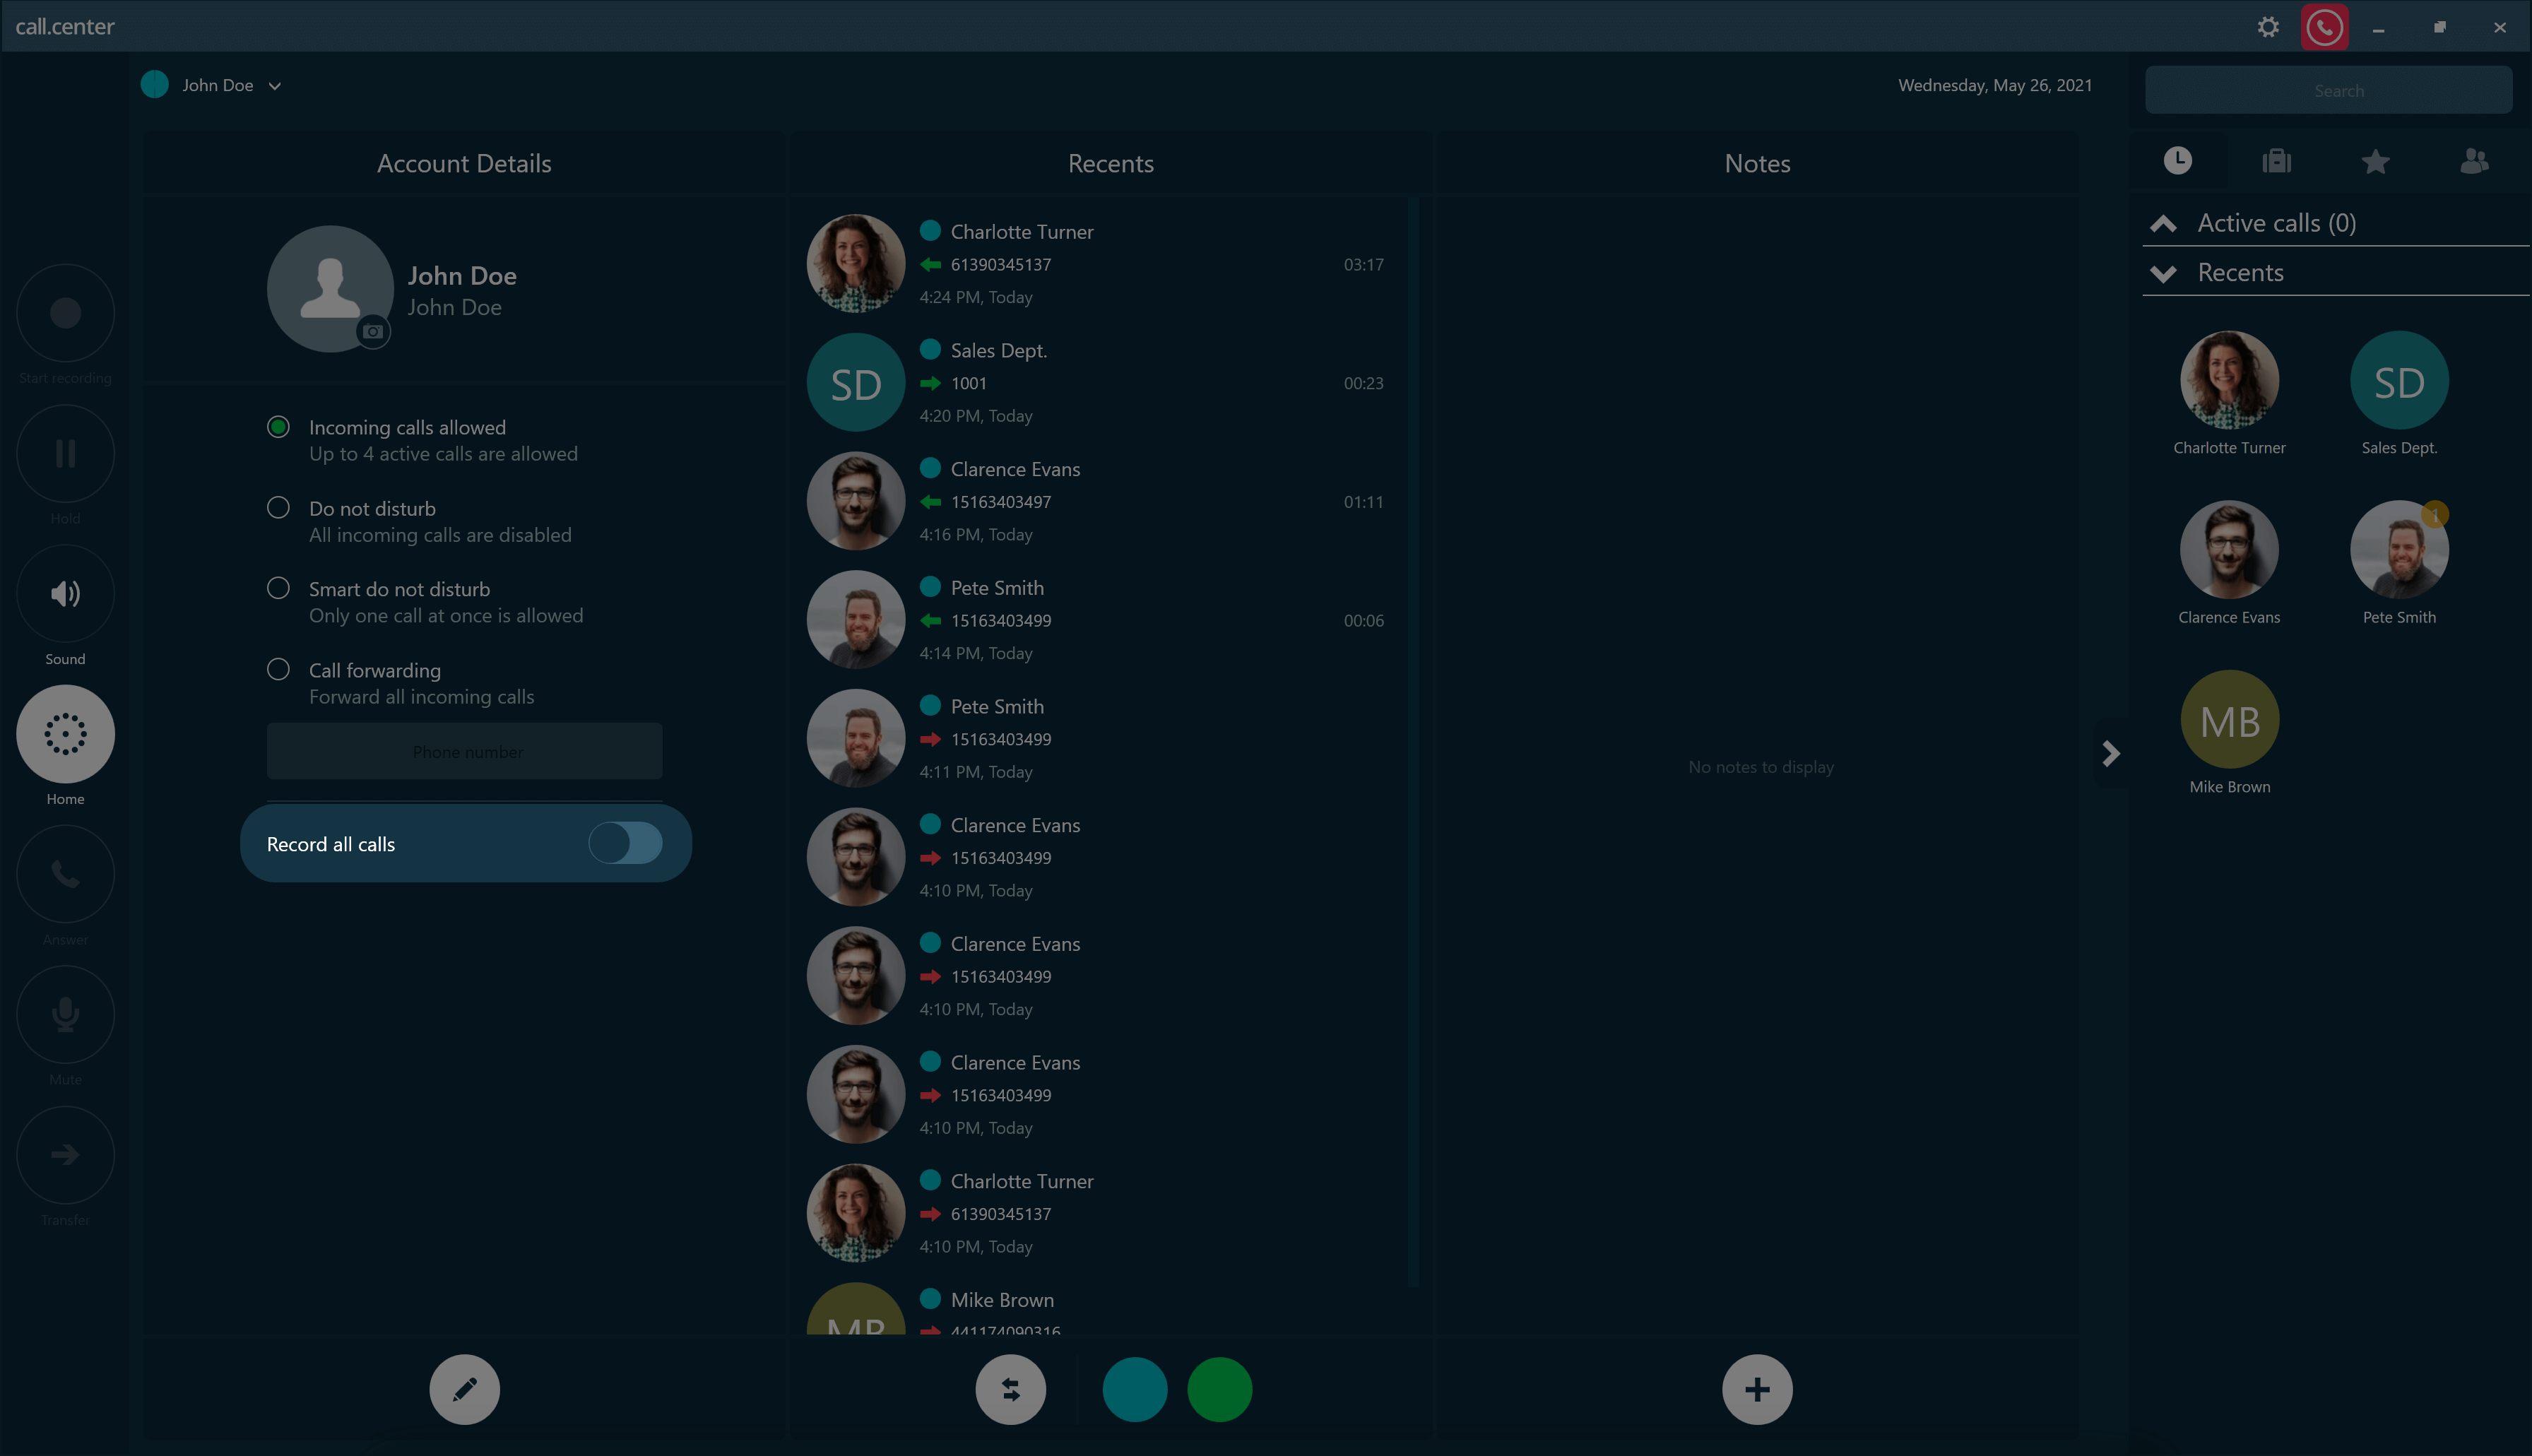
Back to the topAccount Info window
To access the Account Info window, click on your account owner’s Avatar located in the Home Circle.
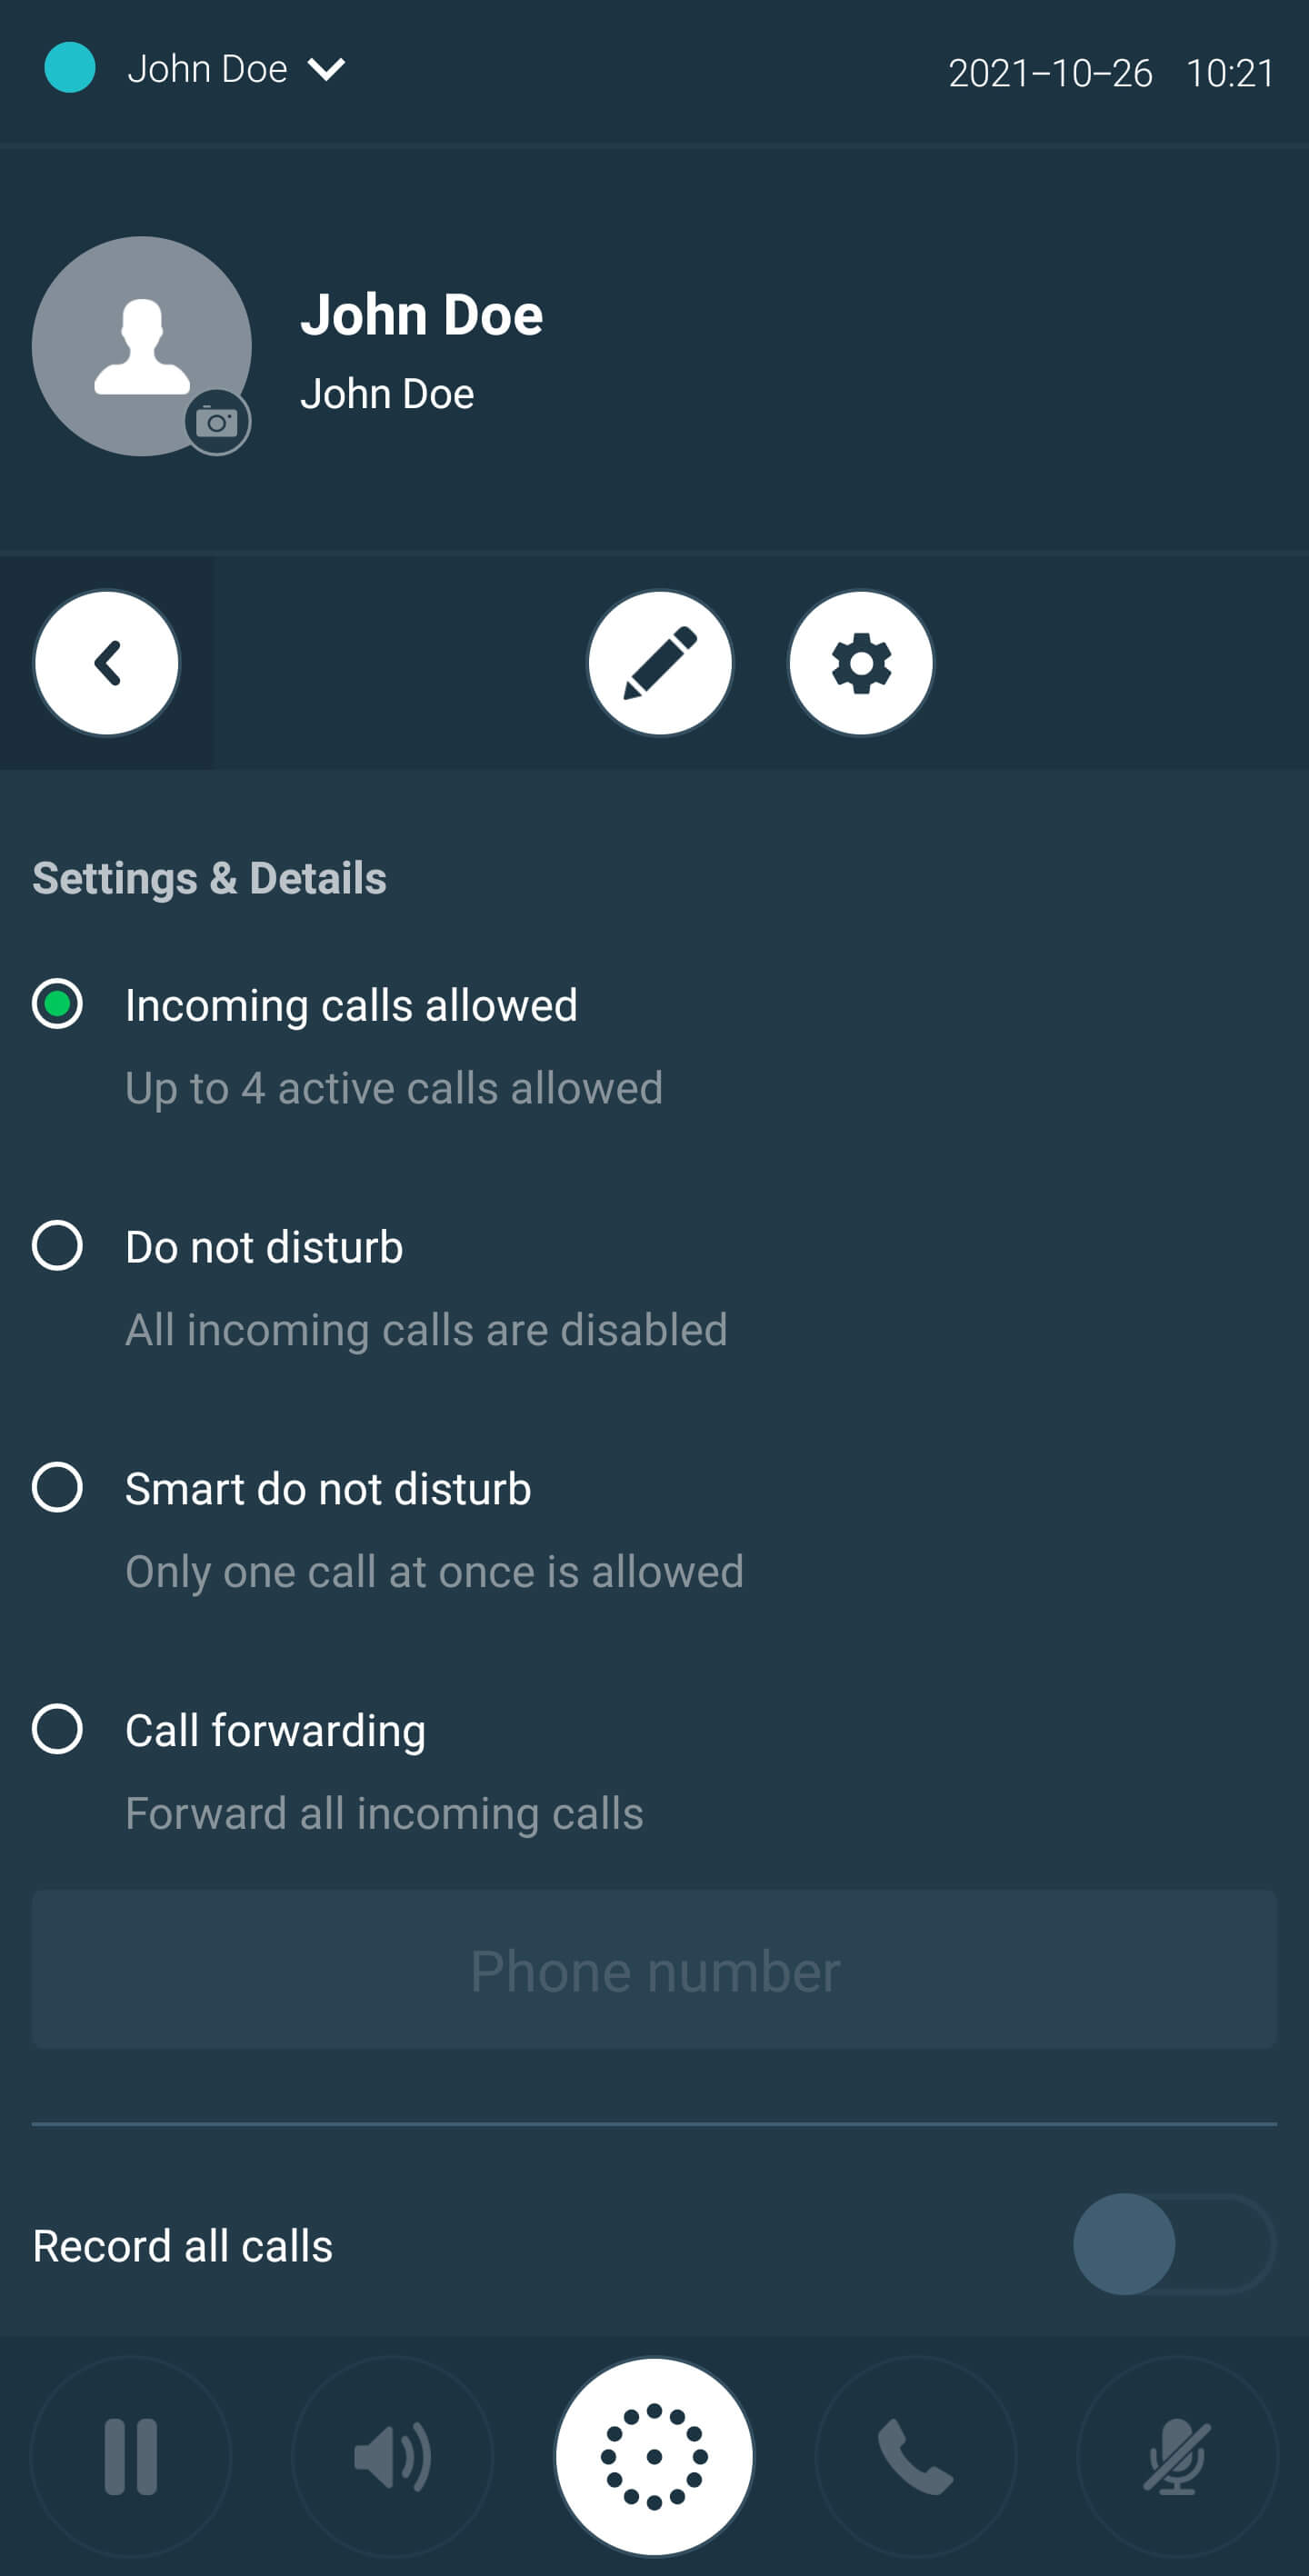
In the Account Info window, you are able to:
- Review and filter your recent calls
- Add, edit and delete personal notes
- Enable/Disable call recording
- Play call recordings
-
Windows/macOS - right-click on the
 icon Play Recording from
the displayed menu.
icon Play Recording from
the displayed menu.
-
Android/iOS - make a long press on the
icon and select
Play Recording from the displayed menu.
- Enable/disable the Do Not Disturb mode
- Enable/disable Smart do not disturb
- Enable/disable call forwarding
- Edit SIP Account passwords (if they need to be manually provisioned)
Review your call history, with the ability to display specific results by using the filters provided at the bottom of the Recents section.
Manage personal notes that are associated with your account.
Call recording may be enabled and disabled from the Account Info window. When enabled, all incoming and outgoing calls will be recorded and stored locally on your device.
Recorded calls are designated by a recording icon
![]() is displayed next to the phone
numbers listed in the Recents section. To listen to a recorded call:
is displayed next to the phone
numbers listed in the Recents section. To listen to a recorded call:
Enabling the Do Not Disturb mode will cause all incoming calls to your device to be automatically ignored. You will not be alerted as to these calls, and incoming call notifications will be silenced. Note that you will still be able to place outgoing calls.
Enabling the Smart do Not Disturb mode will cause more than one incoming call to your device to be automatically ignored, but you will still be able to place outgoing calls.
Enabling call forwarding will forward all incoming calls to the phone number that you have set below the toggle button. Note that call forwarding will continue until this option is disabled.
If you have SIP accounts that require the manual provisioning of passwords, then these passwords may be entered by clicking on the Edit button located in the Account Details section. An Edit SIP Passwords dialog box will open, where changes may be made and saved.
 Back to the top
Phone Function Menu
This menu includes buttons that may be used for phone functionality, and is located on the left-hand side or bottom of the screen, depending on the platform used and/or the device orientation.
The options in this menu are:
![]() /
/
![]() Record an active call. For more details, see the section
Recording a call.
Record an active call. For more details, see the section
Recording a call.
 /
/
 Place an active call on hold or unhold that call. For more details, see the section
Holding/Unholding a call.
Place an active call on hold or unhold that call. For more details, see the section
Holding/Unholding a call.
![]() Opens the audio configuration where you will be able to:
Opens the audio configuration where you will be able to:
- Set the Capture/Playback/Incoming call device
- Select a ringtone
- Enable/Disable dial pad sounds
- Enable/Disable/Reduce the audio volume of other apps during the call
 /
/
 Access the dial pad or the home screen. For more details, see the section
Making a call.
Access the dial pad or the home screen. For more details, see the section
Making a call.
 /
/  /
/
 Answer or hang up a call. For more details, see the section
Answering a call.
Answer or hang up a call. For more details, see the section
Answering a call.
 /
/
 Mute/un-mute the microphone during a call. For more details, see the section
Muting/Unmuting a call.
Mute/un-mute the microphone during a call. For more details, see the section
Muting/Unmuting a call.
![]() Transfer a call. For more details, see the section
Transferring a call.
Transfer a call. For more details, see the section
Transferring a call.
The call.center™ app Home Screen Mobile
The Home (or main) screen consists of various areas, windows and menus that fulfill different functions.
The appearance, layout and functionality of this screen is dependent on the operating system and device used. However, the information provided below is general to all platforms hosting the call.center™ app.
 Back to the top
SIP Accounts and Line Status
This information is located at the top left-hand corner of the screen and displays the SIP account name as well as the current status of that SIP connection (Not Connected, Connecting or Connected). Note that if multiple SIP accounts are configured for this app, then the name and status of the account that is currently selected is displayed.
Important - If your device’s SIP Accounts were configured for the user to manually enter their passwords during the device activation, these passwords may be edited at any time through the Account Info window. For more information, see the section Account Info.
 Back to the top
Home Menu
This area serves as the main "workspace" for the call.center™ app, and indicates the current call status of the softphone. The central "contact" that is displayed belongs to the user to whom this app is registered, and clicking on this contact provides access to the Account Info window, as well as to call history and notes relevant to the owner of this app.
 Back to the top
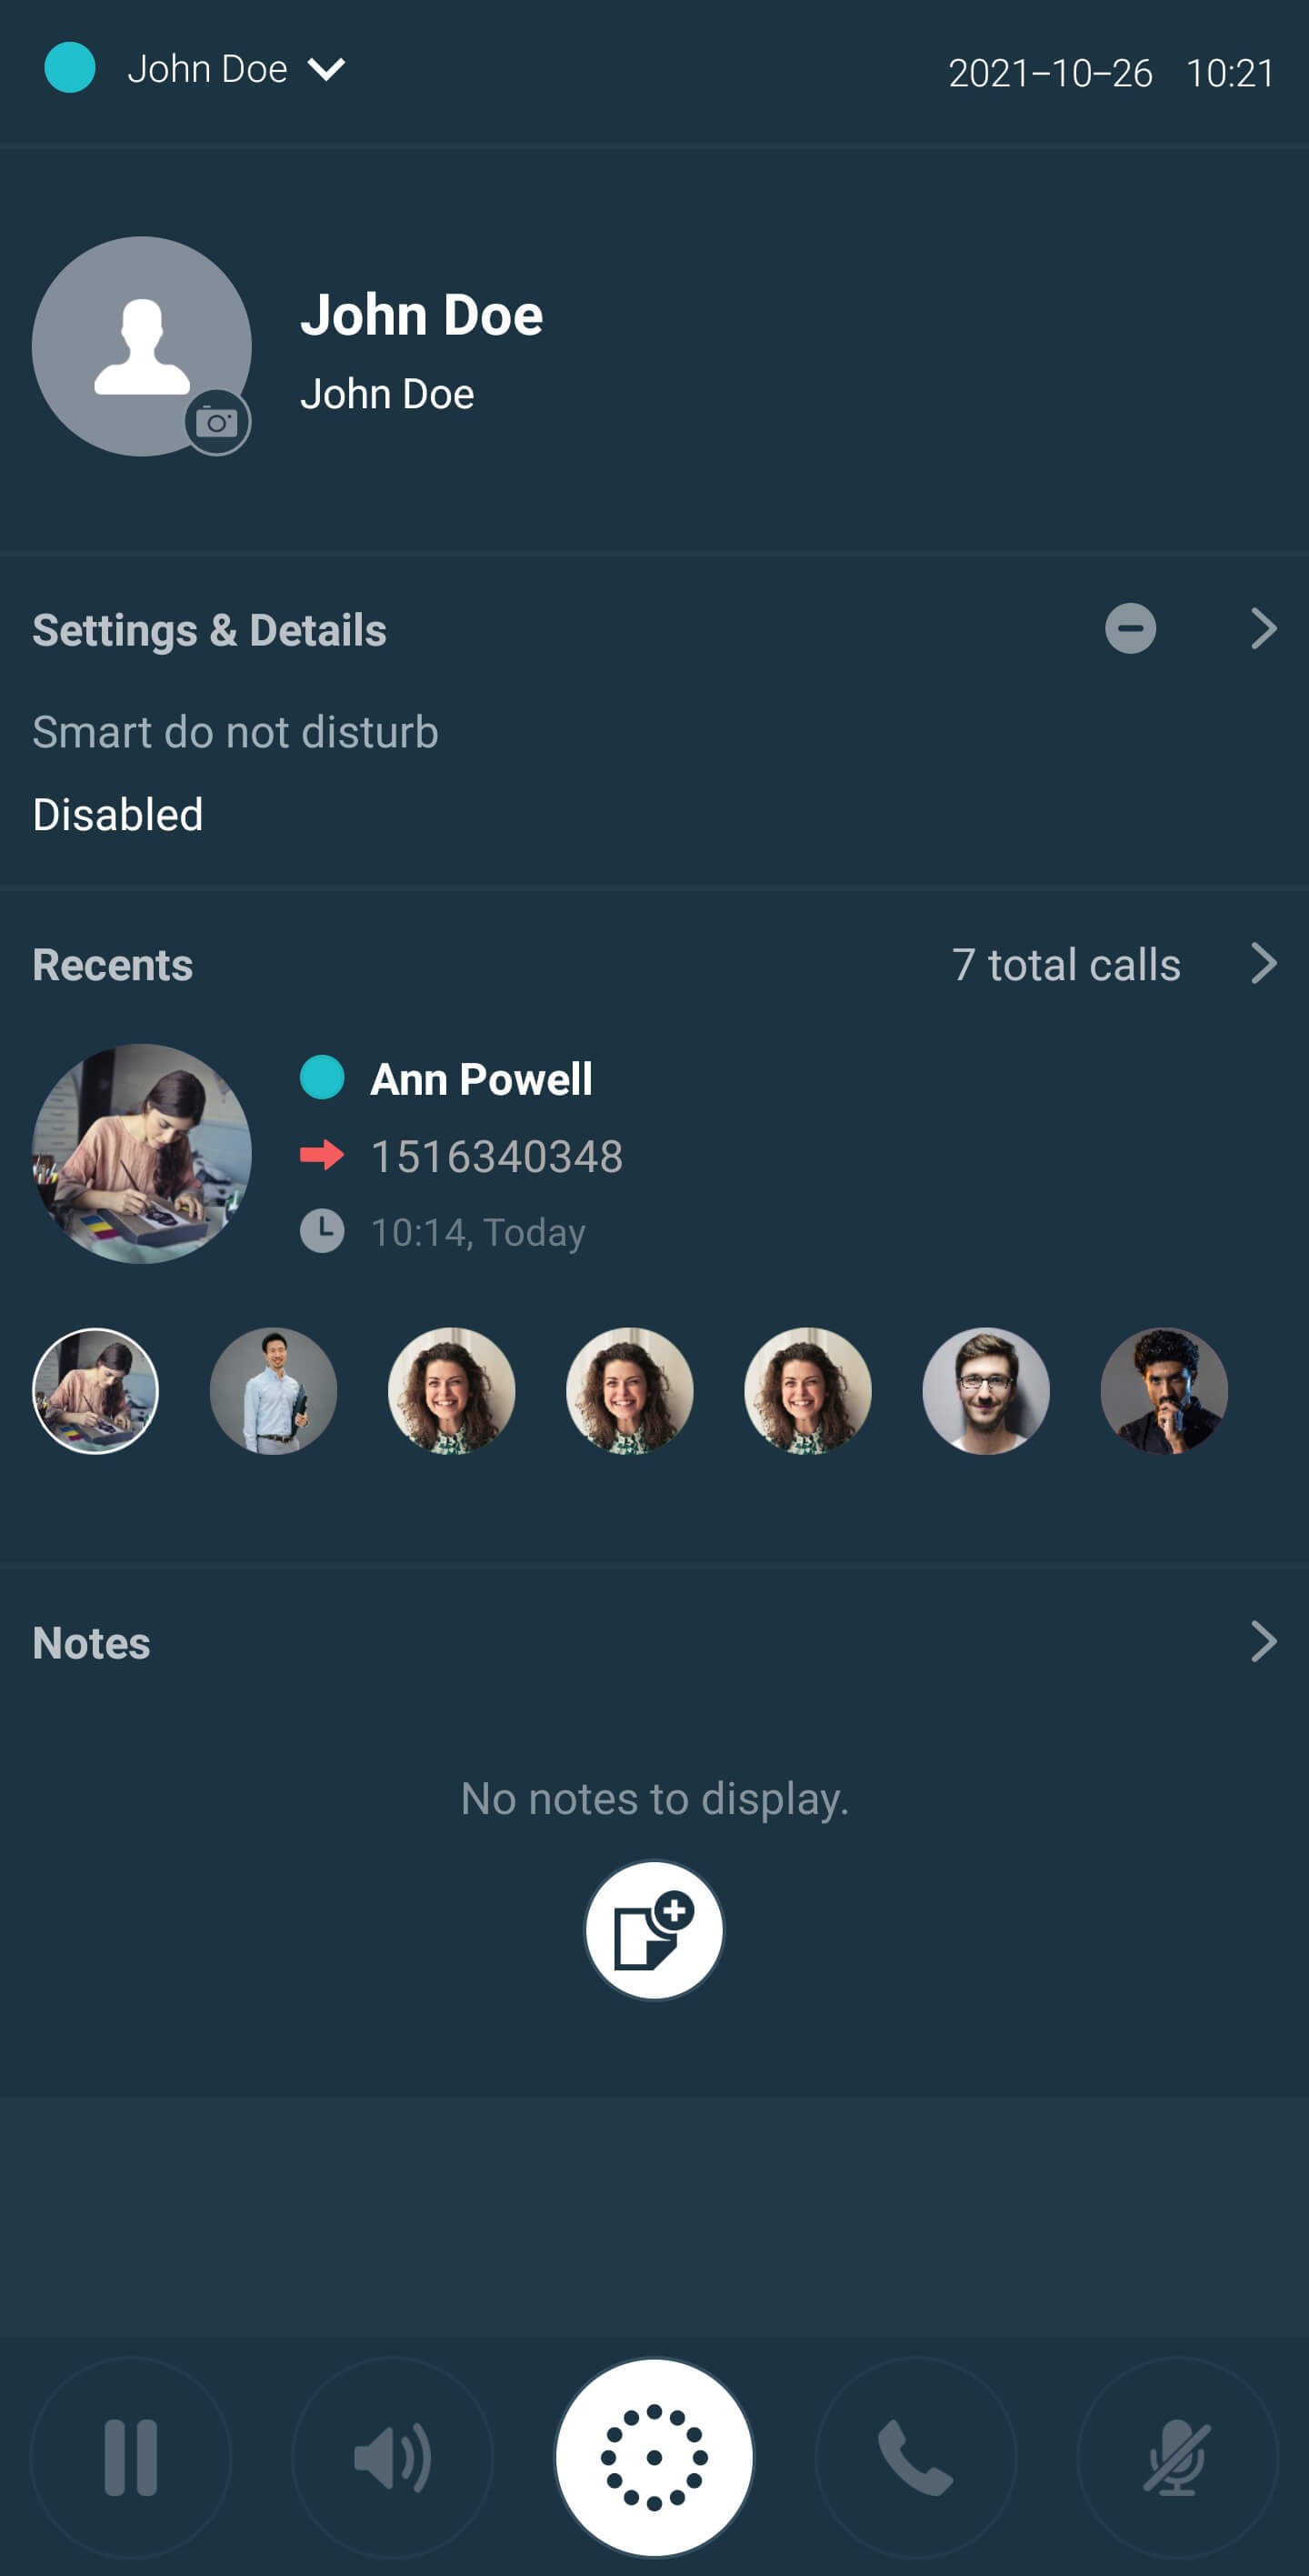
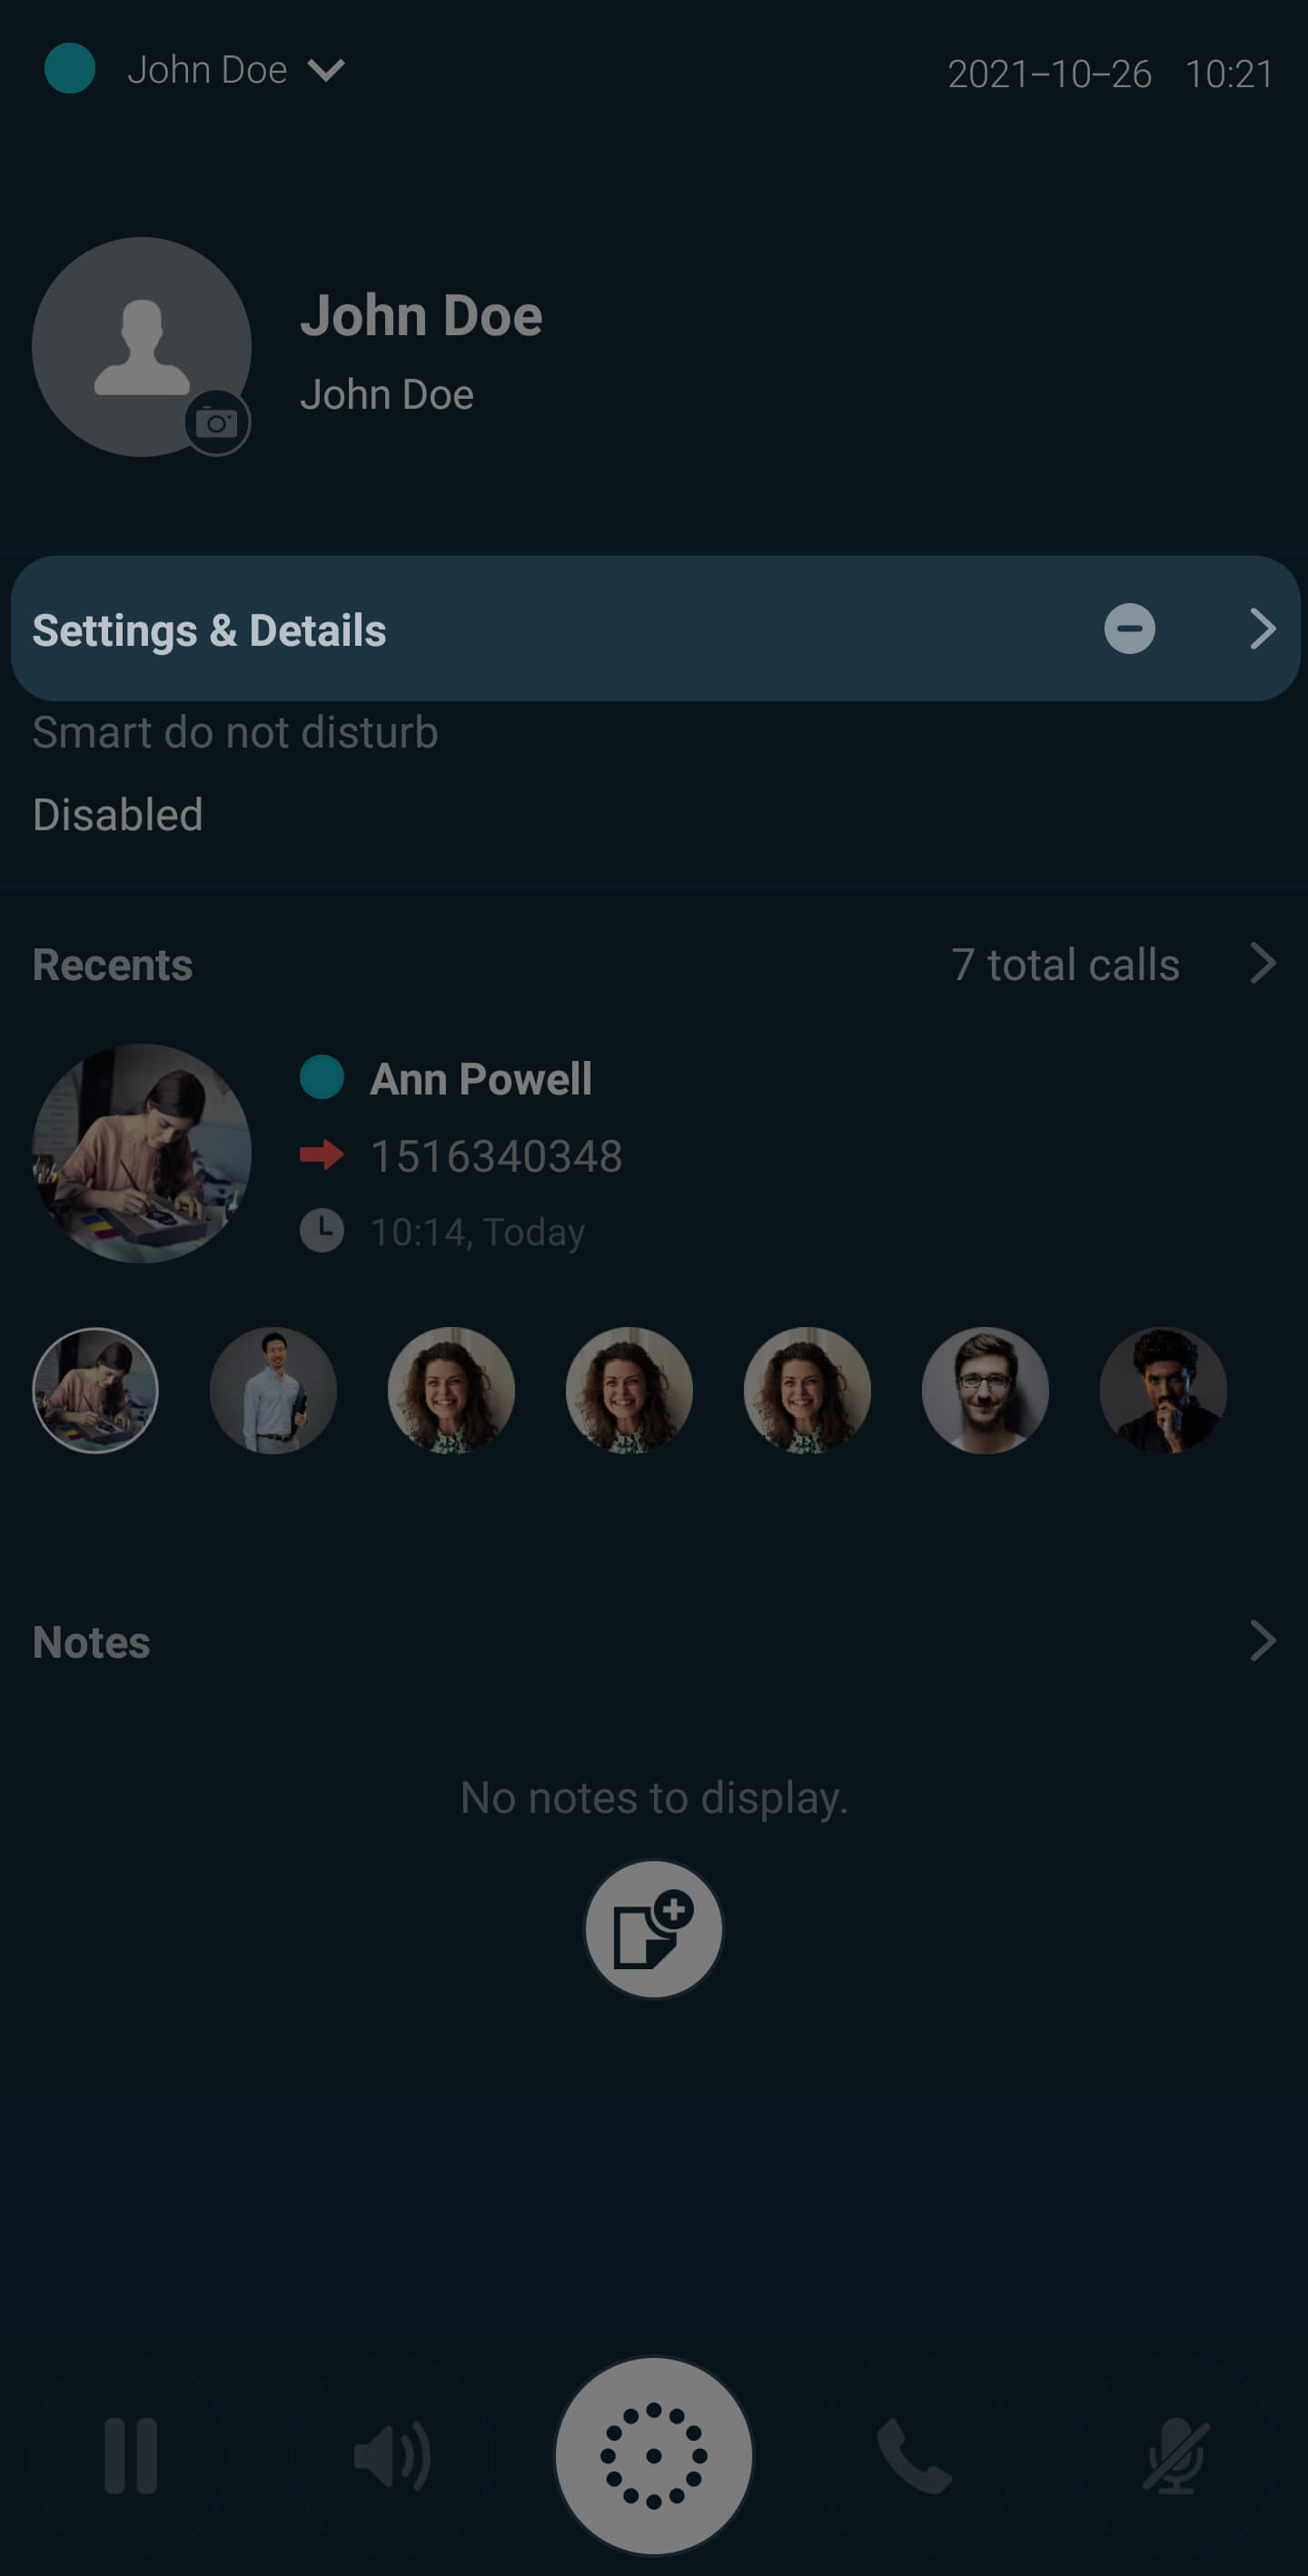
Account Info window
To access the Account Info window, click on your account owner’s Avatar located in the Home Screen.
In the Account Info window, you are able to:
-
Review and filter your recent calls
Review your call history, with the ability to display specific results by using the filters provided at the bottom of the Recents section.
-
Add, edit and delete personal notes
Manage personal notes that are associated with your account.
-
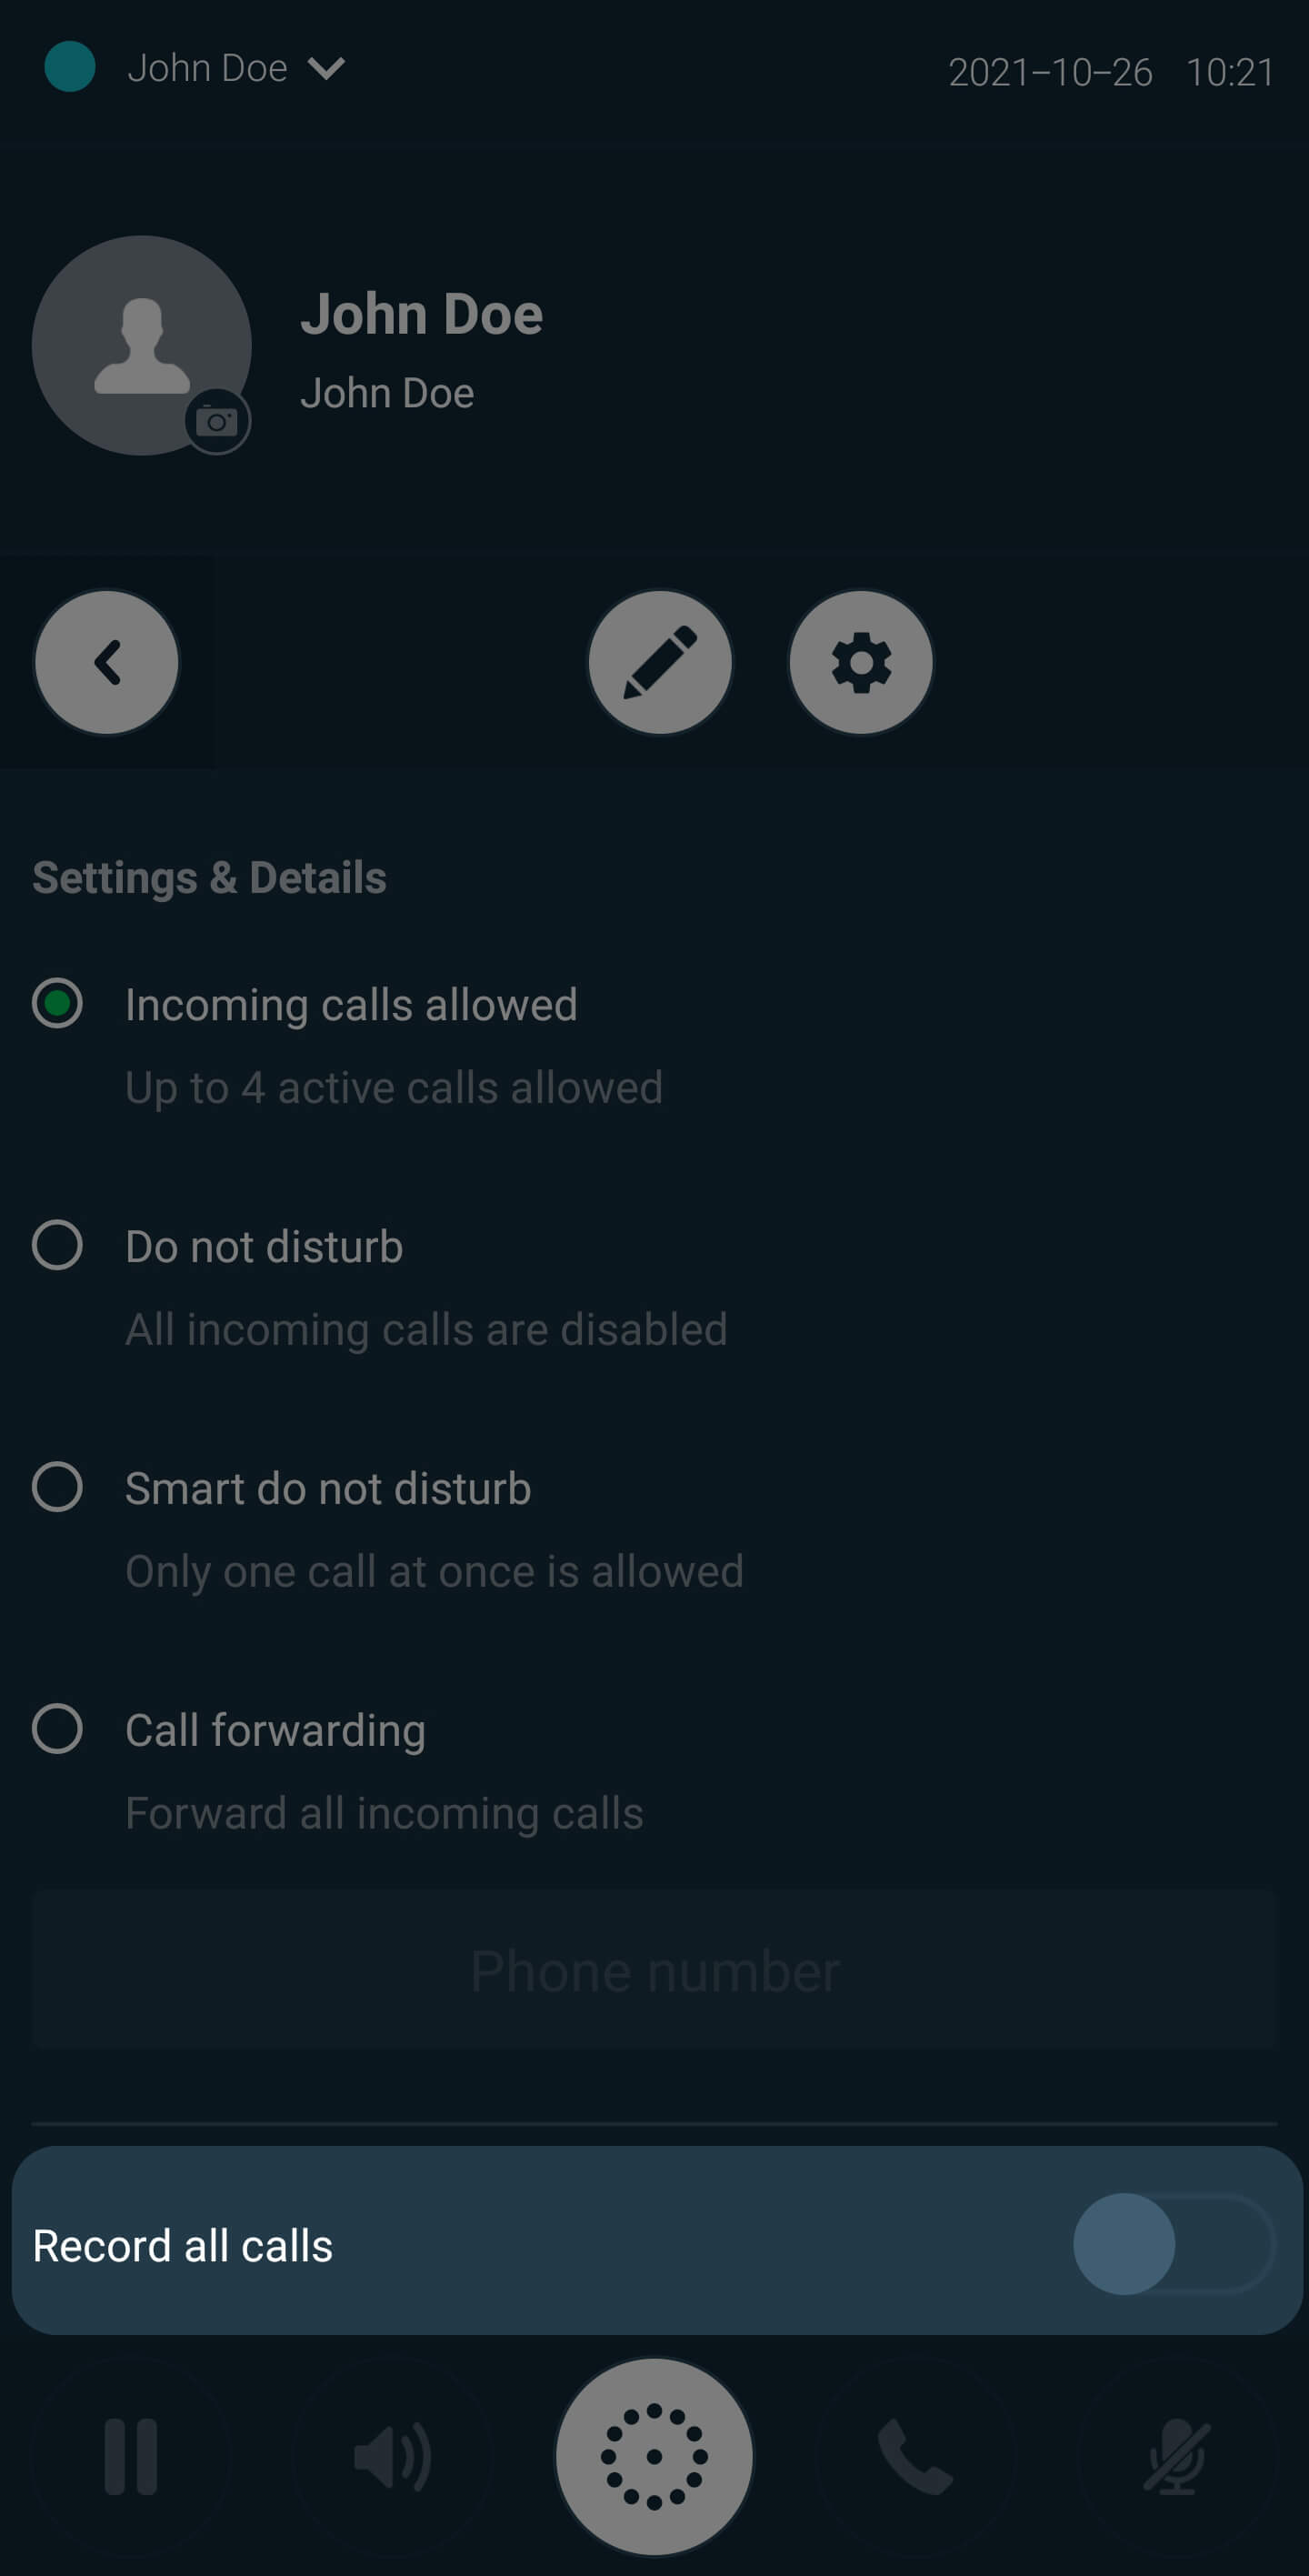
Enable/Disable call recording
Call recording may be enabled and disabled from the Account Info window. When enabled, all incoming and outgoing calls will be recorded and stored locally on your device.
-
Play call recordings
Recorded calls are designated by a recording icon
that is
displayed next to the phone numbers listed in the Recents section. To listen to a
recorded call: Make a long press on the
icon and
select Play Recording from the displayed menu.
-
Enable/disable the Do Not Disturb mode
Enabling the Do Not Disturb mode will cause all incoming calls to your device to be automatically ignored. You will not be alerted as to these calls, and incoming call notifications will be silenced. Note that you will still be able to place outgoing calls.
-
Enable/disable Smart do not disturb
Enabling the Smart do Not Disturb mode will cause more than one incoming call to your device to be automatically ignored, but you will still be able to place outgoing calls.
-
Enable/disable call forwarding
Enabling call forwarding will automatically forward all incoming calls to the phone number that you have set below the toggle button. Note that call forwarding will continue until this option is disabled.
-
Edit SIP Account passwords (if they need to be manually provisioned)
If you have SIP accounts that require the manual provisioning of passwords, then these passwords may be entered by clicking on the Edit button located in the Account Details section. An Edit SIP Passwords dialog box will open, where changes may be made and saved.

Phone Function Menu
This menu includes buttons that may be used for phone functionality and is located on the left-hand side or bottom of the screen, depending on the platform used and/or the device orientation.
The options in this menu are:
/
Place an active call on hold or unhold that call. For more details, see the section
Holding/Unholding a call.
![]() The audio configuration where you will be able to:
The audio configuration where you will be able to:
- Enable/Disable the phone speaker
- Enable/Disable headphones
/
Access the dial pad or the home screen. For more details, see the section
Making a call.
/ /
Answer or hang up a call. For more details, see the section
Answering a call.
/
Mute/un-mute the microphone during a call. For more details, see the section
Muting/Unmuting a call.
Operating the call.center™ app Desktop
Recording a call
The Record button in the Phone Function Menu may be used to record an active call. When a call is active, you may click the button Start Recording and the call will be recorded.
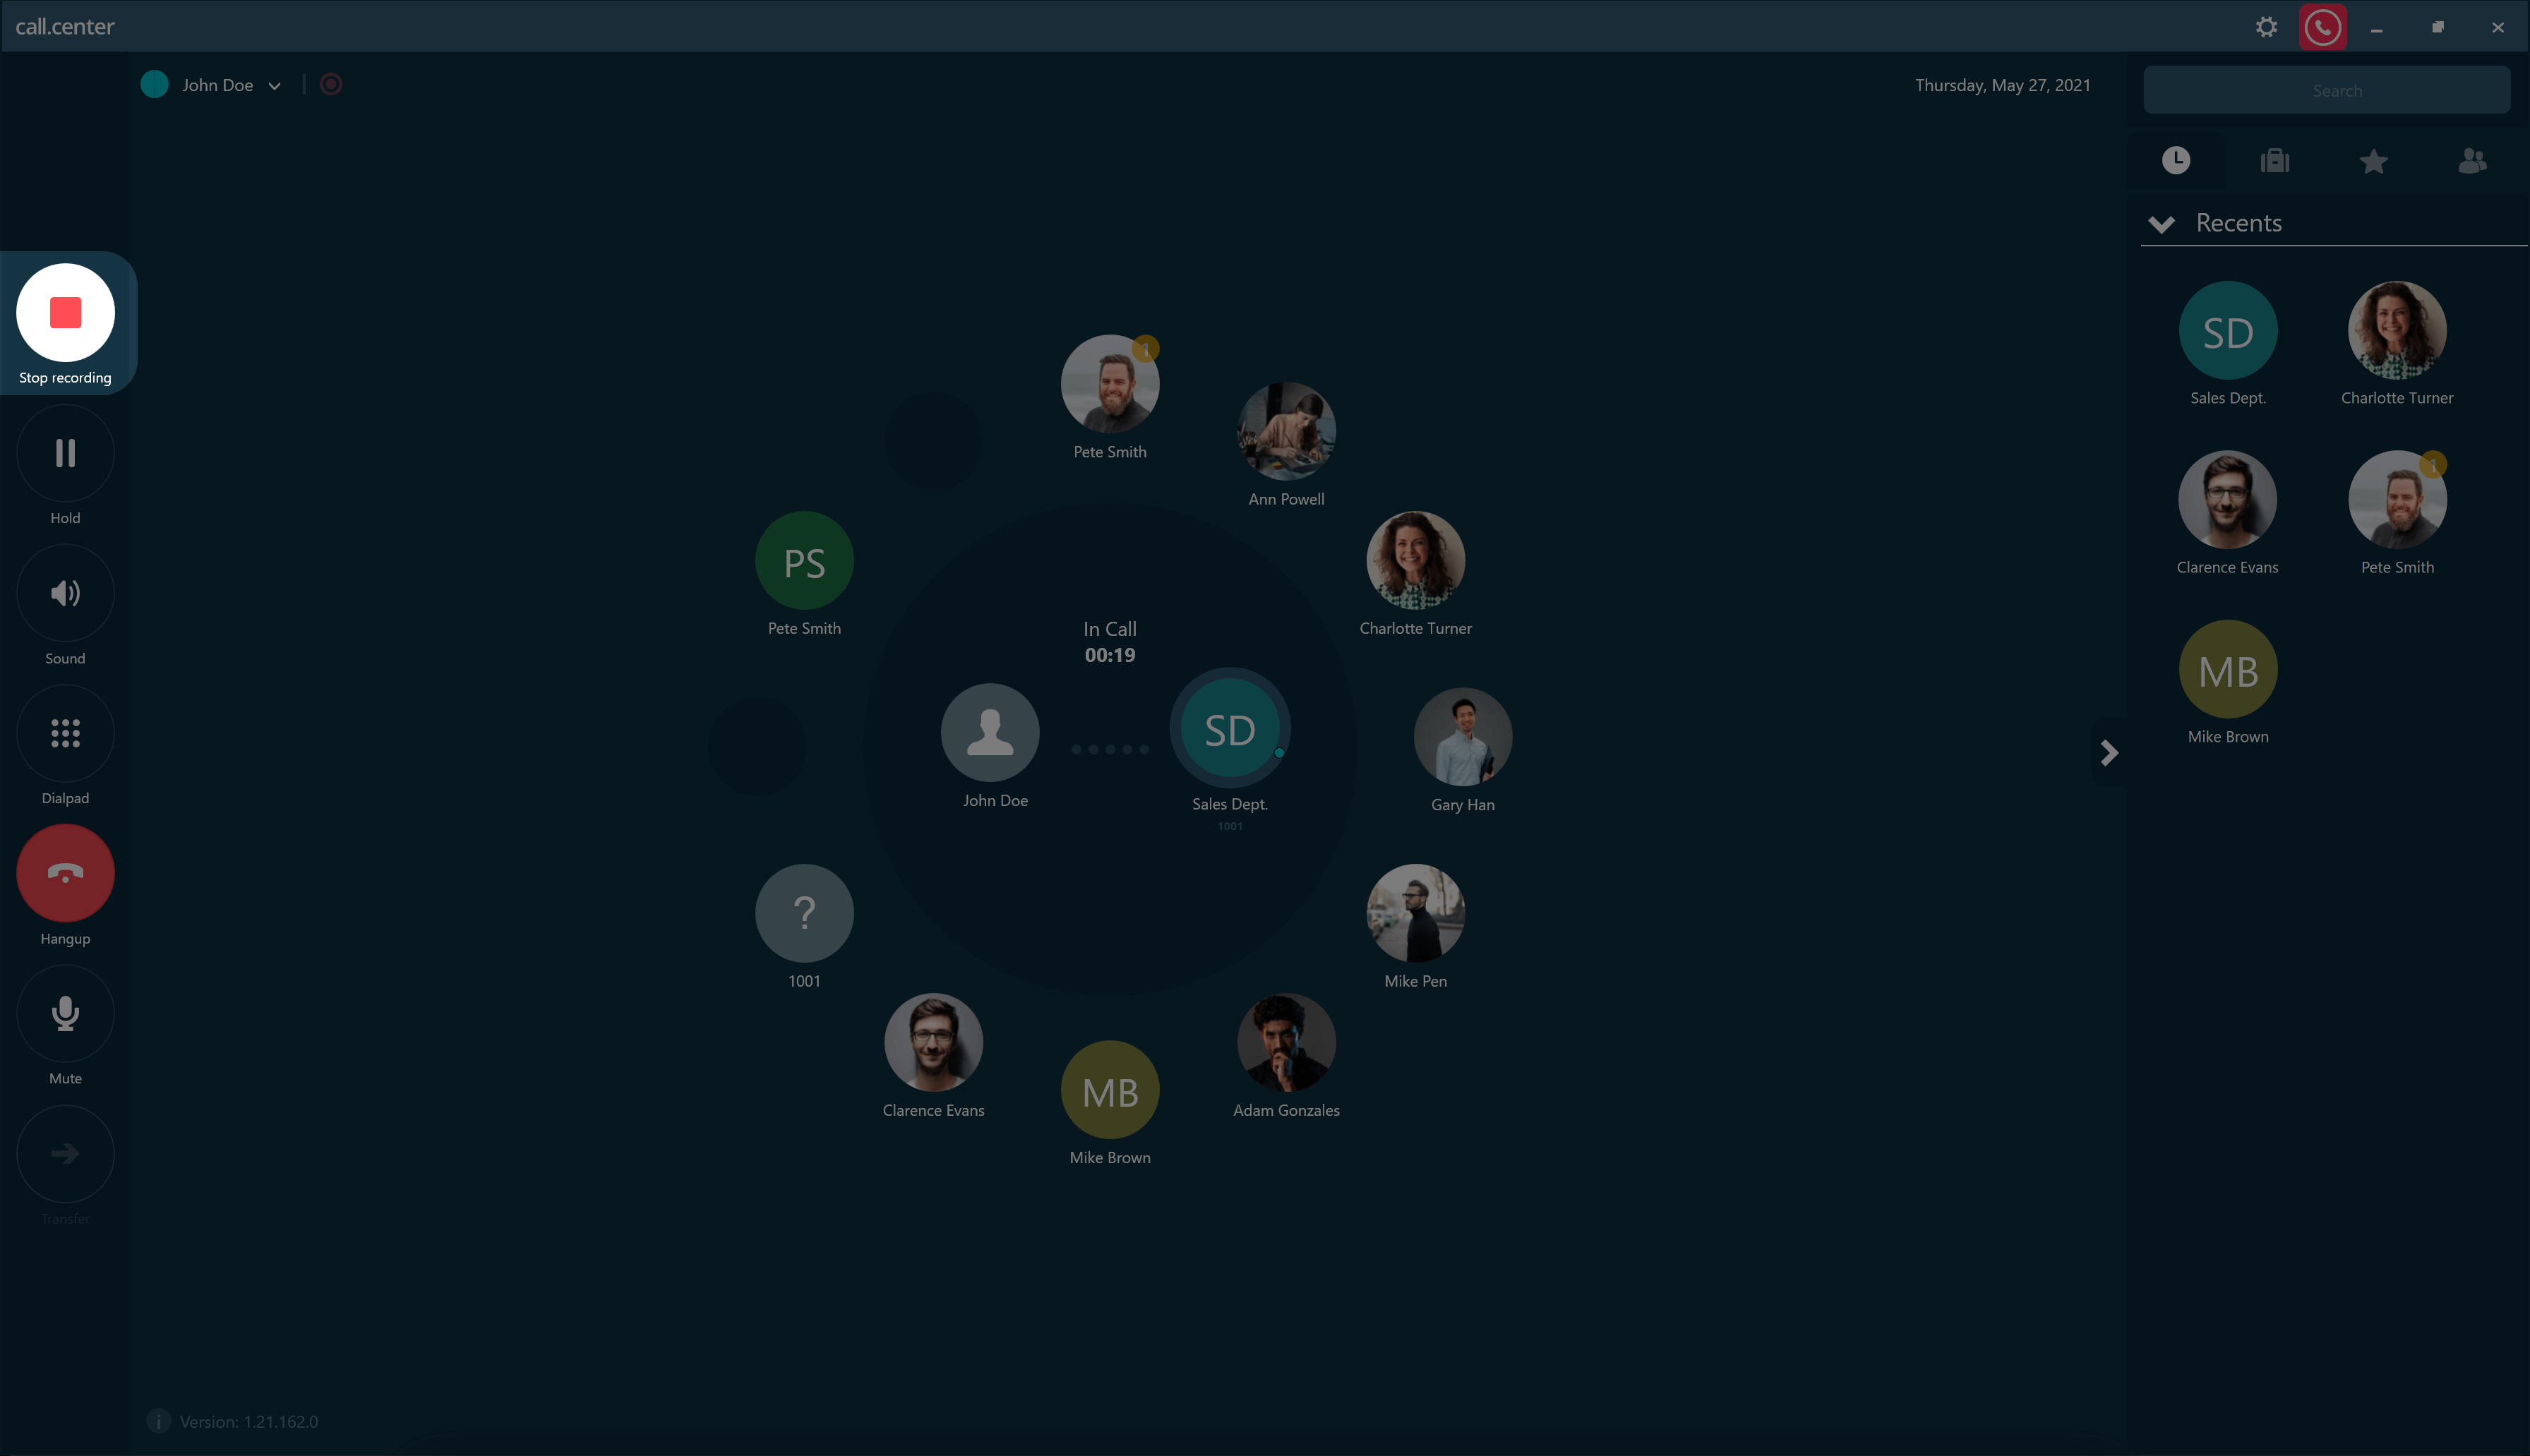
When the Stop recording button in the Phone Function Menu is active (i.e., the call is currently being recorded), you may click on that button to stop recording the call. Also, the call recording will be automatically stopped when the call is terminated.
The Record all calls button in the Account info window may be used to automatically record all inbound and outbound calls.
 Back to the top
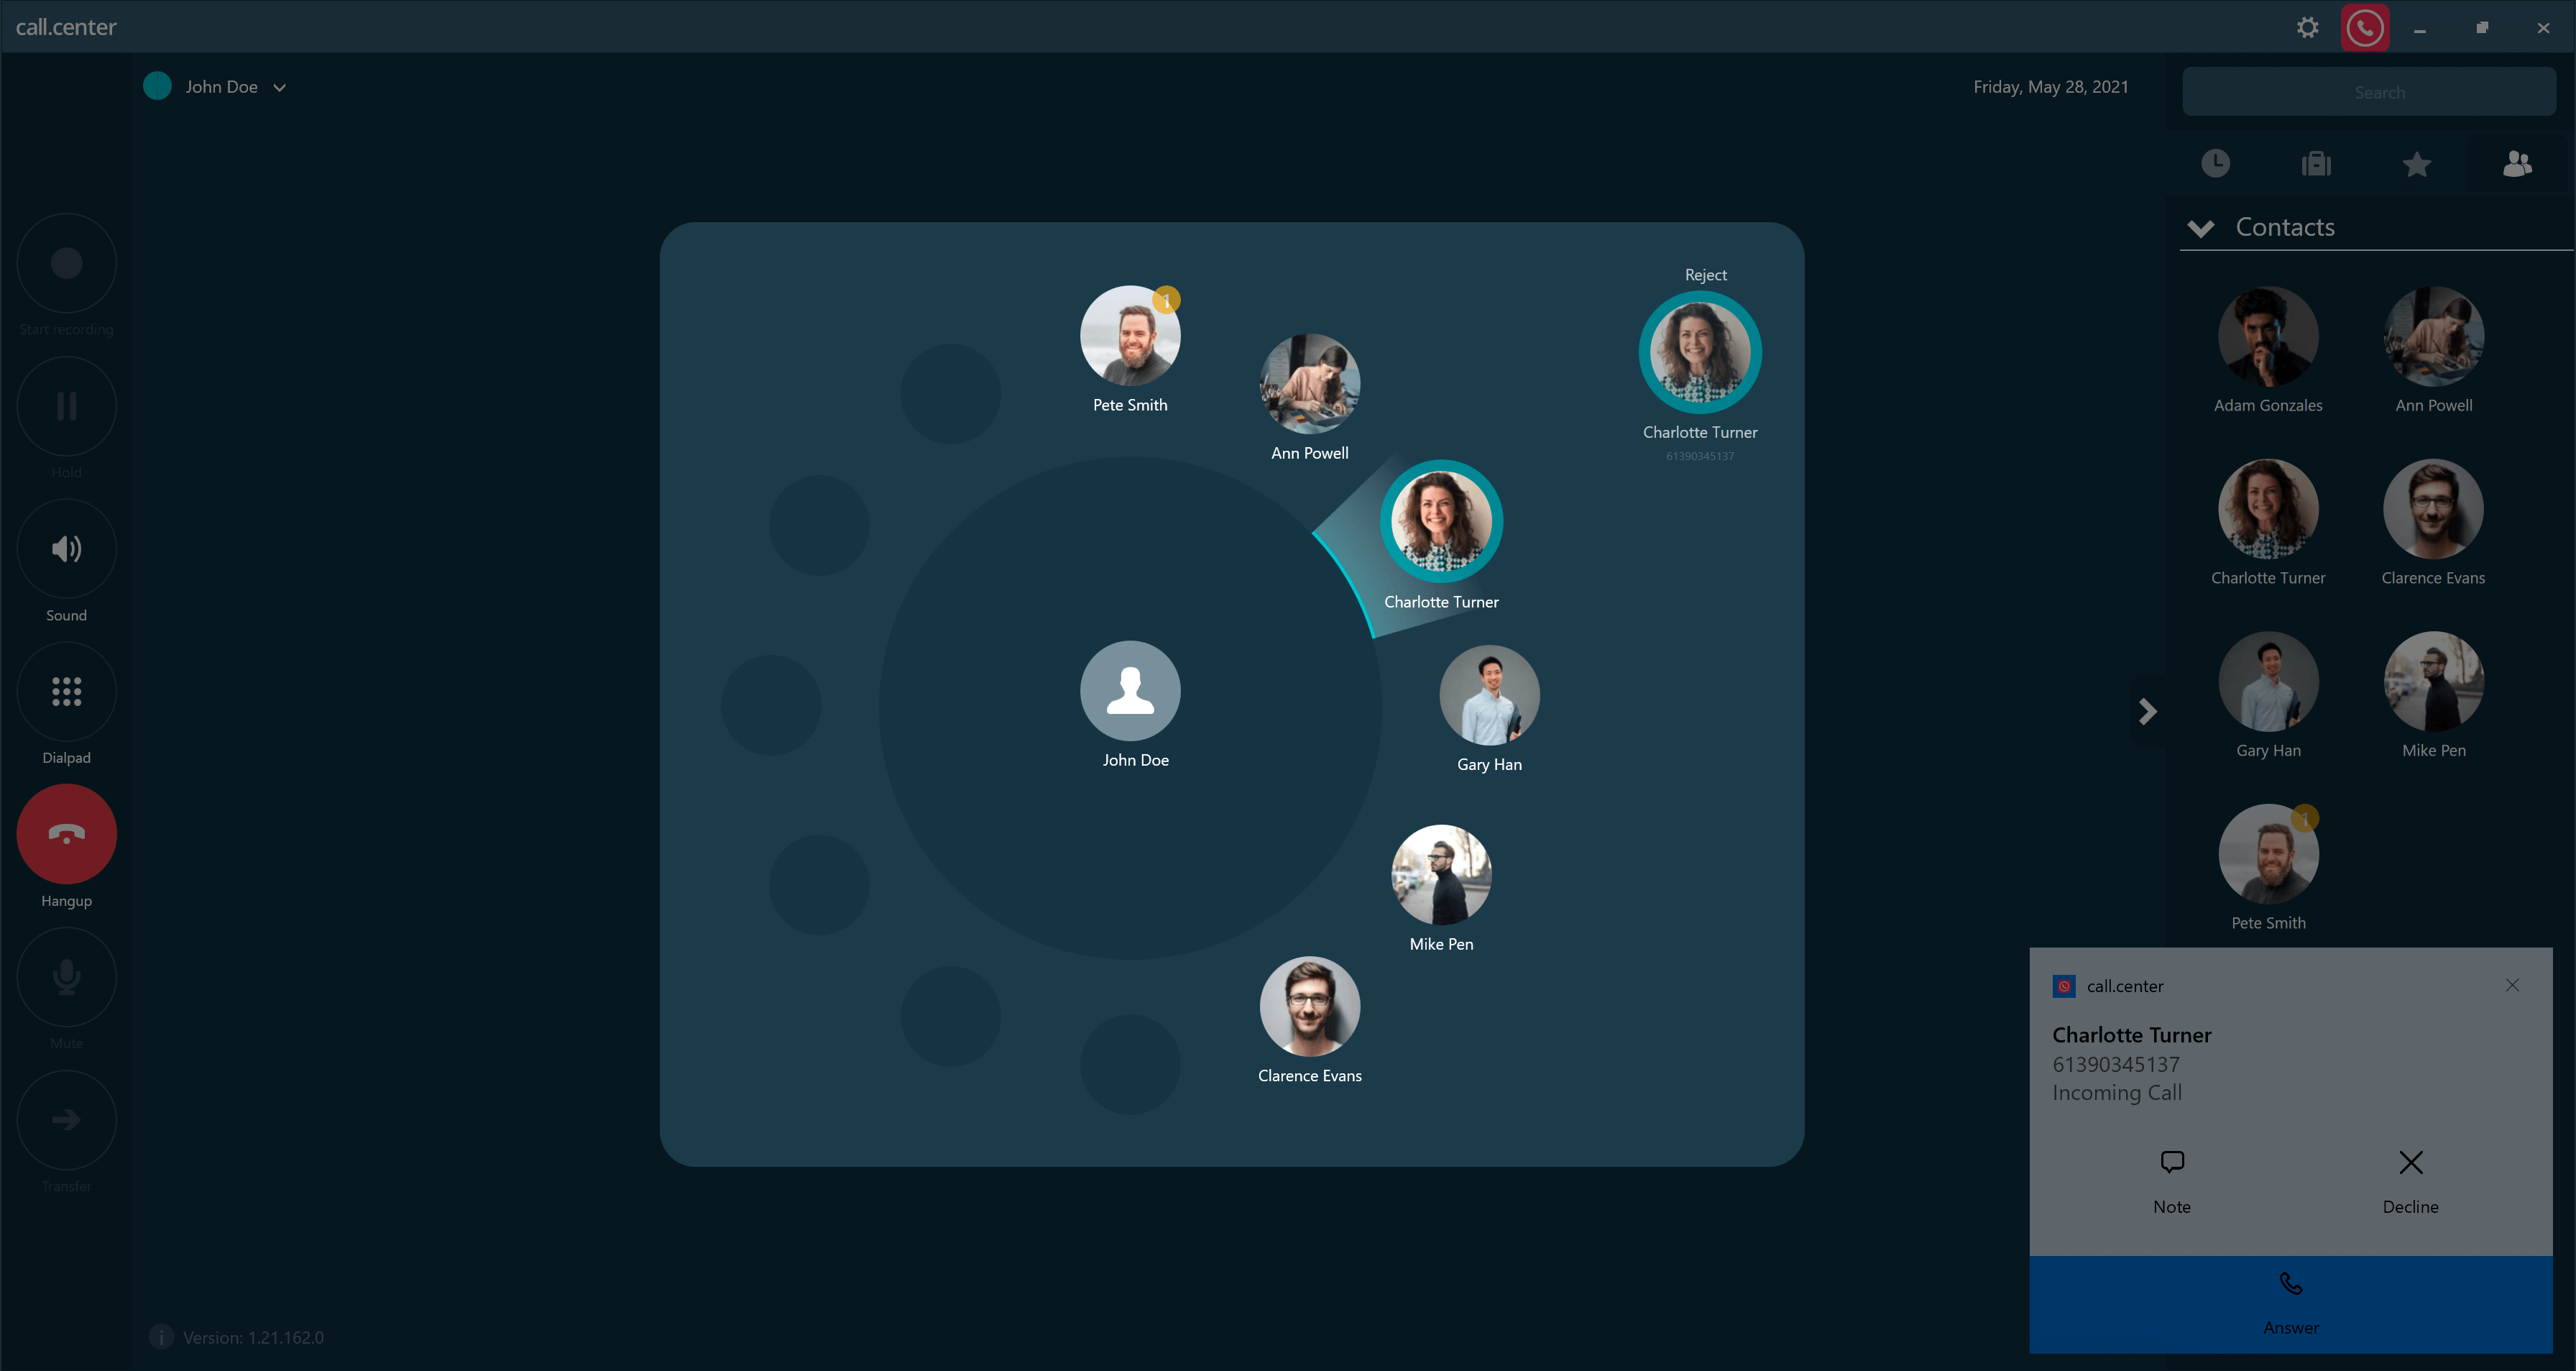
Answering a call
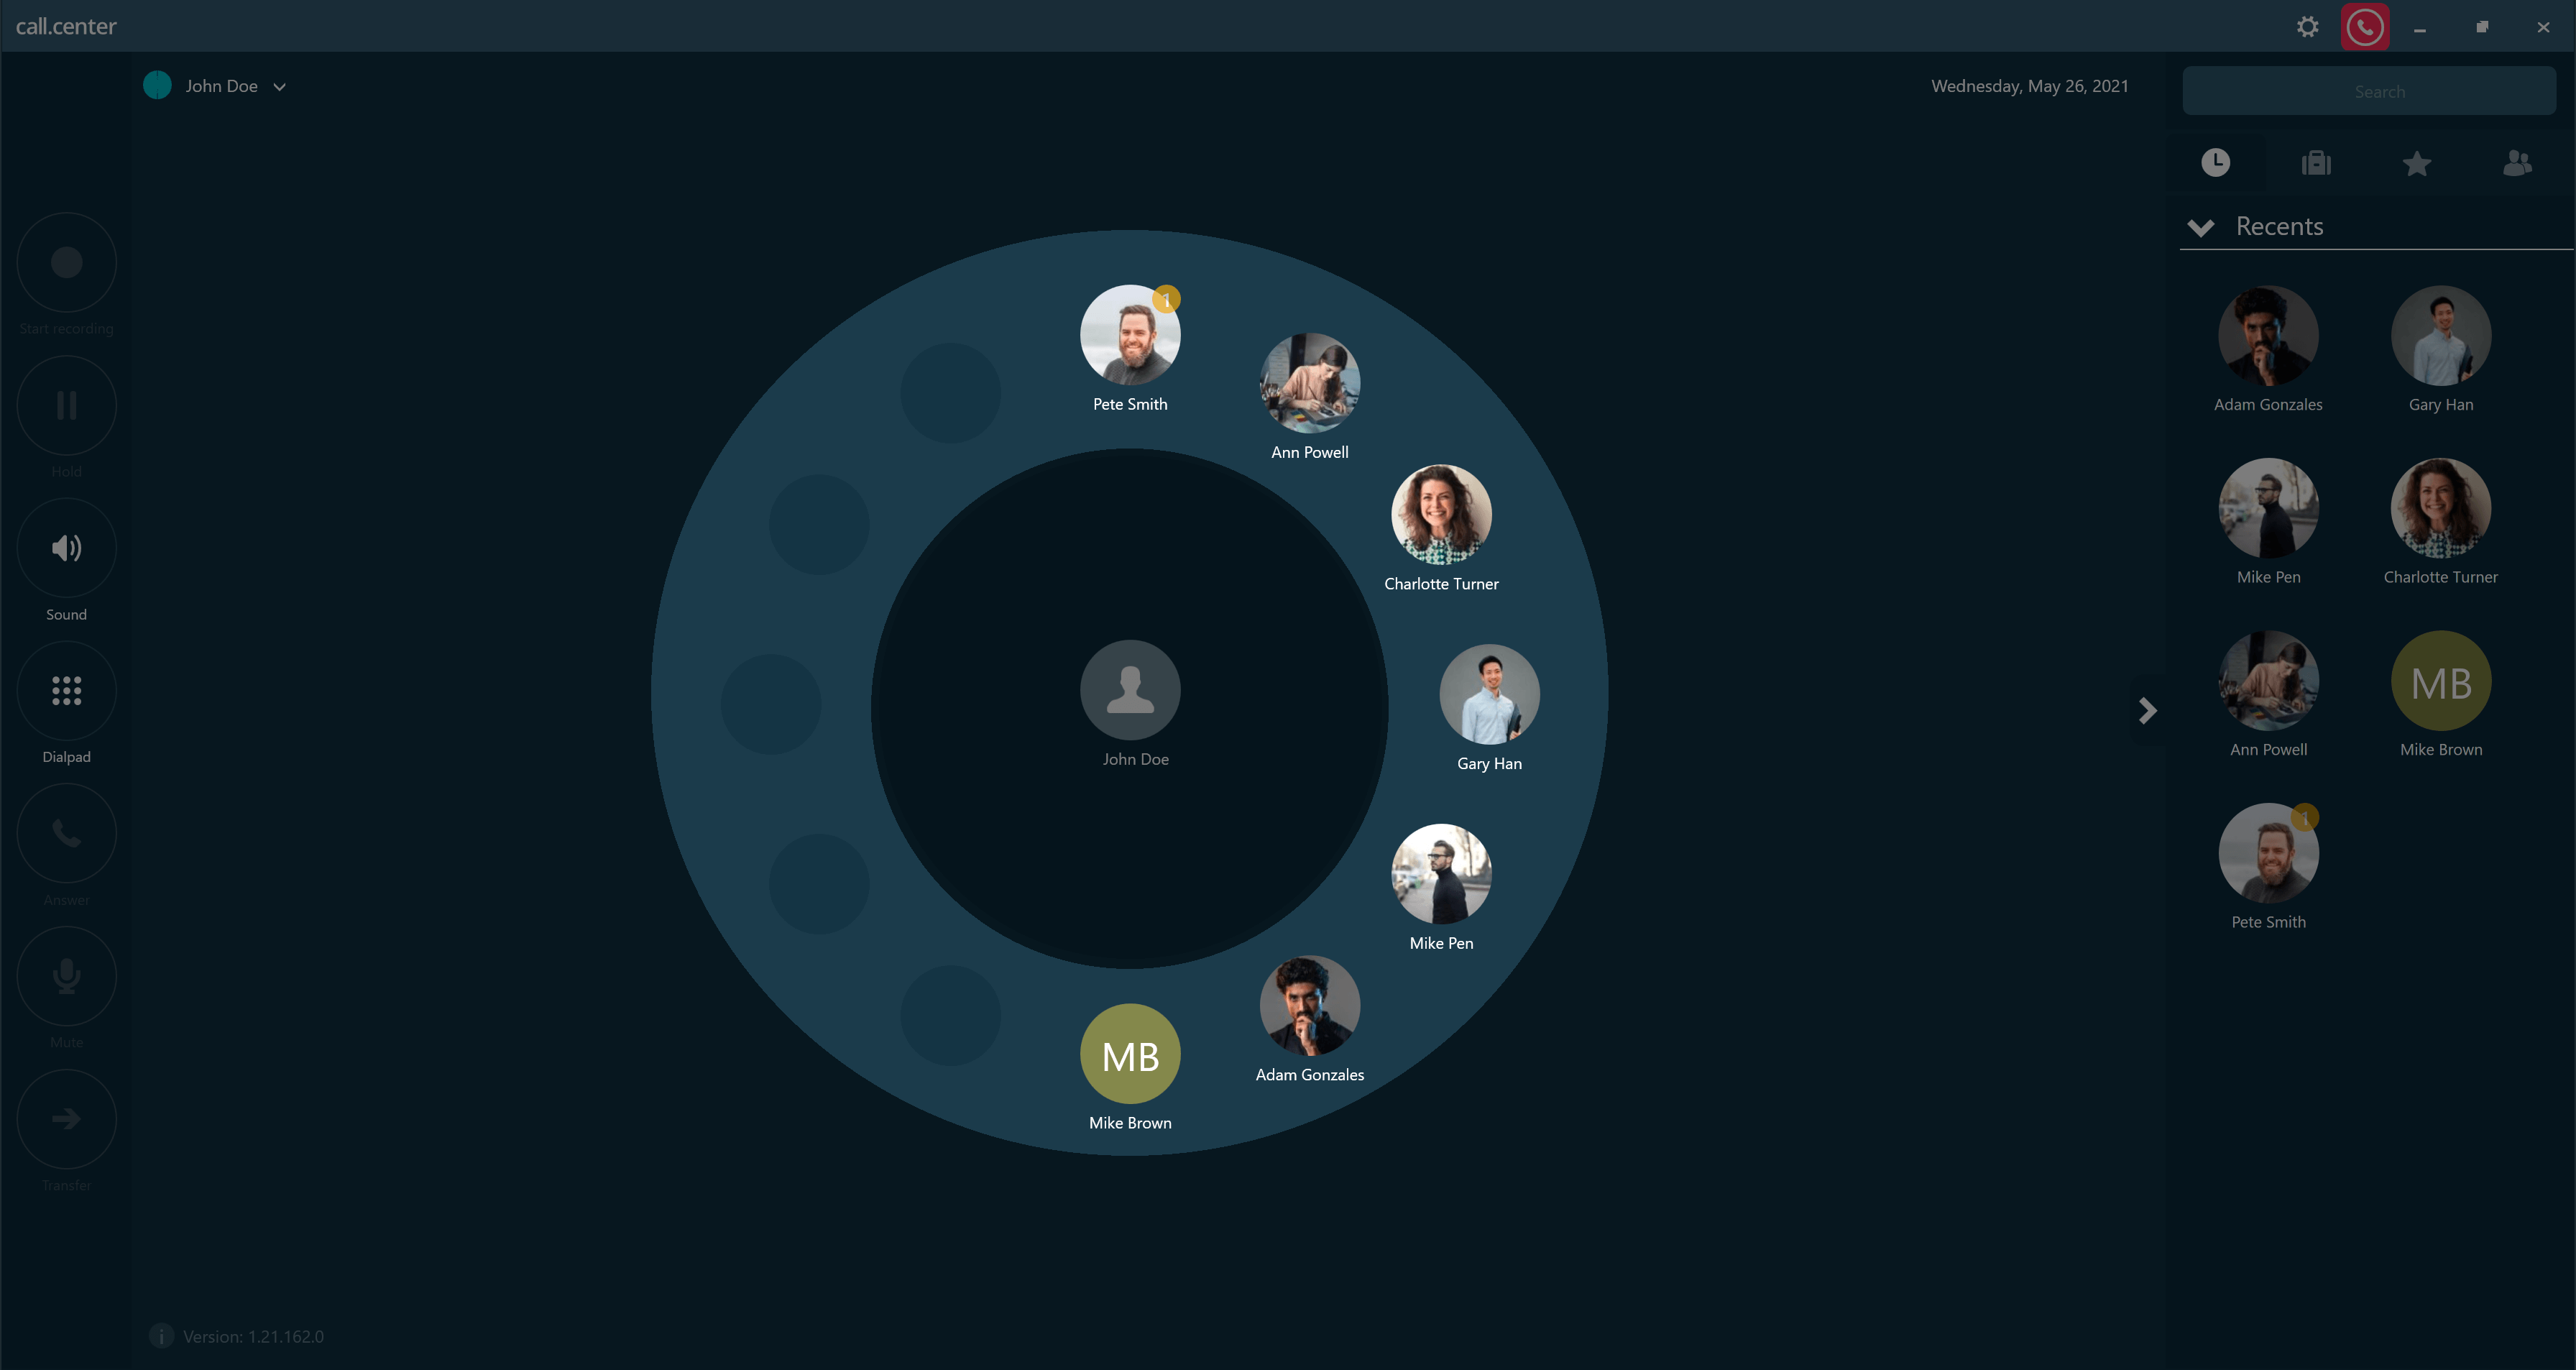
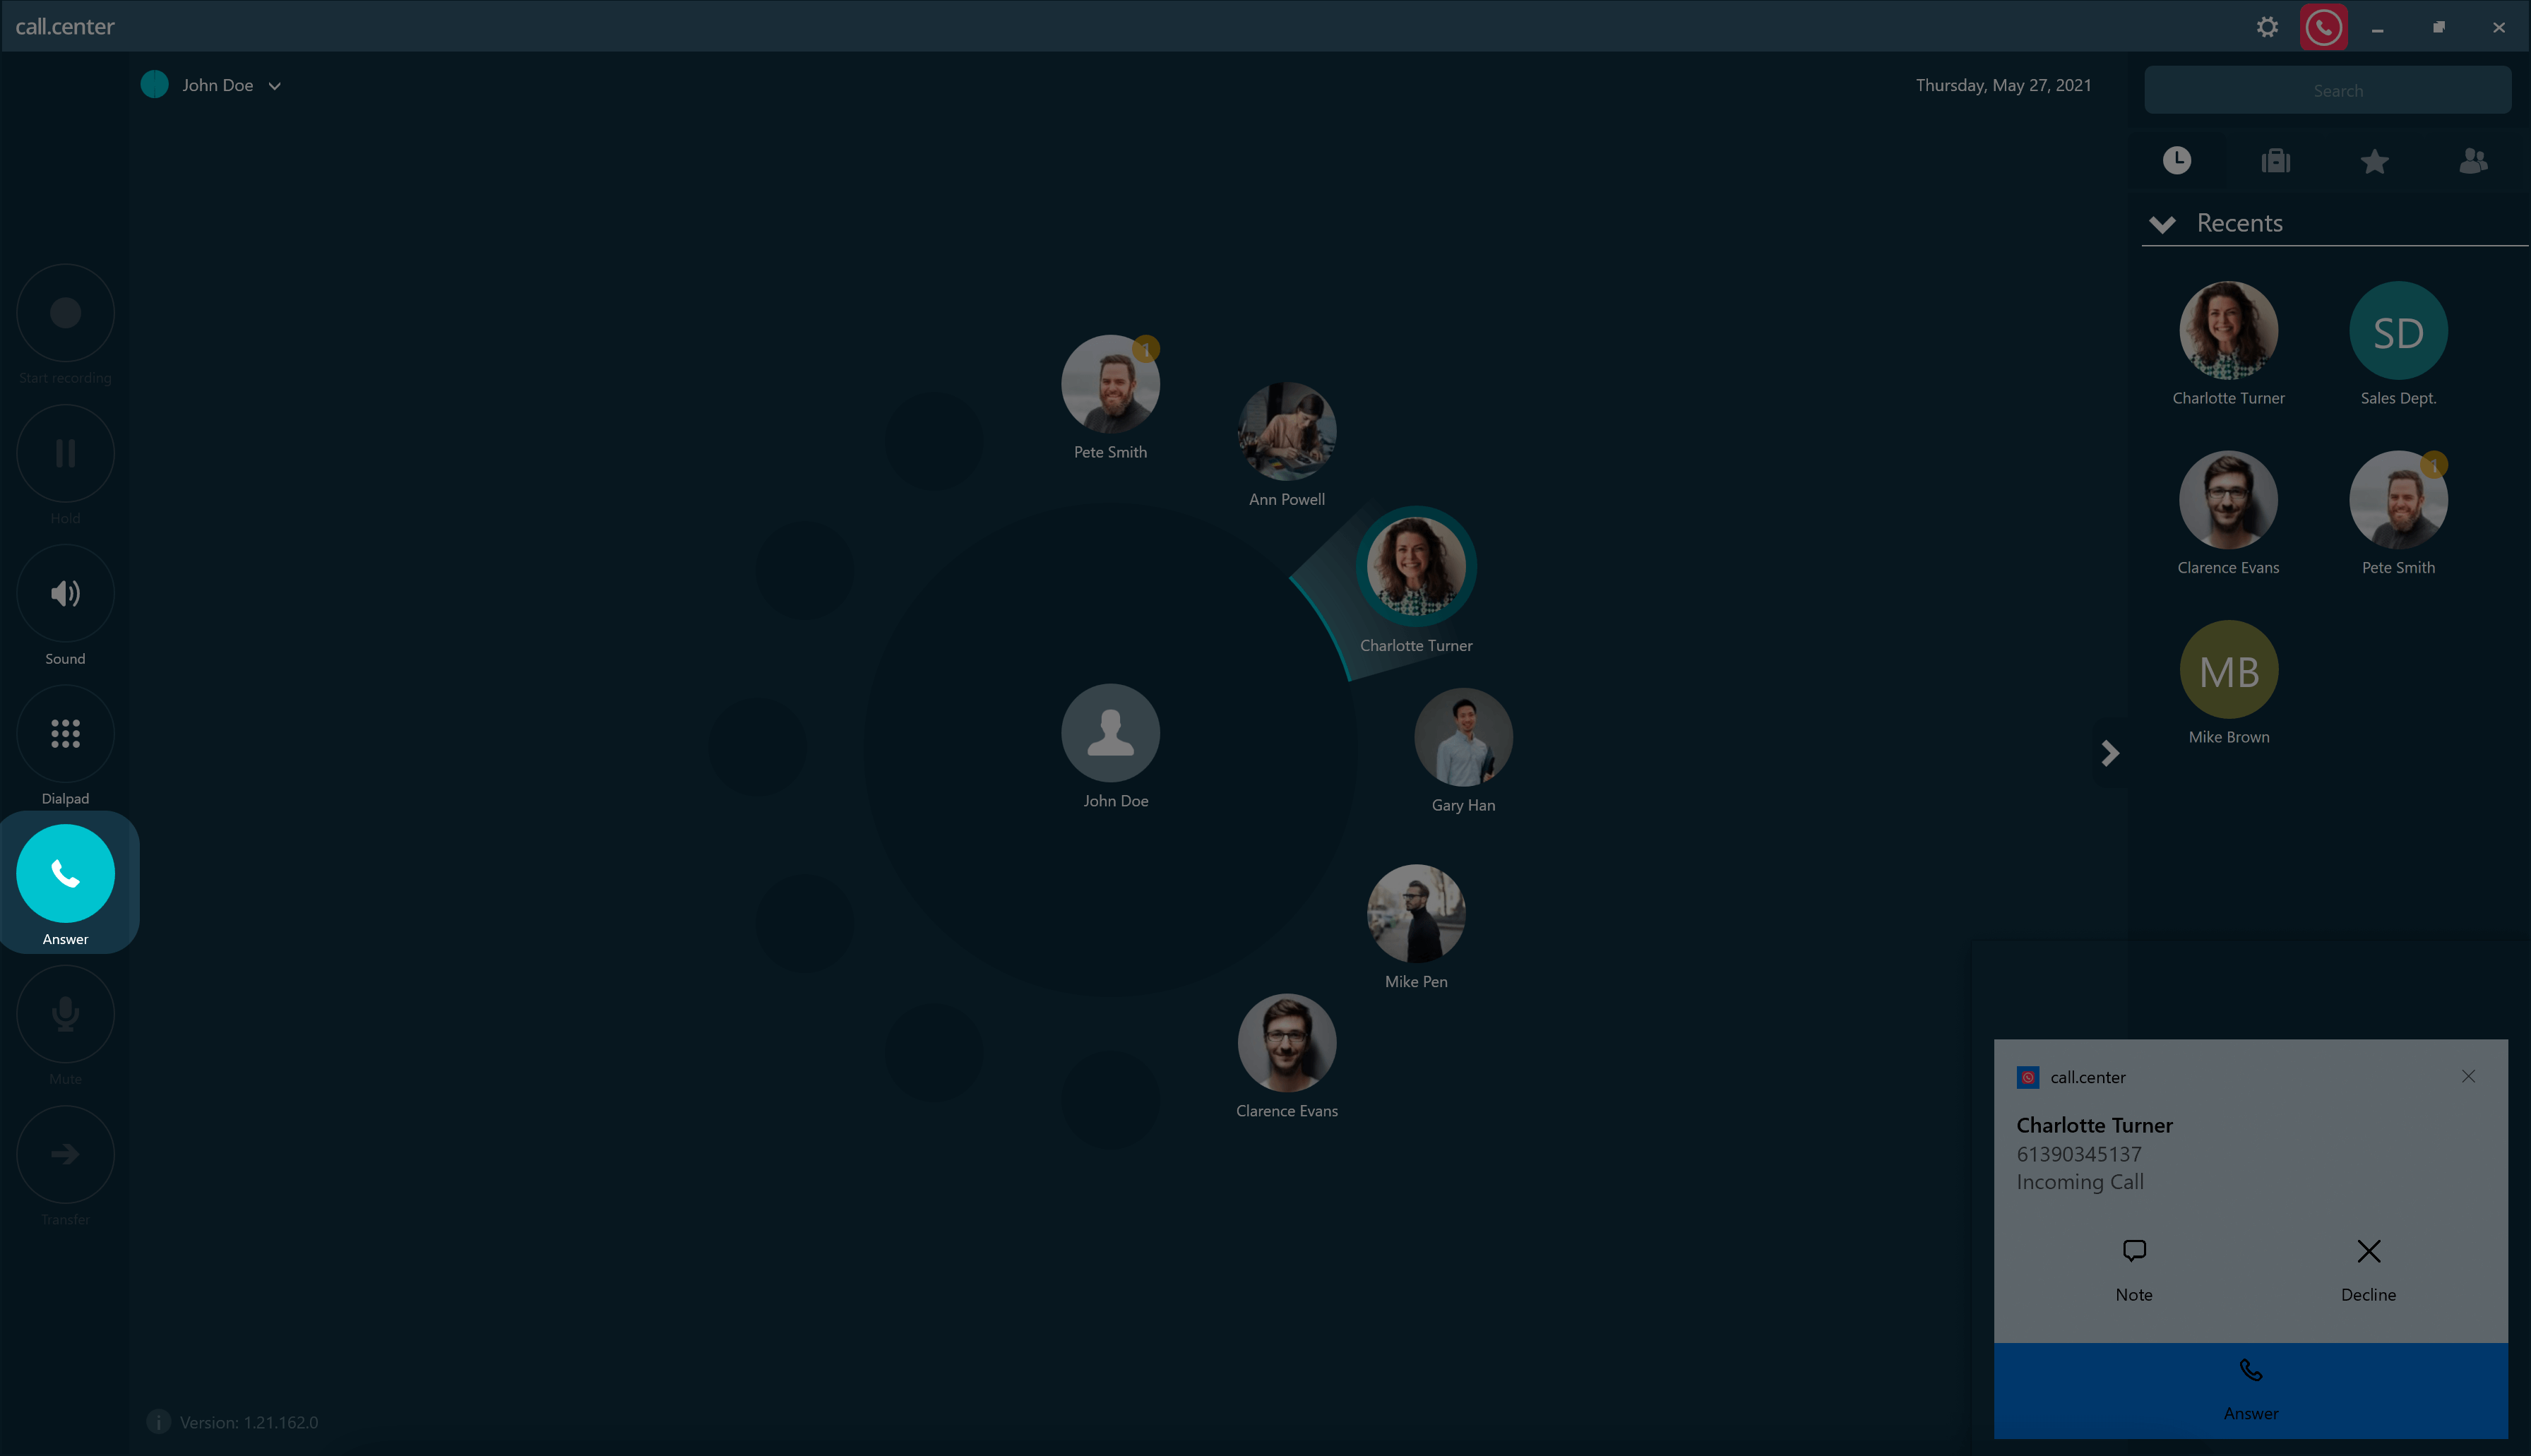
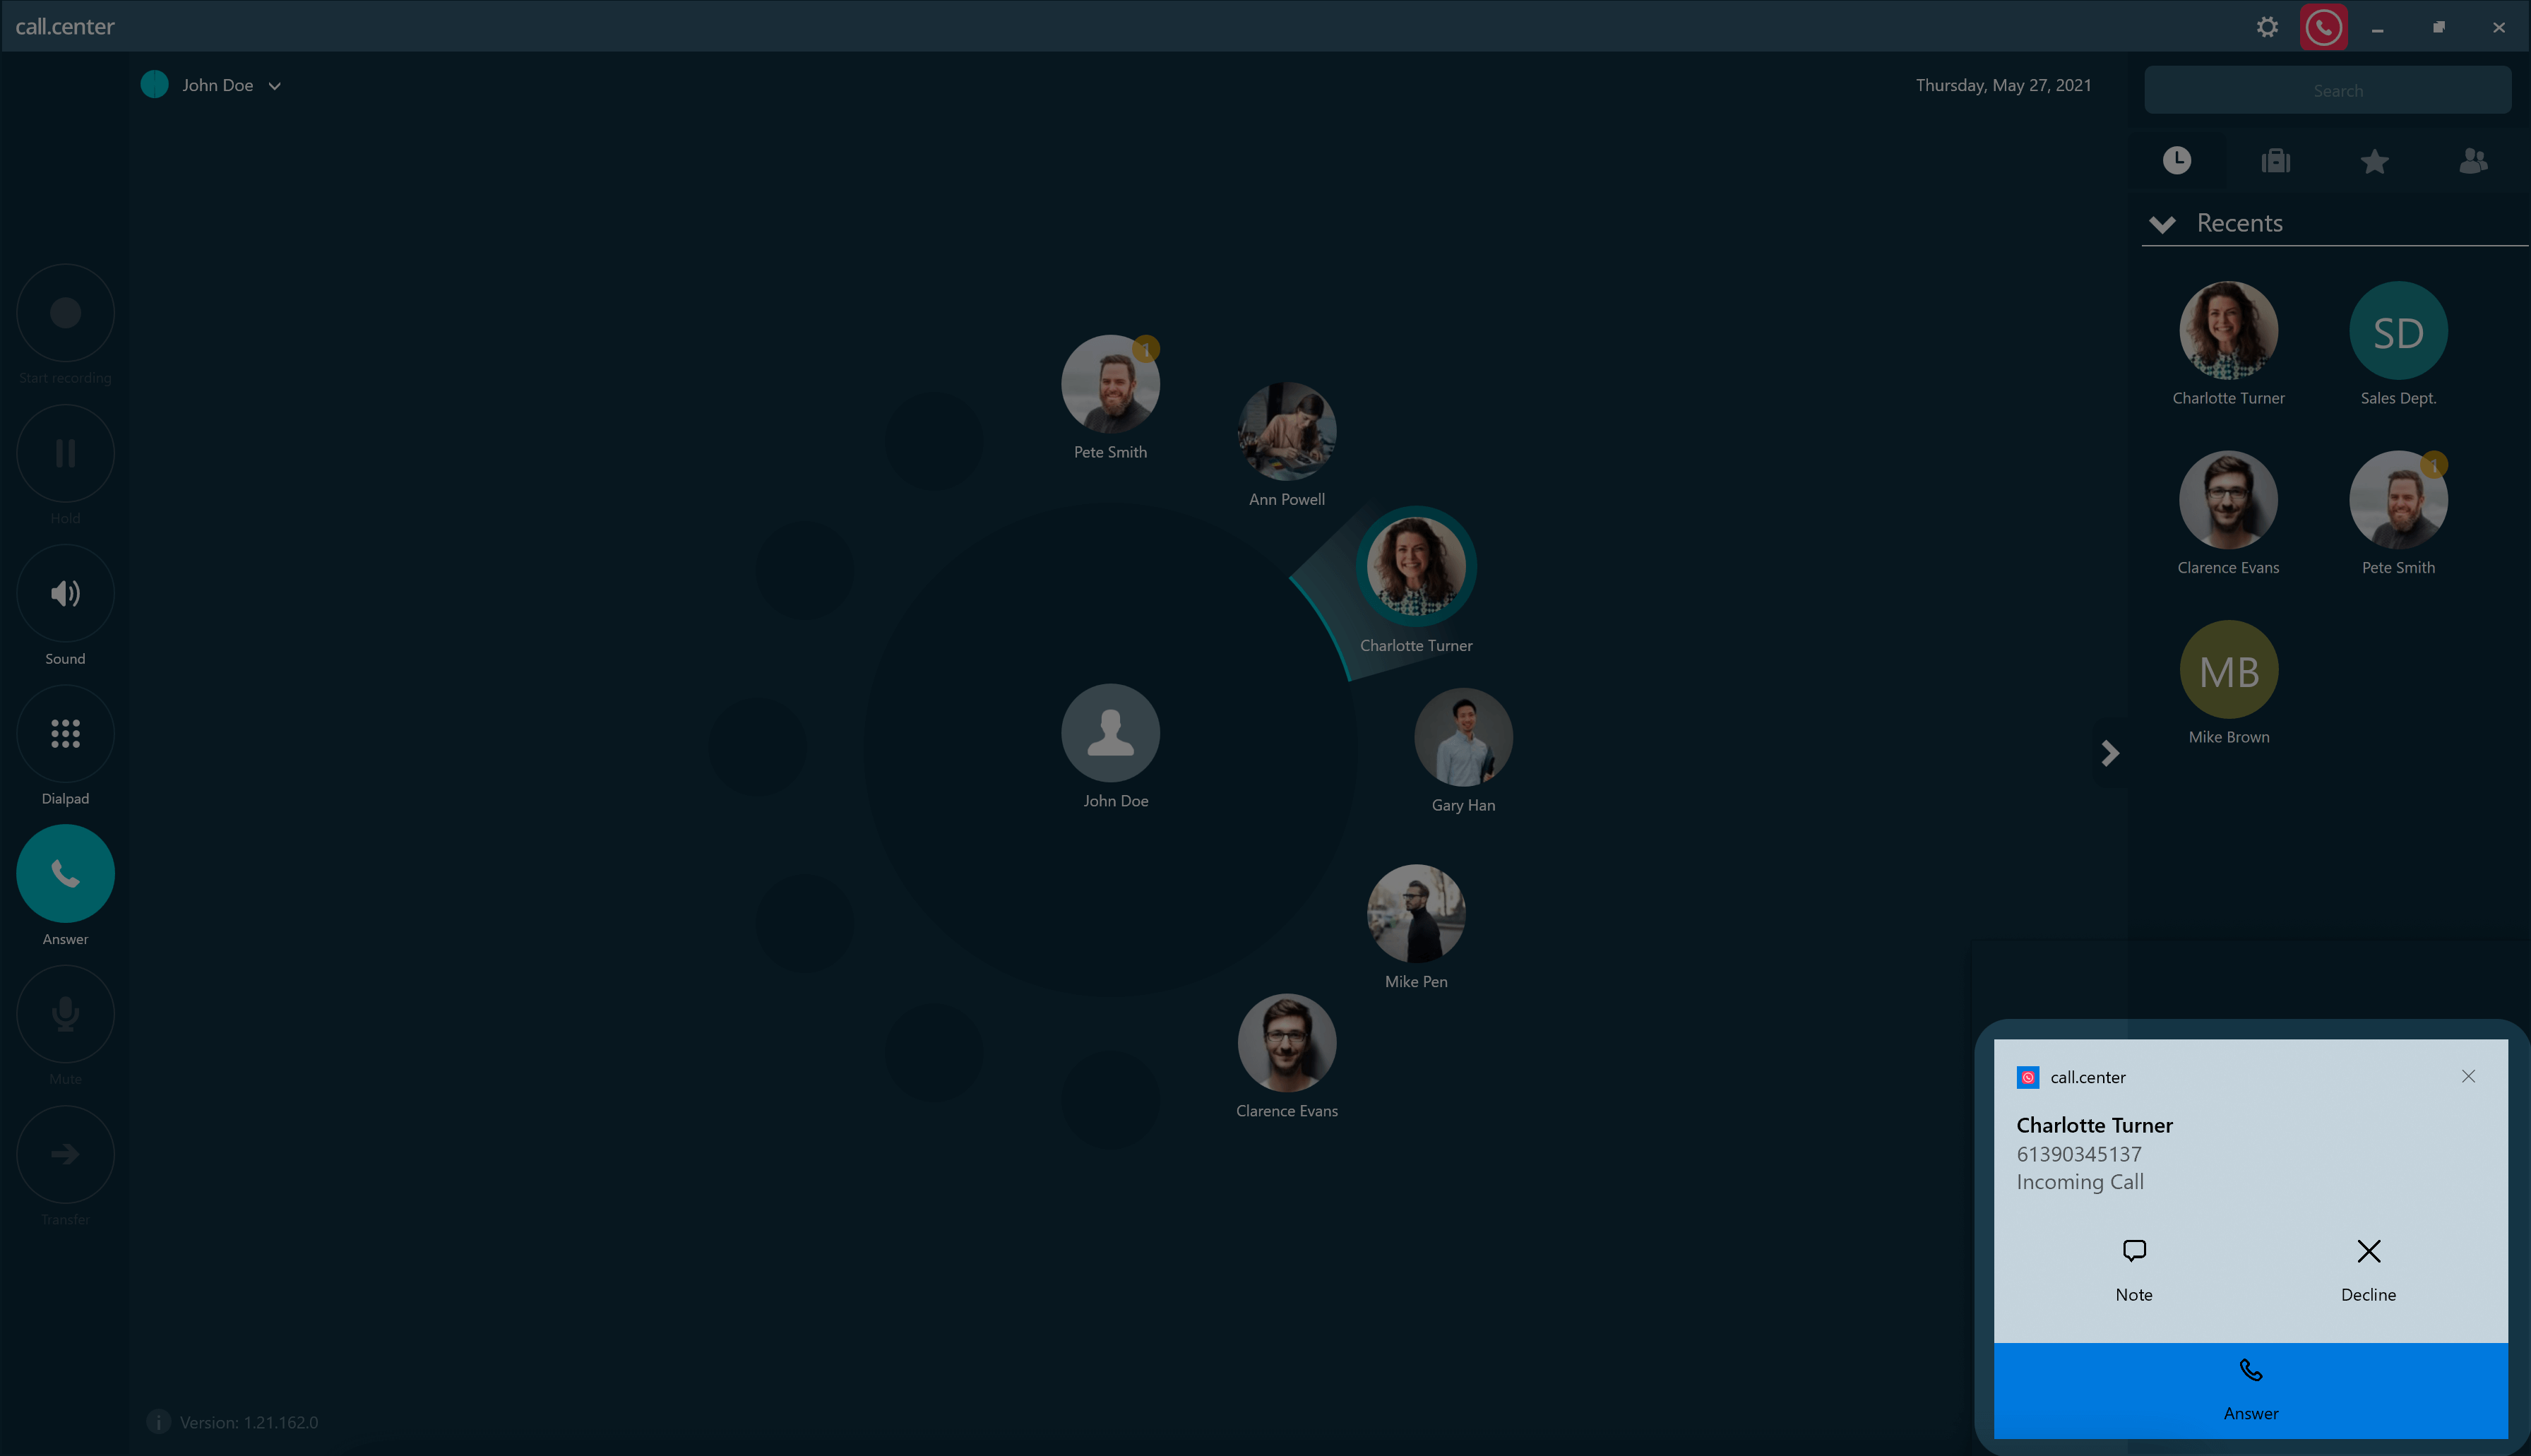
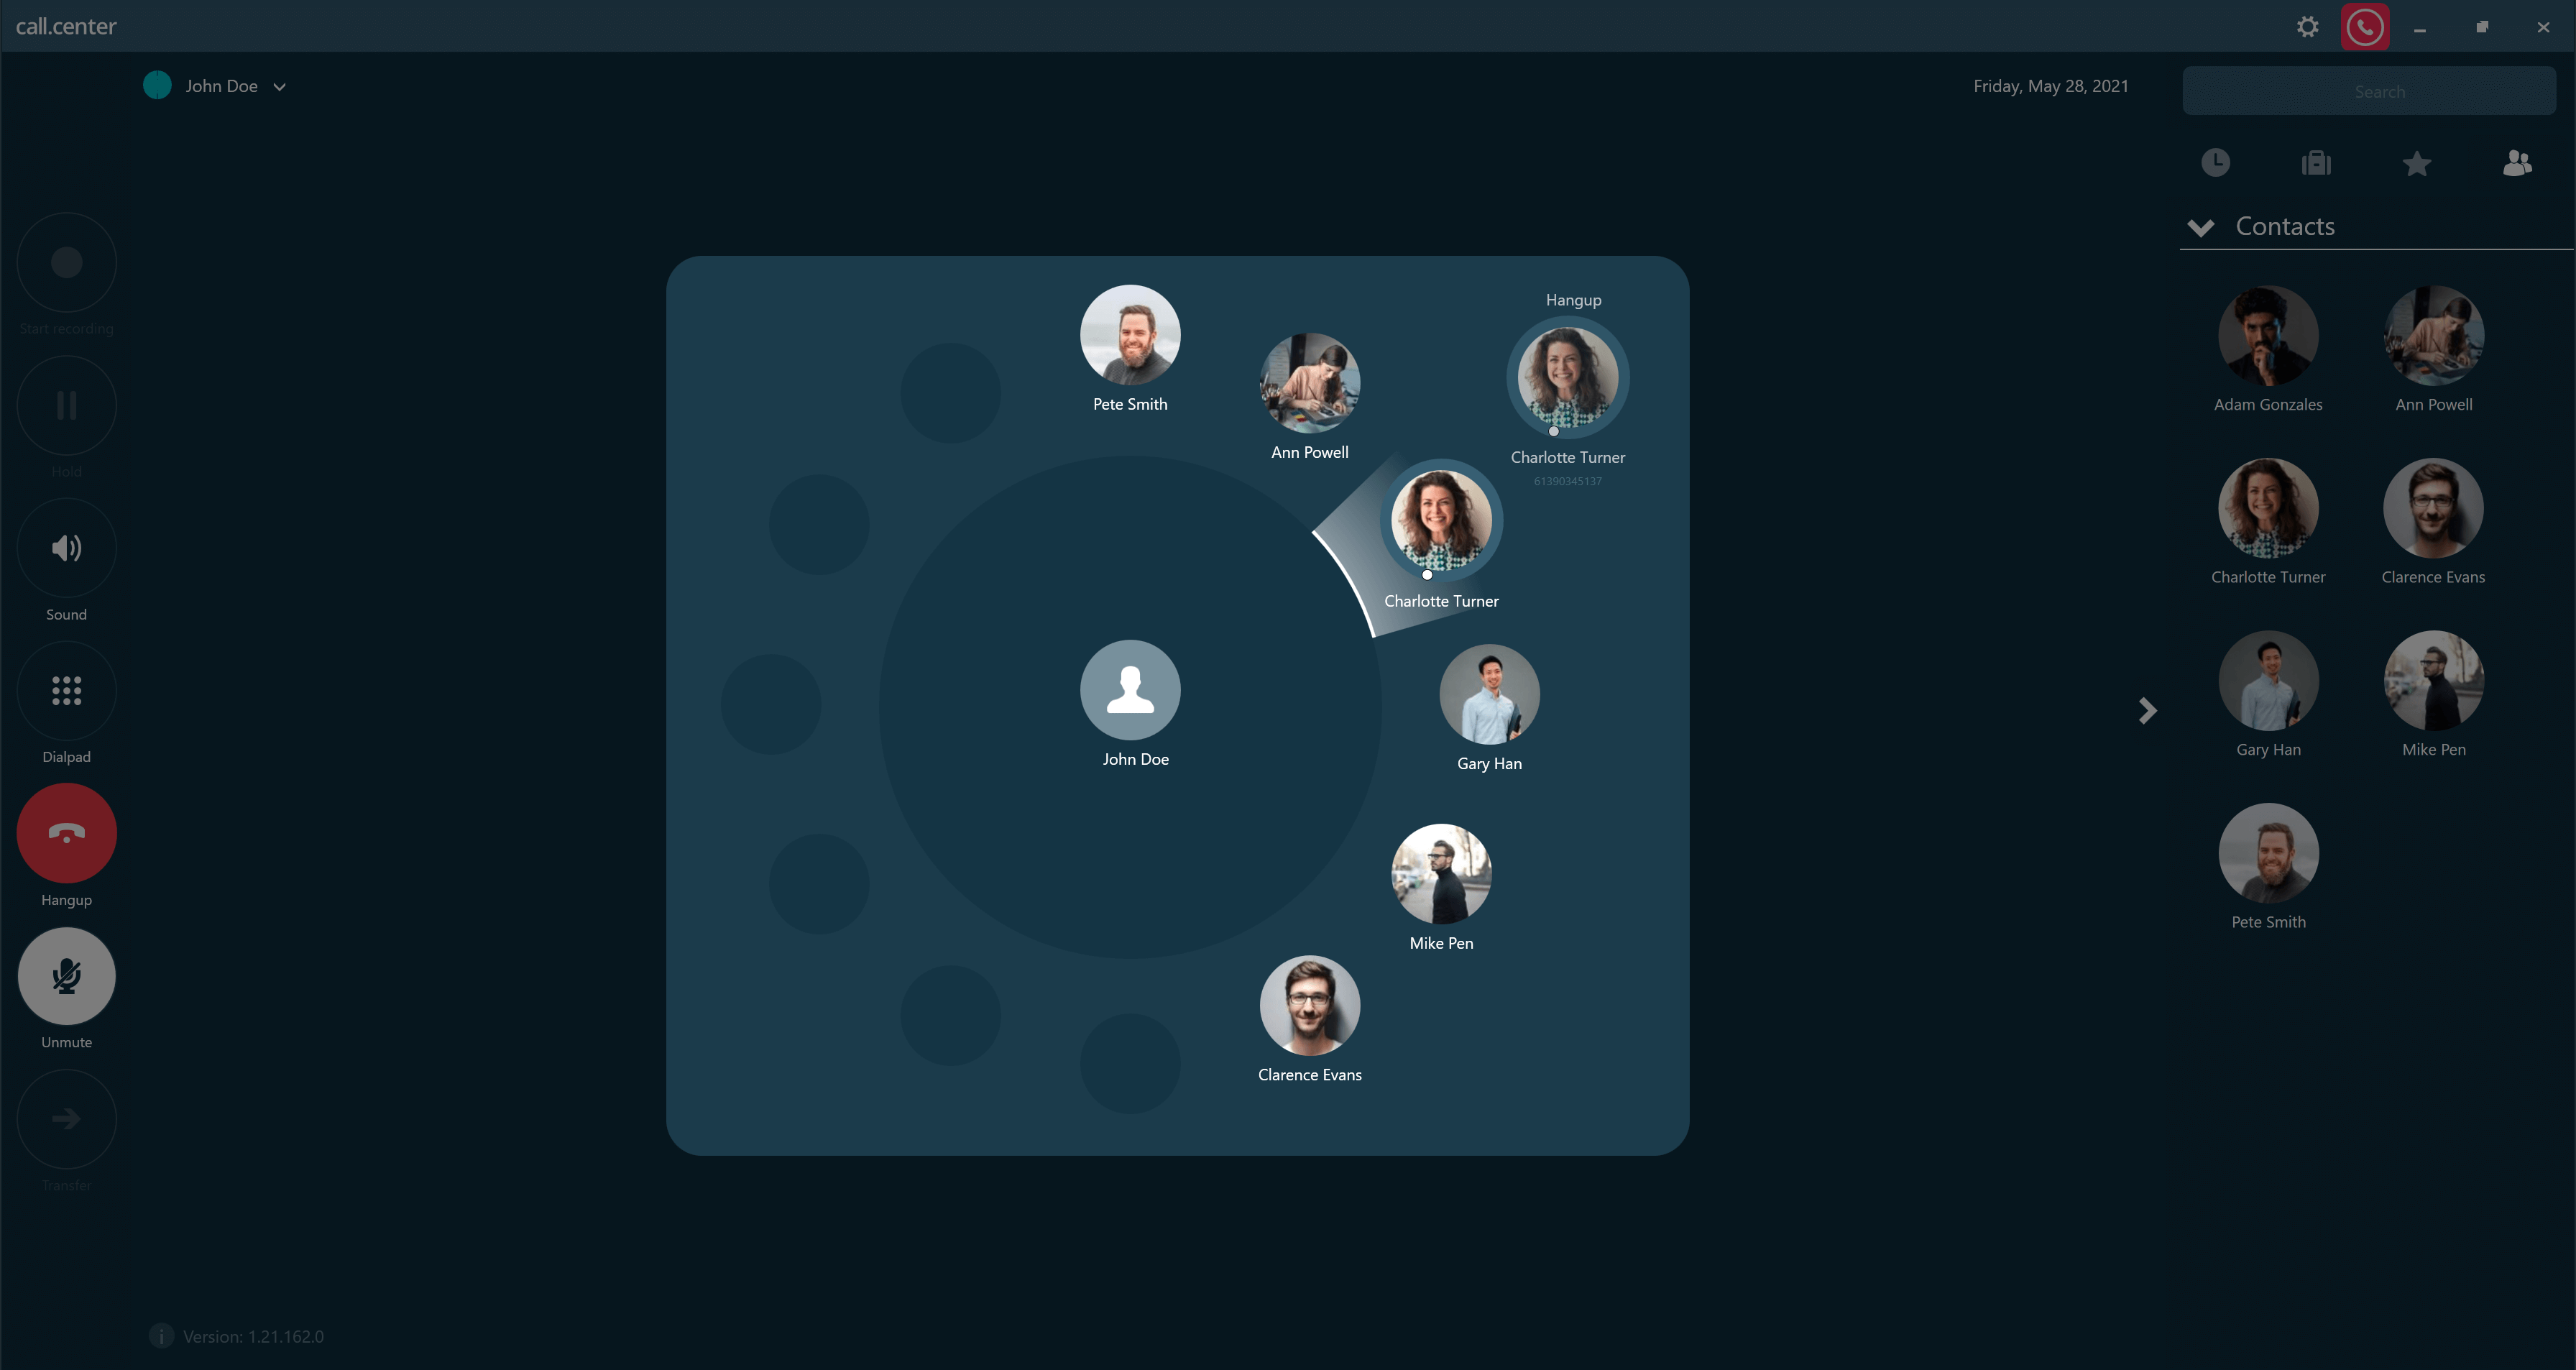
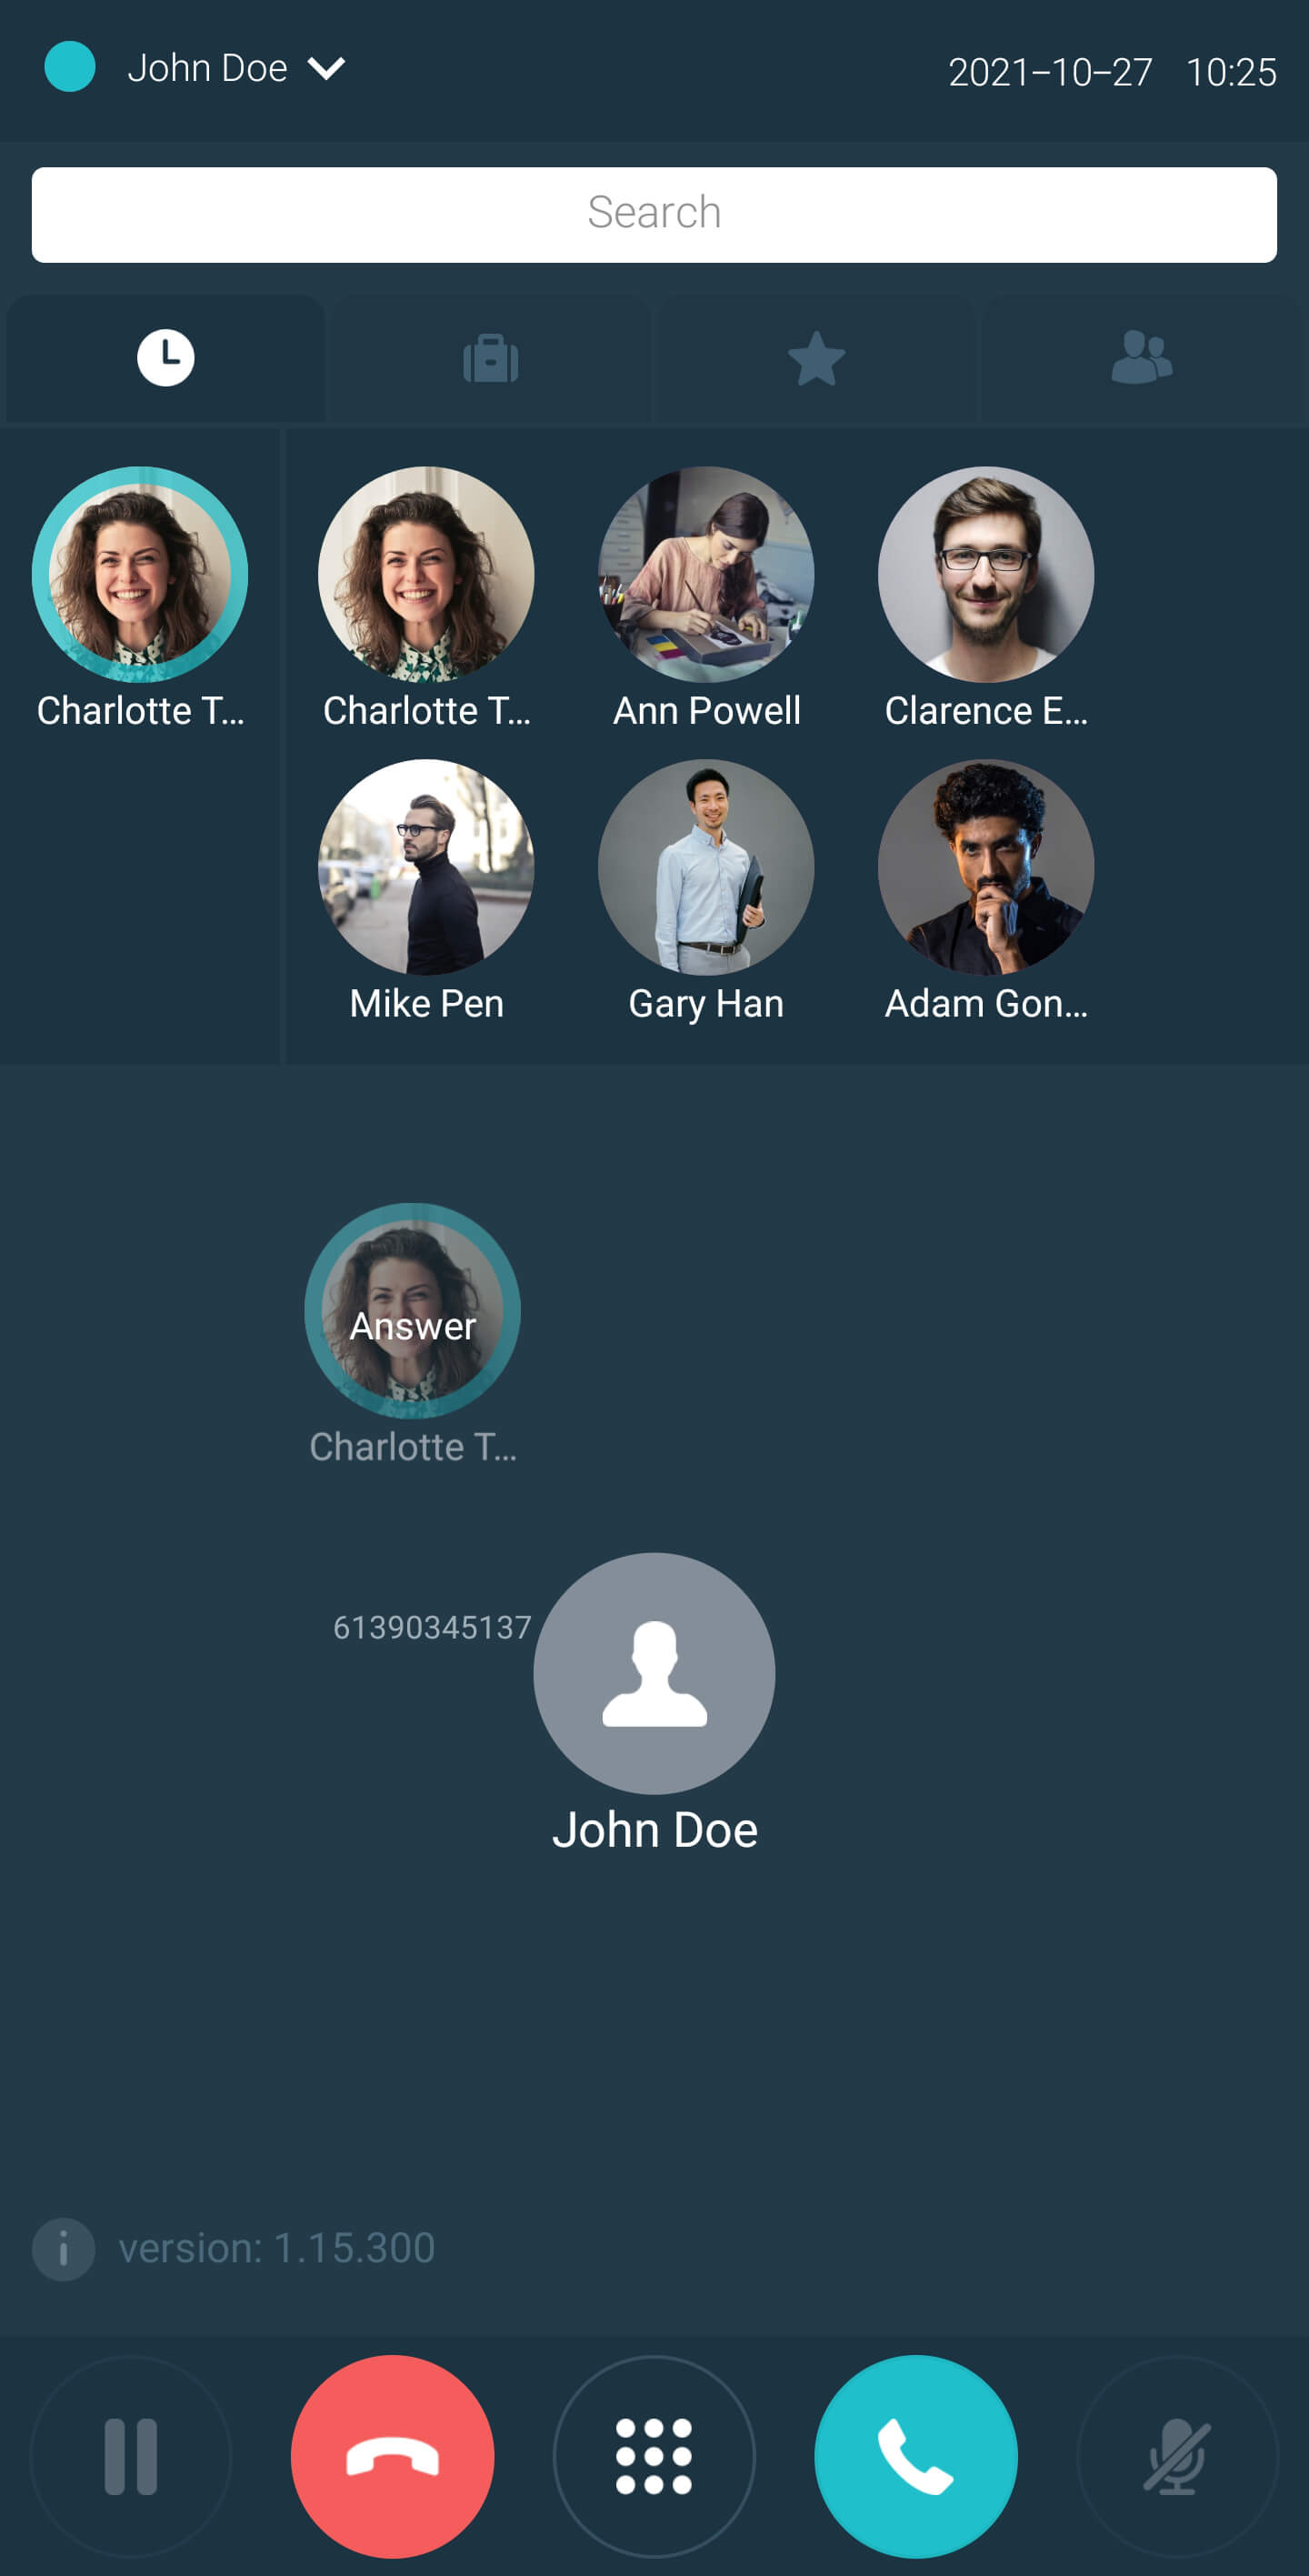
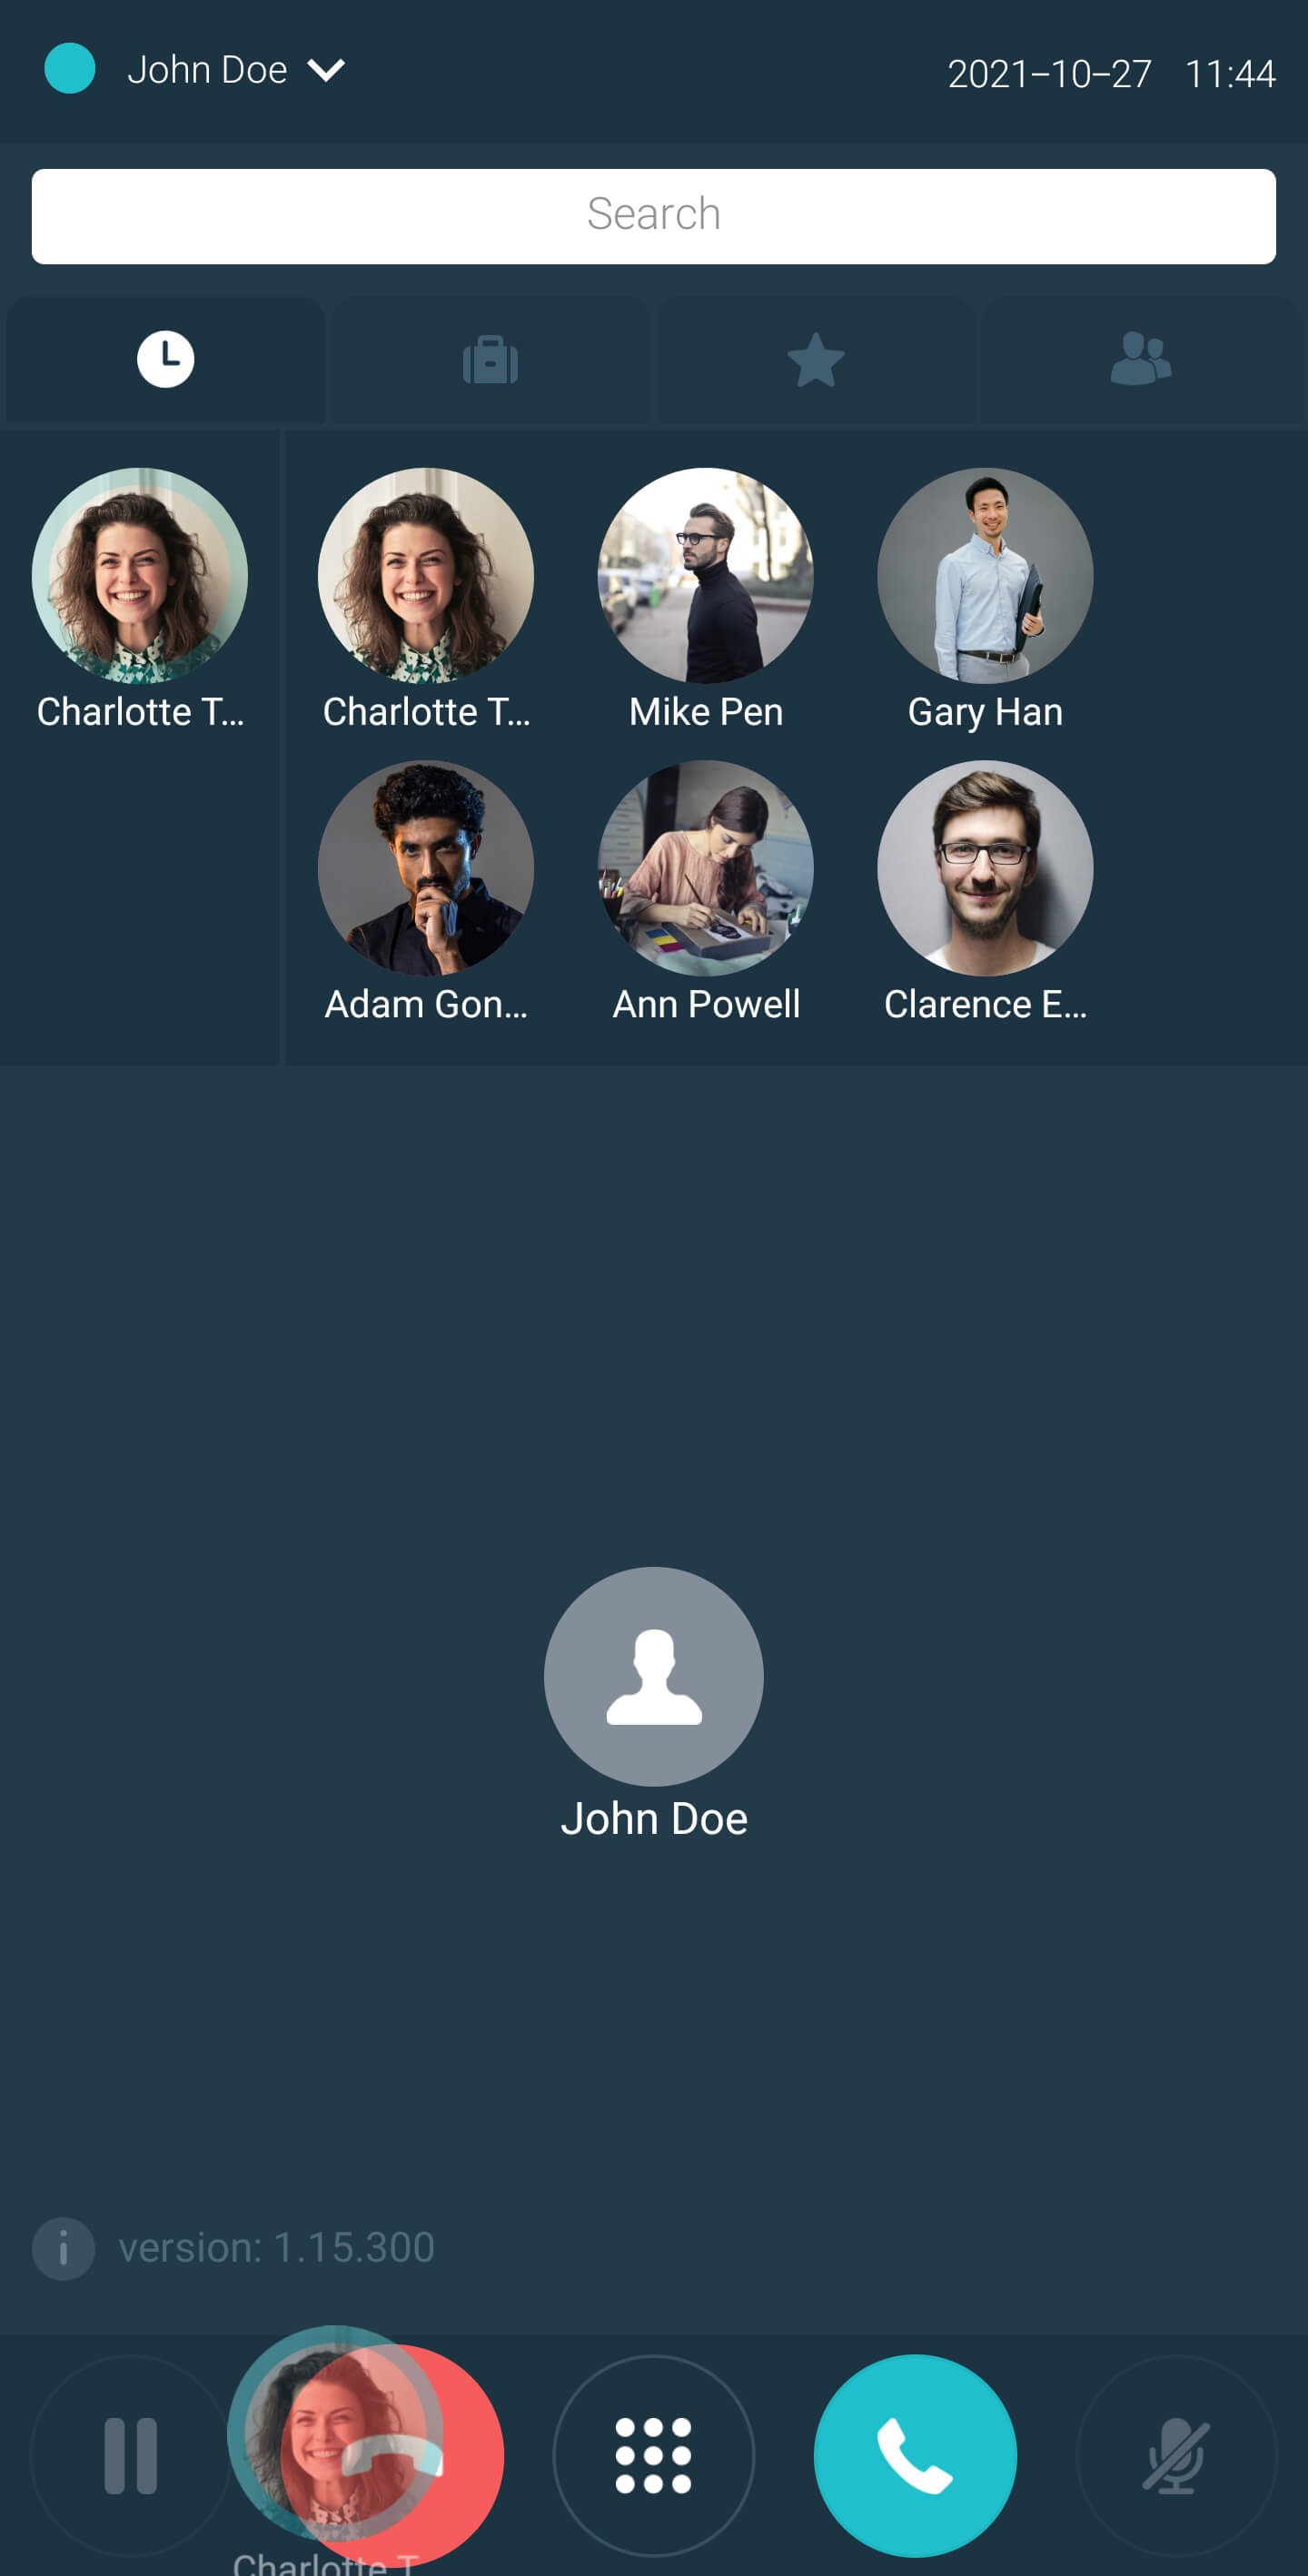
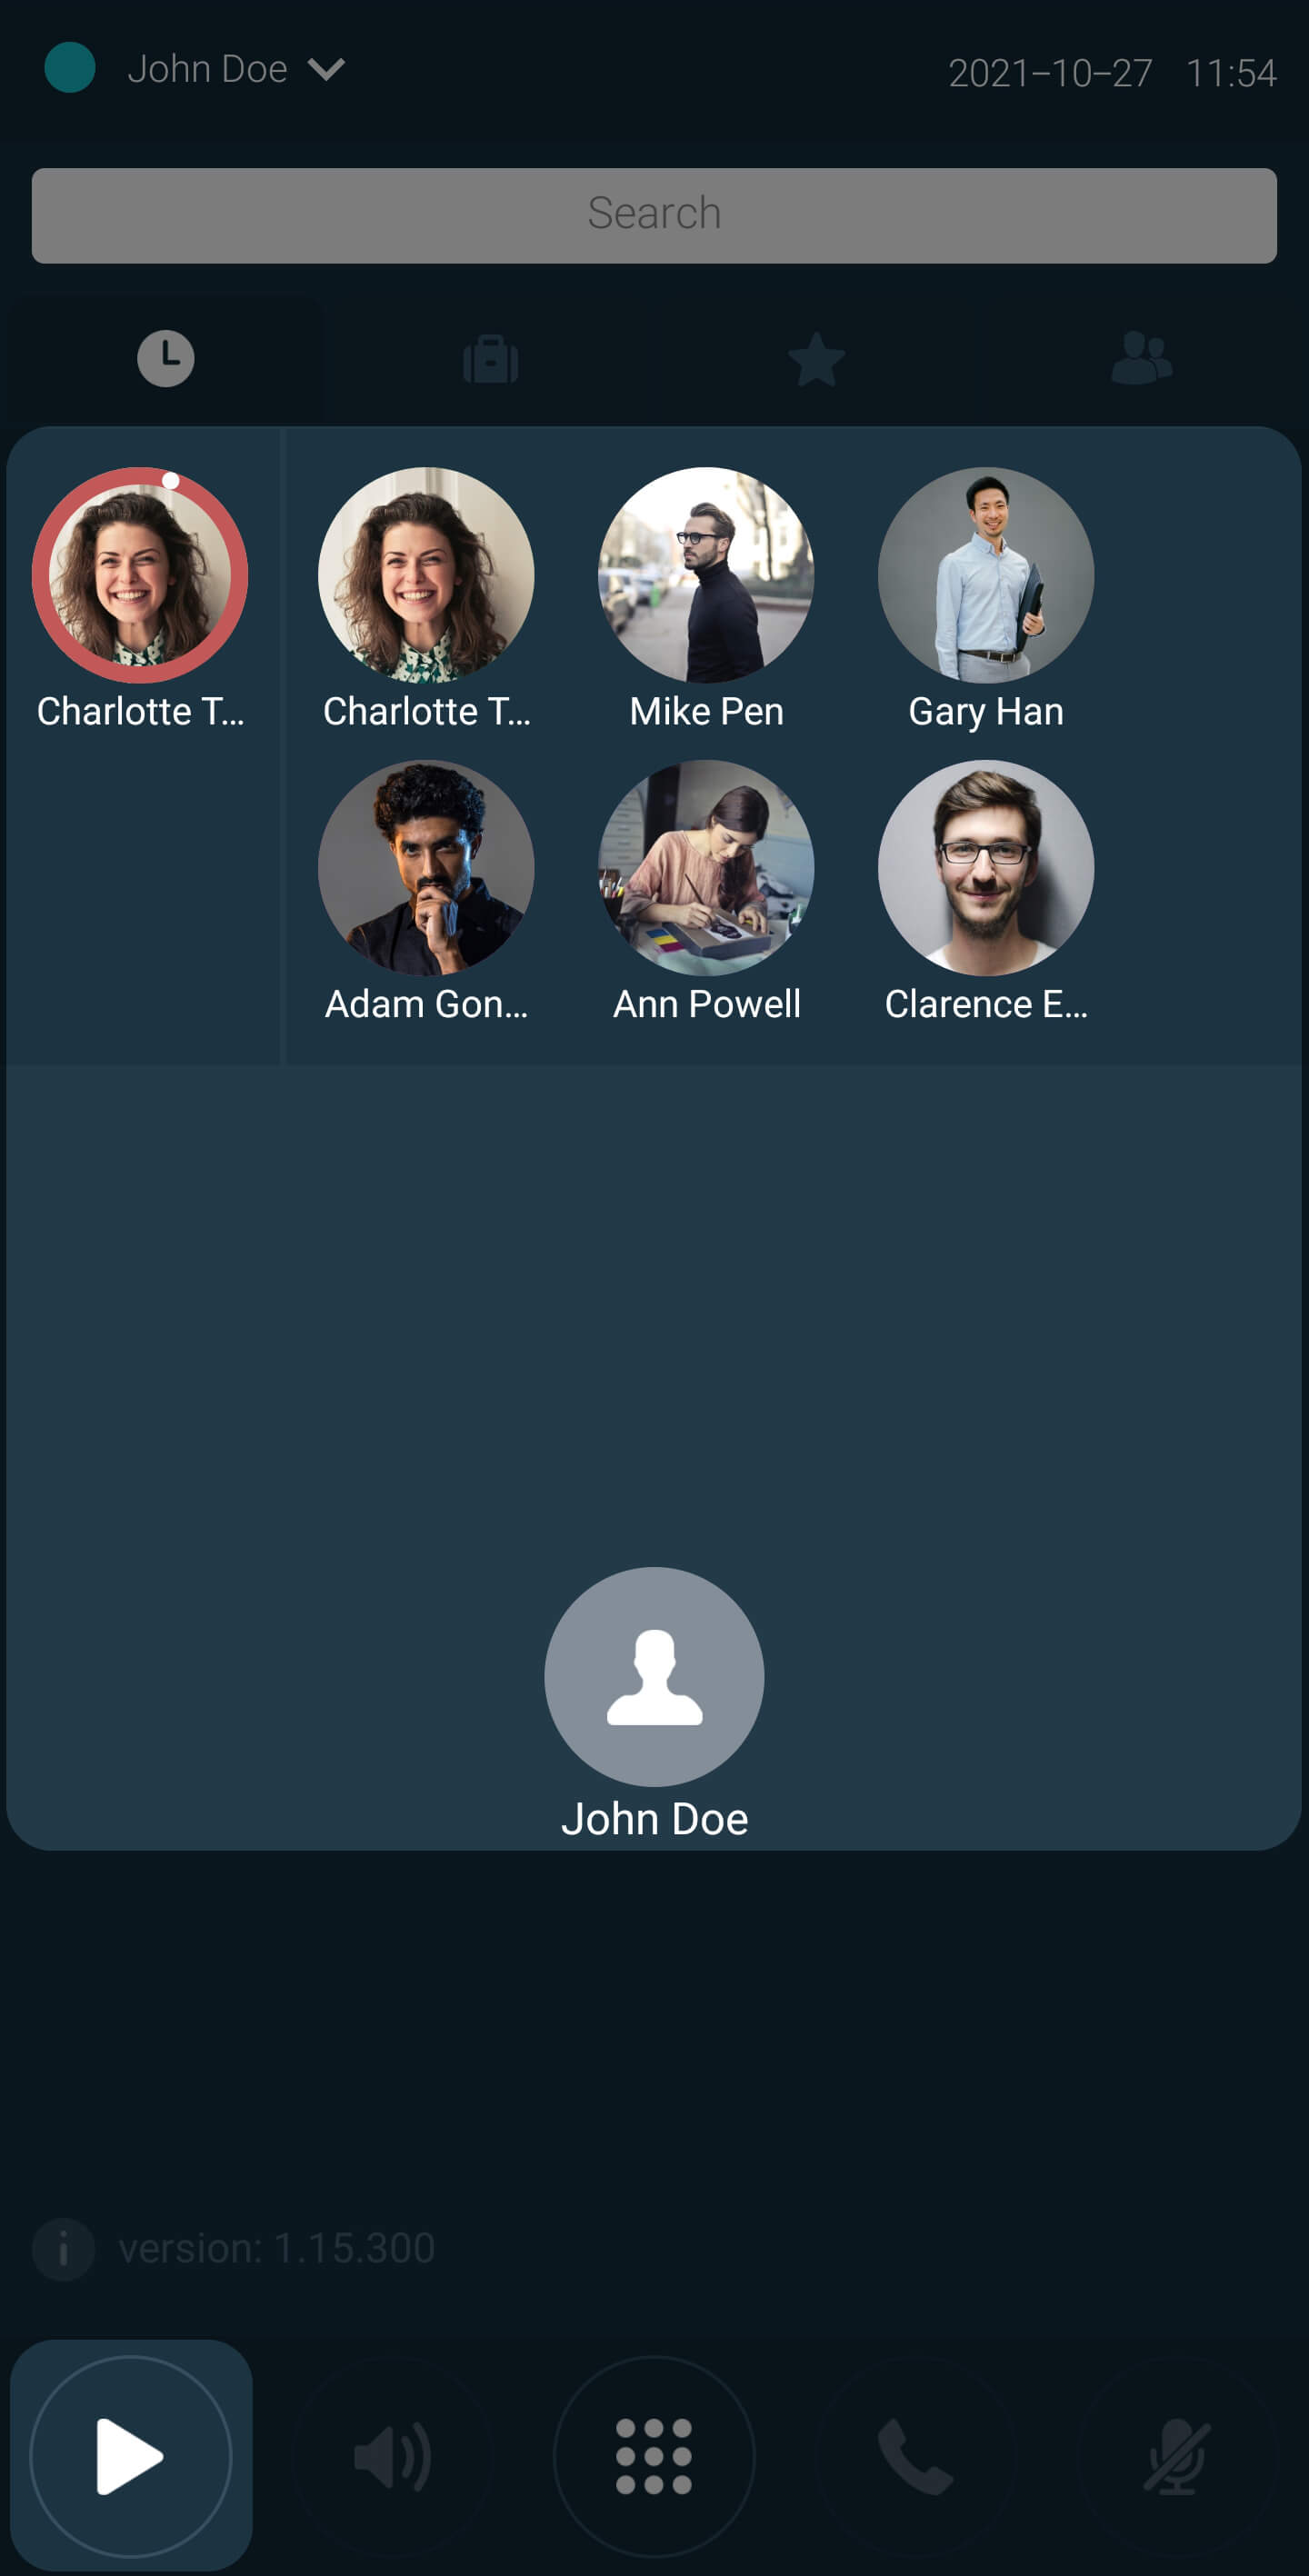
A ring sound/notification from the call.center™ app indicates an incoming call. The caller’s icon appears in the Activities Wheel in the area surrounding the Home Circle and this icon, together with the Answer button are highlighted in green to indicate a ready state. The incoming call may be answered (or rejected).
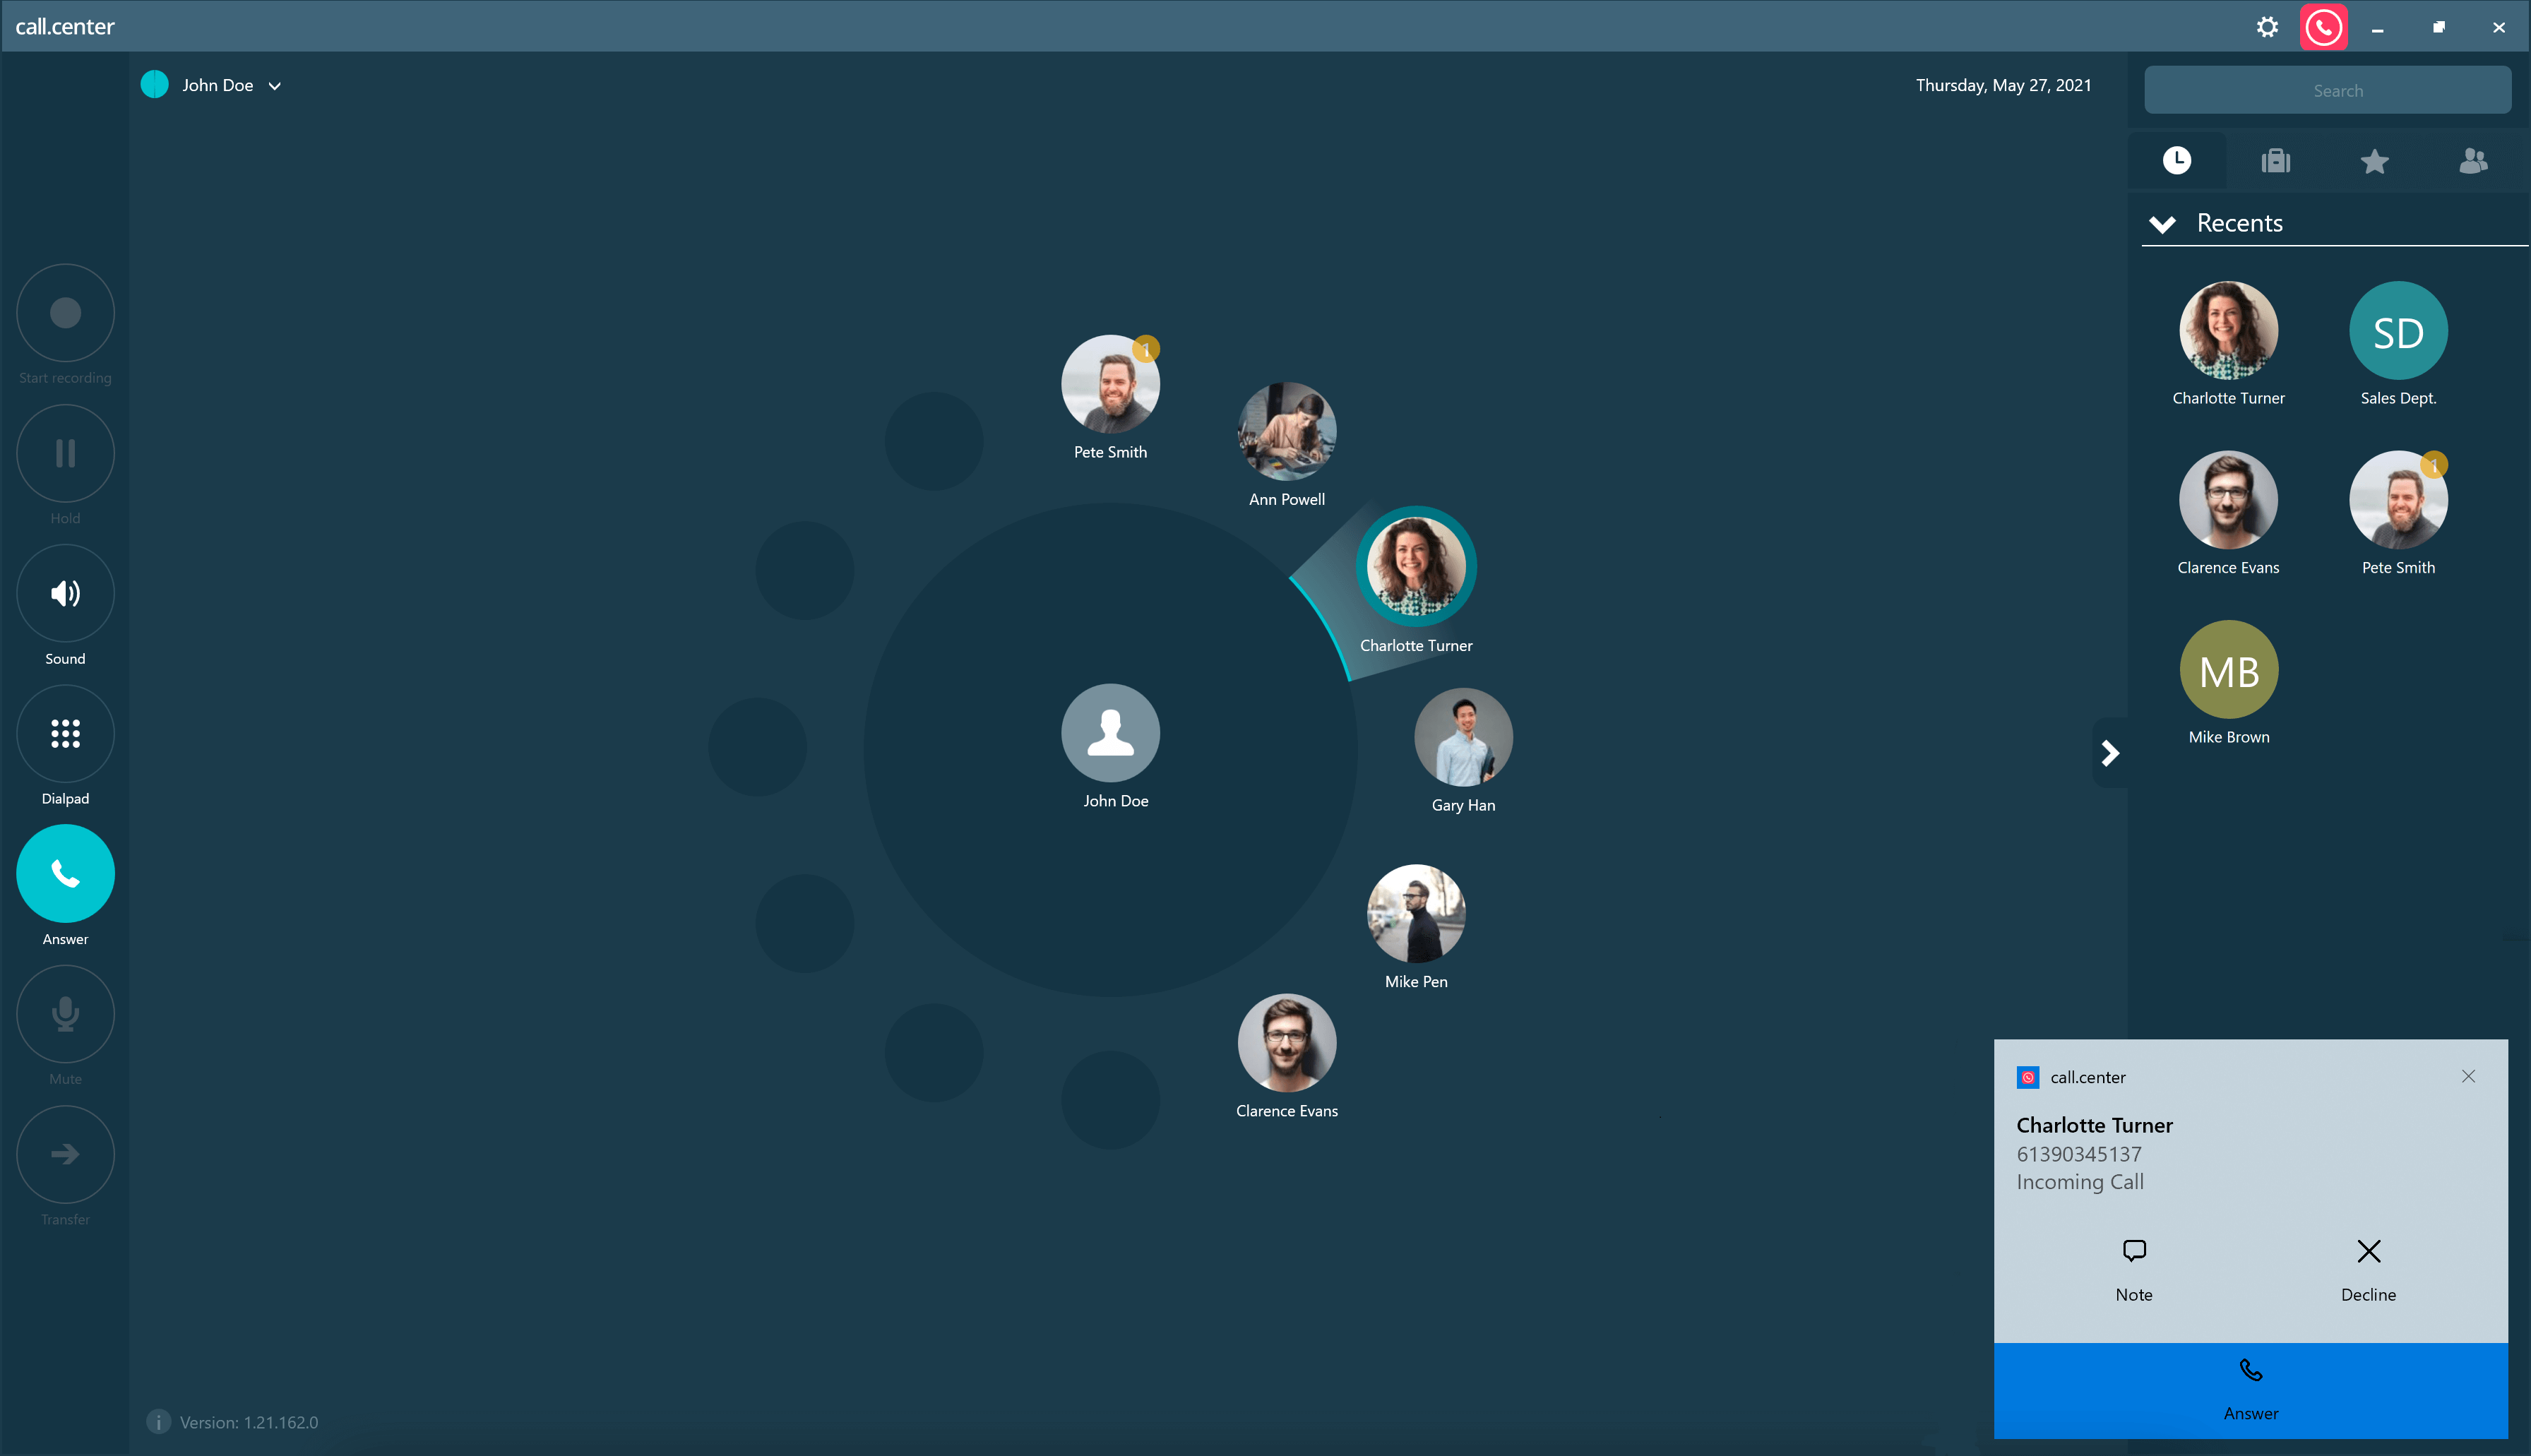
There are three ways to answer incoming calls, depending on your operating system platform:
- 1. Click the Answer button in the Phone Function Menu.
- OR 2. Drag and drop the highlighted contact icon associated with the incoming call into the Home Circle.
- OR 3. Click the Answer button from the incoming call pop-up notification, if enabled.
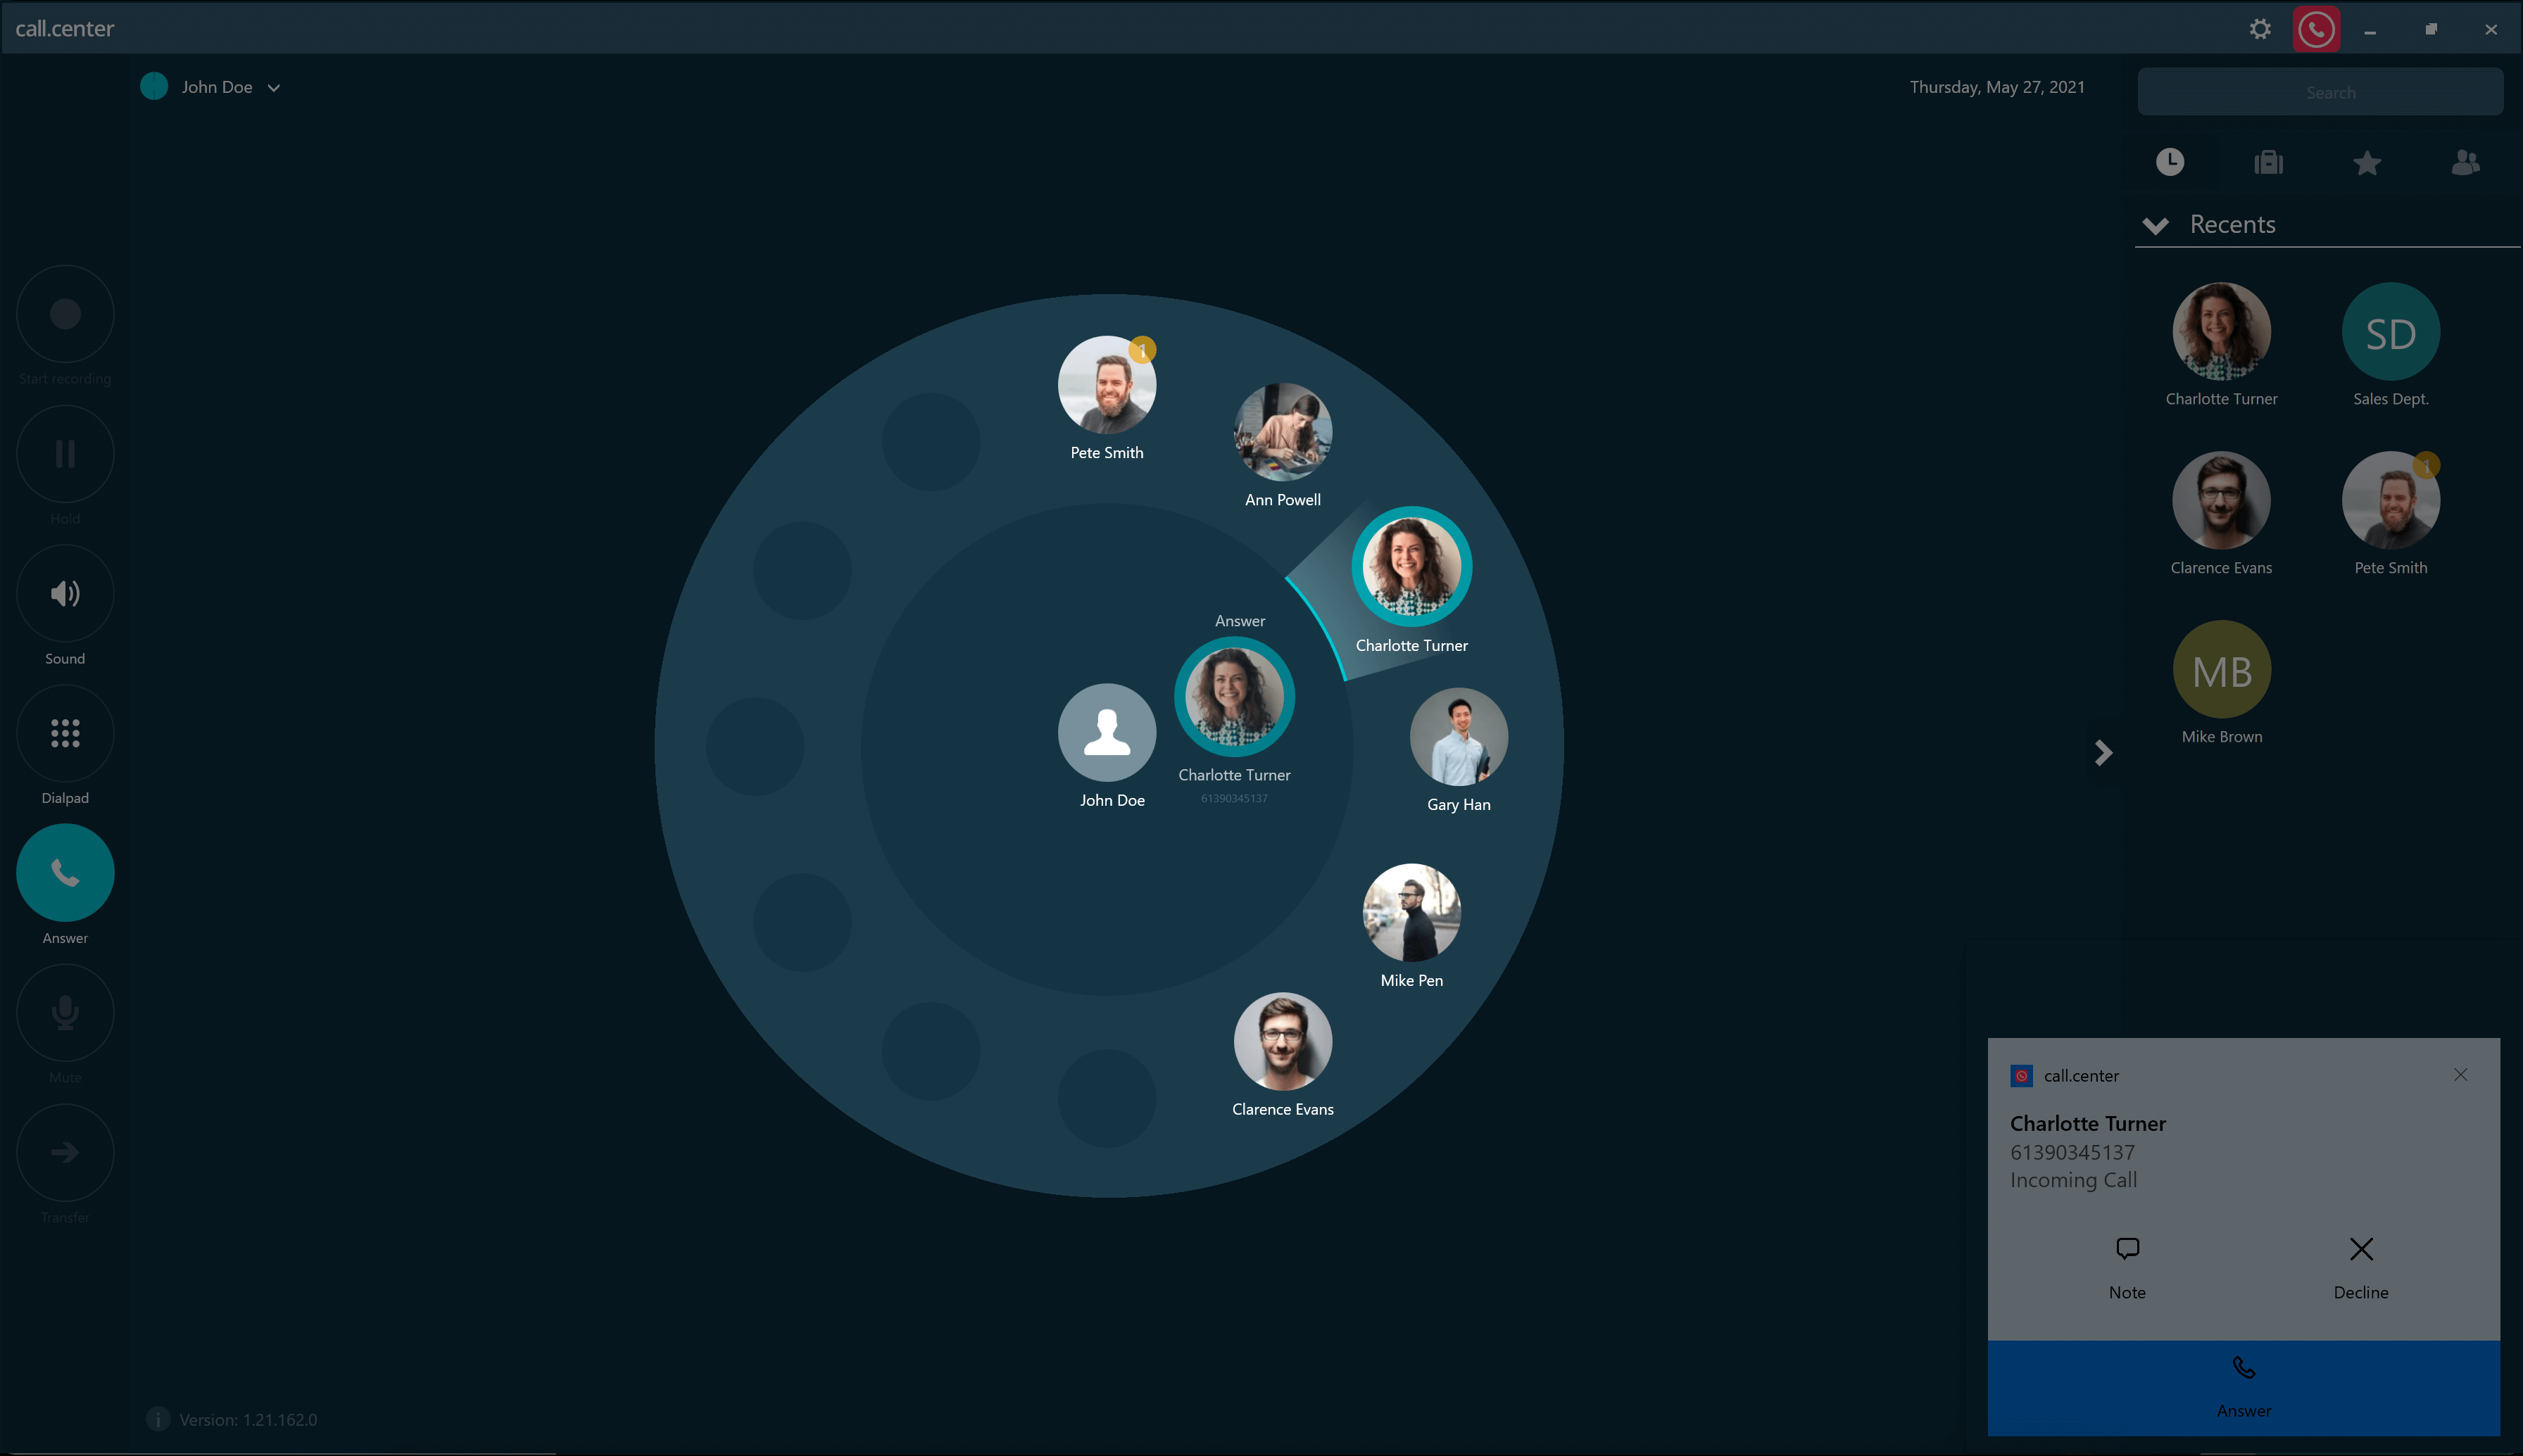
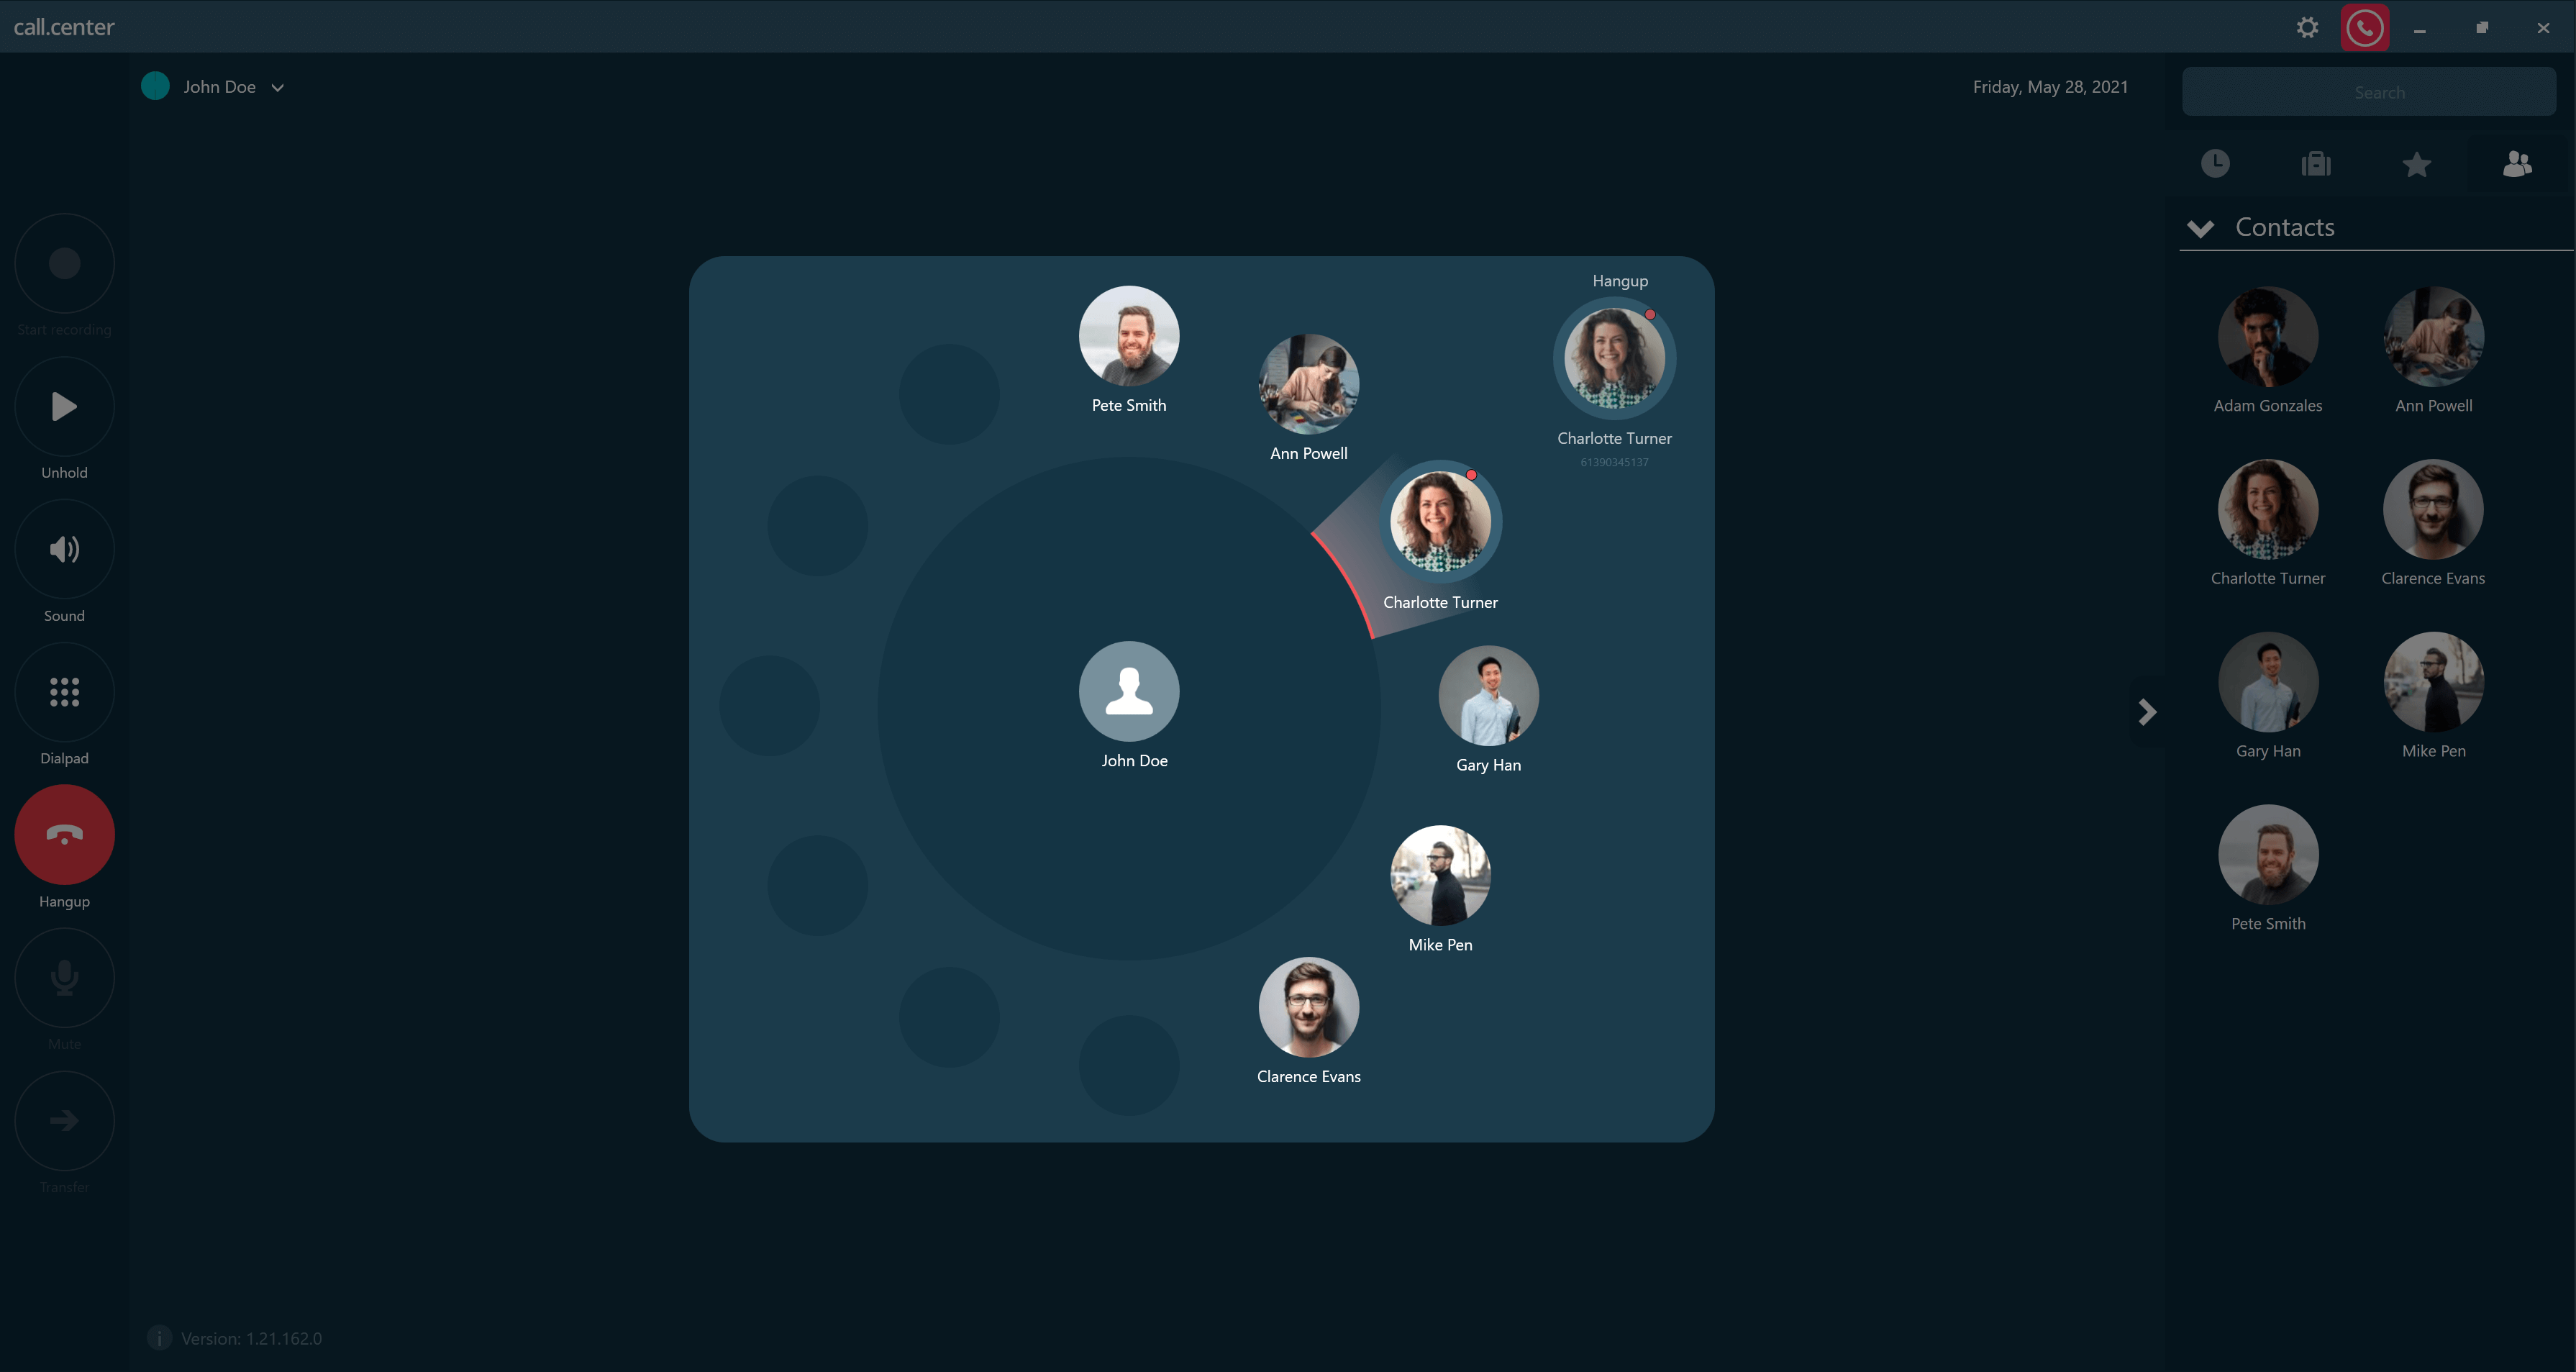
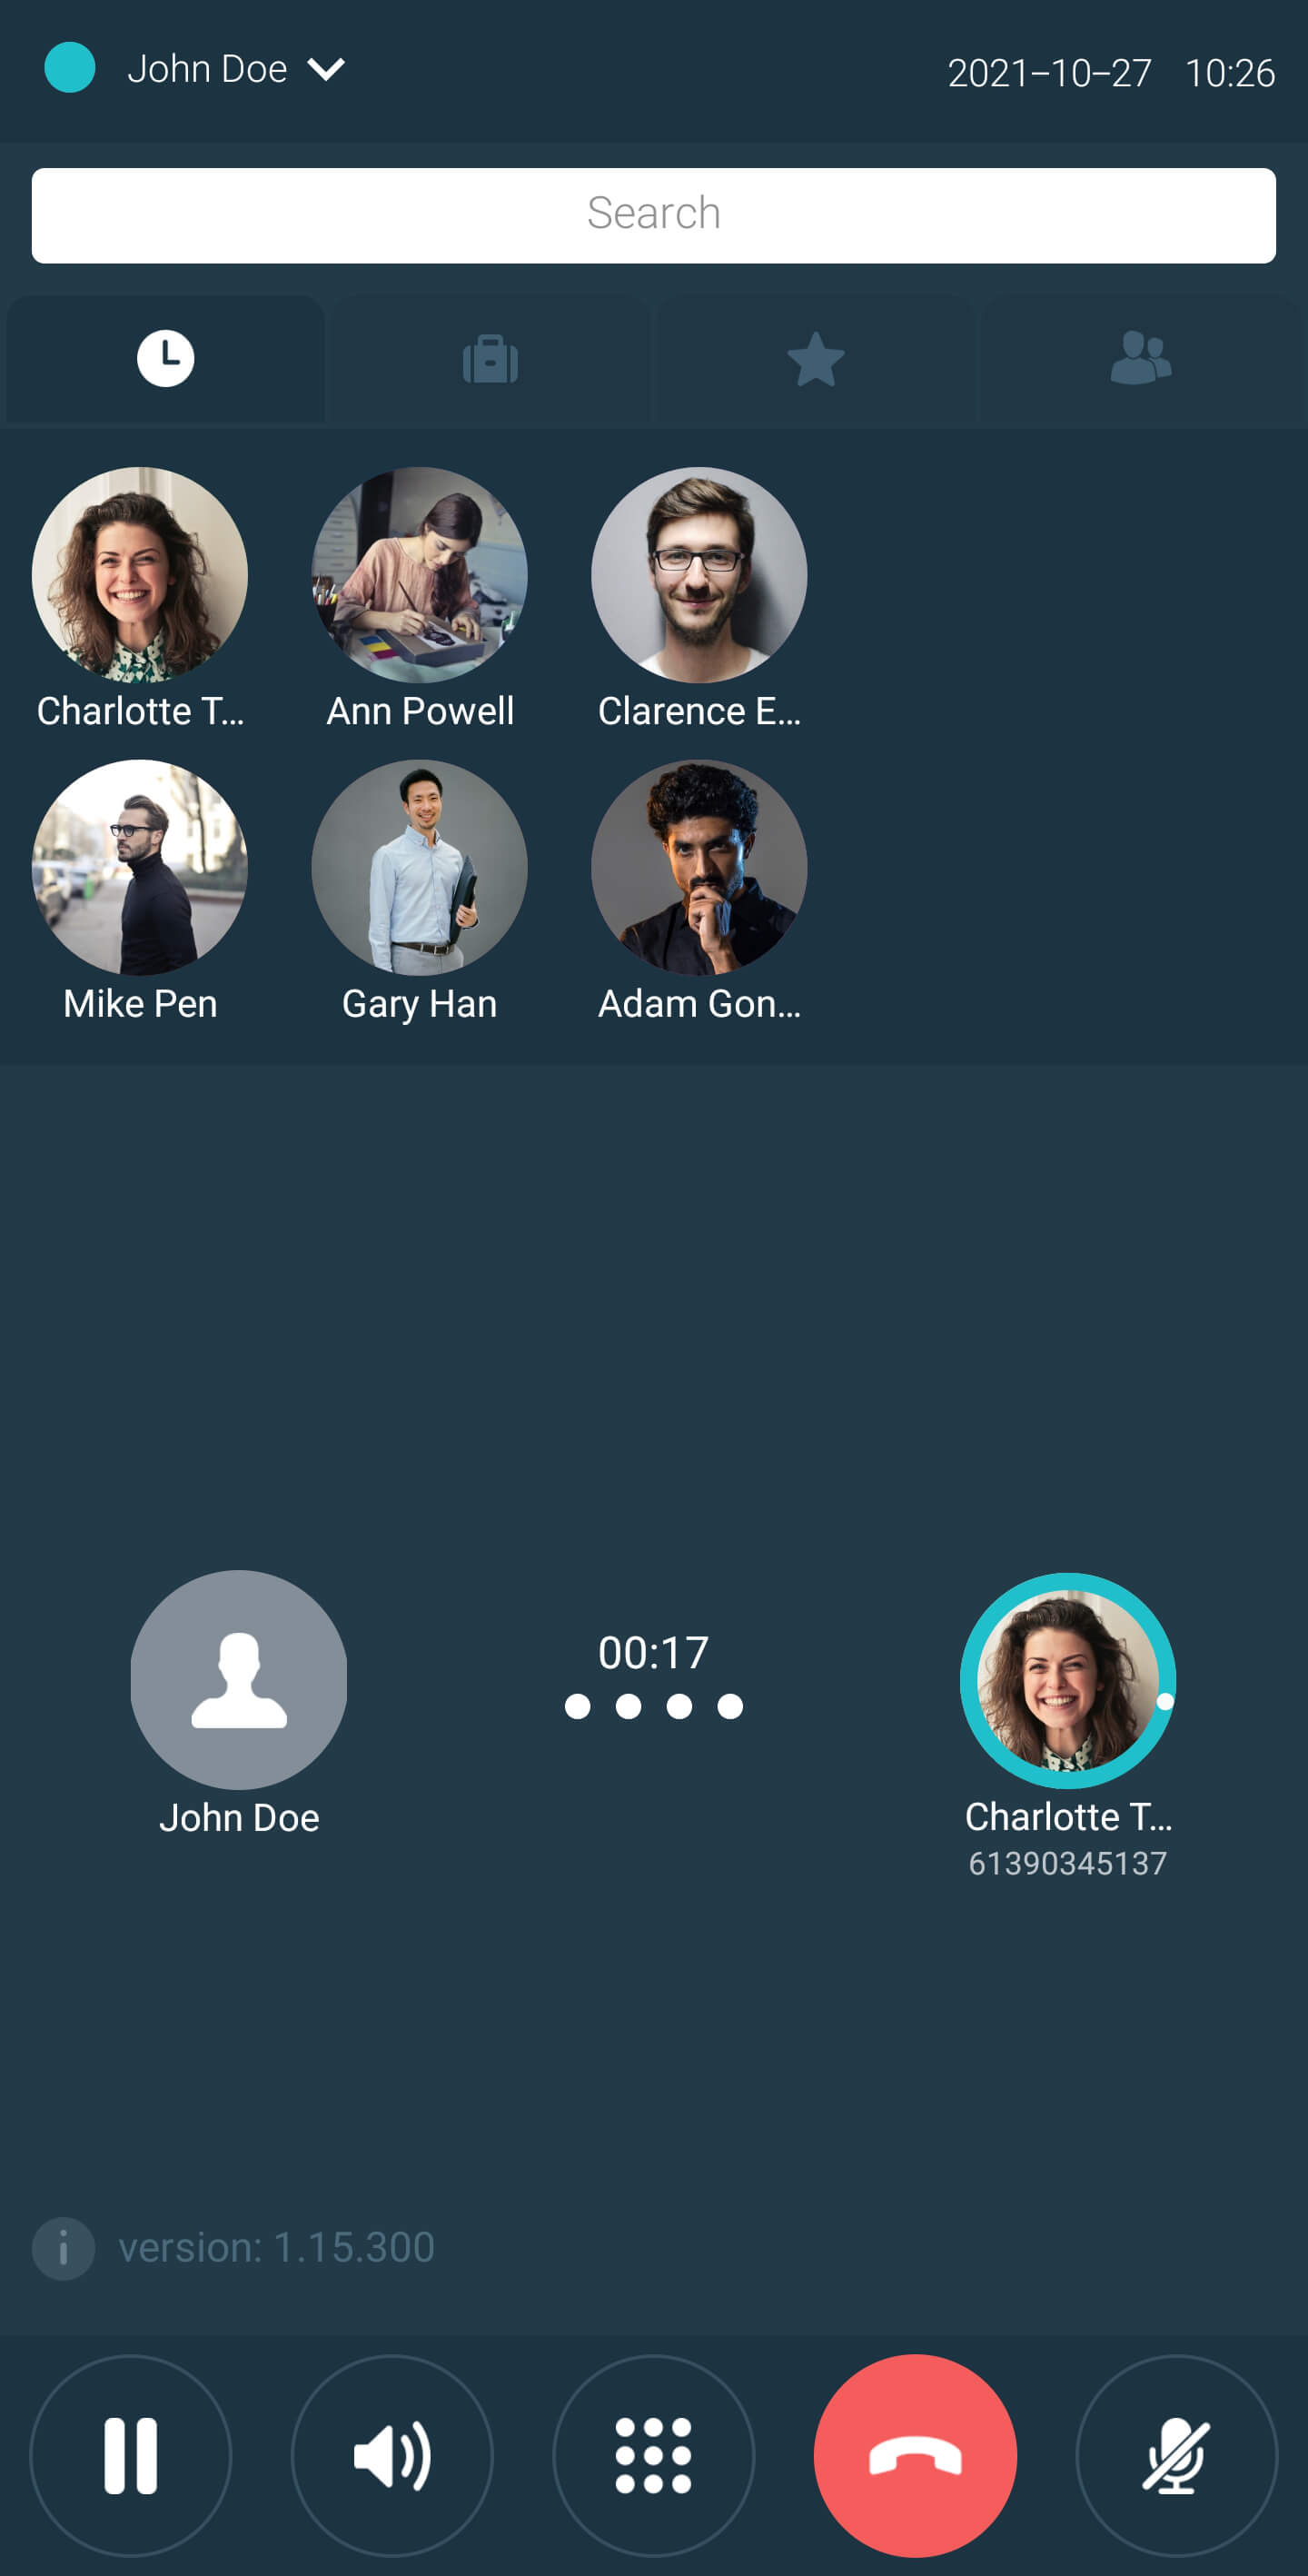
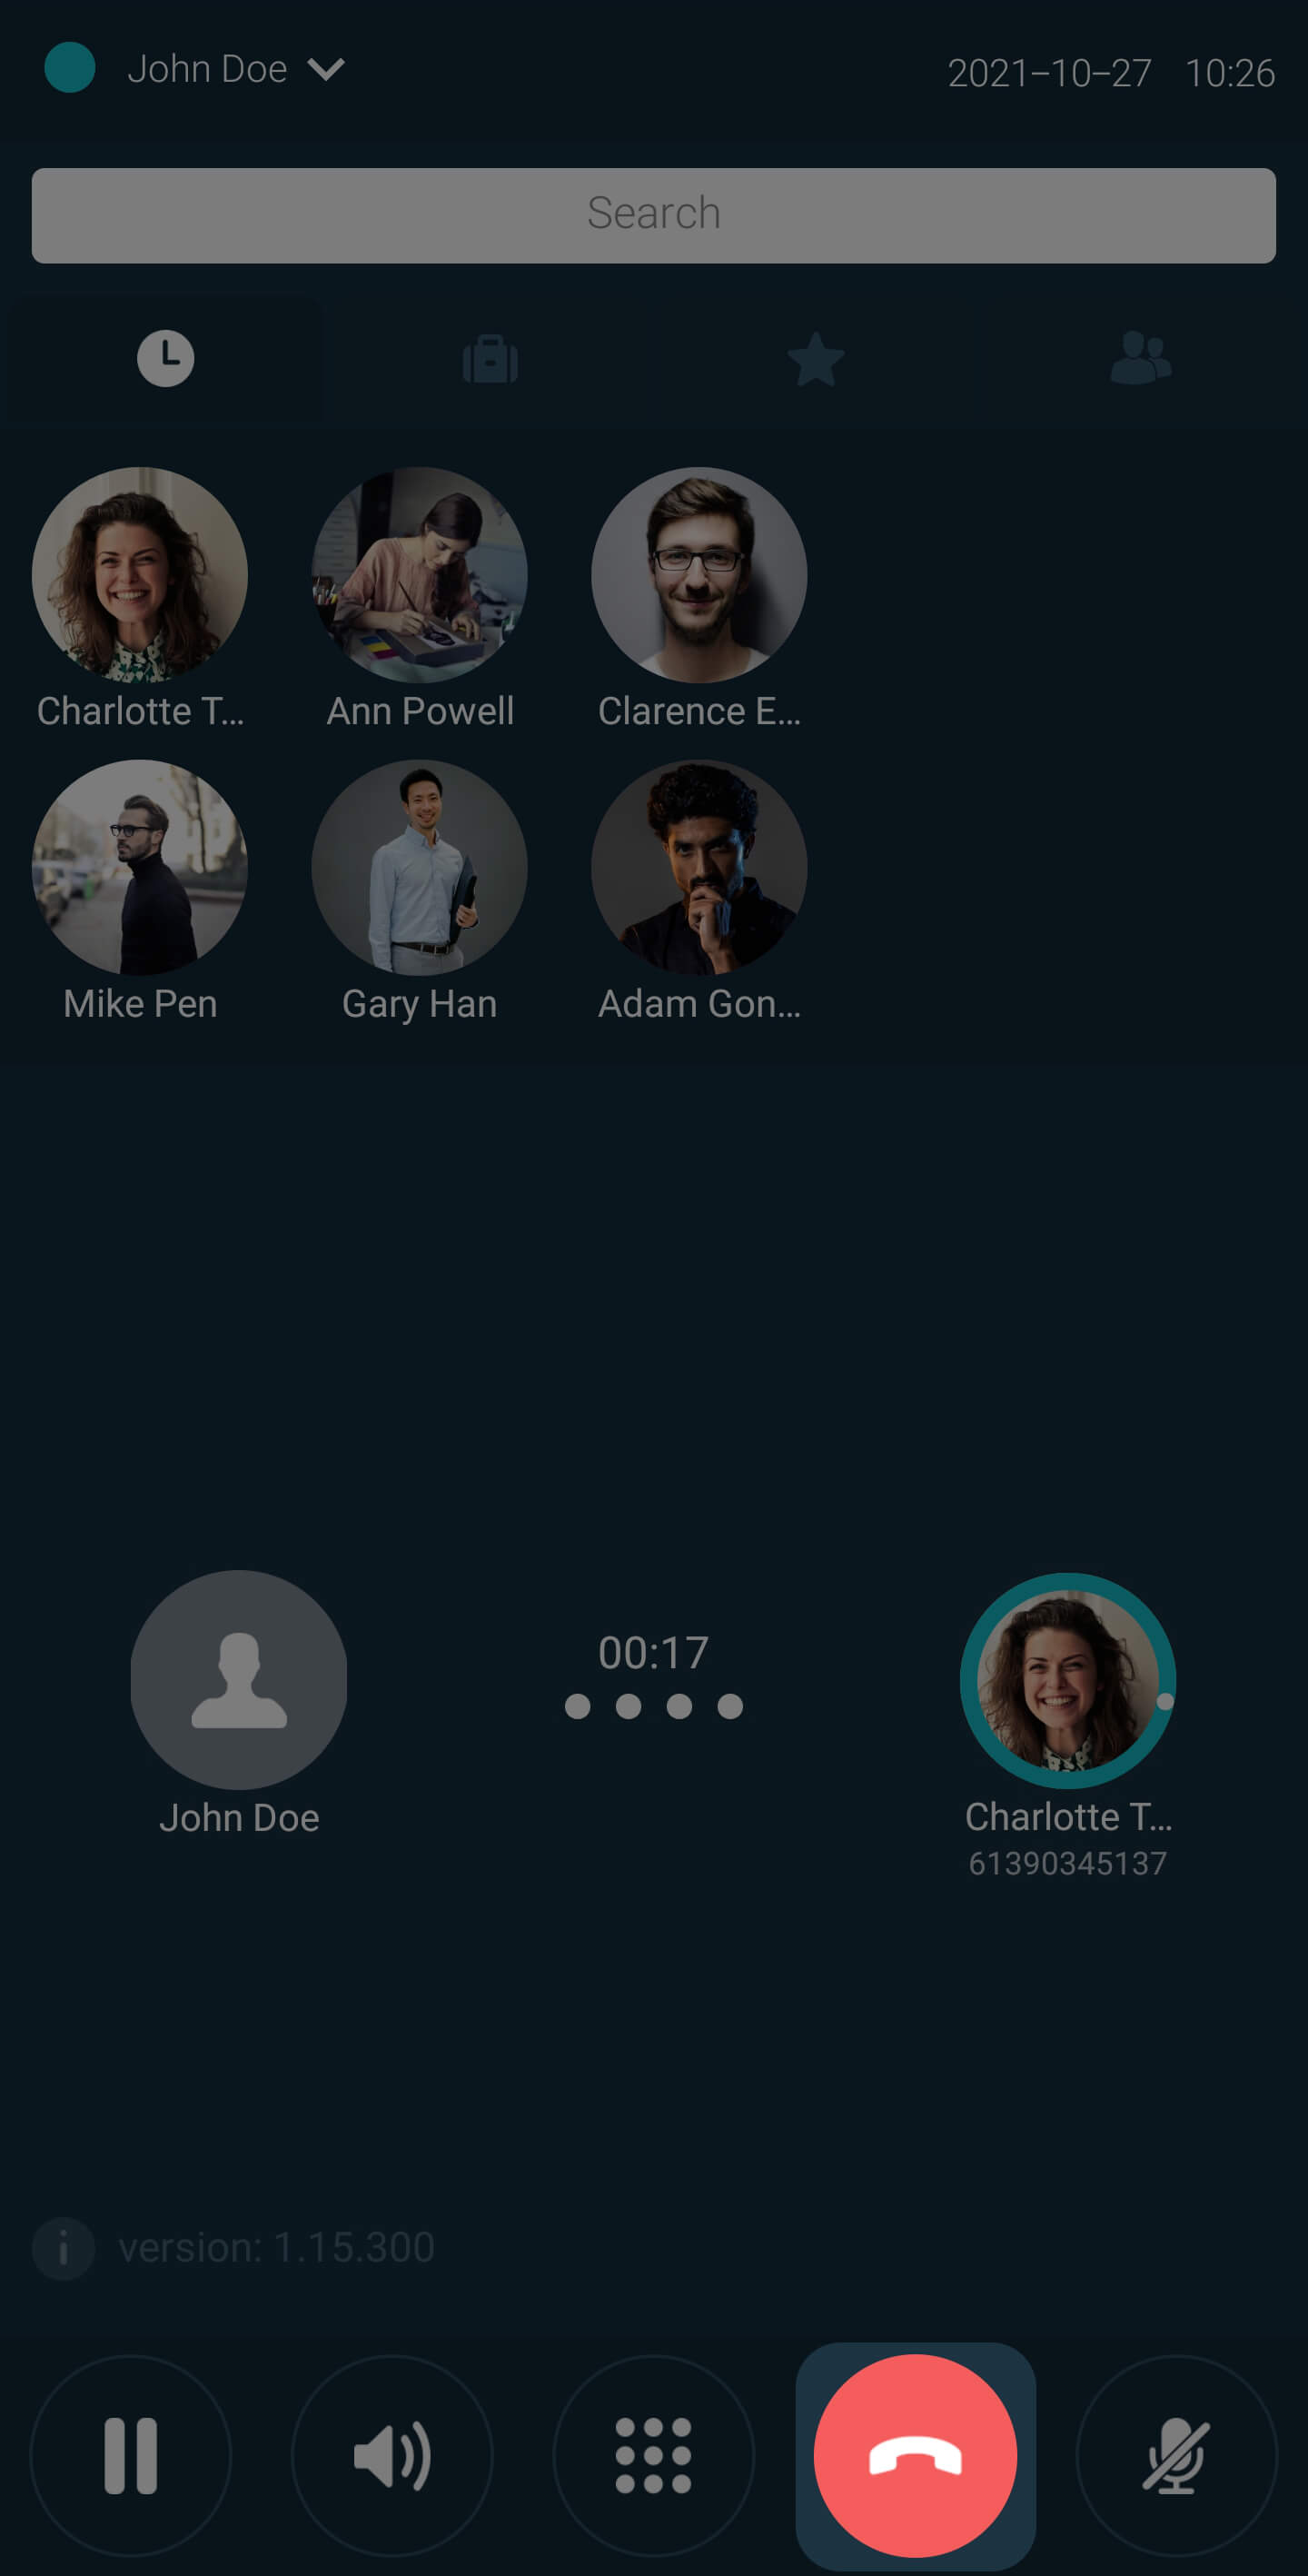
Once the call has been answered, the caller’s icon joins the app owner’s icon in the
Home Circle
to indicate the call connection.
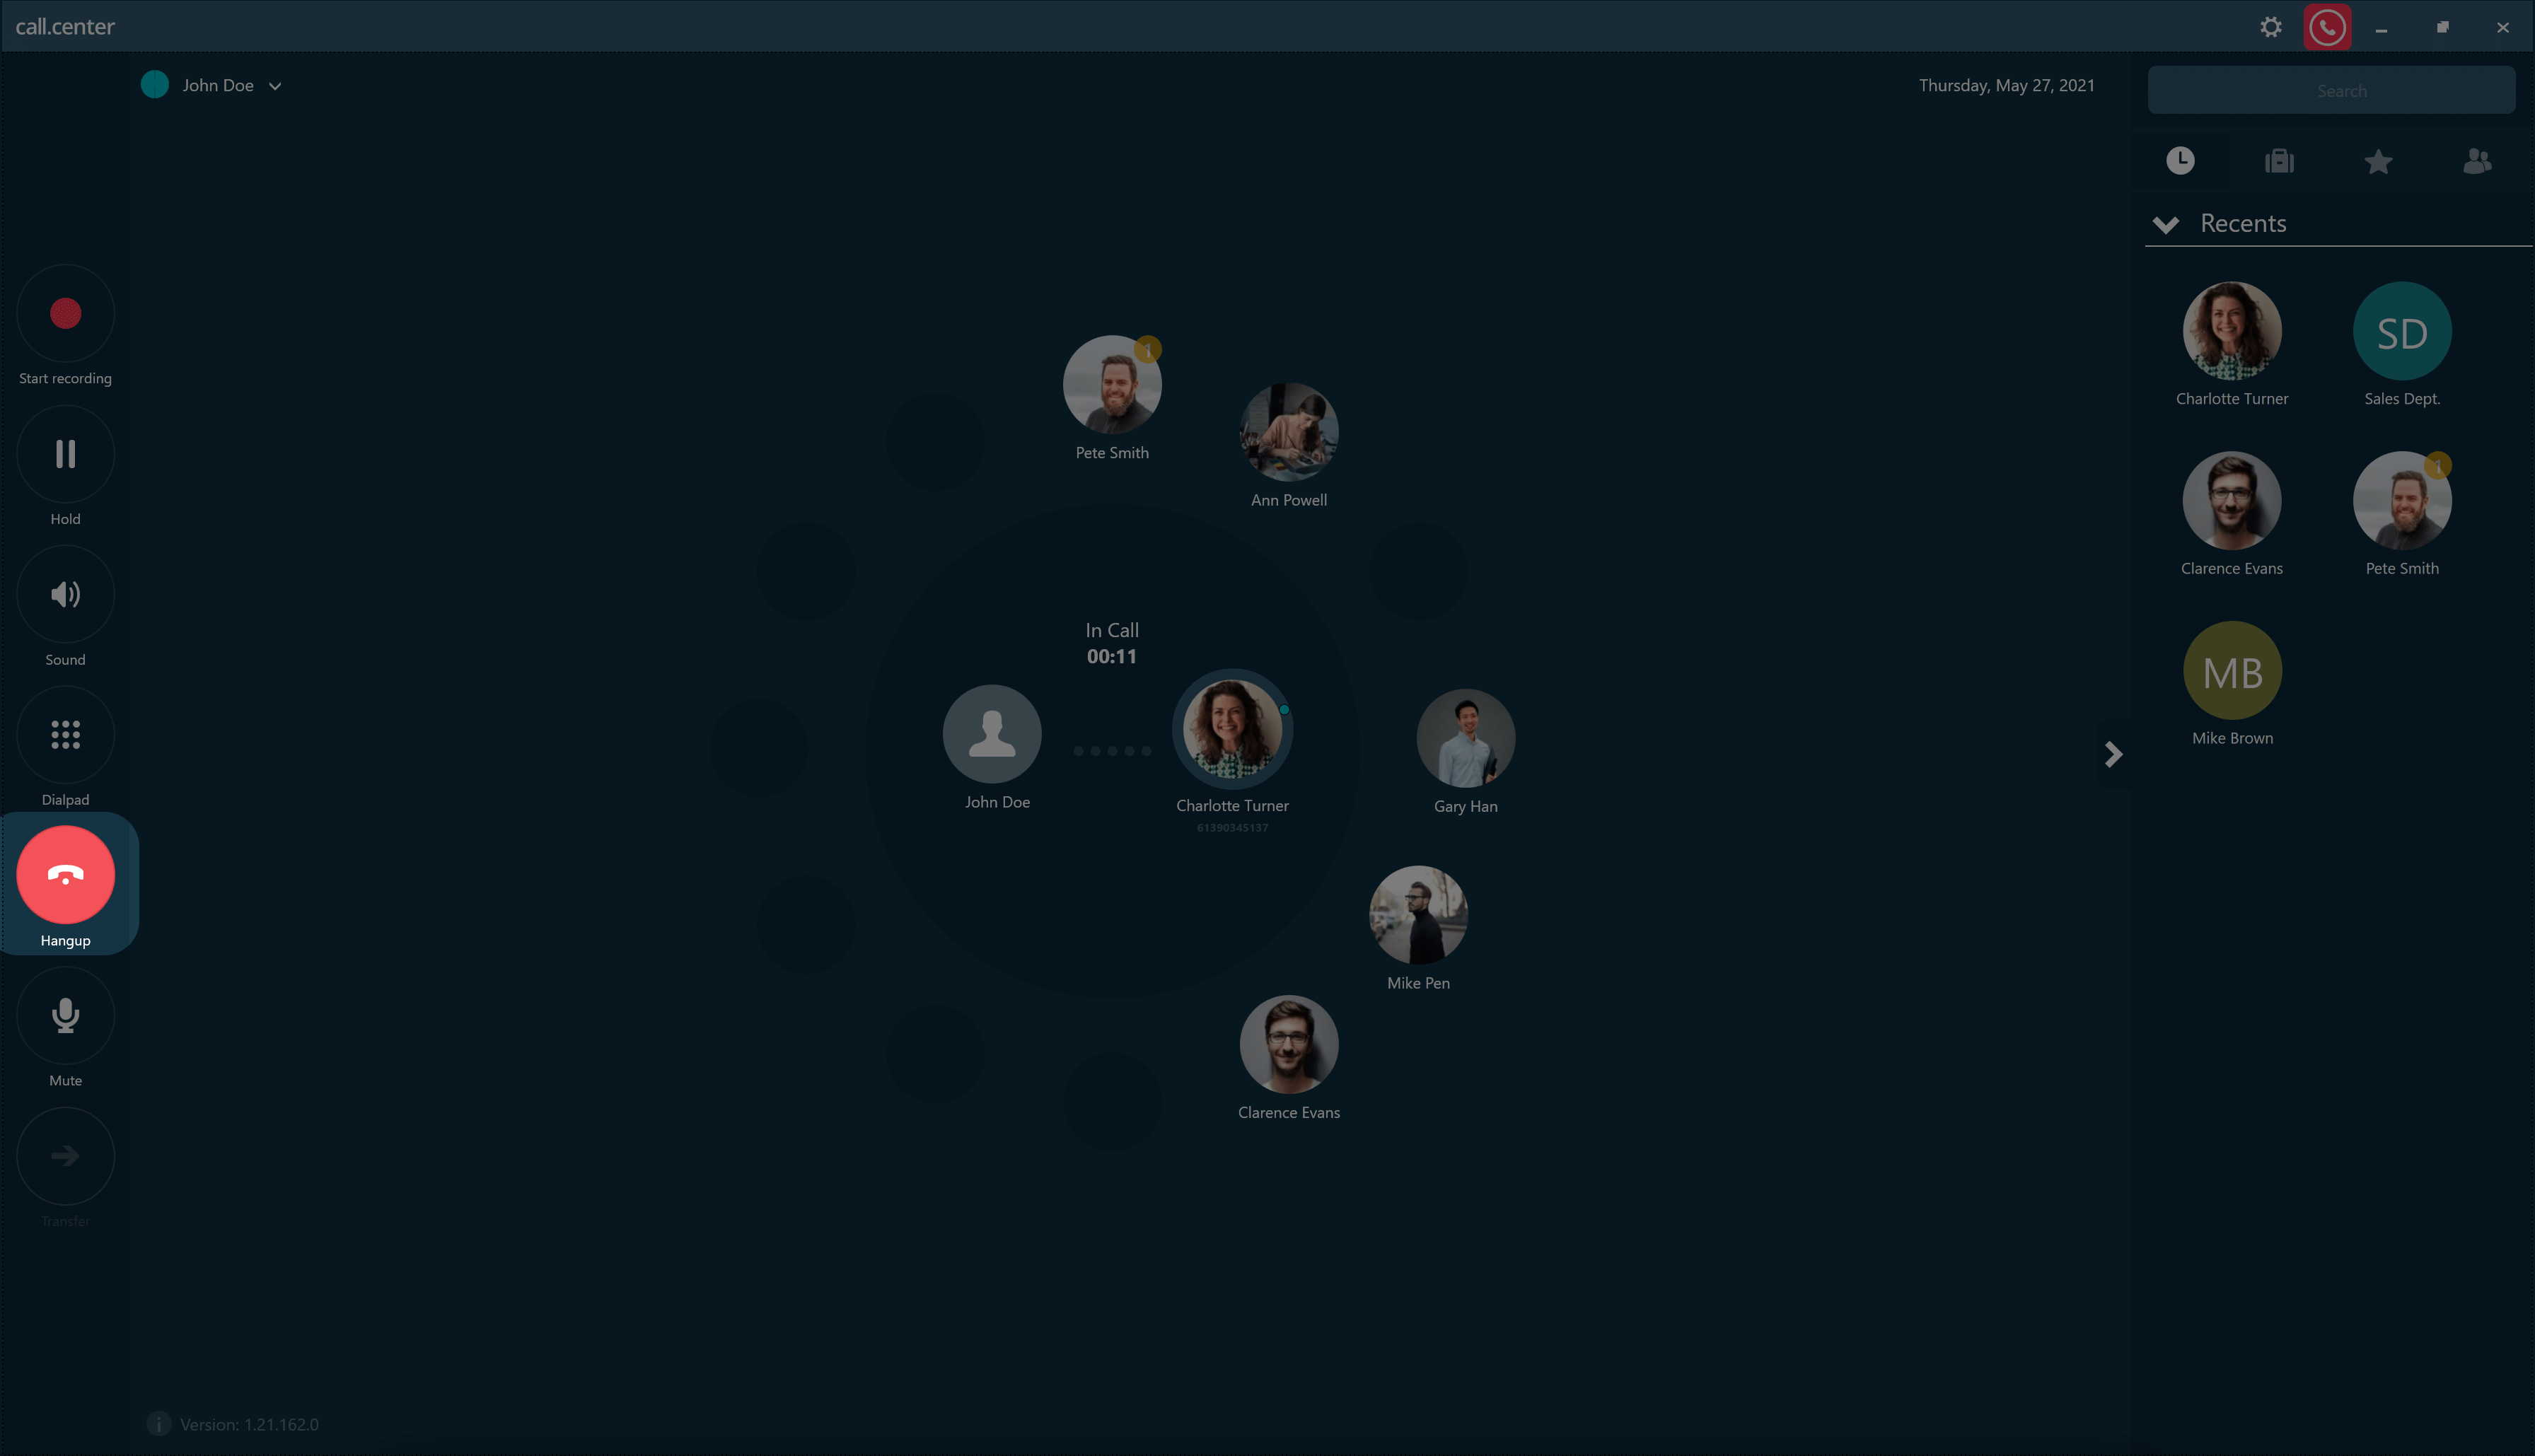
The Answer button is re-labeled to become a Hang-up button, indicating that the call
is active but may be terminated as and when required.
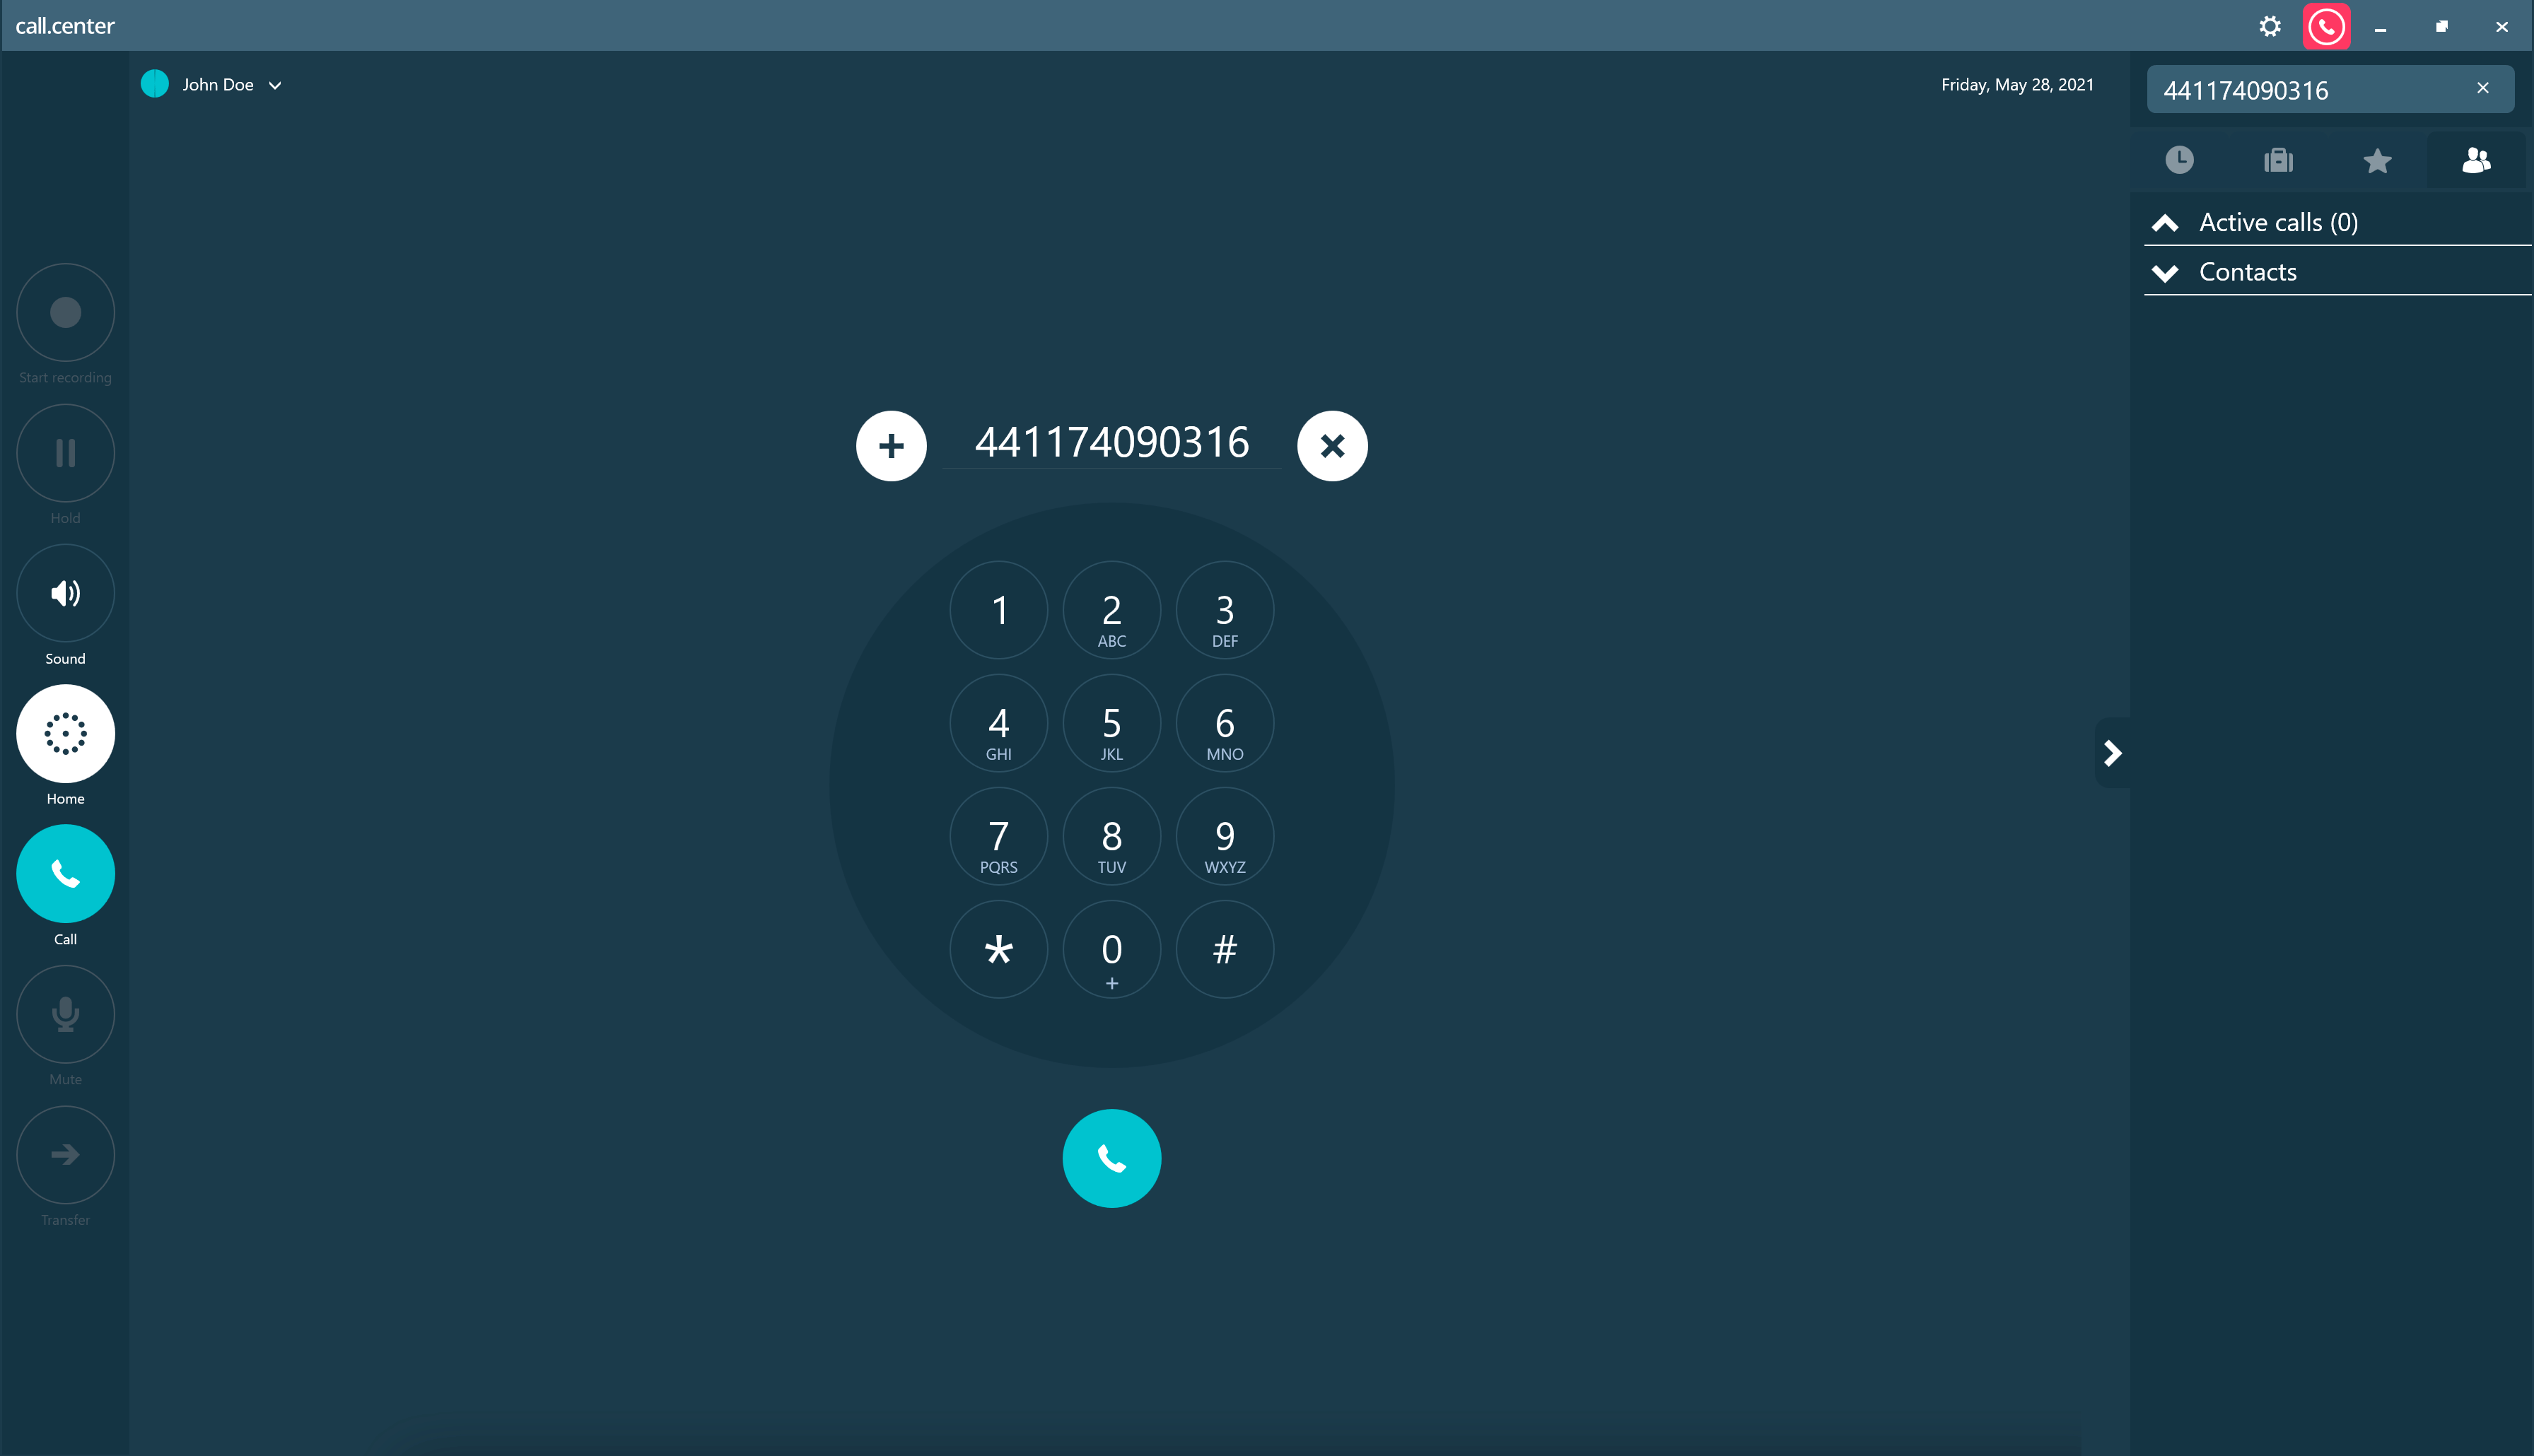
Making a call
There are three ways of making an outgoing call:
- 1. Drag the icon of the Contact to whom the call should be placed from the Activities Wheel or from the Recents, Company Directory, Favorites or Contacts Tab, and drop that icon into the Home Circle.
- OR 2. Click on the icon of the Contact that you wish to call. The Contact’s Details window will be opened, and you can choose which of the contact’s phone numbers you wish to dial.
- OR 3. Open up the Dialer, manually enter the contact’s phone number, and click the Call button below the dial pad or in the Phone Function Menu.
Click on the selected phone number, and the call will be initiated.
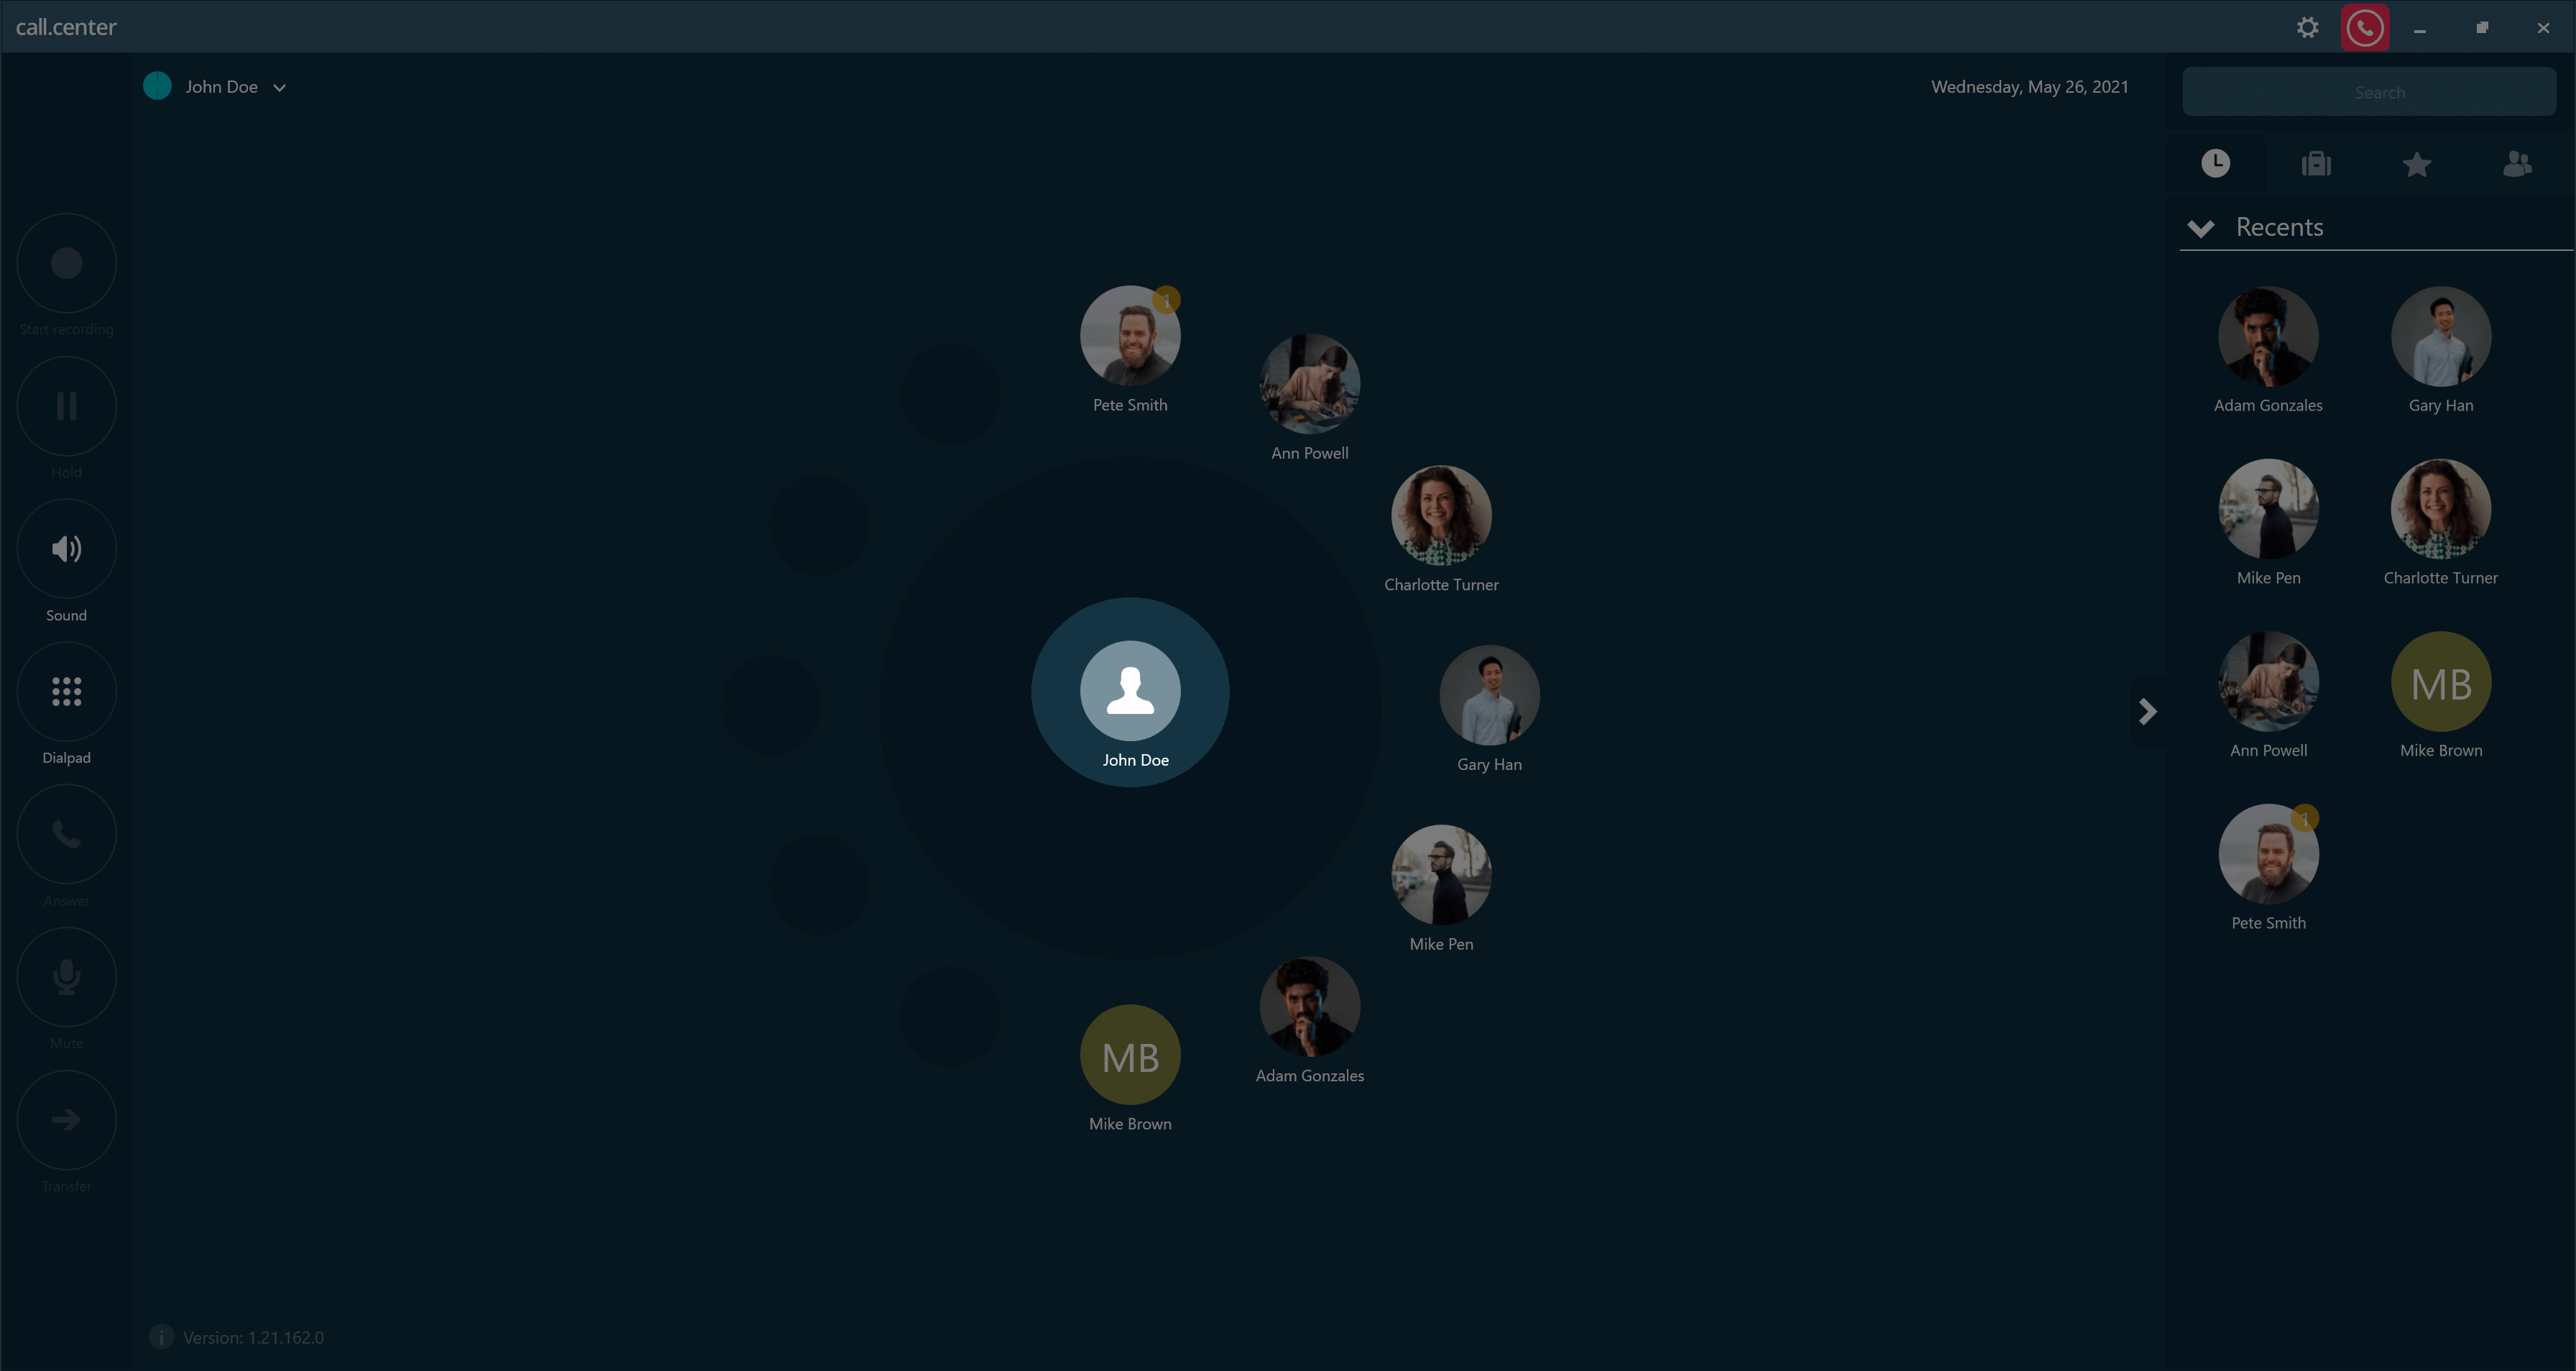
Rejecting a call
All incoming calls (including those from unknown callers) are displayed in the Activities Wheel area surrounding the Home Circle. The current caller’s icon is highlighted, as shown in the image below.
There are two ways of rejecting an incoming call, depending on your operating system platform:
- 1. Drag the caller’s icon out of the Activities Wheel area and then release that icon.
- OR 2. Select the Decline button from the incoming call’s pop-up notification (if enabled).
Holding/Unholding a call
The Hold button in the Phone Function Menu may be used when a call is active. When you place a call on hold, a pre-recorded audio file is played to the party that is on hold. The call status changes to Unhold when you once again click the Hold button or when the call is terminated.
Once a call is on hold, the icon for the on-hold party moves from the Home Circle to the Activities Wheel area to indicate the change in status for that call.
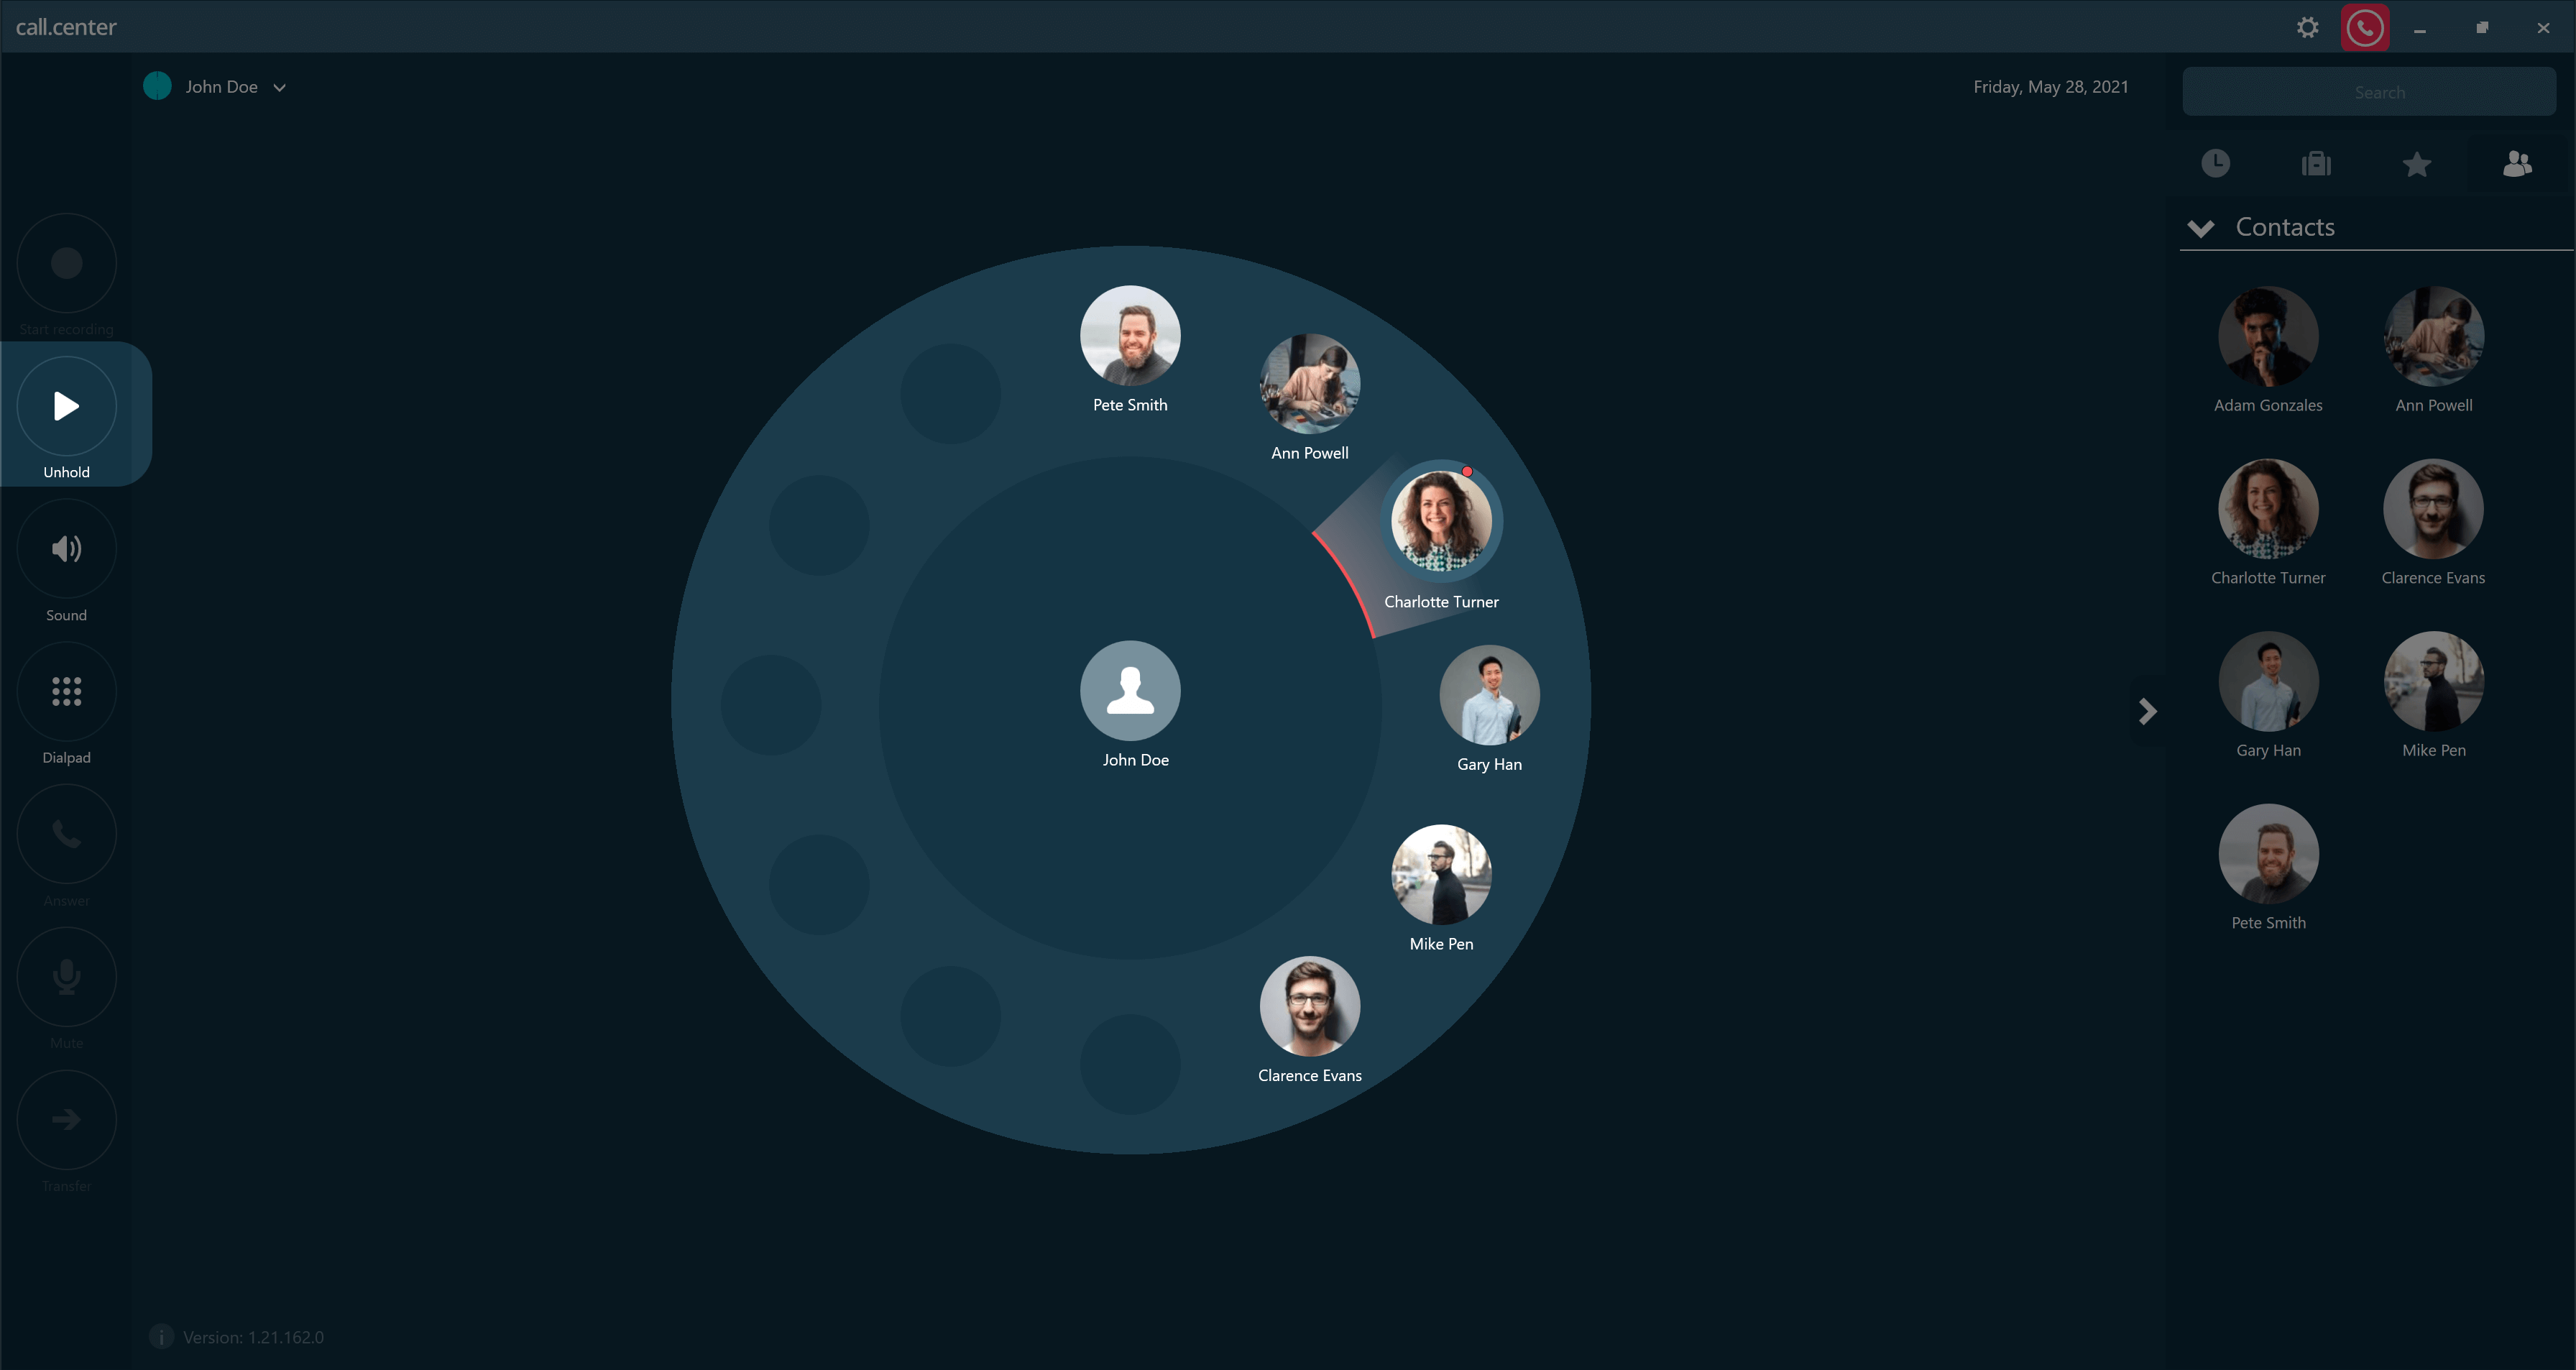
When the Unhold button in the Phone Function Menu is active, you may click on this button to return the call to the Unhold mode. Alternatively, you may drag and drop the on-hold party’s icon from the Activities Wheel area into the Home Circle for the call to resume.
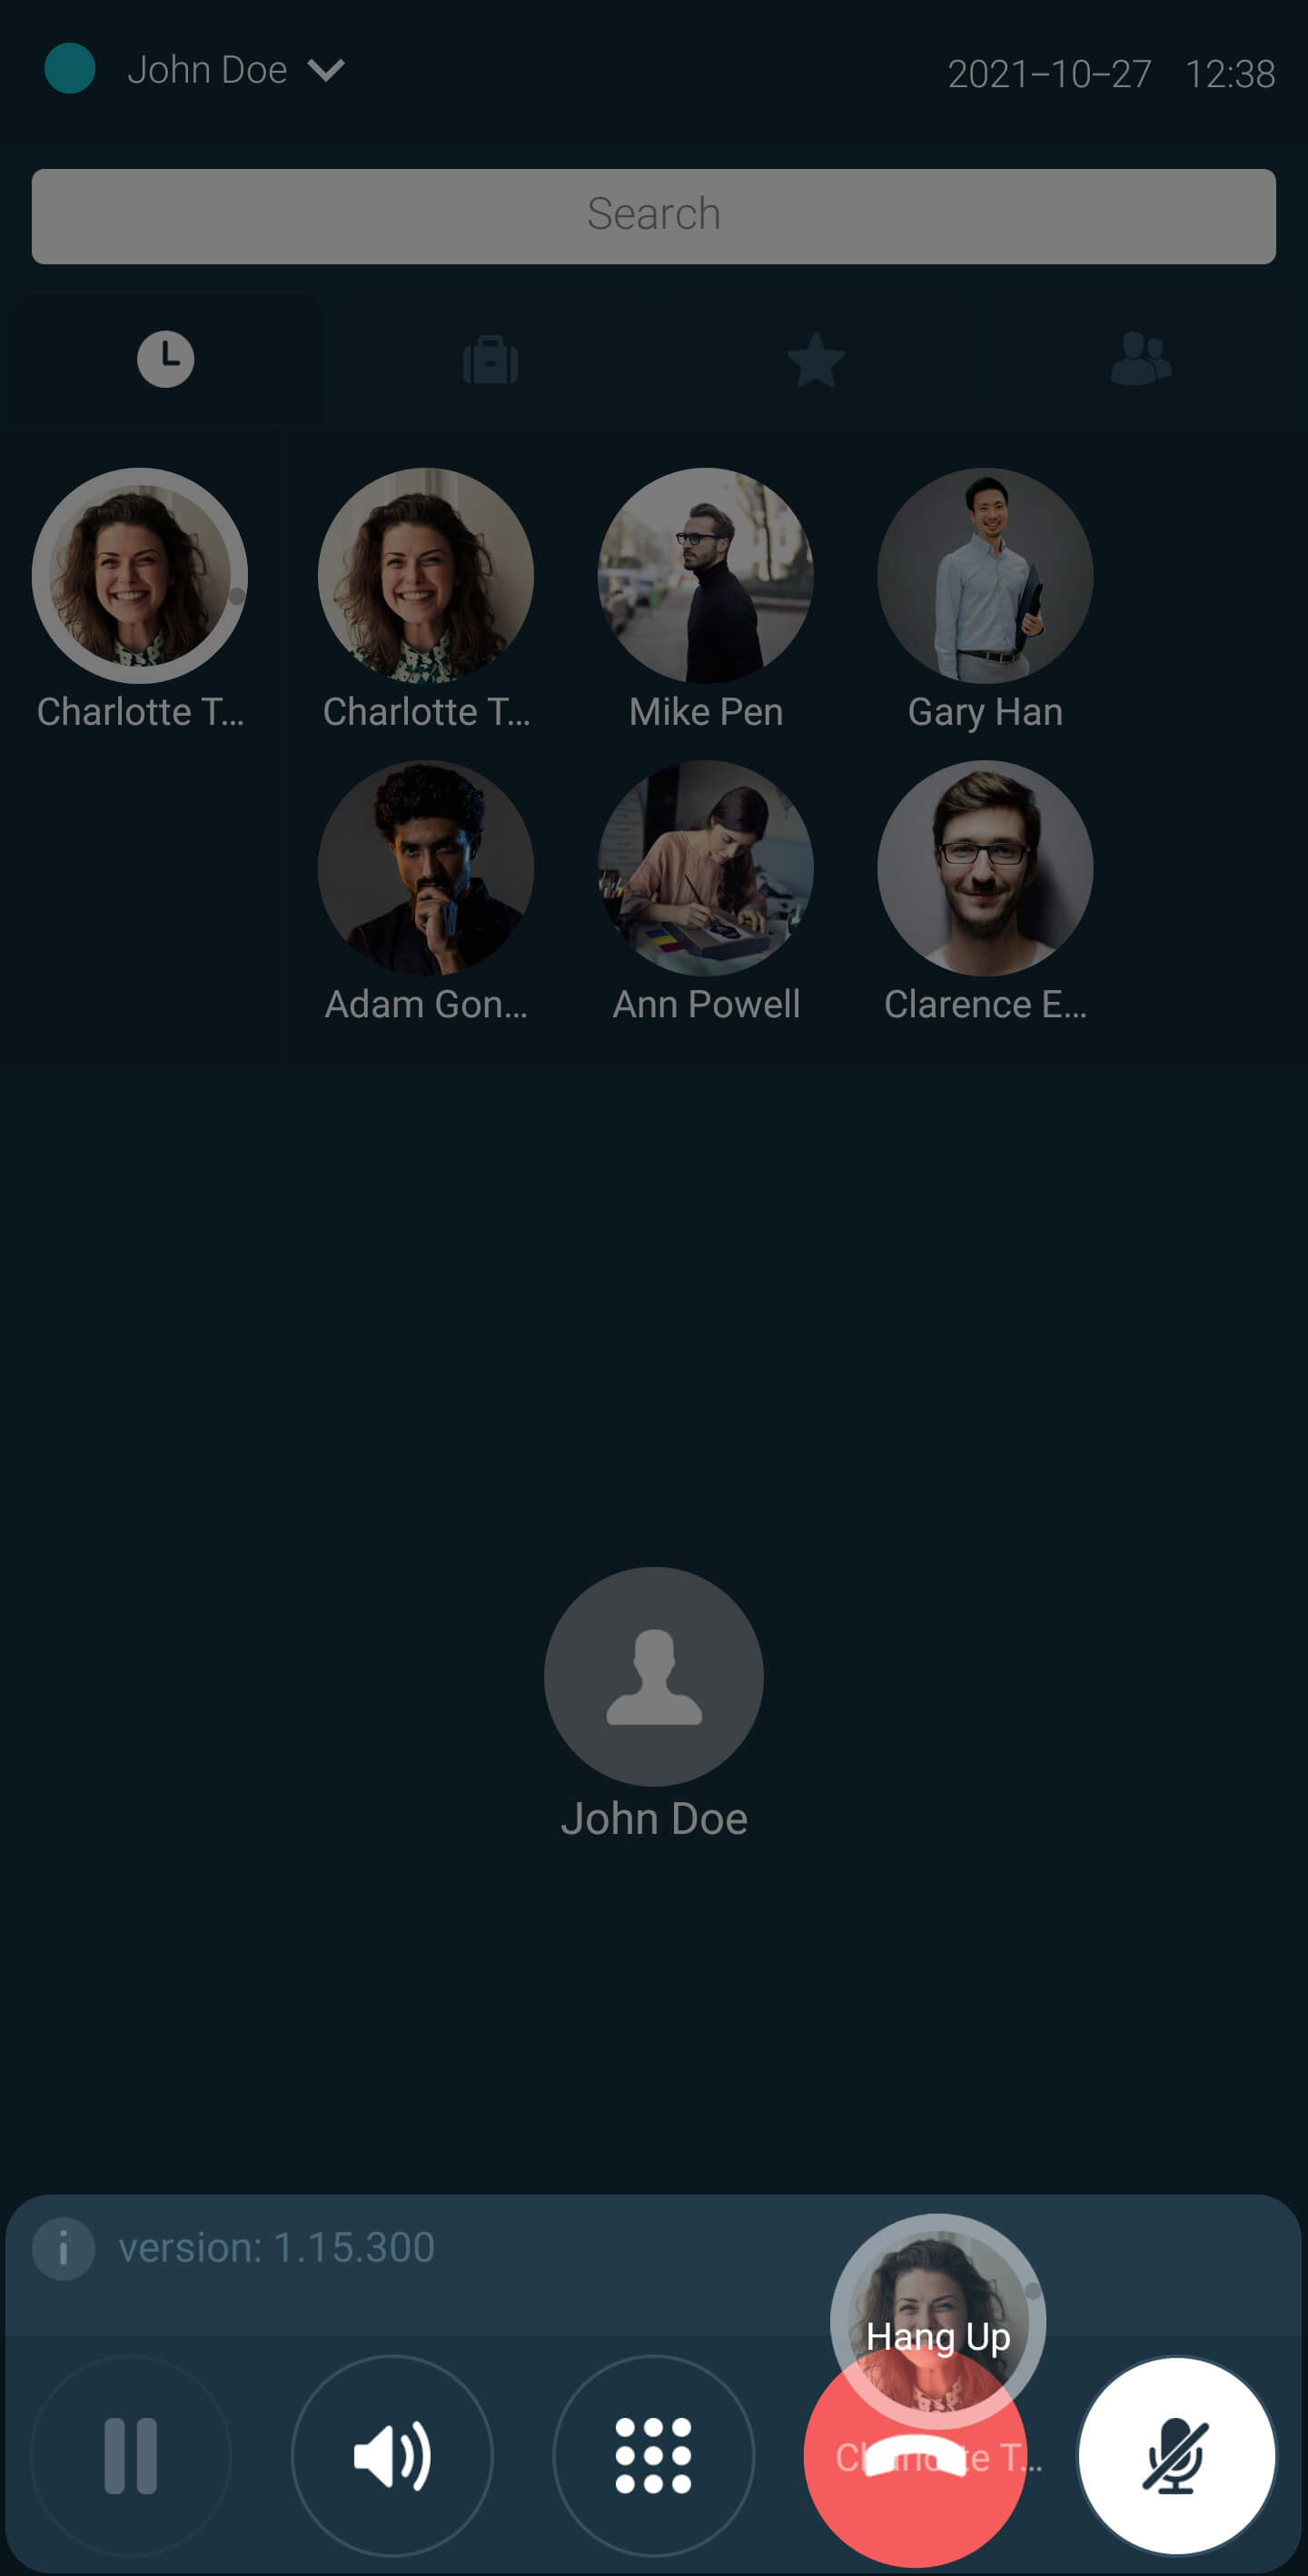
To terminate an on-hold call without returning to the Unhold status, drag and release the on-hold party’s icon in an area outside the Activities Wheel.
 Back to the top
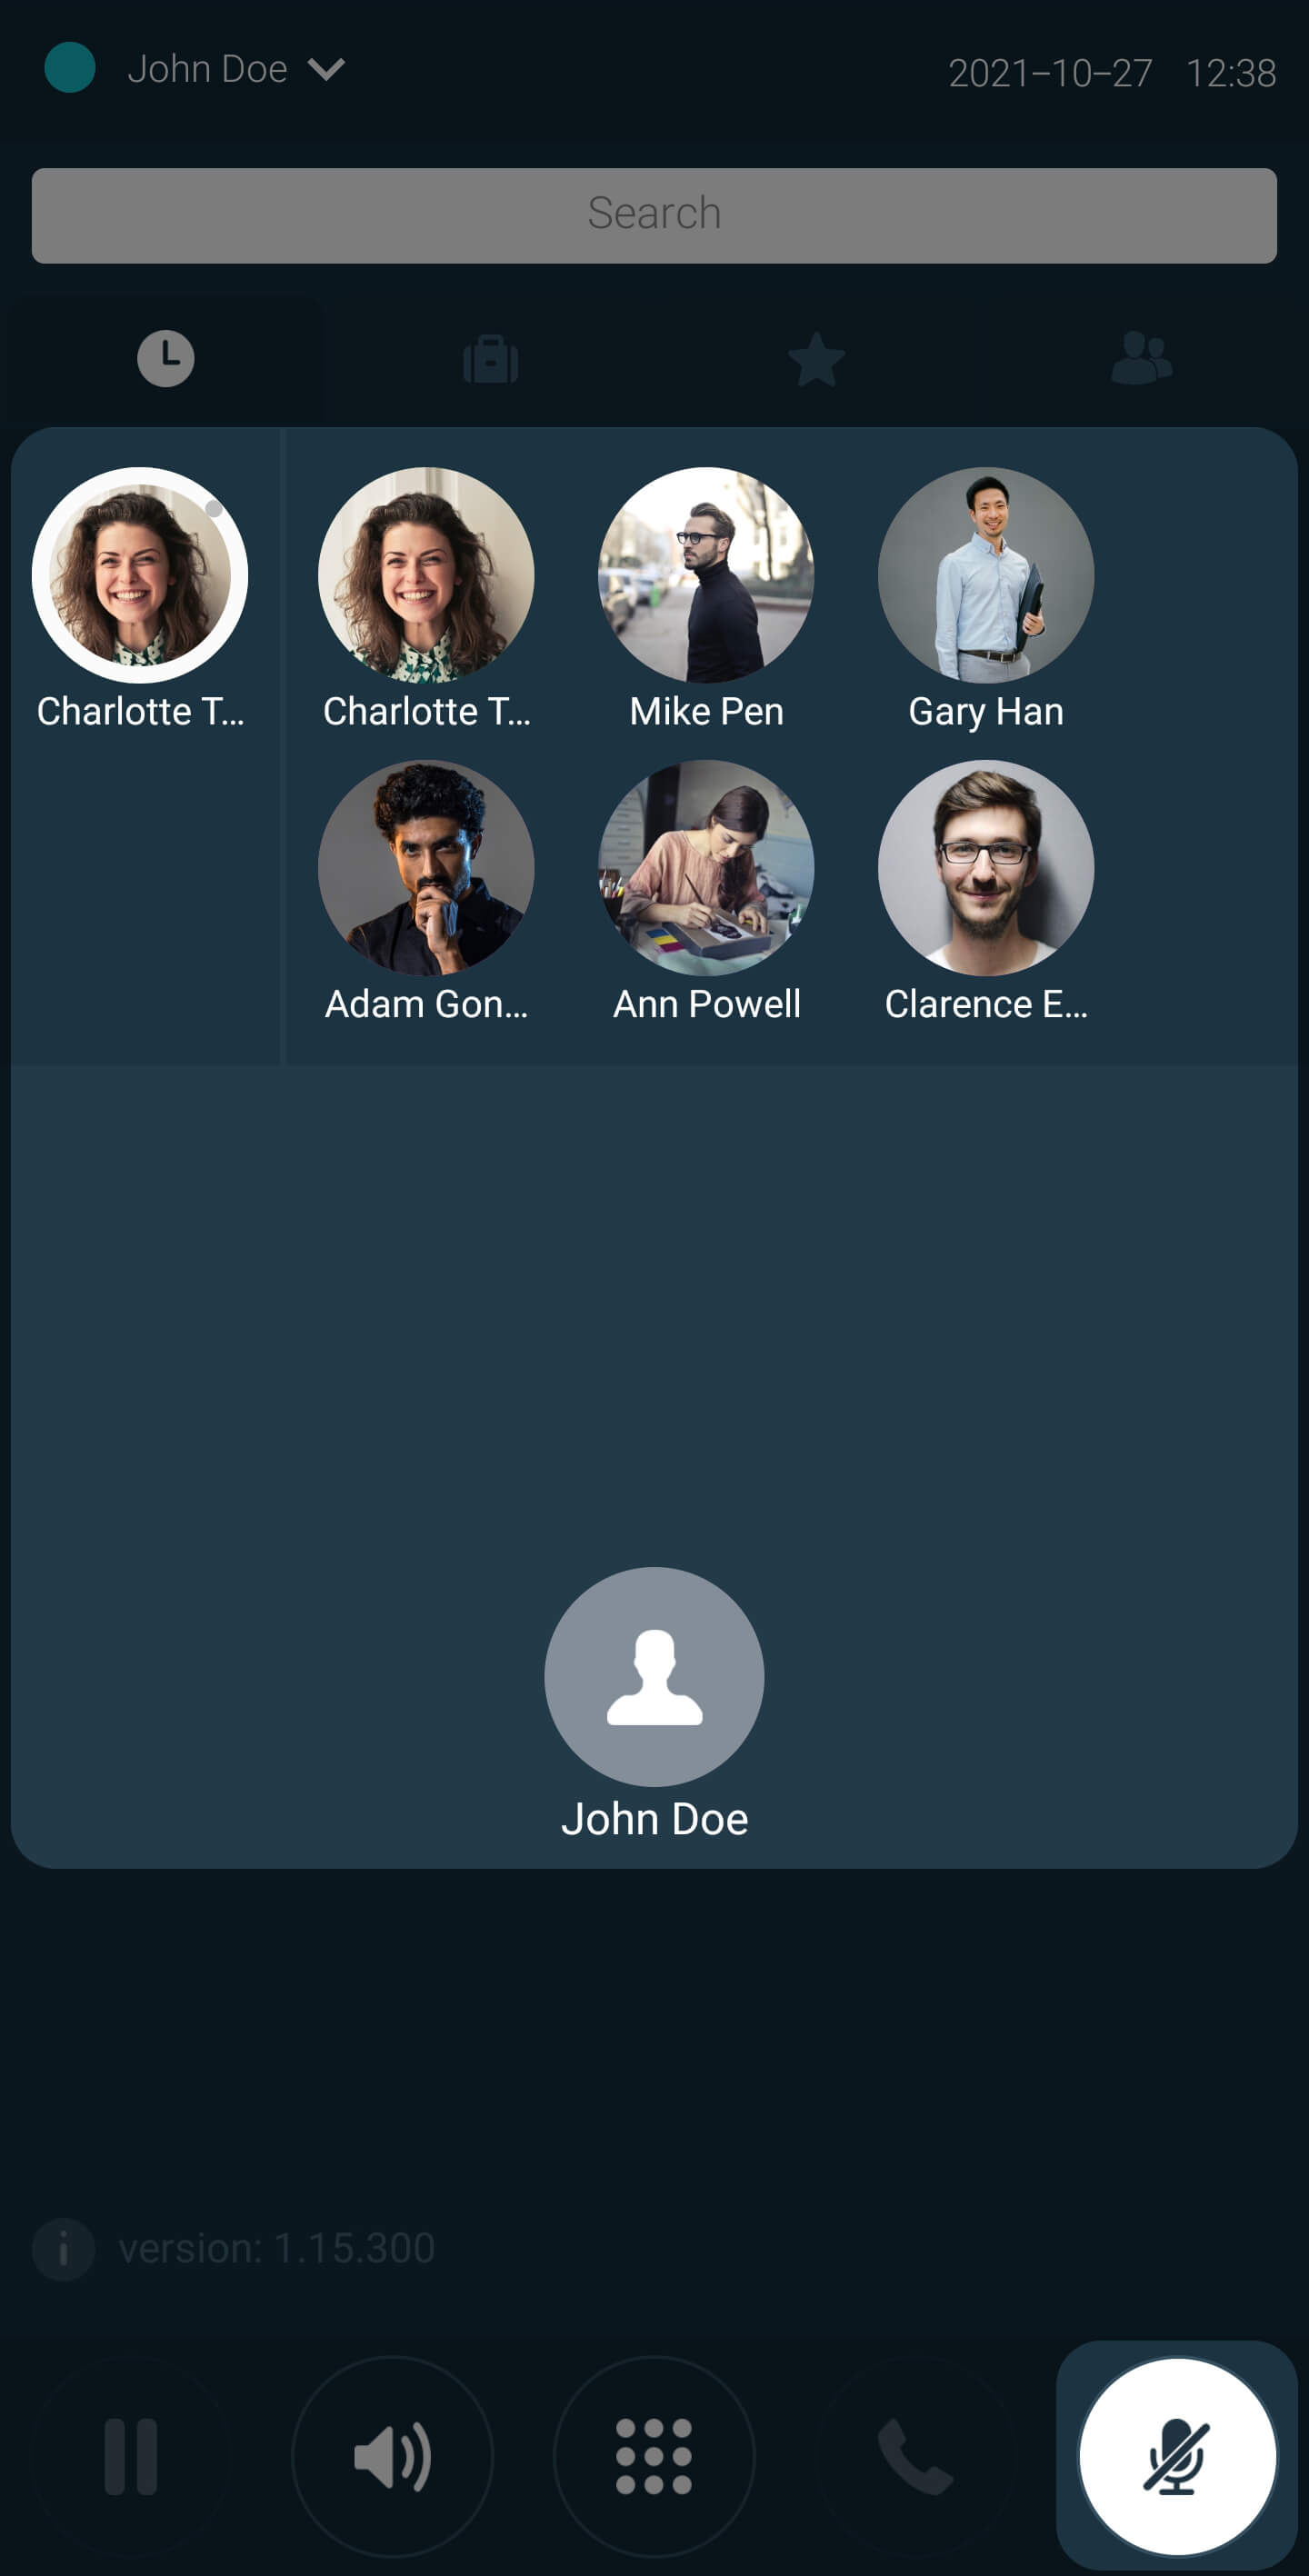
Muting/Unmuting a call
The Mute button in the Phone Function Menu may be used to mute an active call. When a call is muted, the muted party’s icon moves from the Home Circle to the Activities Wheel area, indicating the change in the status of that call.
When the Unmute button in the Phone Function Menu is active (i.e., the call is muted), you may click on that button to return the call to the normal (unmuted) status. Alternatively, you may drag the Muted party’s icon from the Activities Wheel area and drop it into the Home Circle to return the call to the normal status.
To terminate a muted call without returning to the unmuted status, drag and drop the muted party’s icon to an area outside the Activities Wheel.
 Back to the top
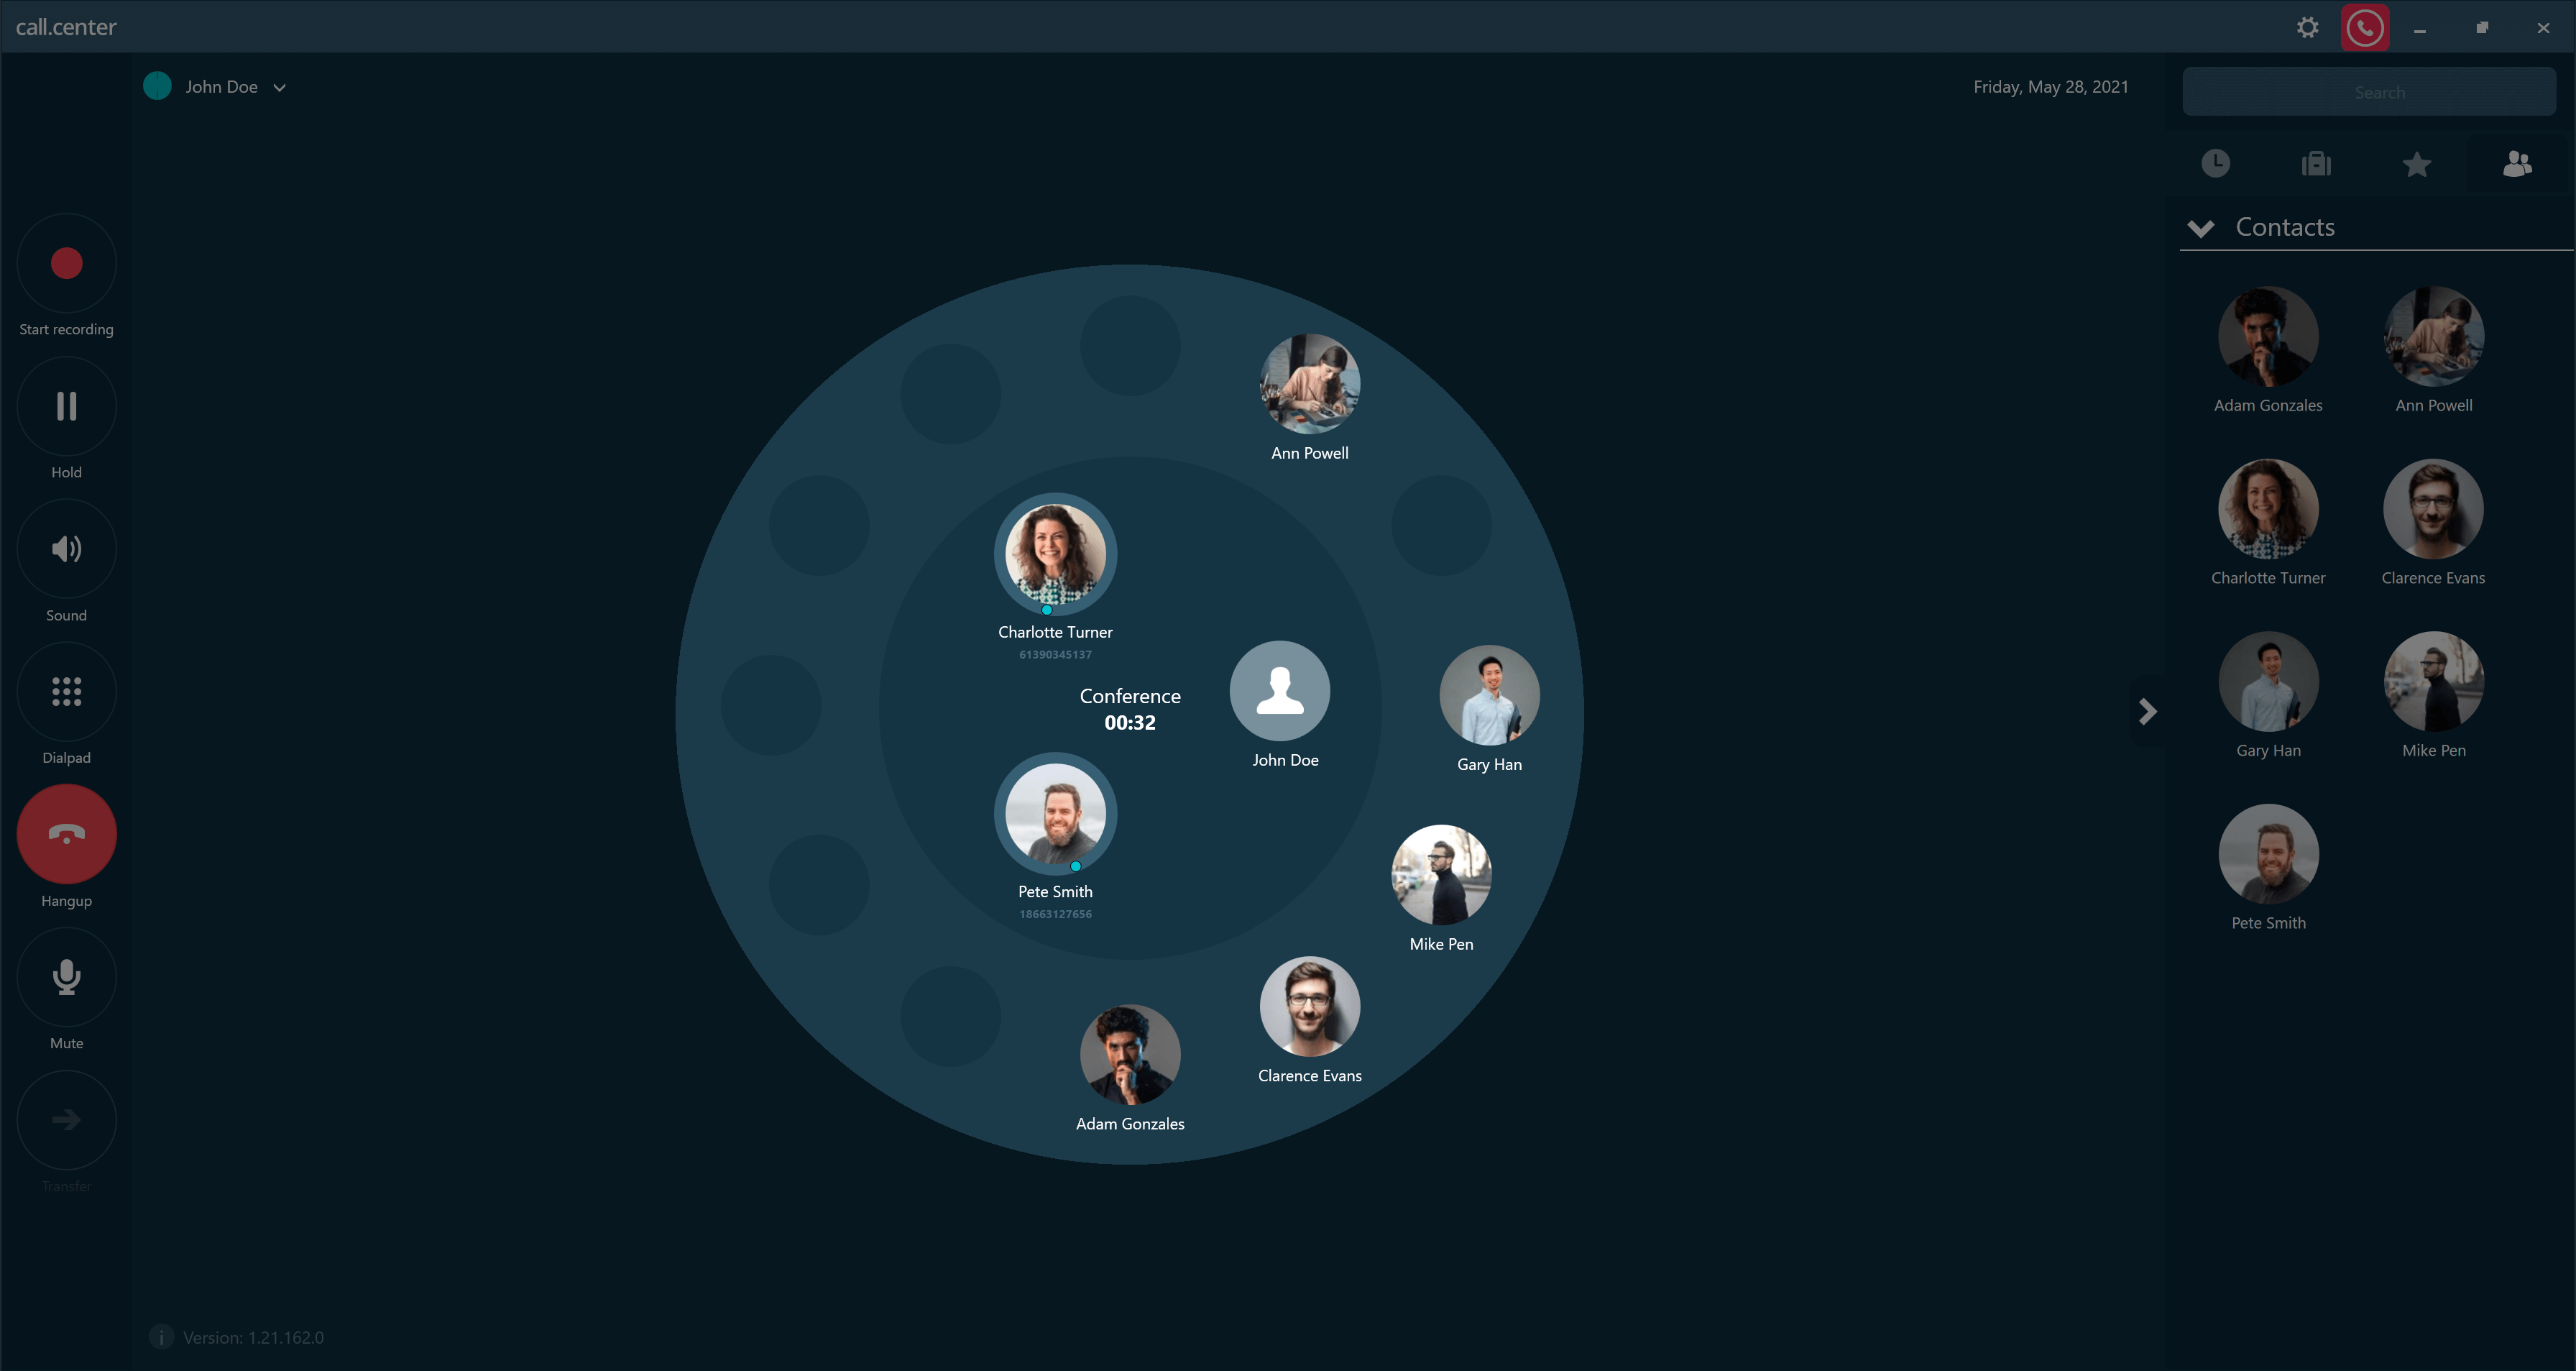
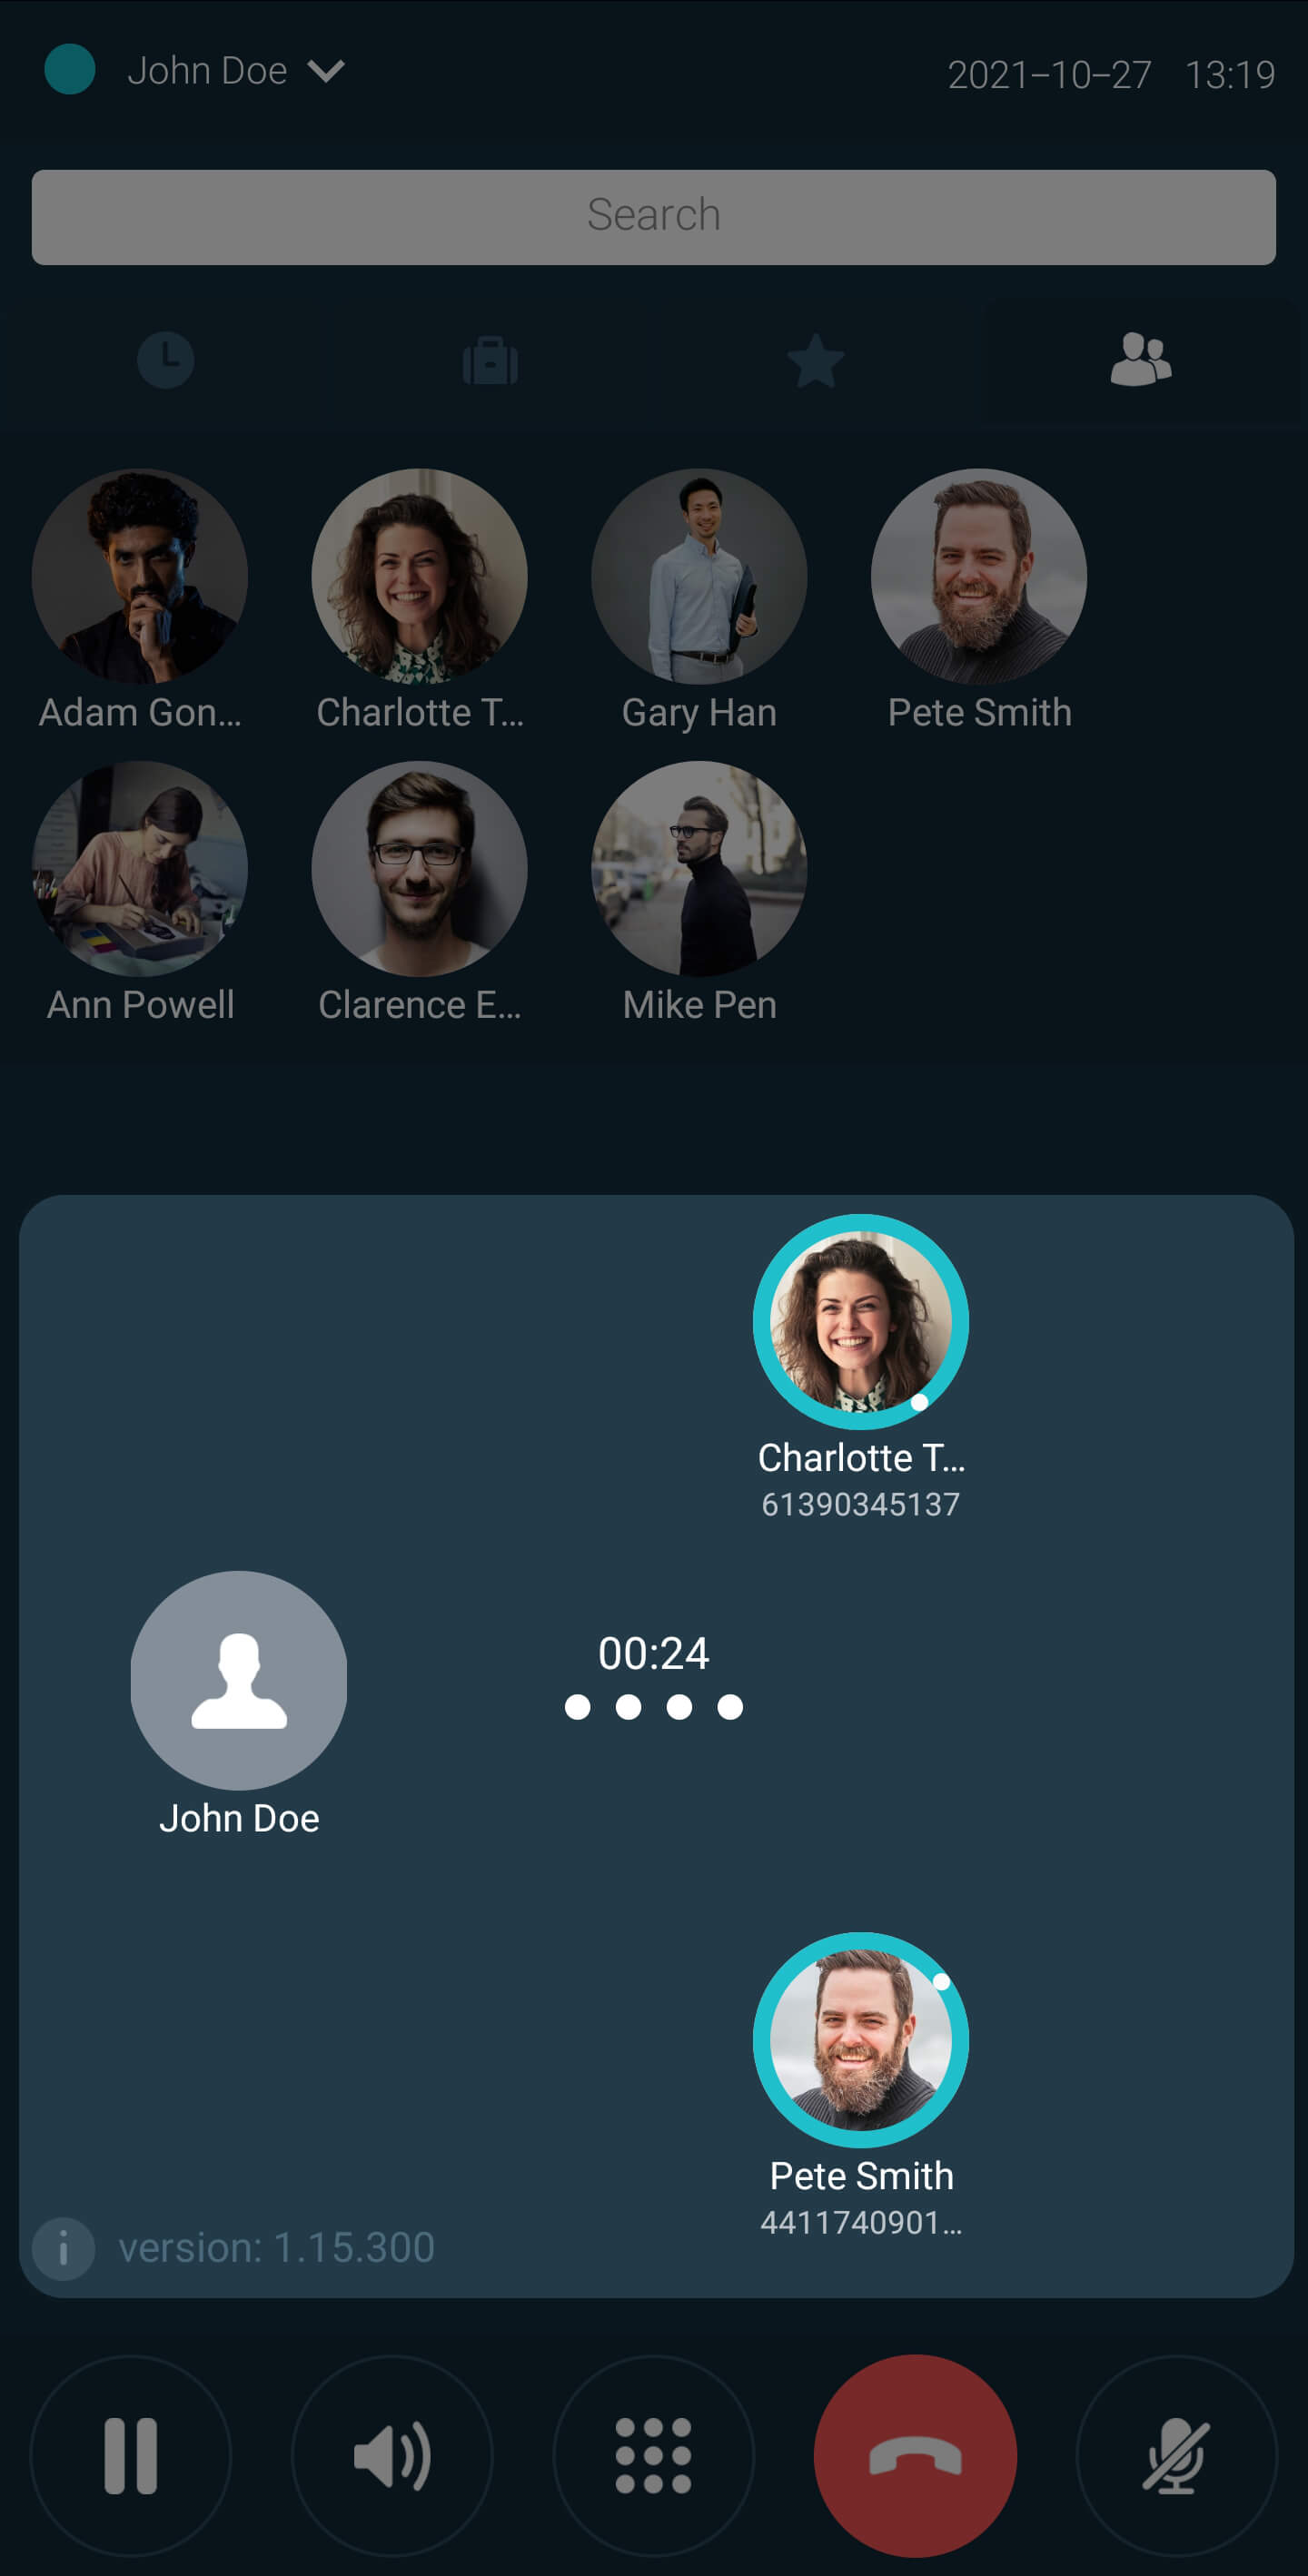
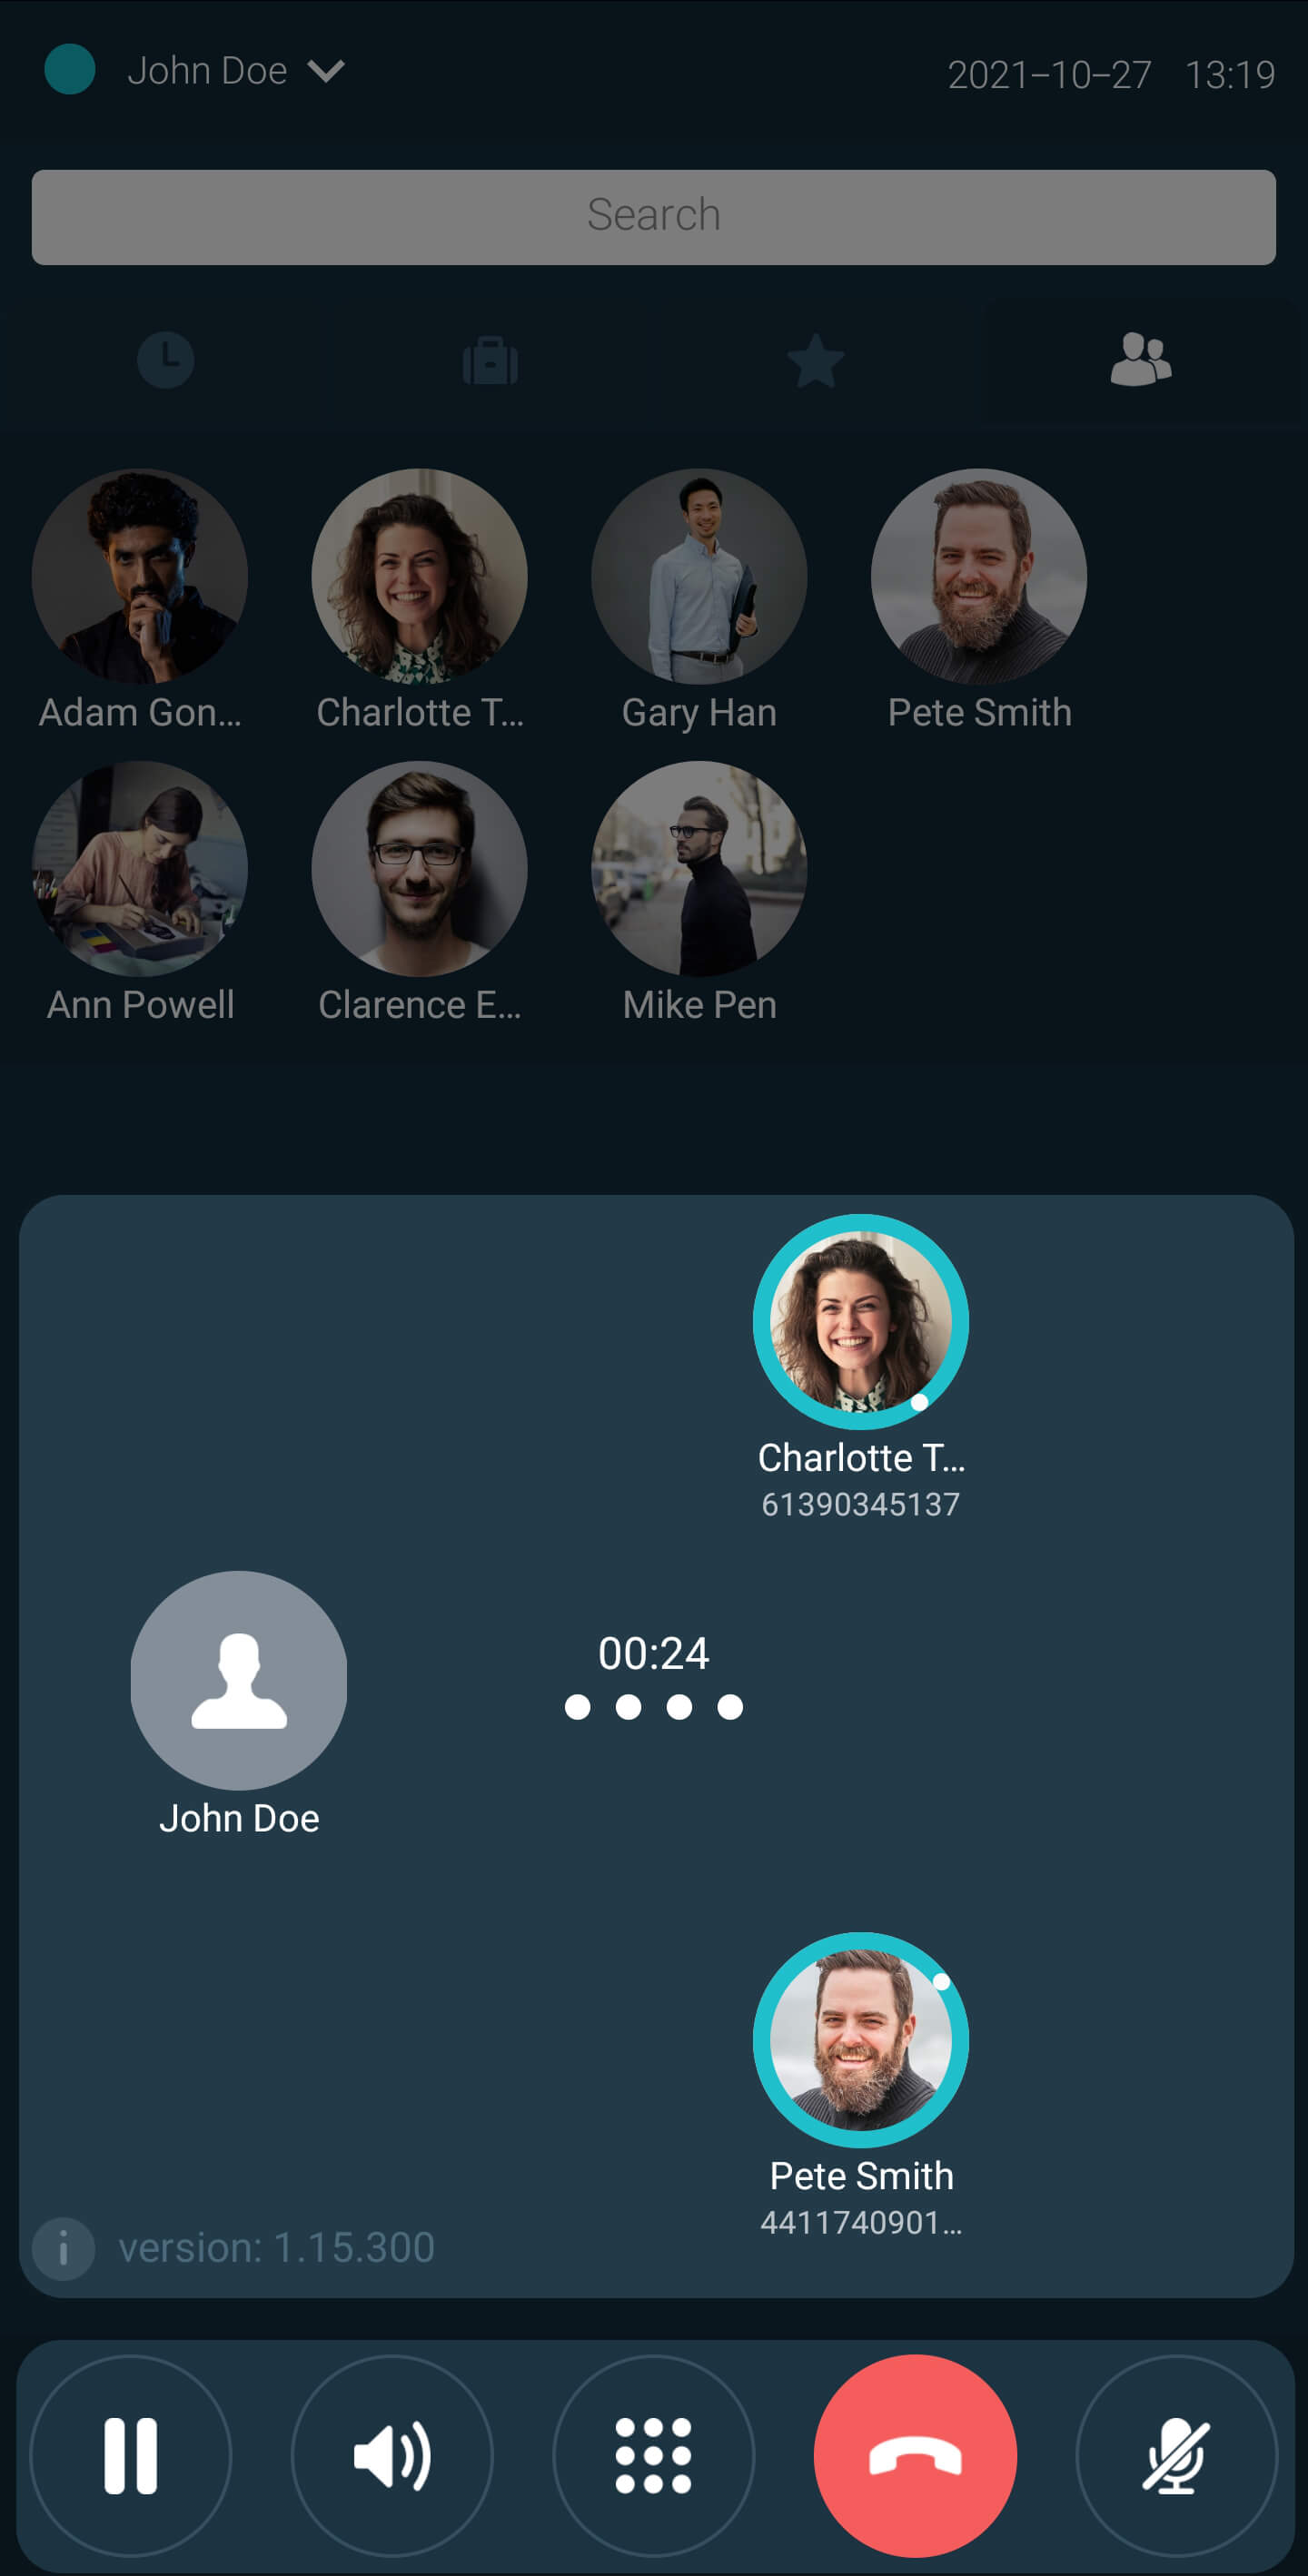
Joining/Splitting a conference call
When a call is active, participants may invite other parties to join that call or to participate in a conference call.
To invite another party to participate in a conference call, drag and drop the relevant contact’s icon from the Activities Wheel or from the Recents, Company Directory, Favorites or Contacts Tab into the Home Circle.

The contact’s phone number will ring and, if answered, that contact will automatically join the conference call.
If a participant to be invited to a conference call is not listed as an existing Contact, then that participant may be manually added to the conference by clicking on the Dialer, inputting the relevant phone number, and clicking the Dial button.
Note that the icons of the participants joining the conference call appear in the Home Circle of the call.center™ app belonging to the person who invited that participant. This means that the inviting party fully controls the activities and participation of any invited third parties, and can Hold, Mute, or Hang up those participants, or Hold, Mute or Terminate the conference call, depending on the operating platform.
During the conference call, the inviting party may right-click inside the Home Circle to display a menu with the following options:
- Hold
- Mute
- Hang up
- Hold conference
- Mute conference
- Terminate conference
- Contact information
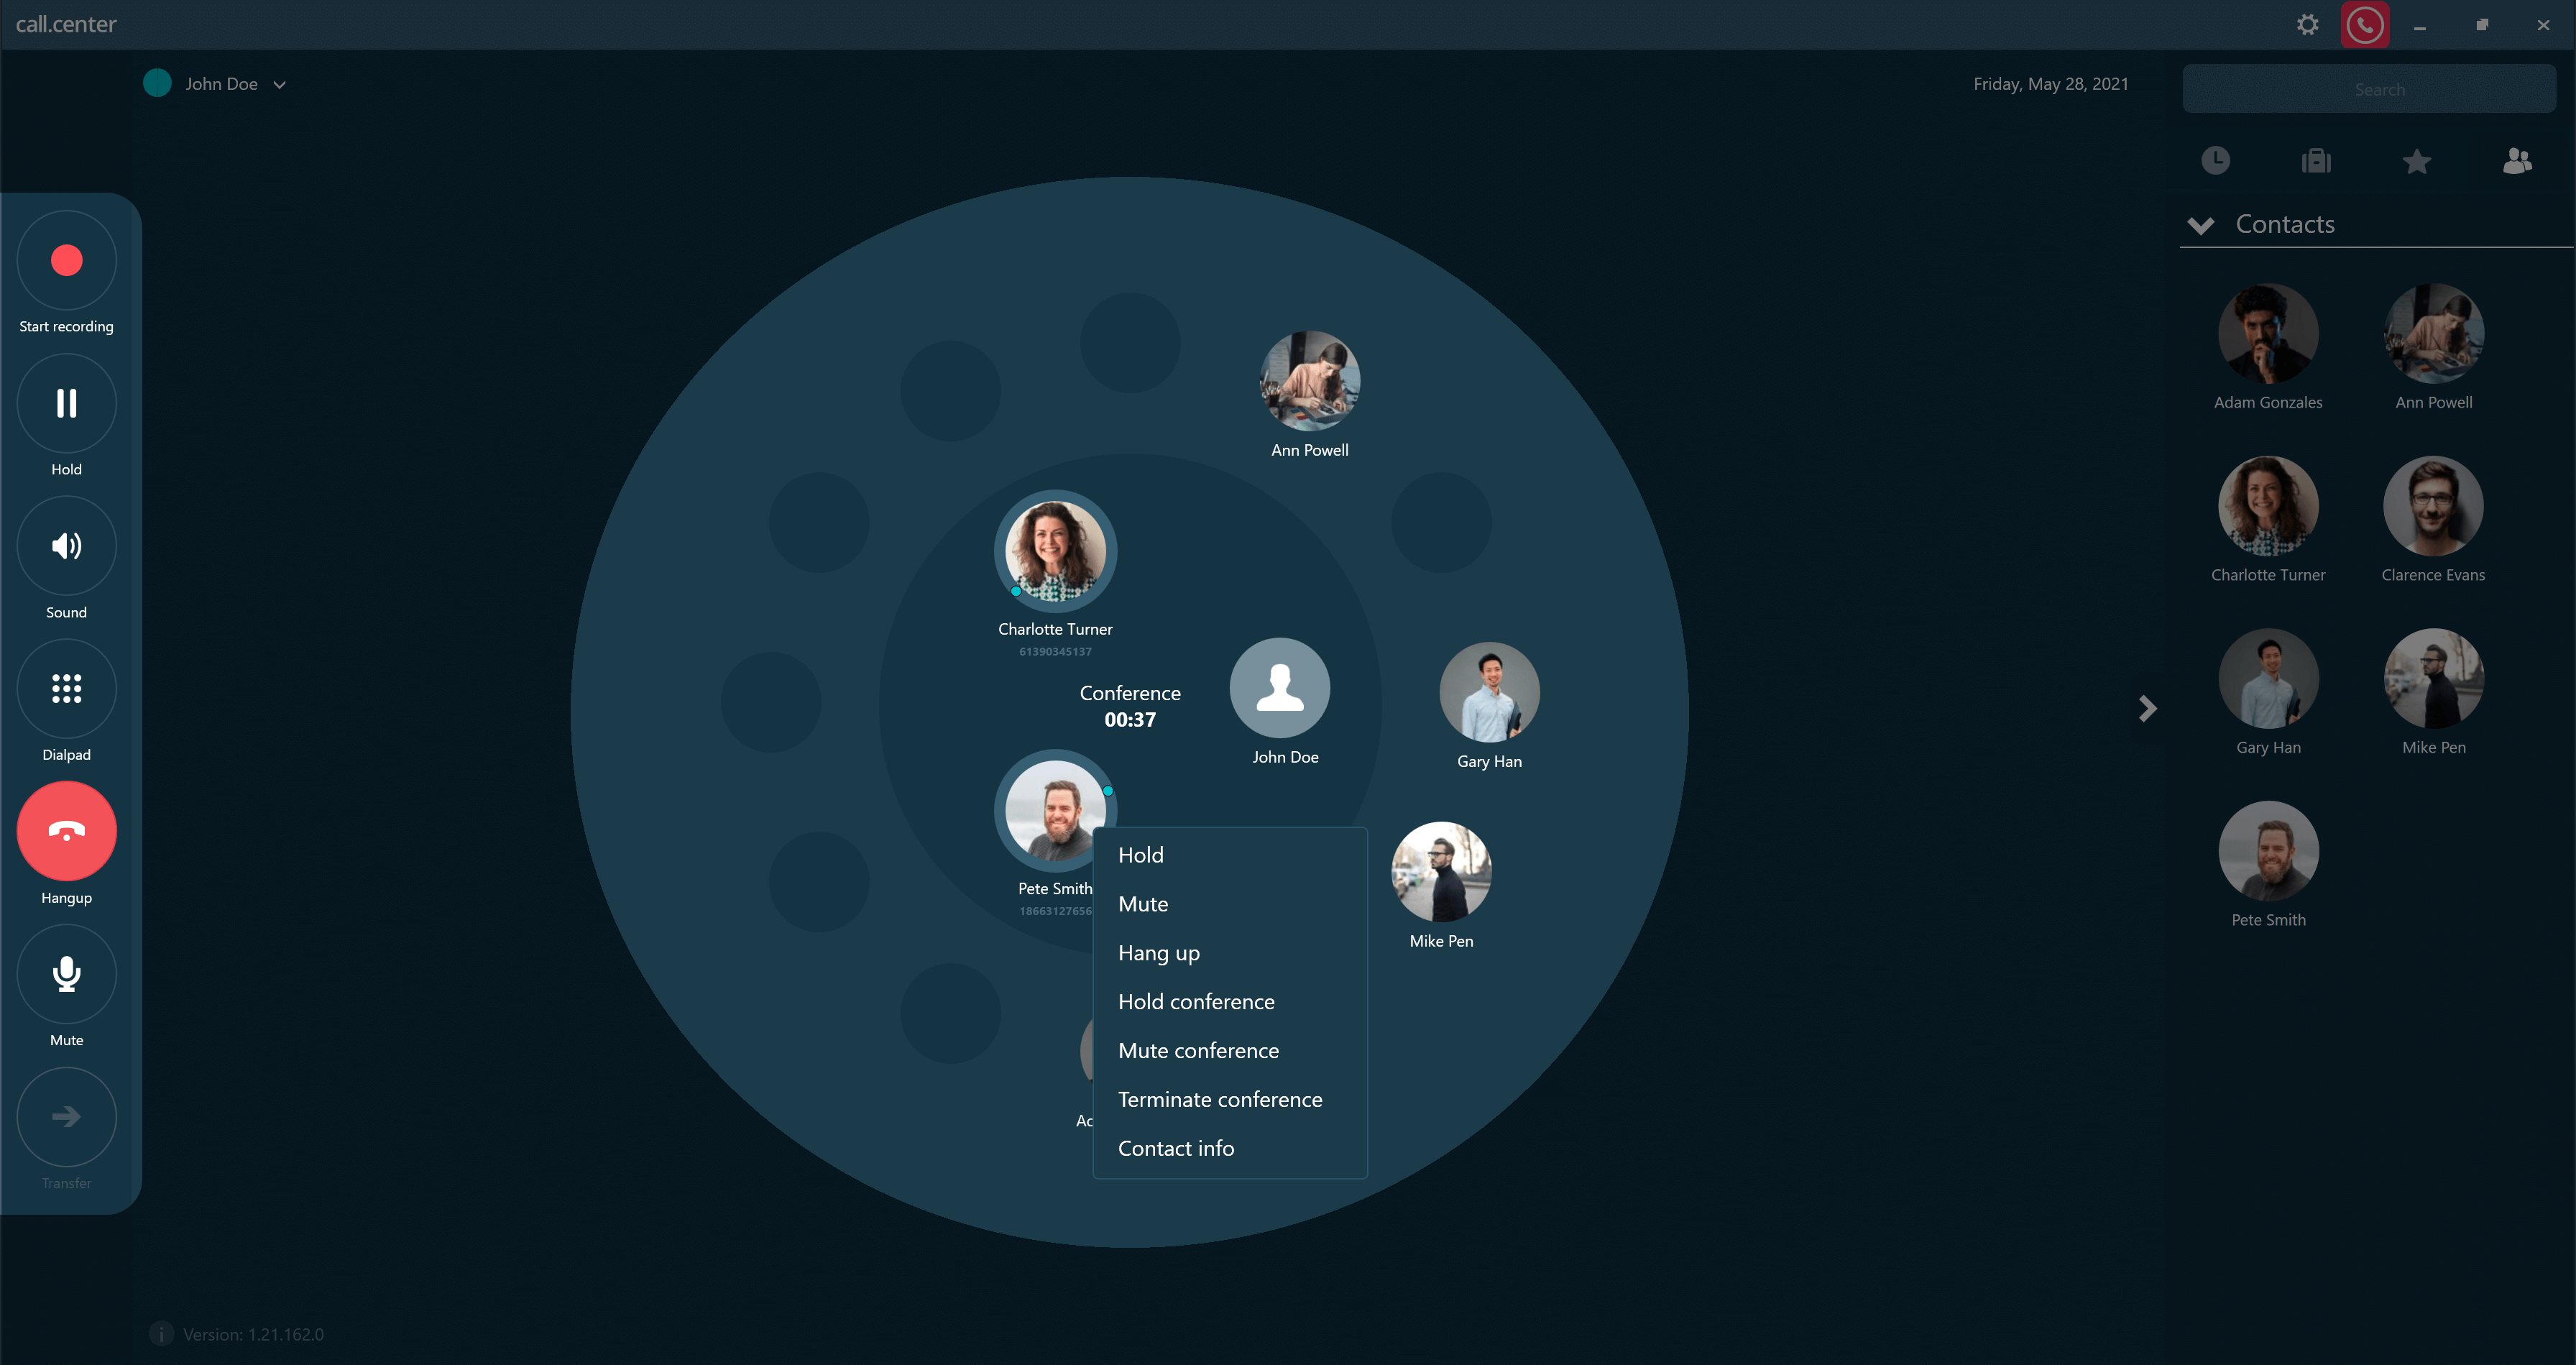
Alternatively, the inviting party can also mute, hold, or terminate the conference using buttons in the Phone Function Menu.
Back to the topTransferring a call
Once a call is active, users may transfer that call to other contacts. This is achieved by dragging the call participant’s icon from the Home Circle and dropping that icon directly onto another contact in the Activities Wheel, Recents, Company Directory, Favorites or Contacts Tab areas.
Depending on the operating system platform, a drop-down menu (with the possible options Pin and hold, Pin and mute and Transfer) is displayed. Selecting Transfer causes a call transfer to be initiated. The transfer target phone rings and, if answered, the call is then successfully transferred.
Transferring a call to a Contact
Once a call is active, users may transfer that call to other contacts.
This is achieved by selecting a contact from the Company Directory, Favorites or Contacts Tab areas.
Selecting Transfer from the phone function menu causes a call transfer to be initiated. The transfer target phone rings and, if answered, the call is then successfully transferred.
Transferring a call to another phone number
Once a call is active, users may transfer that call to other phone numbers. This is achieved by manually entering the transfer target phone number using the Dial pad, and then using the Call Transfer button.
Note that this feature is available for macOS and Windows only.
After clicking the Call Transfer button, the call is disconnected from the initiator of the call transfer. This is the case even if the call setup does not succeed, for example, in the case where the call is not answered.
Back to the topOperating the call.center™ app Mobile
Recording calls
The Record all calls button in the Account info window may be used to automatically record all inbound and outbound calls.
To enable call recording click on Home Menu and choose Settings & Details.
Answering a call
A ring sound/notification from the call.center™ app indicates an incoming call. The caller’s icon appears in the Activities Area in the space surrounding the Home Screen. This icon, together with the Answer button, is highlighted in blue to indicate a ready state. The incoming call may be answered or rejected.
There are two ways of answering incoming calls:
- 1. Click the Answer button in the Phone Function Menu.
- 2. Drag and drop the highlighted contact icon associated with the incoming call onto the Home Menu.
Once the call has been answered, the caller’s icon joins the app owner’s icon in the Home Screen to indicate the call connection.
The Answer button is re-labeled to become a Hang-up button, indicating that the call is active but may be terminated as and when required.
 Back to the top
Making a call
There are three ways of making an outgoing call:
- 1. Drag the icon of the Contact to whom the call should be placed from the Recents, Company Directory, Favorites or Contacts Tab, and drop that icon into the Home Screen.
-
2. Click on the icon of the Contact that you wish to call. Then click on
Settings & Details and a Contact’s Details window will be opened, and you can choose
which of the contact’s listed phone numbers you wish to dial.
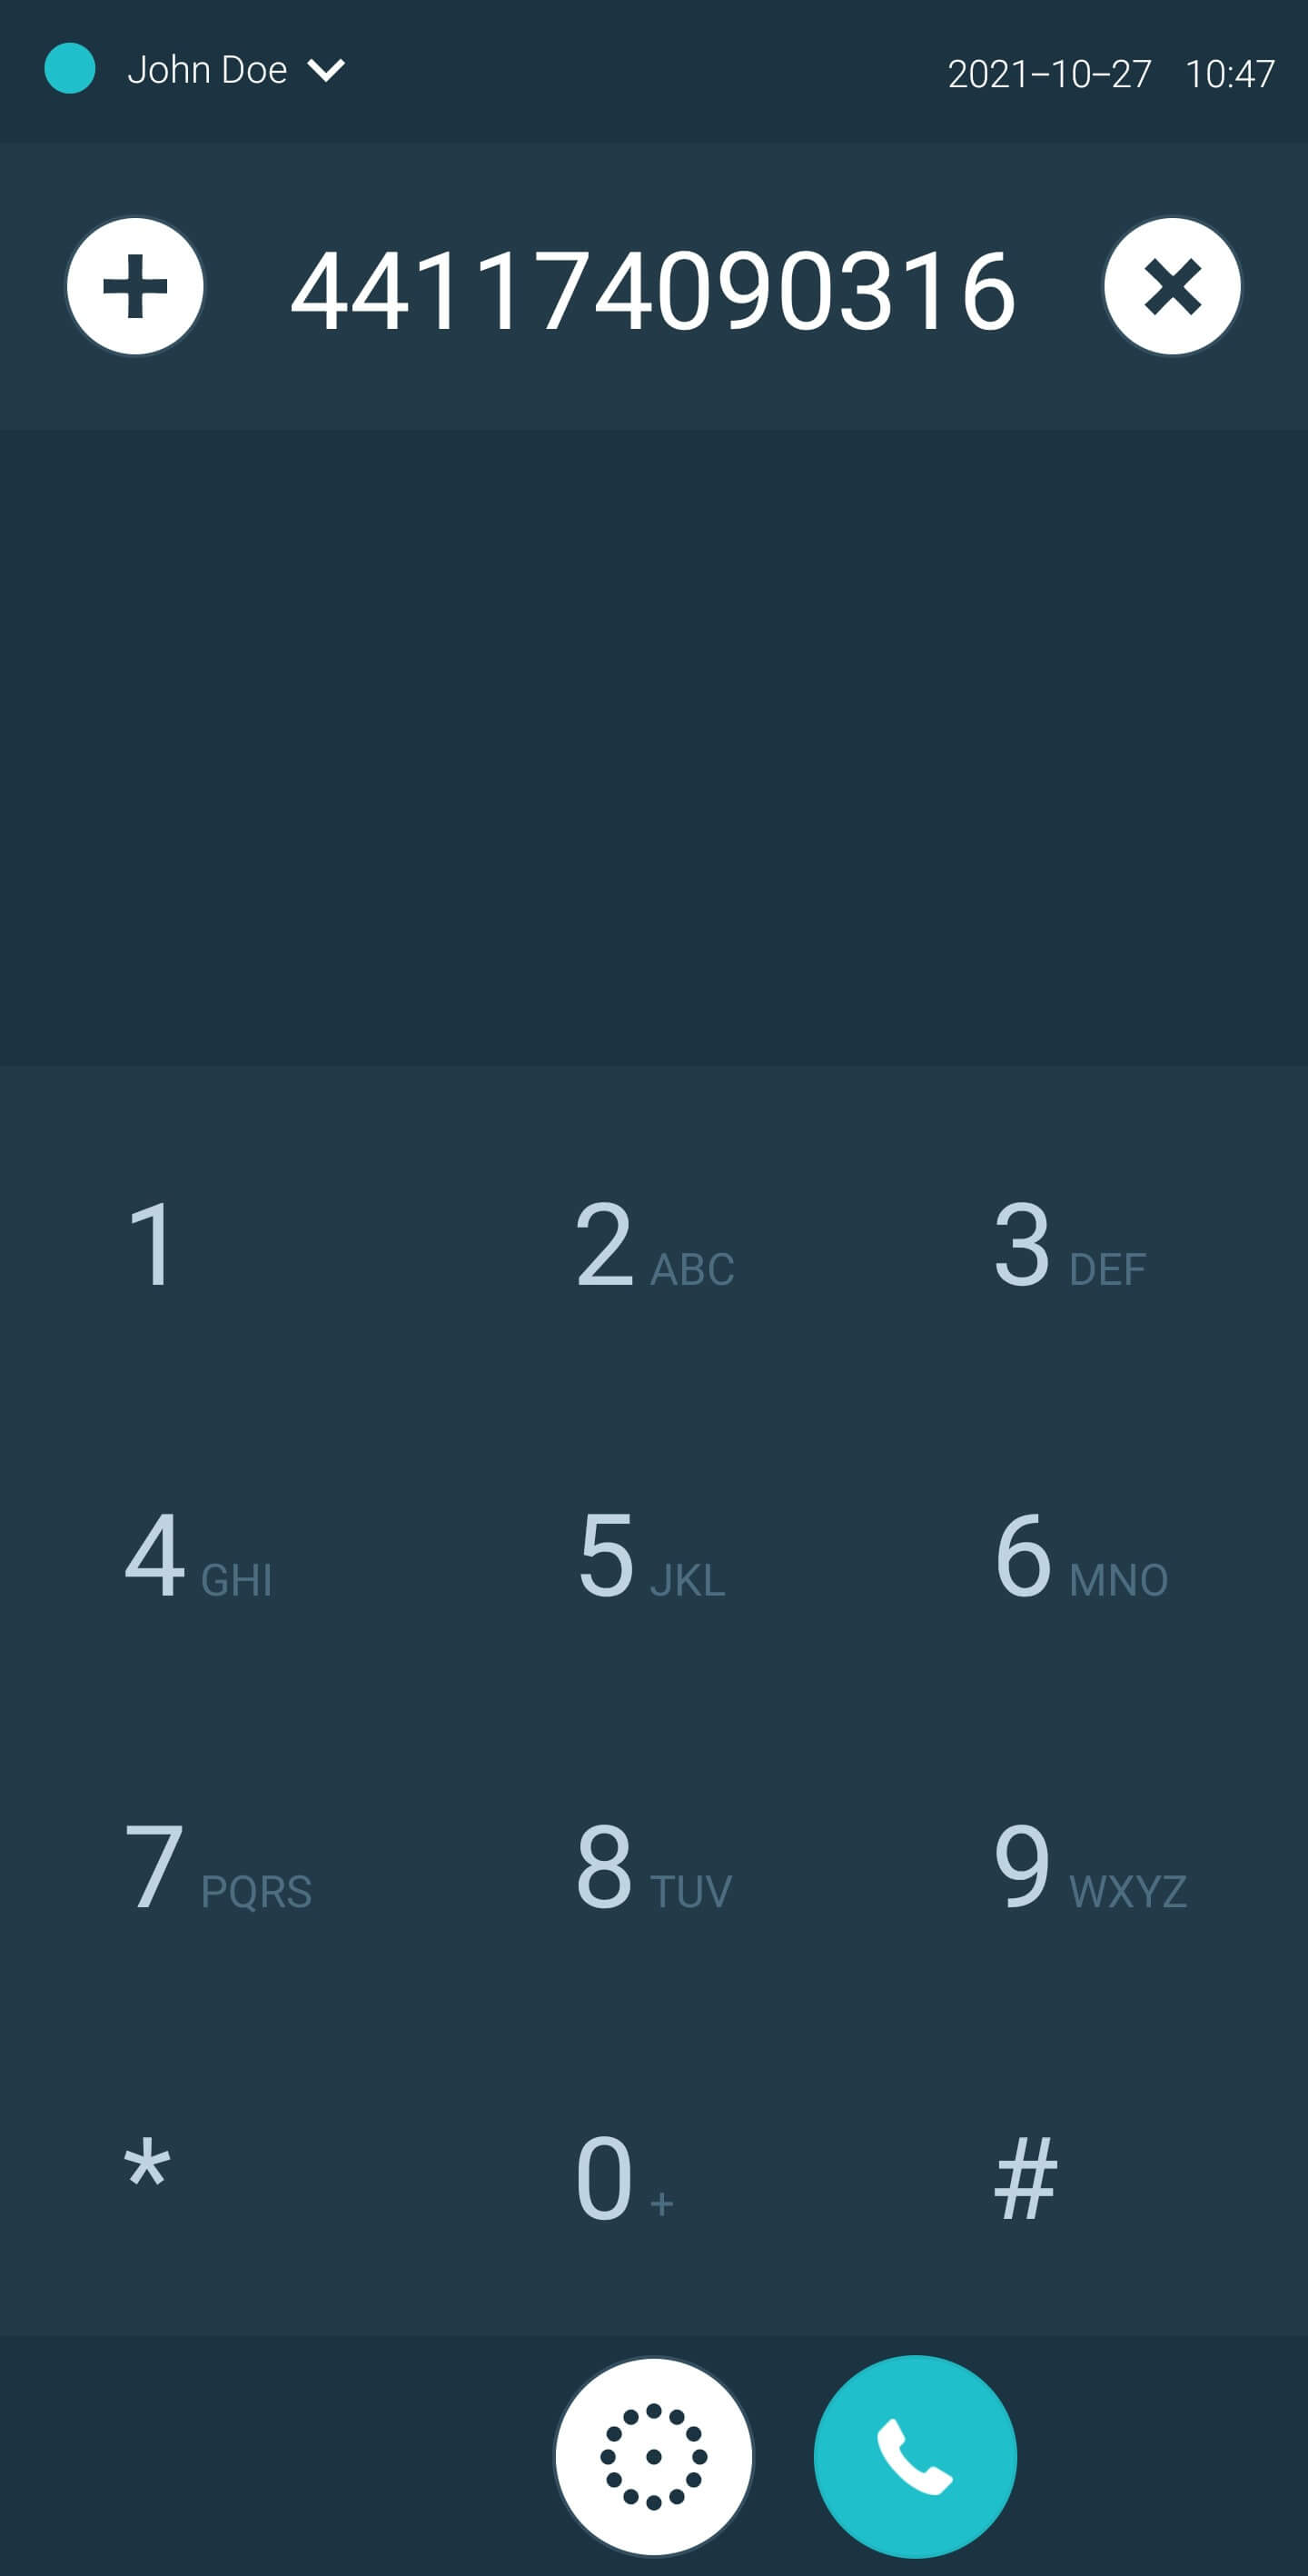
Click on the selected phone number, and the call will be initiated. - 3. Open up the Dialer, manually enter the contact’s phone number, and click the Call button below the dial pad or in the Phone Function Menu.
Rejecting a call
The notifications for all incoming calls (including those from unknown callers) are displayed in the Home Screen area. The current caller’s icon is highlighted, as shown in the image below.
There are two ways of rejecting an incoming call on a mobile phone:
- 1. Drag the caller’s icon to the Hang Up button and then release that icon.
- 2. Select the Decline button.
Holding/Unholding a call
The Hold button in the Phone Function Menu may be used when a call is active. When a call is placed on hold, a pre-recorded audio file is played to the party that is on hold. The call status changes to Unhold when you once again click the Hold button or when the call is terminated.
Once a call is on hold, the icon for the on-hold party moves from the Home Screen to the Activities Area to indicate the change in status of that call.
When the Unhold button in the Phone Function Menu is active, you may click on this button to return the call to the Unhold mode. Alternatively, you may drag and drop the on-hold party’s icon from the Activities Area into the Home Screen for the call to resume.
To terminate an on-hold call without returning to the Unhold status, drag and release the on-hold party’s icon over the Hang up button.
 Back to the top
Muting/Unmuting a call
The Mute button in the Phone Function Menu may be used to mute an active call. When a call is muted, the muted party’s icon moves from the Home Screen to the Activities Area, indicating the change in the status of that call.
When the Unmute button in the Phone Function Menu is active (that is, the call is currently muted), you may click on that button to return the call to the normal (unmuted) state. Alternatively, you may drag the Muted party’s icon from the Activities Area area and drop it into the Home Screen to return the call to the unmuted state.
To terminate a muted call without returning to the unmuted state, drag and drop the muted party’s icon onto the Hang Up button from the outside Activities Area.
 Back to the top
Joining/Splitting a conference call
When a call is active, participants may invite other parties to join that call or to participate in a conference call.
To invite another party to participate in a conference call, drag and drop the relevant contact’s icon from the Recents, Company Directory, Favorites or Contacts Tab into the Home Screen.
The invited contact’s phone will ring and, if answered, that contact will automatically join the conference call.
If a participant to be invited to a conference call is not listed as an existing Contact, then that participant may be manually added to the conference by clicking on the Dialer, inputting the relevant phone number, and clicking the Dial button.
Note that the icons of the participants joining the conference call will appear on the Home Screen of the call.center™ app belonging to the person who invited that participant. This means that the inviting party fully controls the activities and participation of any invited third parties, and can Hold, Mute or Hang up those participants or Hold, Mute or Terminate the conference call.
During the conference call, the inviting party can also mute, hold or terminate the conference using buttons in the Phone Function Menu.
 Back to the top
Transferring a call
Once a call is active, users may transfer that call to other contacts. This is achieved by dragging the call participant’s icon from the Home Screen and dropping that icon directly onto another contact in the Recents, Company Directory, Favorites or Contacts Tab areas. The transfer target’s phone rings and, if answered, the call is then successfully transferred.
Managing Contacts in the call.center™ app Desktop
Creating a contact
The call.center™ app integrates with the native contact information already present on your device on which the app is installed. For some operating system platforms such as Windows, you may import contacts from a Microsoft or Google account or create a private contact database specifically for the call.center™ app.
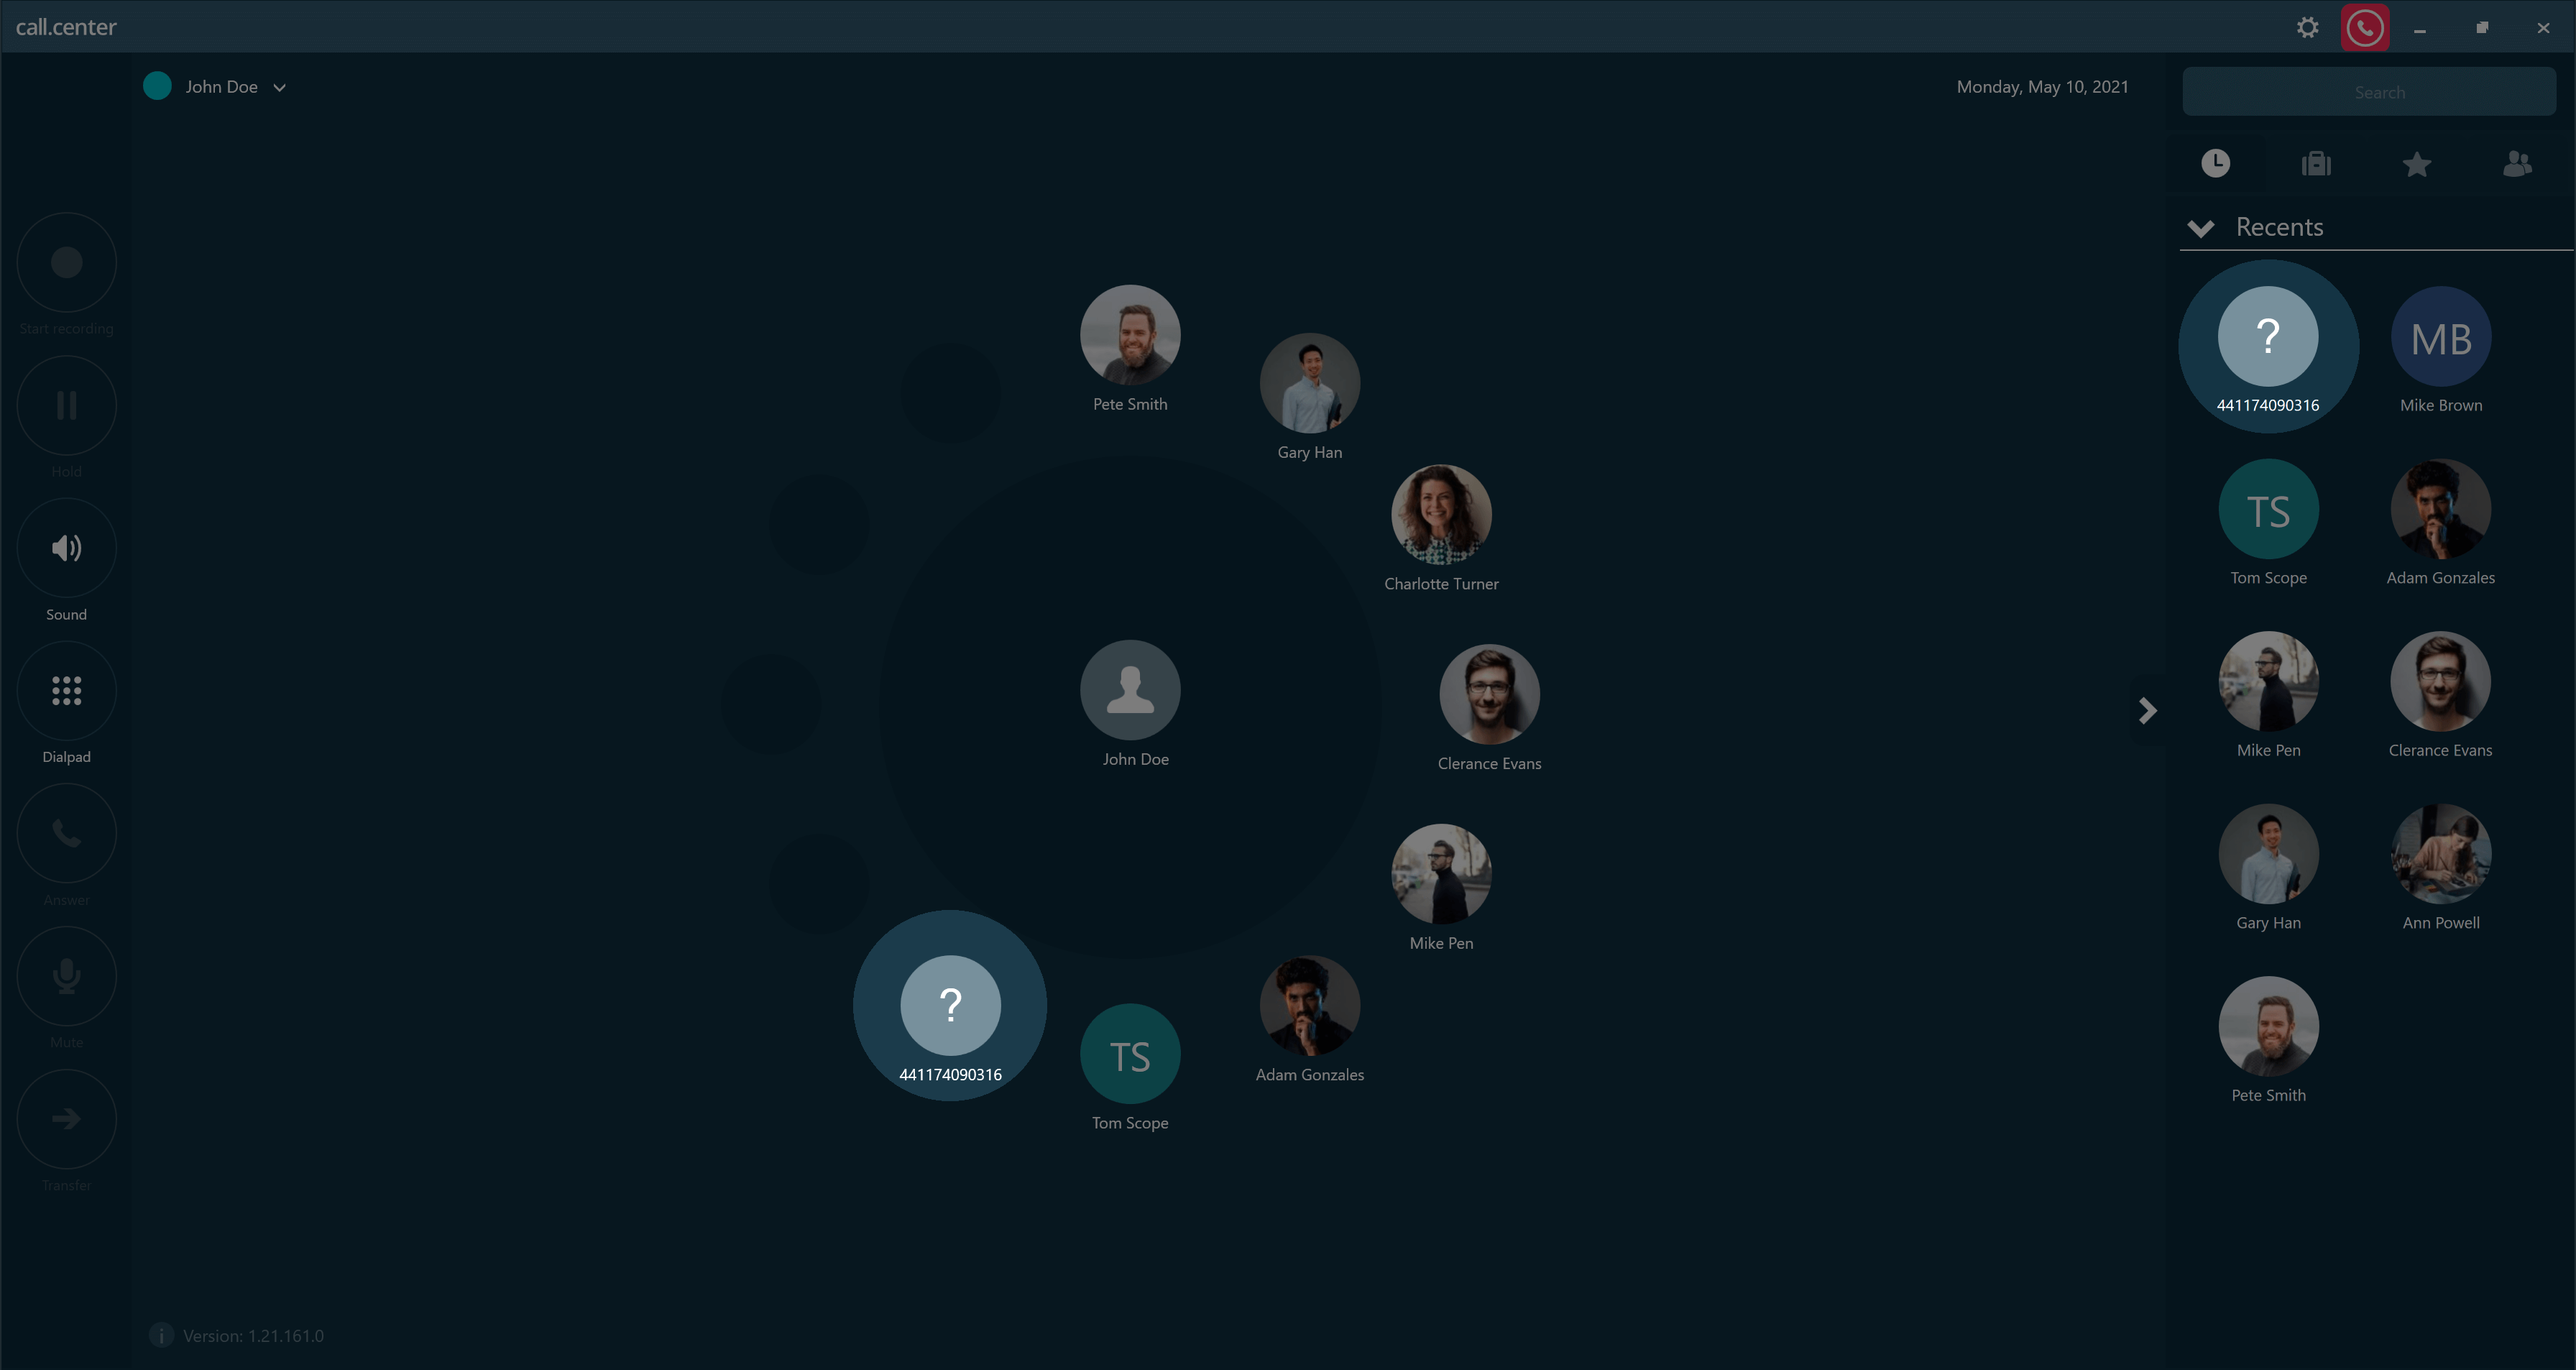
Note that when an incoming call is received, the call.center™ app attempts to match the caller’s number with a phone number listed for an existing contact on your device. If no match is found, then a question mark icon and the caller’s number are displayed in the Activities Wheel area and/or in the Recents tab.
A new contact may be created by either:
- Entering the complete contact information from scratch, or
- By adding contact information to a recently used phone number. This phone number is generally associated with an incoming call received from an unknown or unlisted contact.
Creating a new Contact from scratch
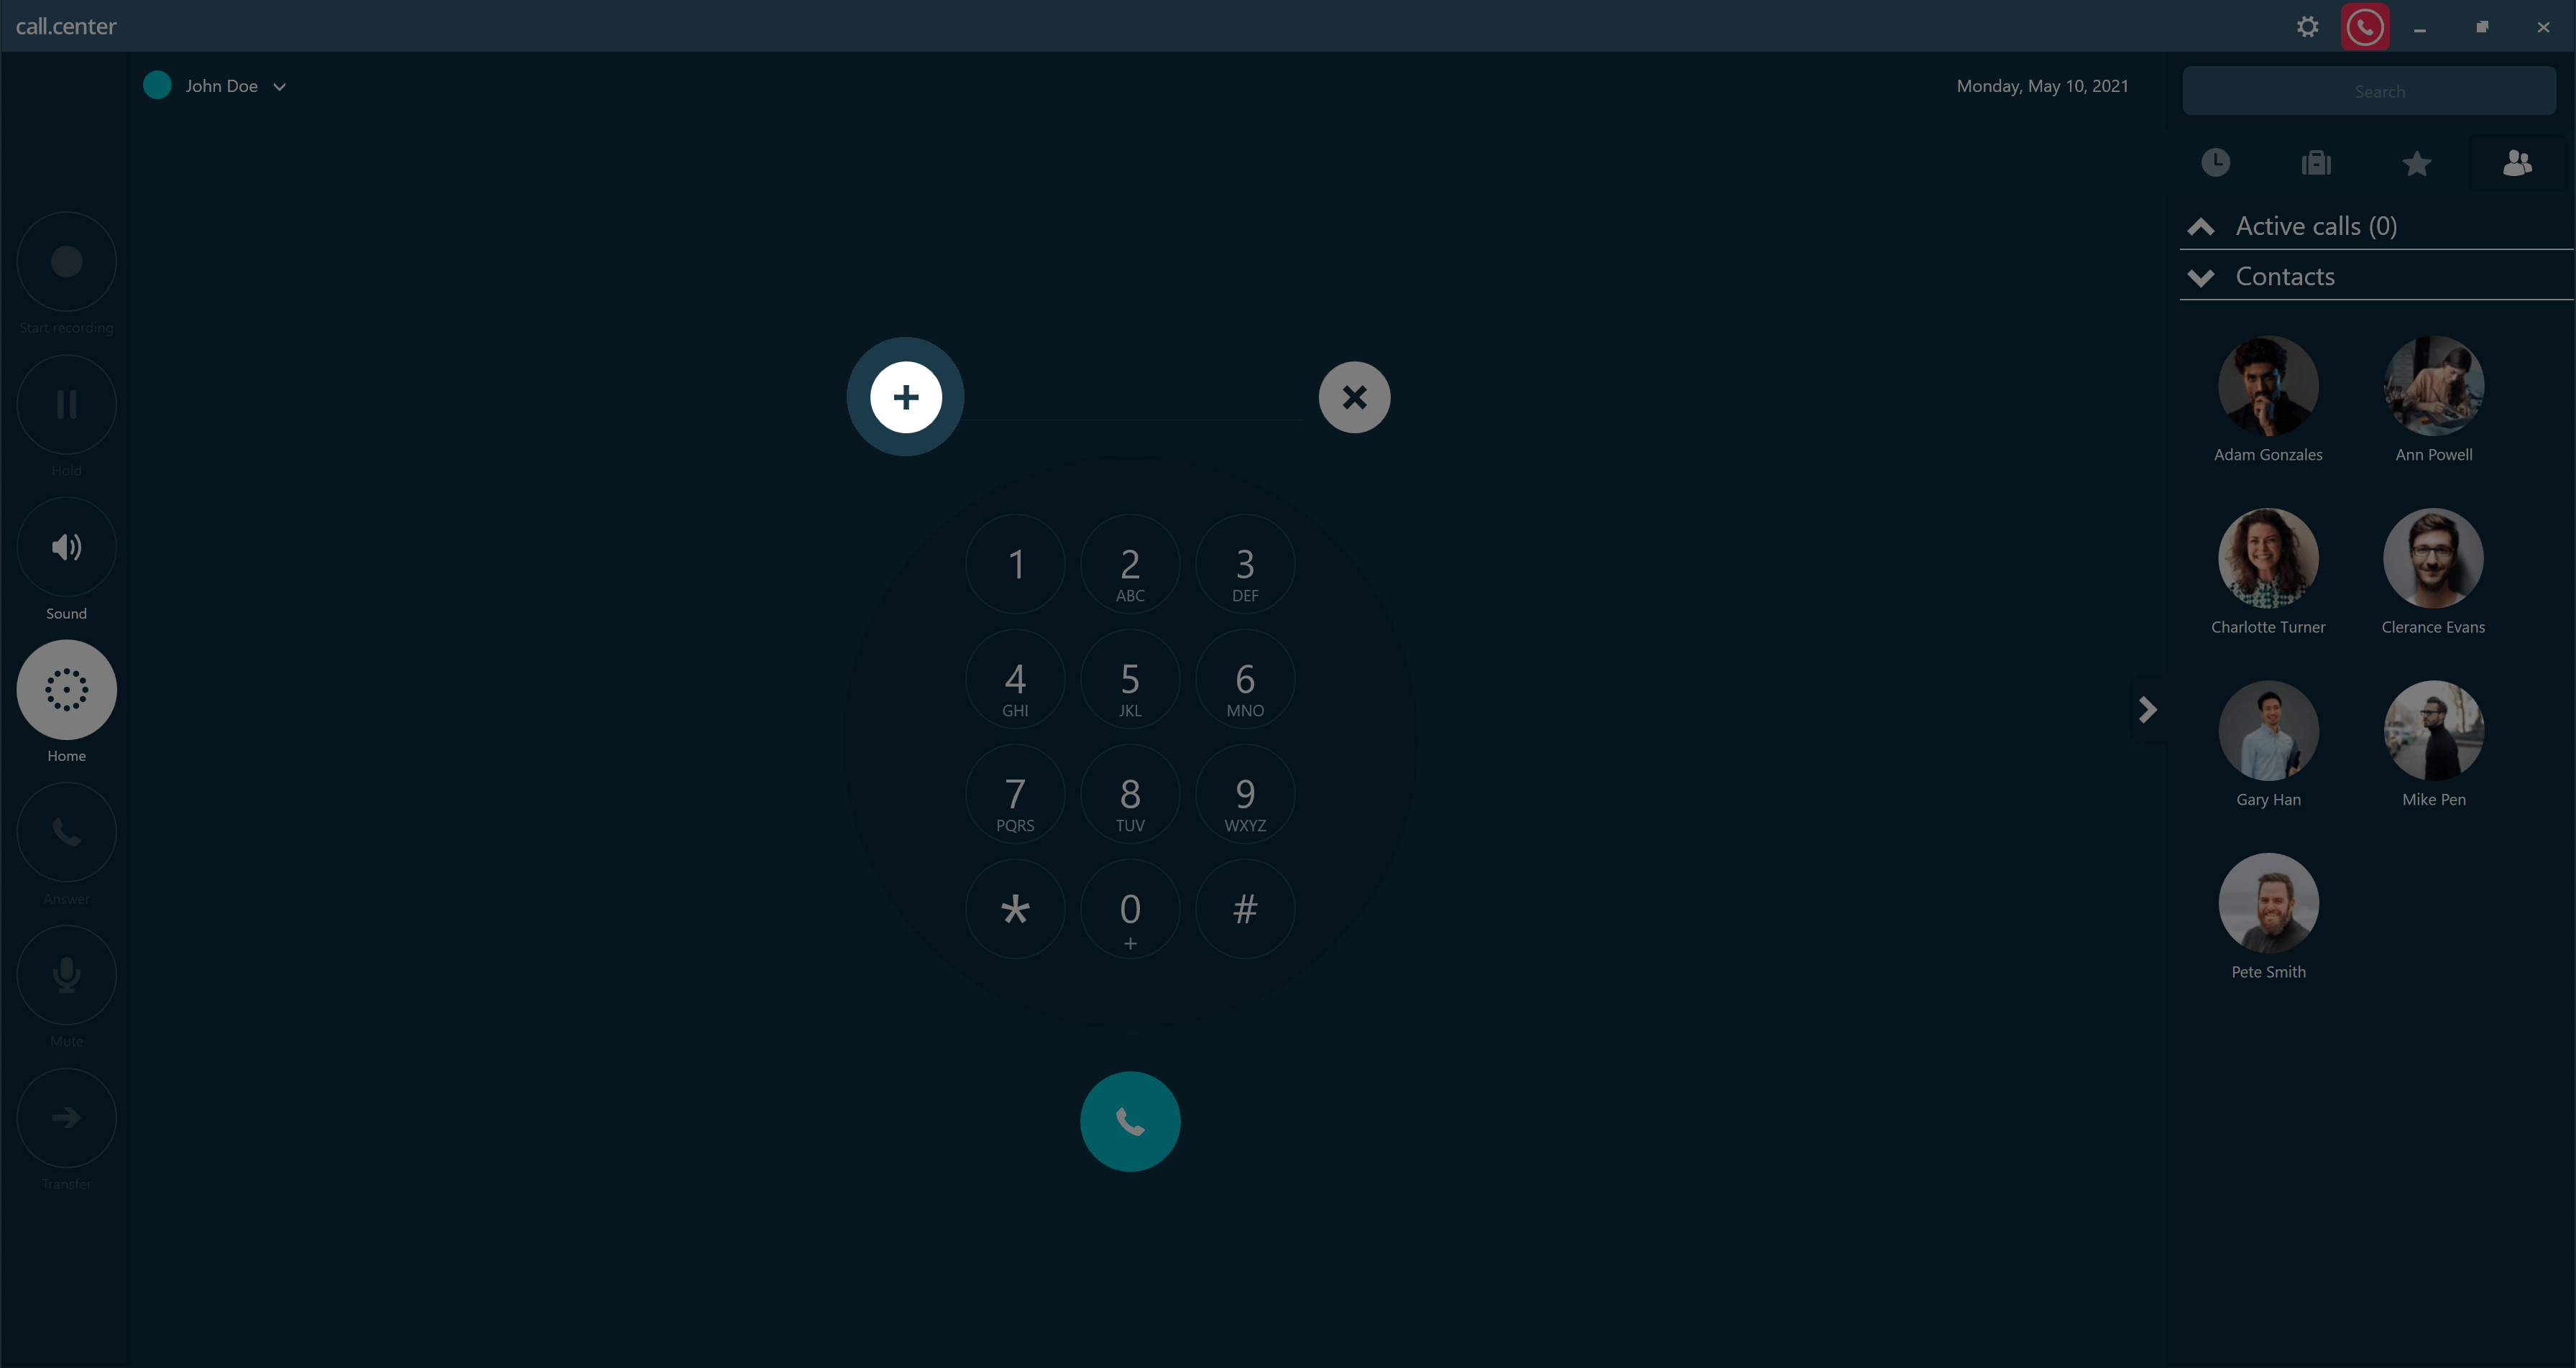
- Click on the Dialpad button in the Phone Function Menu to display the Dial screen.
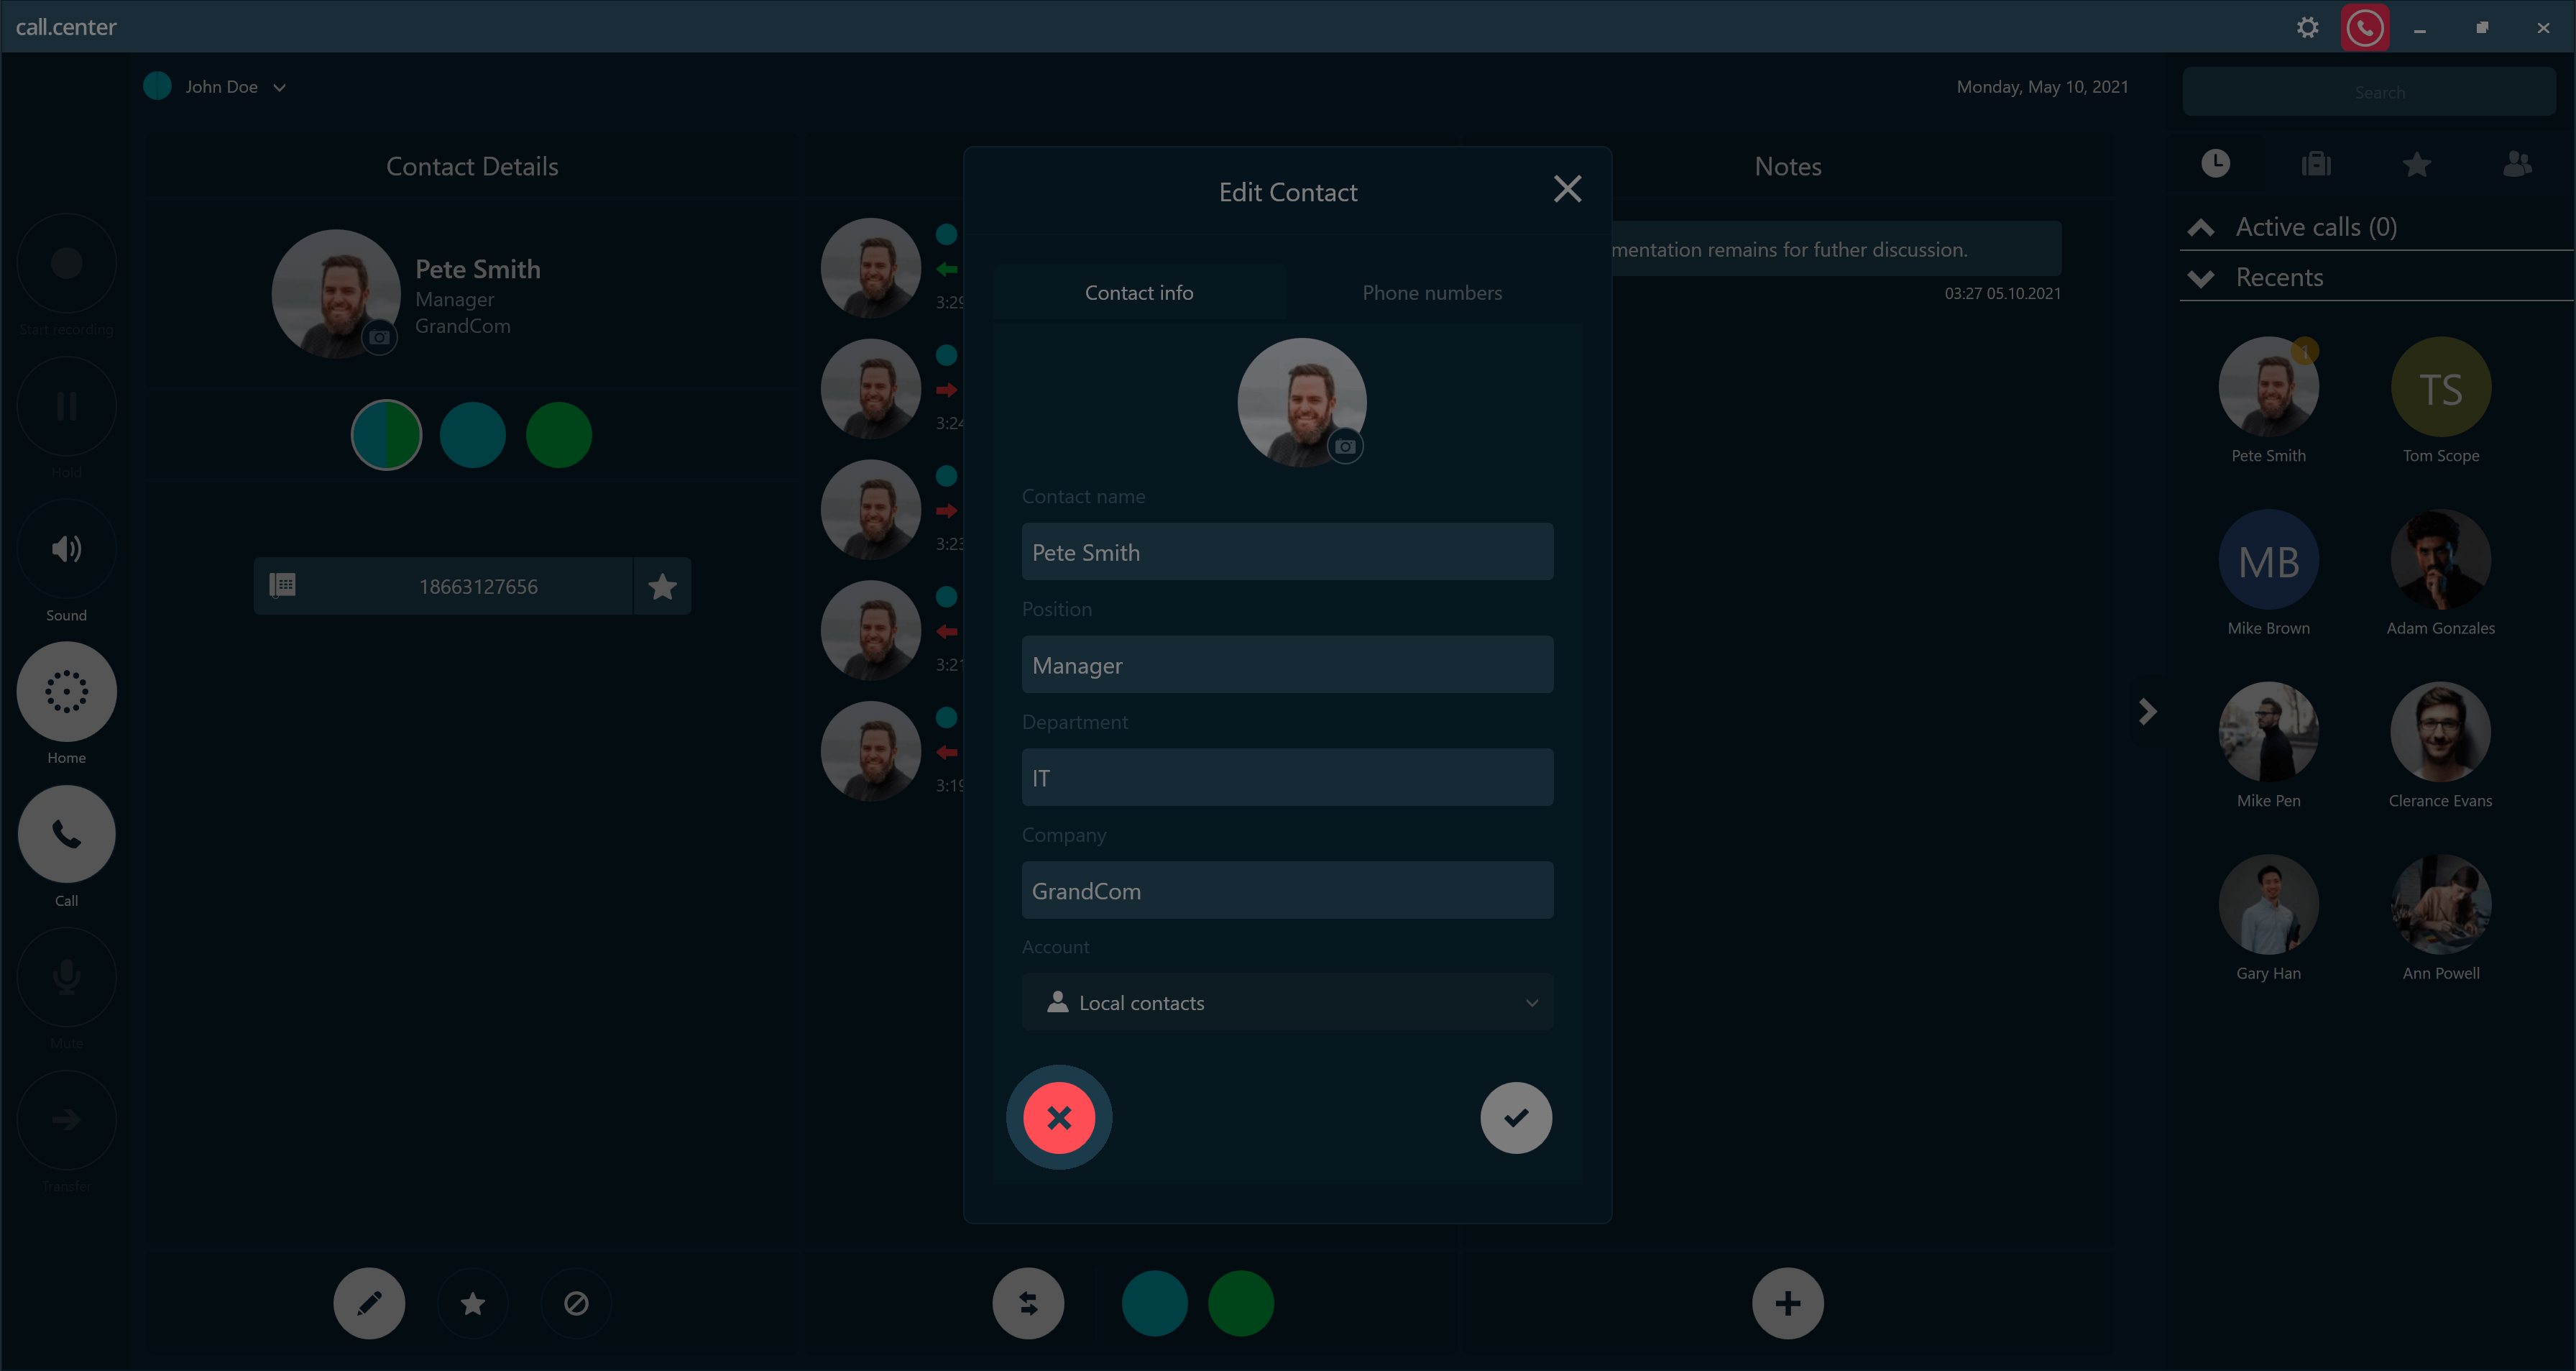
- Click the “PLUS” button to display the Create Contact dialog box.
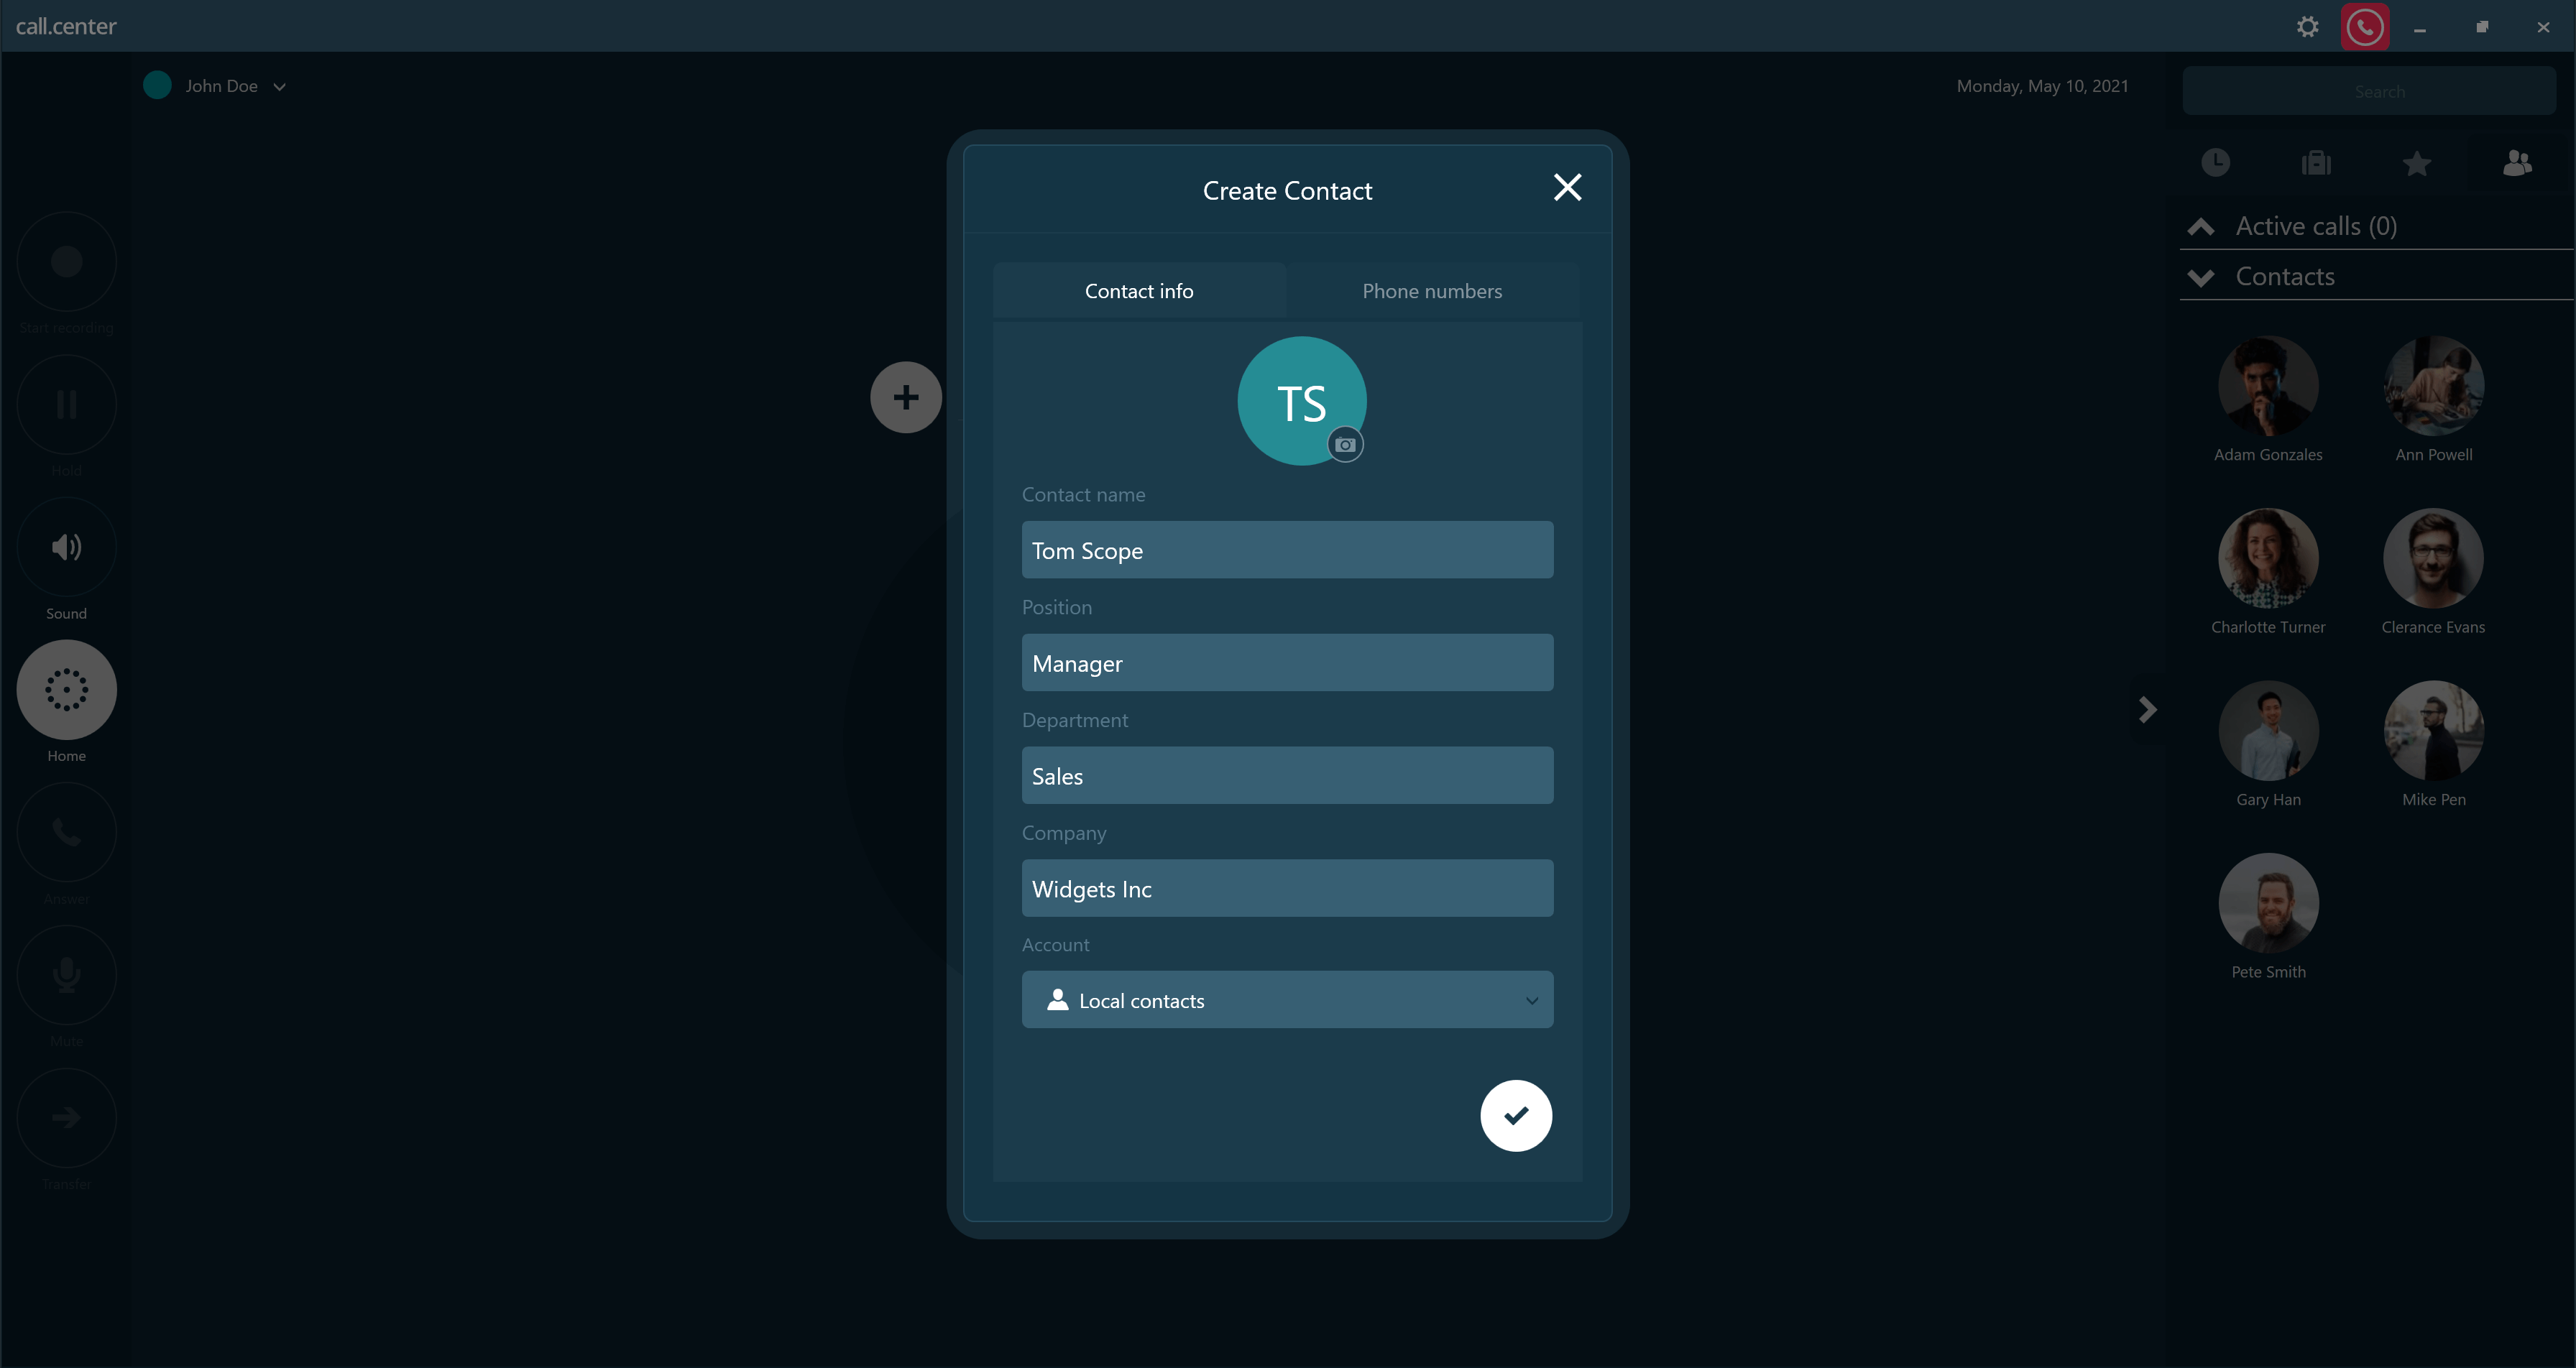
- The Contact name must be entered, and optional details for the fields Position, Department and Company may be entered.
- Select the type of account from the Account drop-down list, for example, Local contacts.
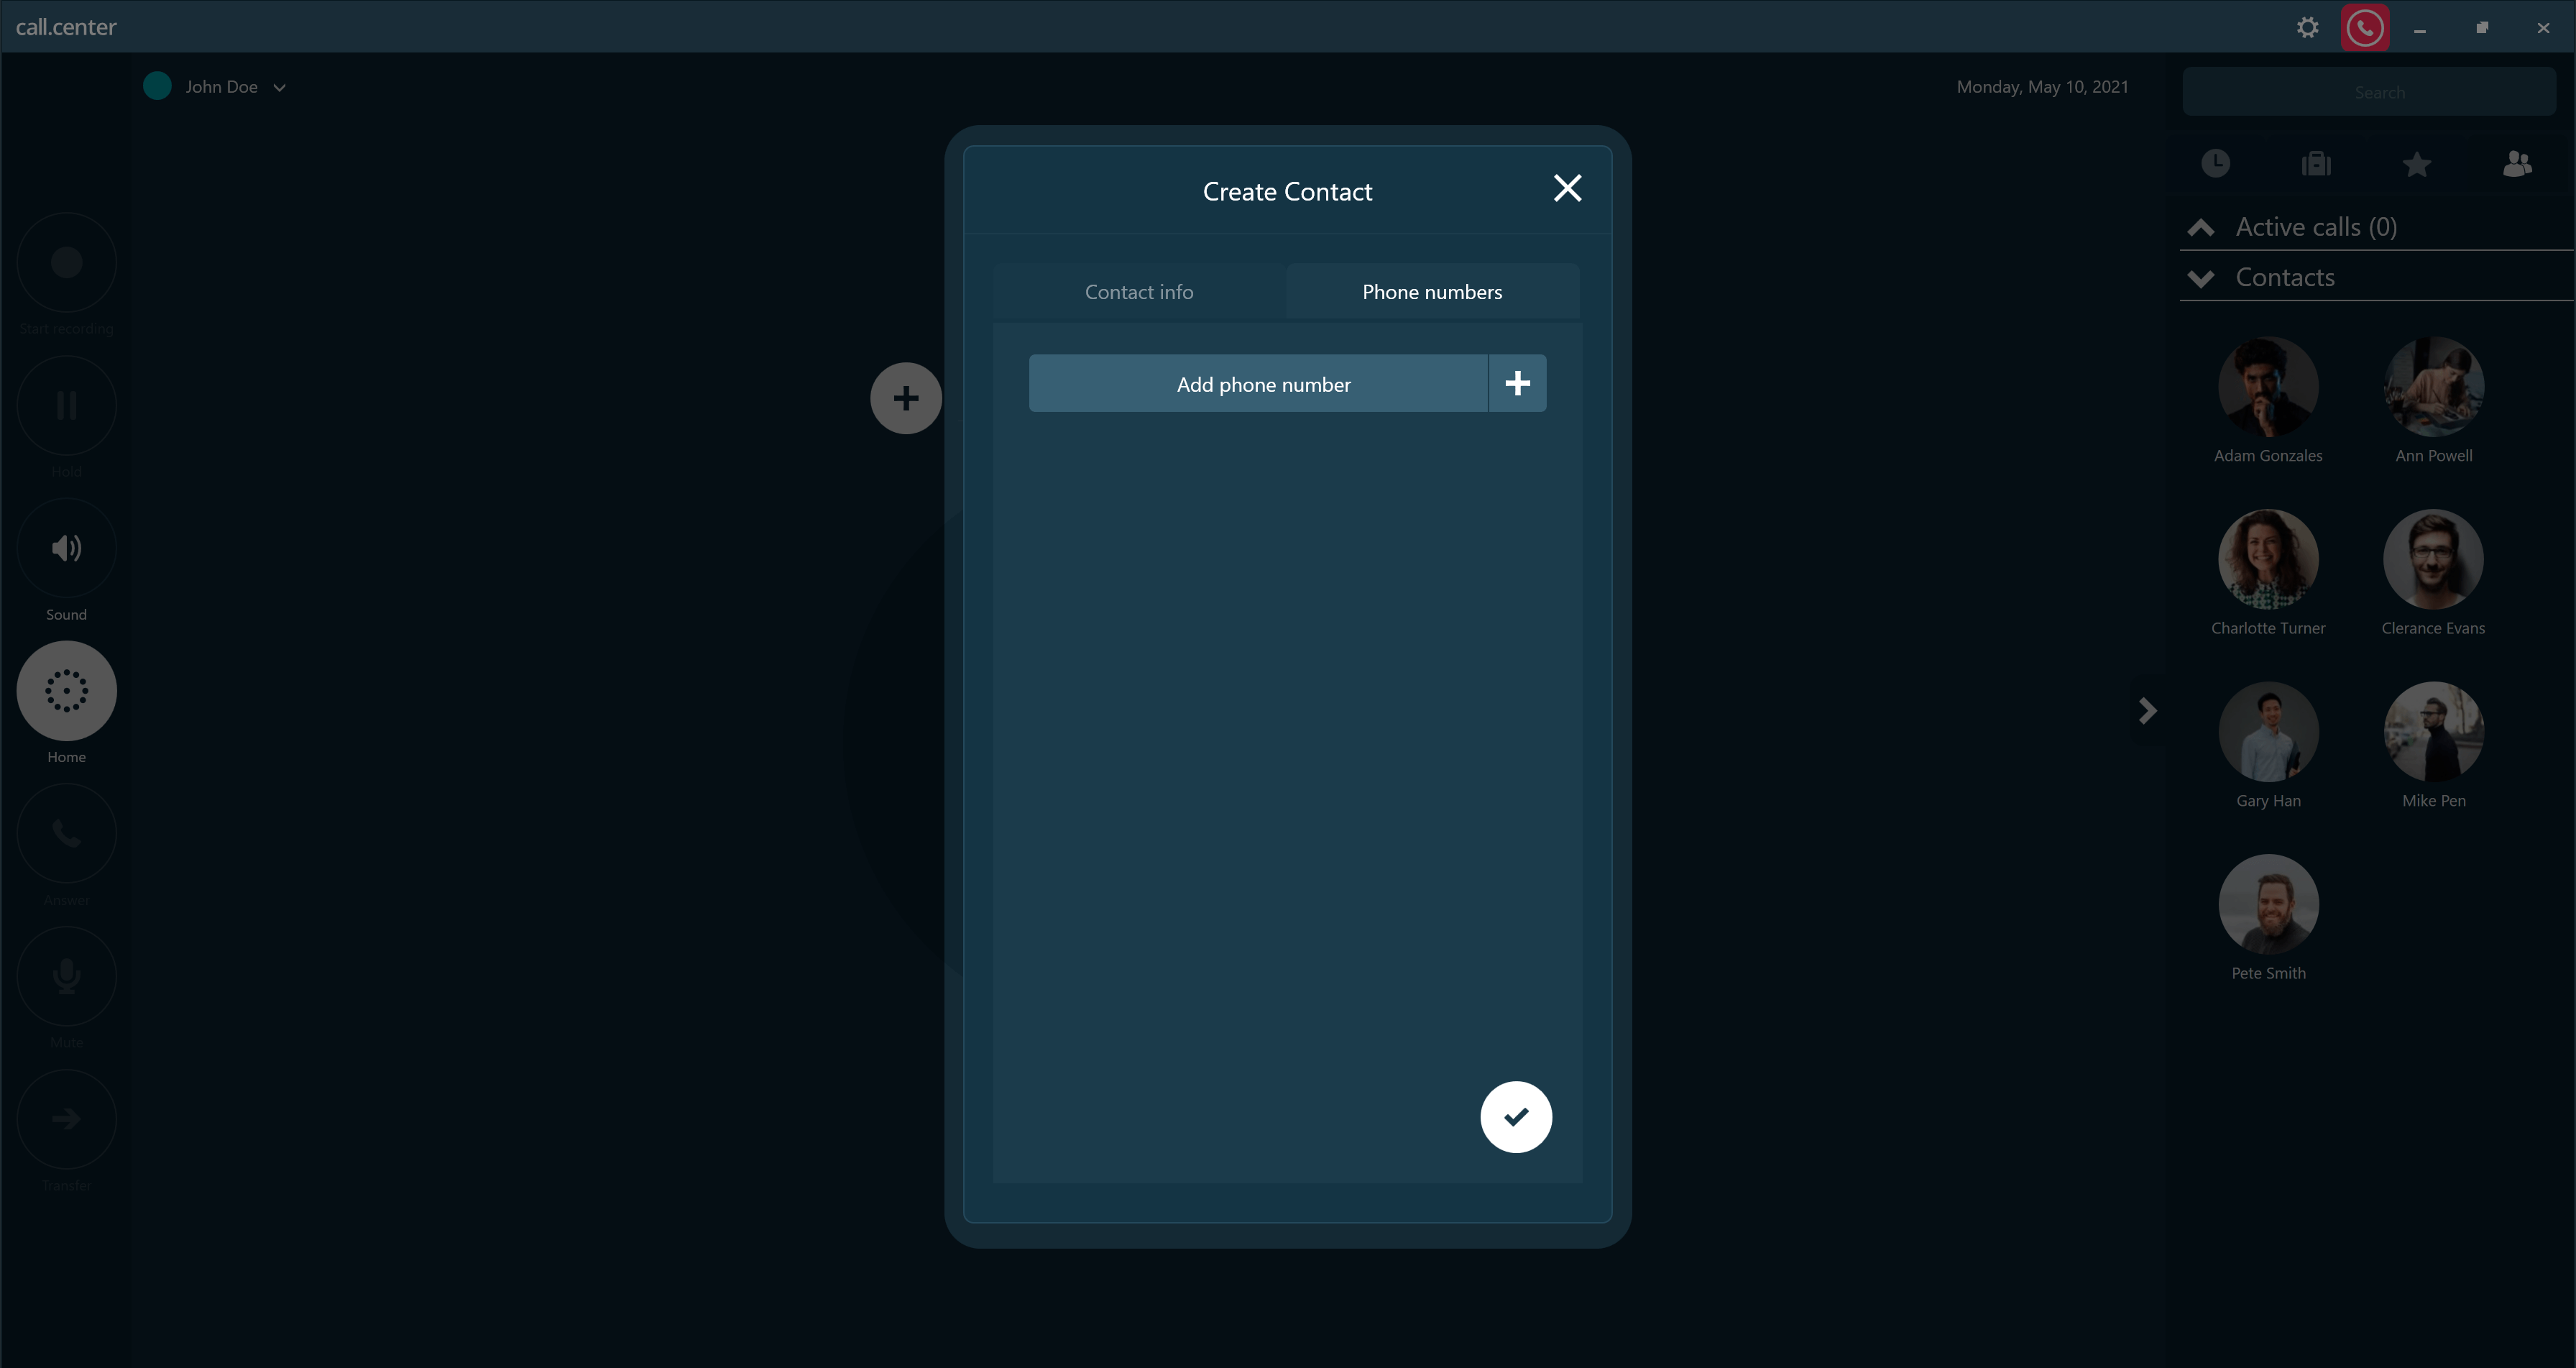
- Click the Phone numbers button on the top-right corner of the Create Contact dialog box to display the Phone numbers window.
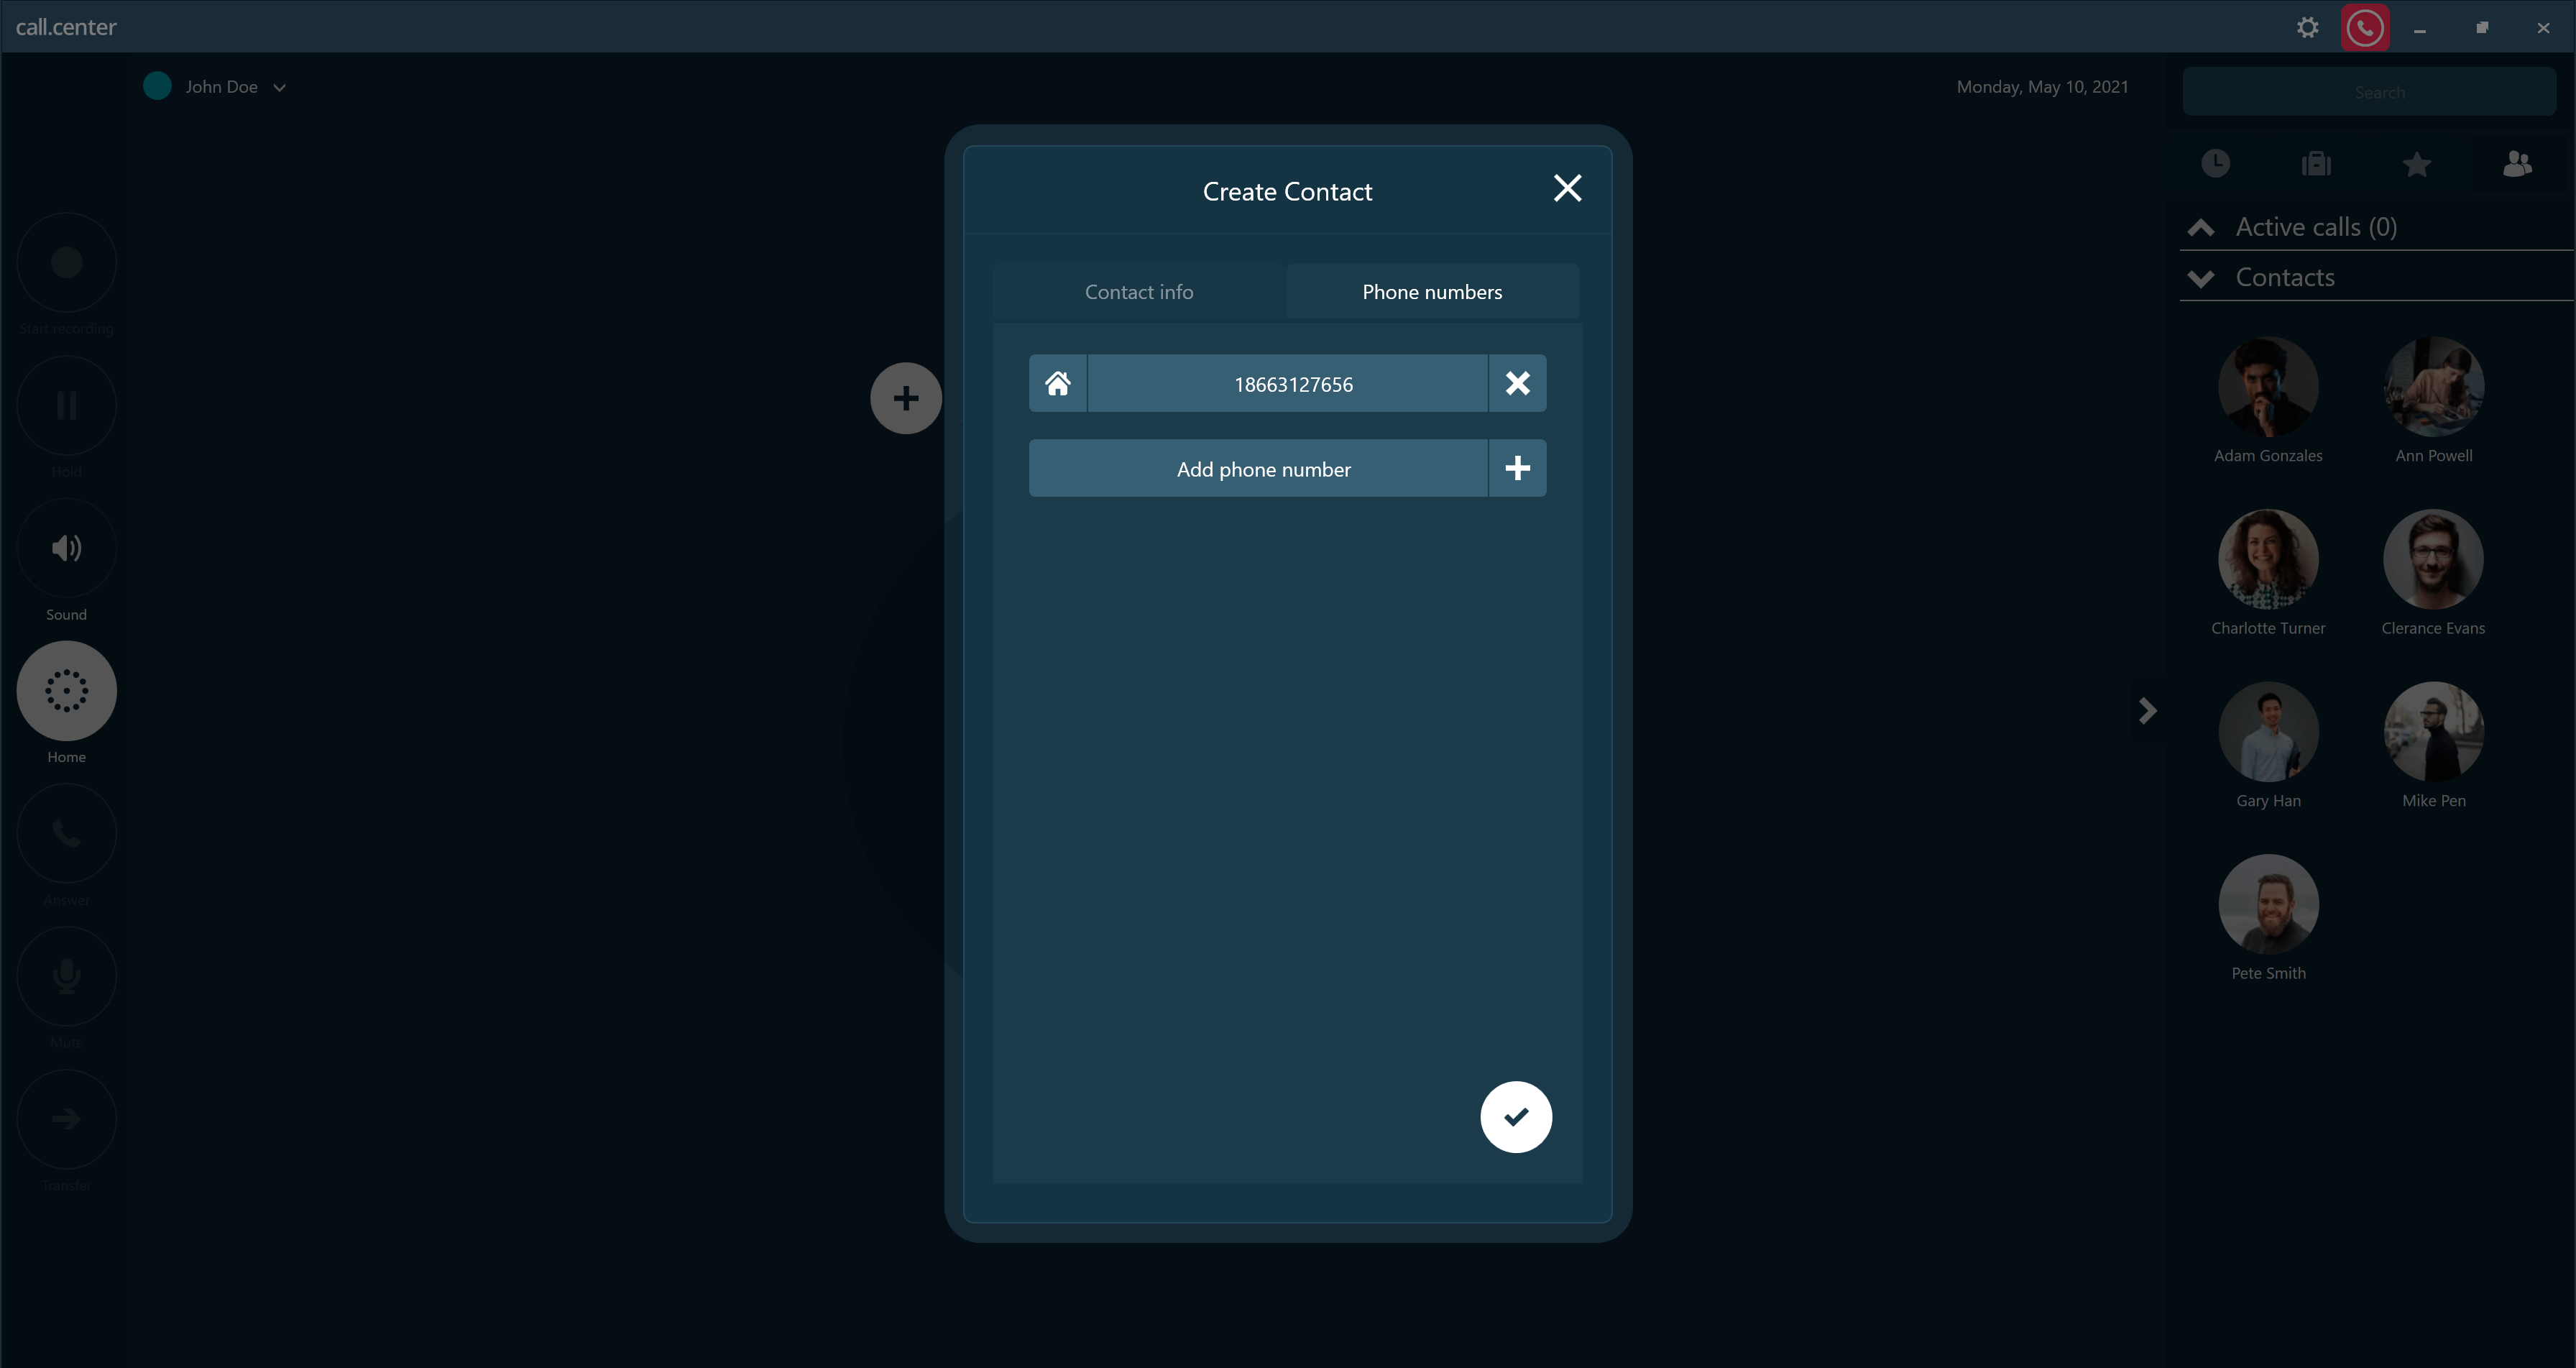
- Click on the Add phone number button to display a field where a phone number may be added.
- Enter the phone number and click the Confirm button to save the information. The new contact that you have created will now be displayed in the Contacts area.
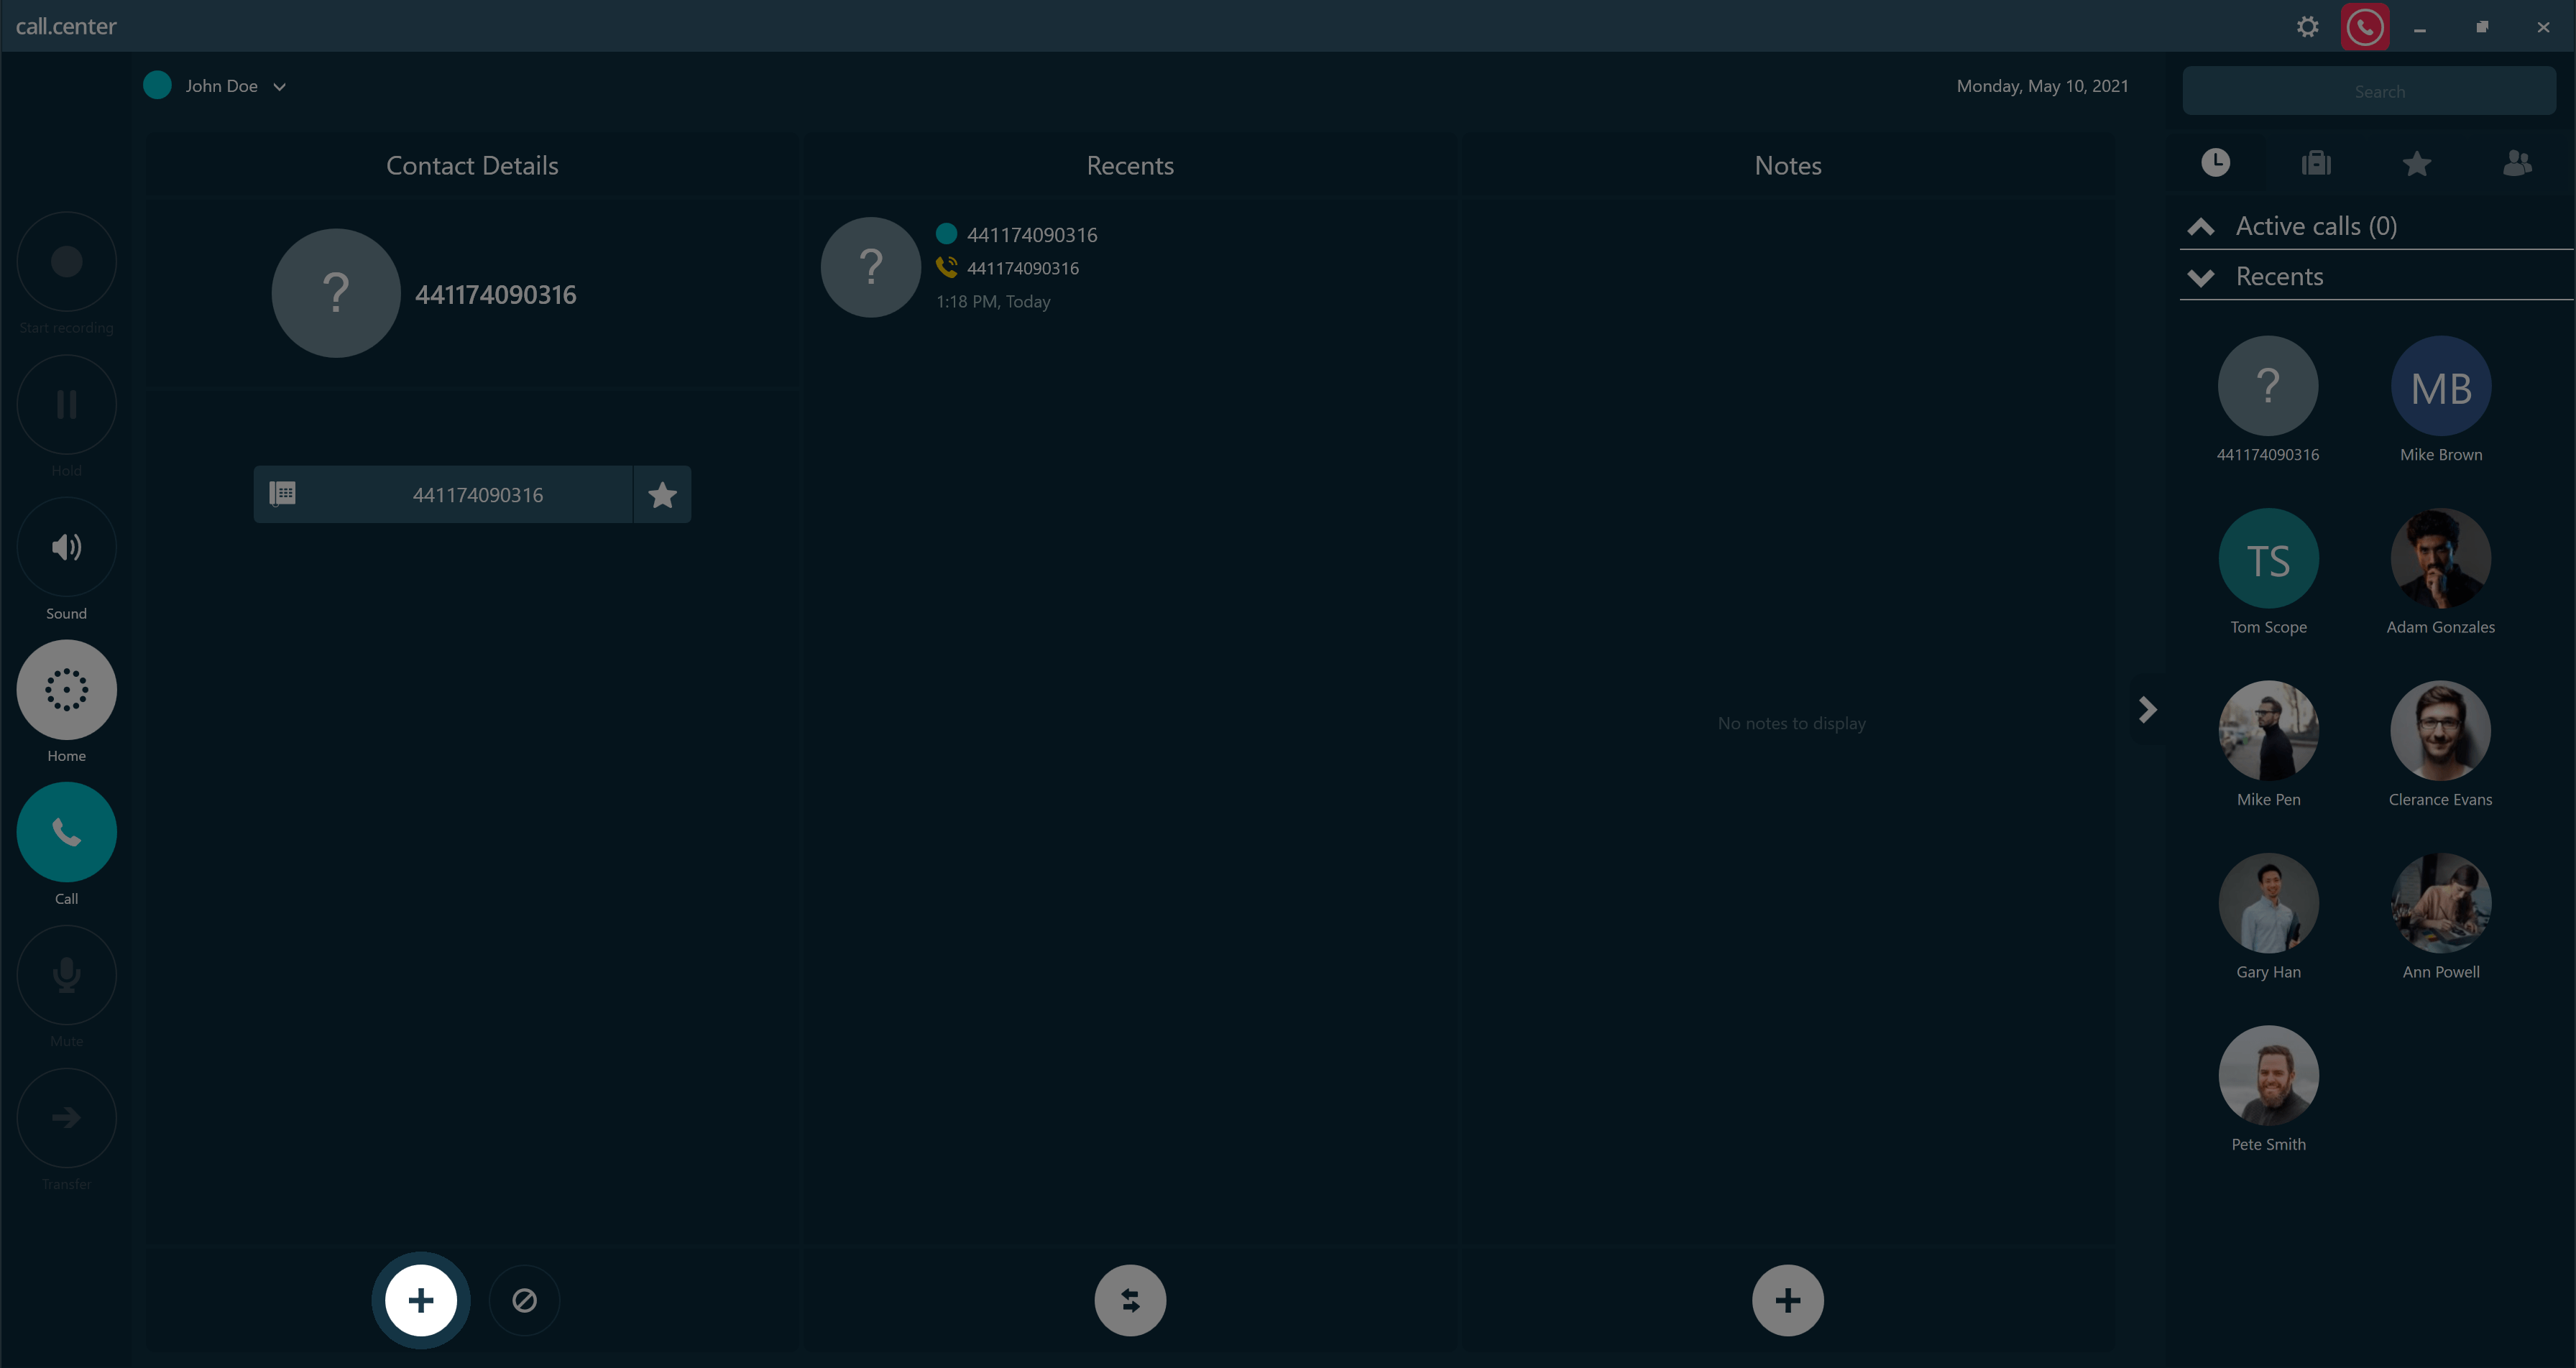
Creating a contact from a recently used phone number
- Click on the selected phone number from the Activities Wheel or from the Recents tab to display the Contact Details tab.
- Click on the “PLUS” button to display the Create Contact dialog box.
- The Contact name must be entered, and optional details for the fields Position, Department and Company may be entered.
- Select the type of account from the Account drop-down list.
- Click the Confirm button to save the information. The new contact that you have created will now be displayed in the Contacts area.
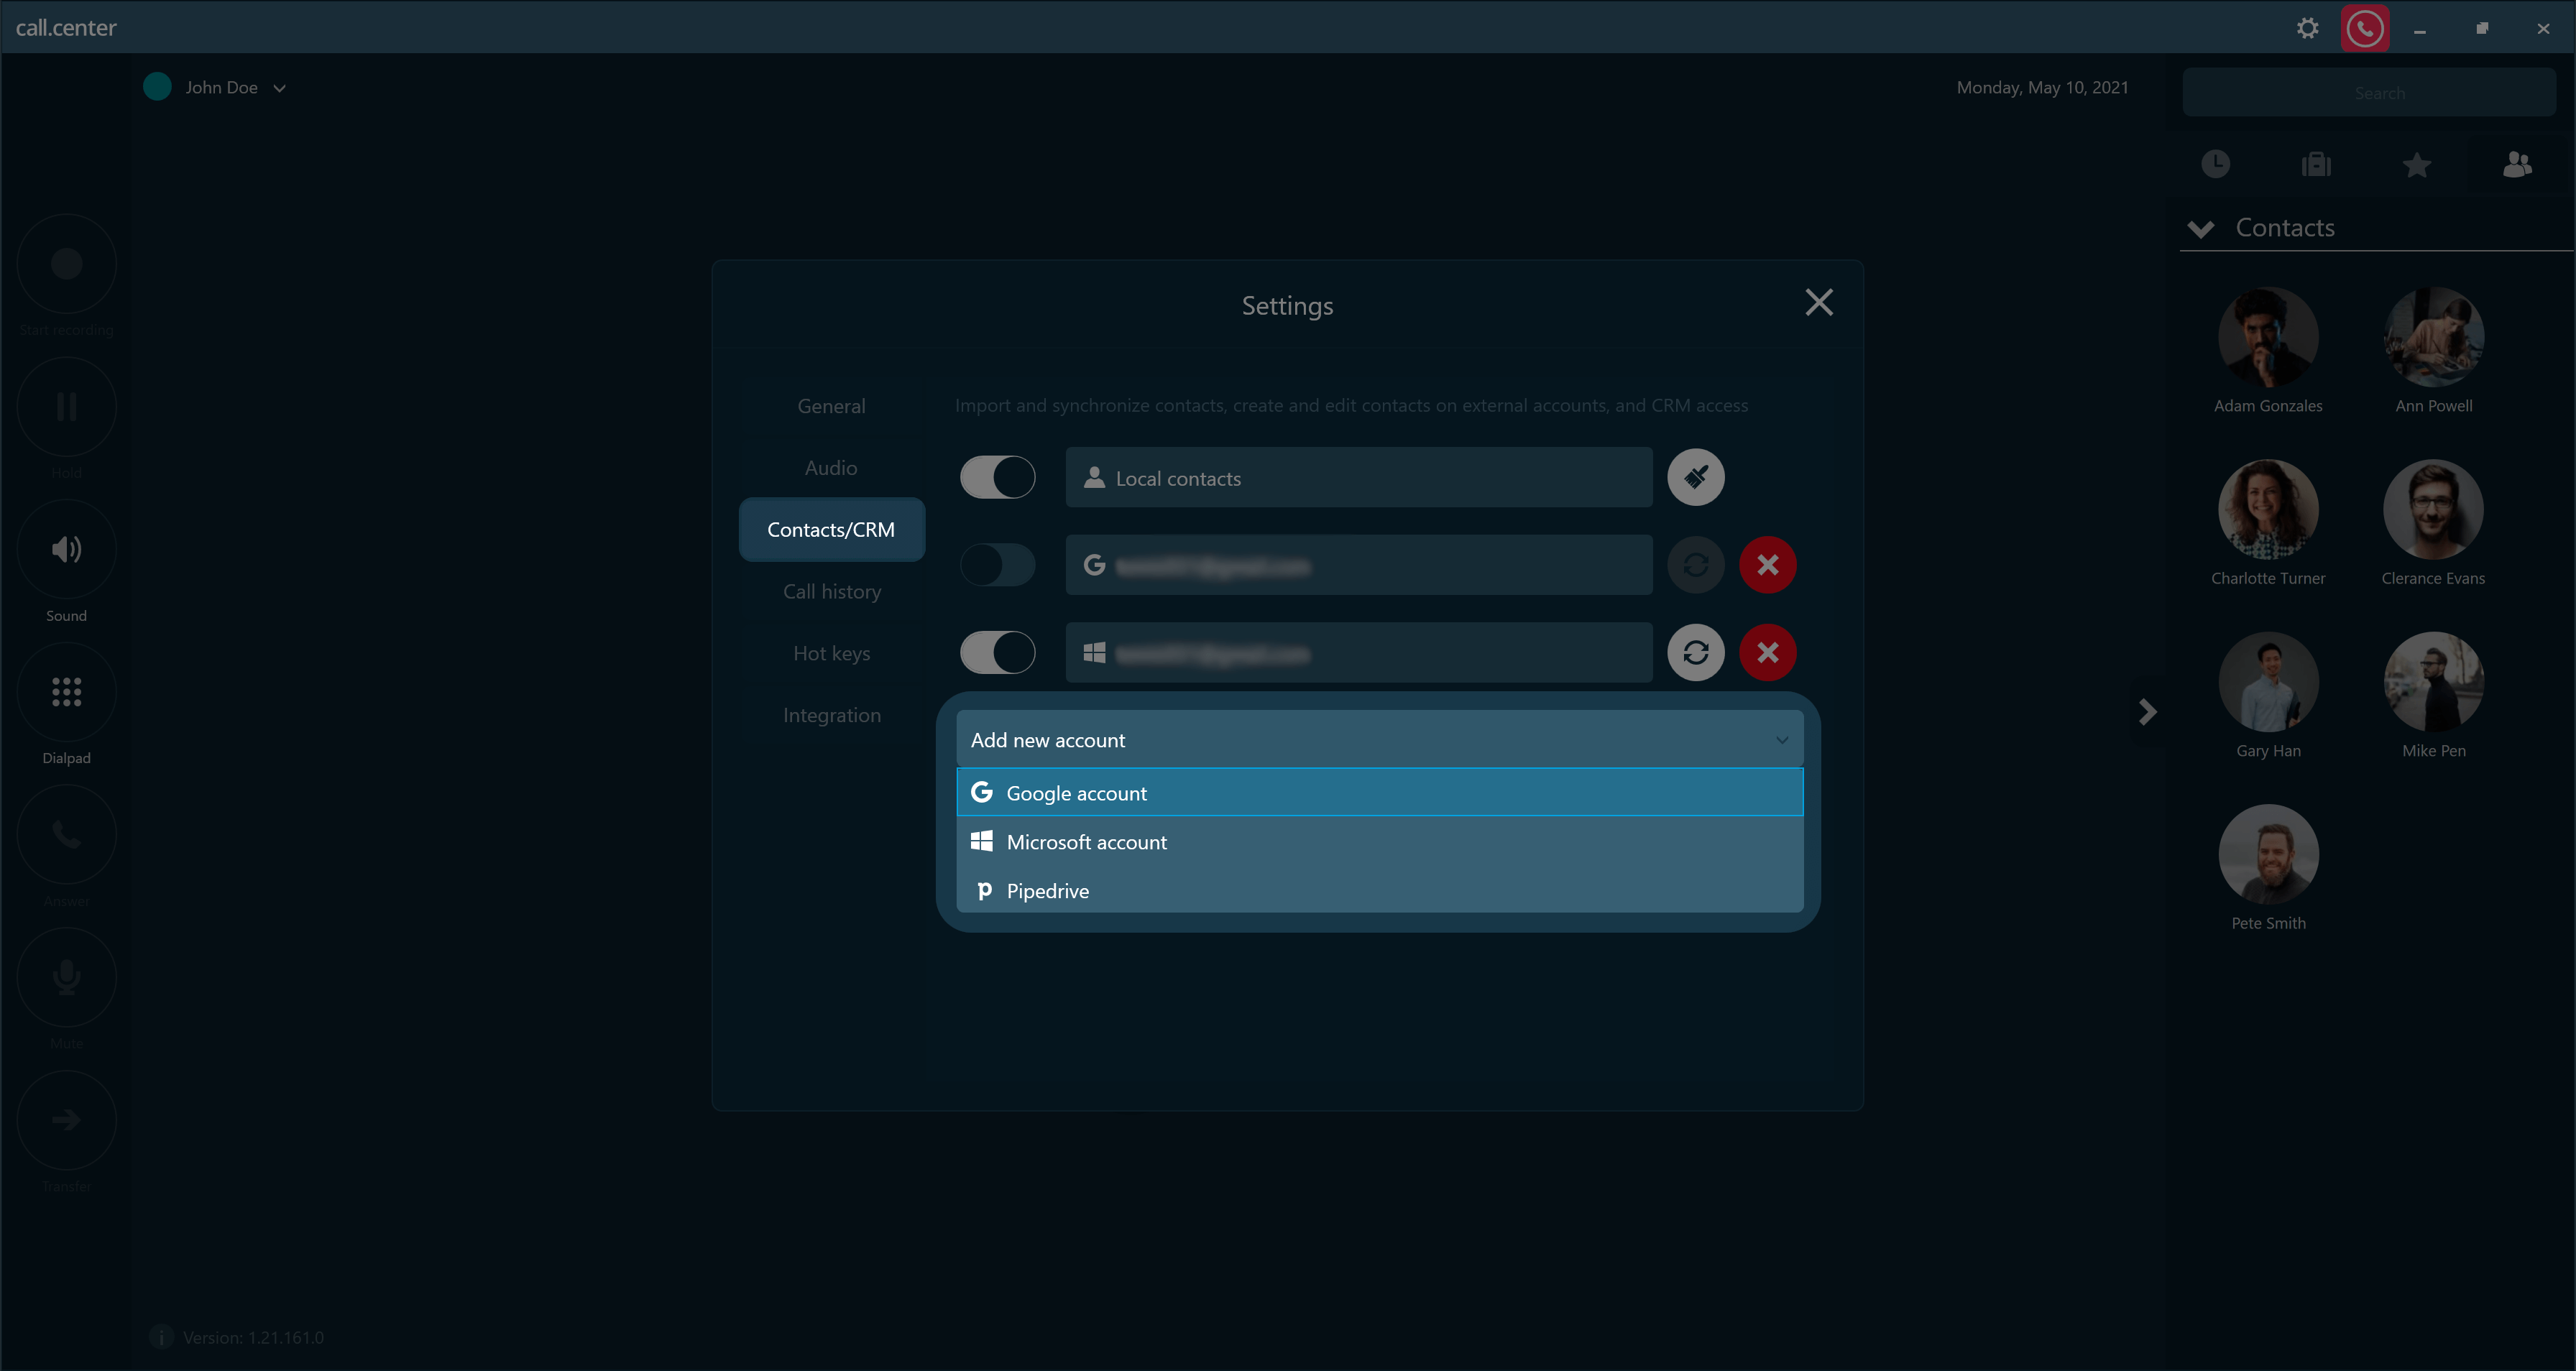
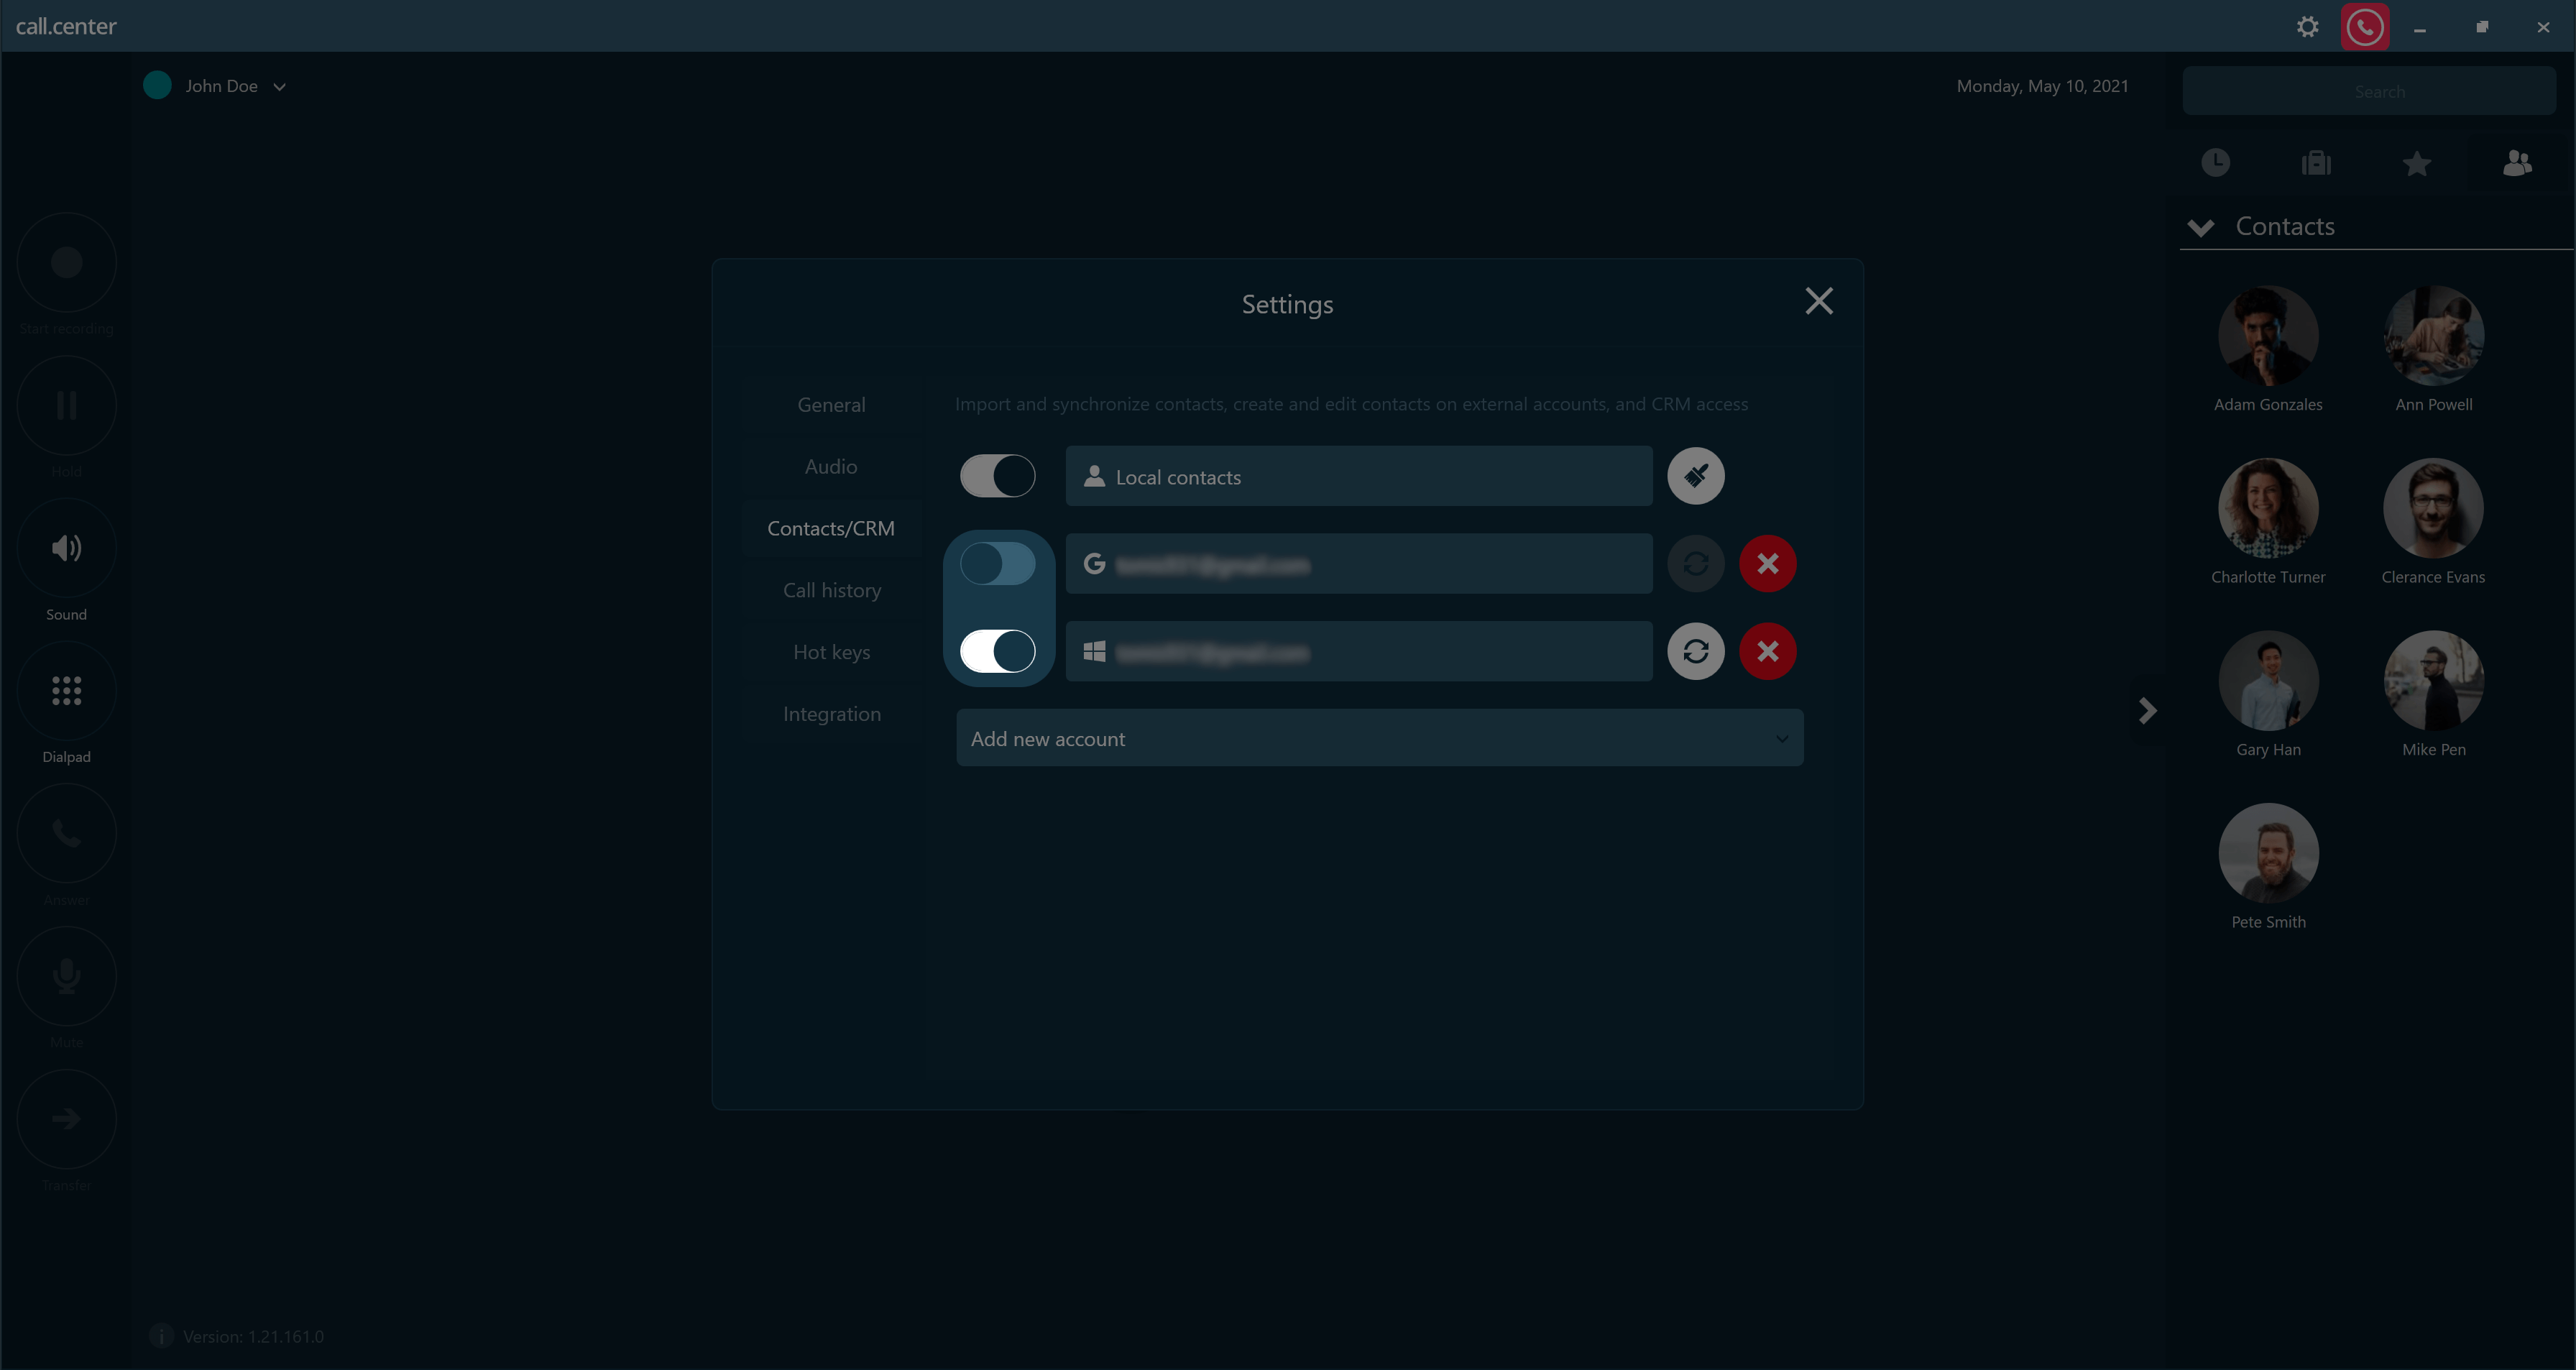
Importing contacts from external accounts or CRM systems
The call.center™ app allows the importing of contacts from external accounts or CRM (Customer Relationship Management) systems. Contacts that have been imported from external sources may then be edited, removed and re-synchronized on your device. New contacts can also be created and synchronized between a call.center™ device and external contacts.
Currently, users can import contacts from the following external accounts and CRMs:
- Google Account
- Microsoft Account
- Pipedrive CRM (only for Windows platform)
Importing contacts on a Windows platform
- Click on the Settings button located on the home screen.
- Select the Contacts/CRM tab.
- From the drop-down menu, select the external accounts or CRM from which the contacts should be imported.
- Log in using the external account credentials to import the contacts.
Managing imported contacts
Enabling or disabling an external account/CRM
Imported contacts can be temporarily disabled without removing the external account. This can be done by Enabling/Disabling usage of the external account via a toggle button.
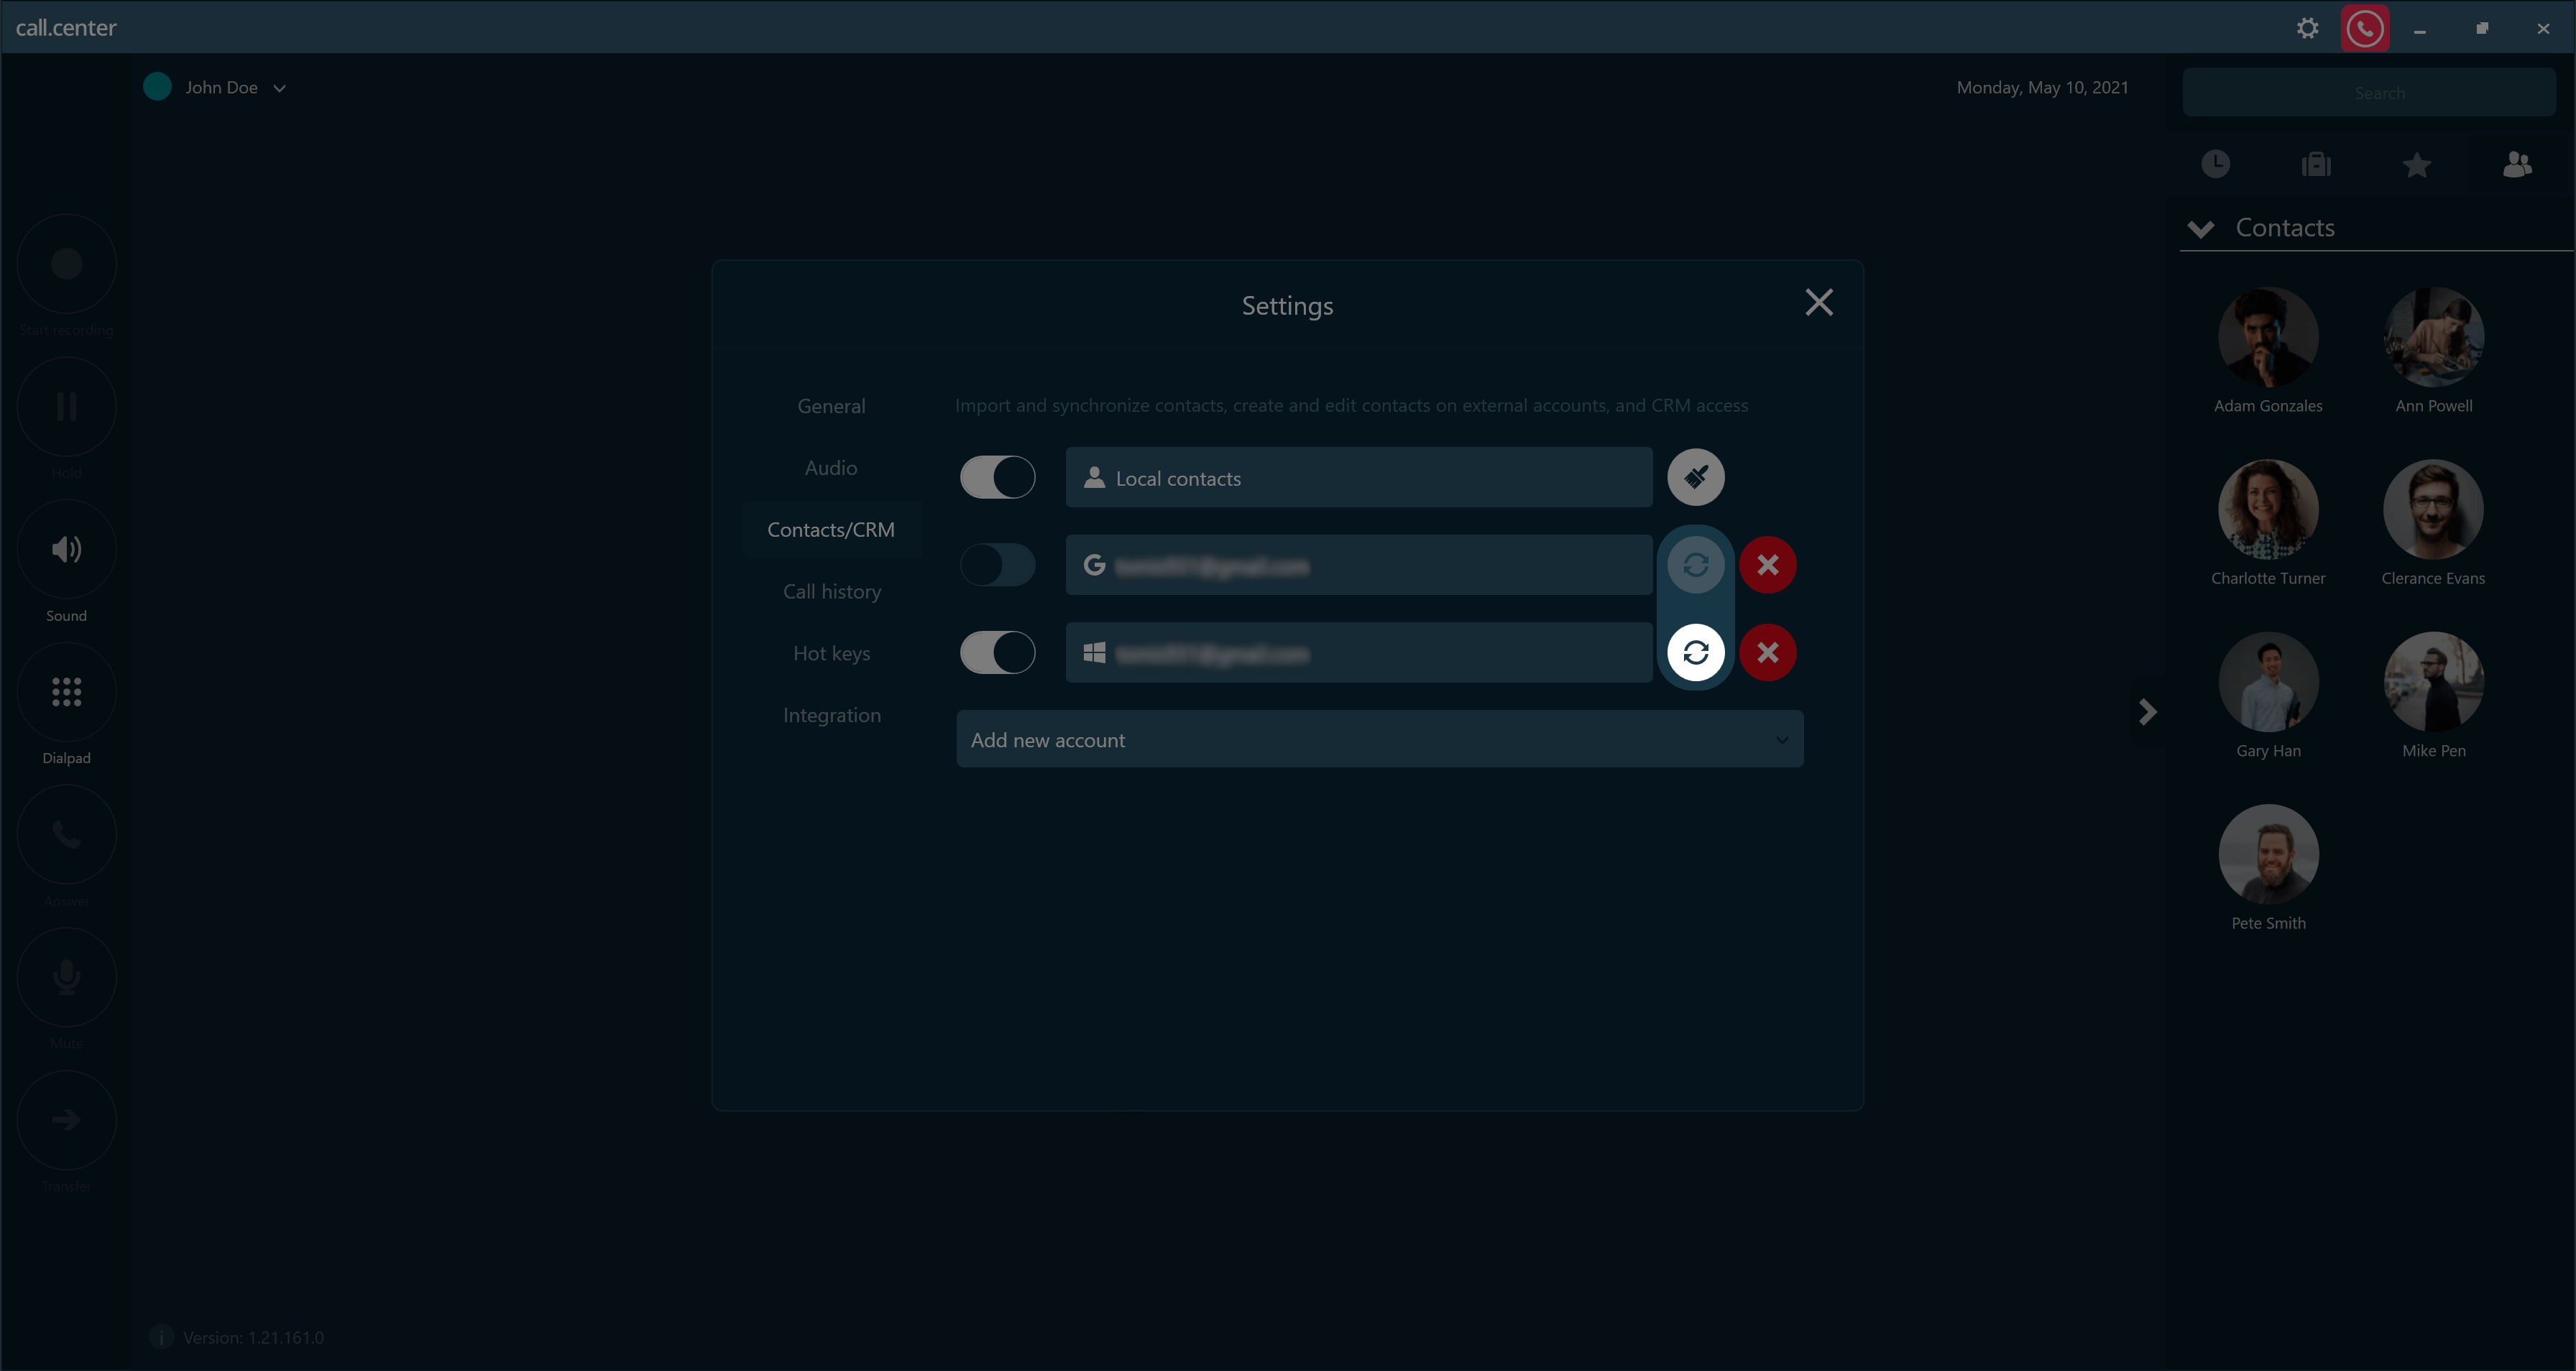
Re-synchronizing the external account/CRM
Although contacts are synchronized every time the call.center™ application is launched, it may be necessary to re-synchronize the contact details between call.center™ and a third-party account/CRM if changes were made to the contact information. This action will update the contact information on both the call.center™ device and the external account.
To re-synchronize contacts, press the “Re-sync” button located next to the external account listing.
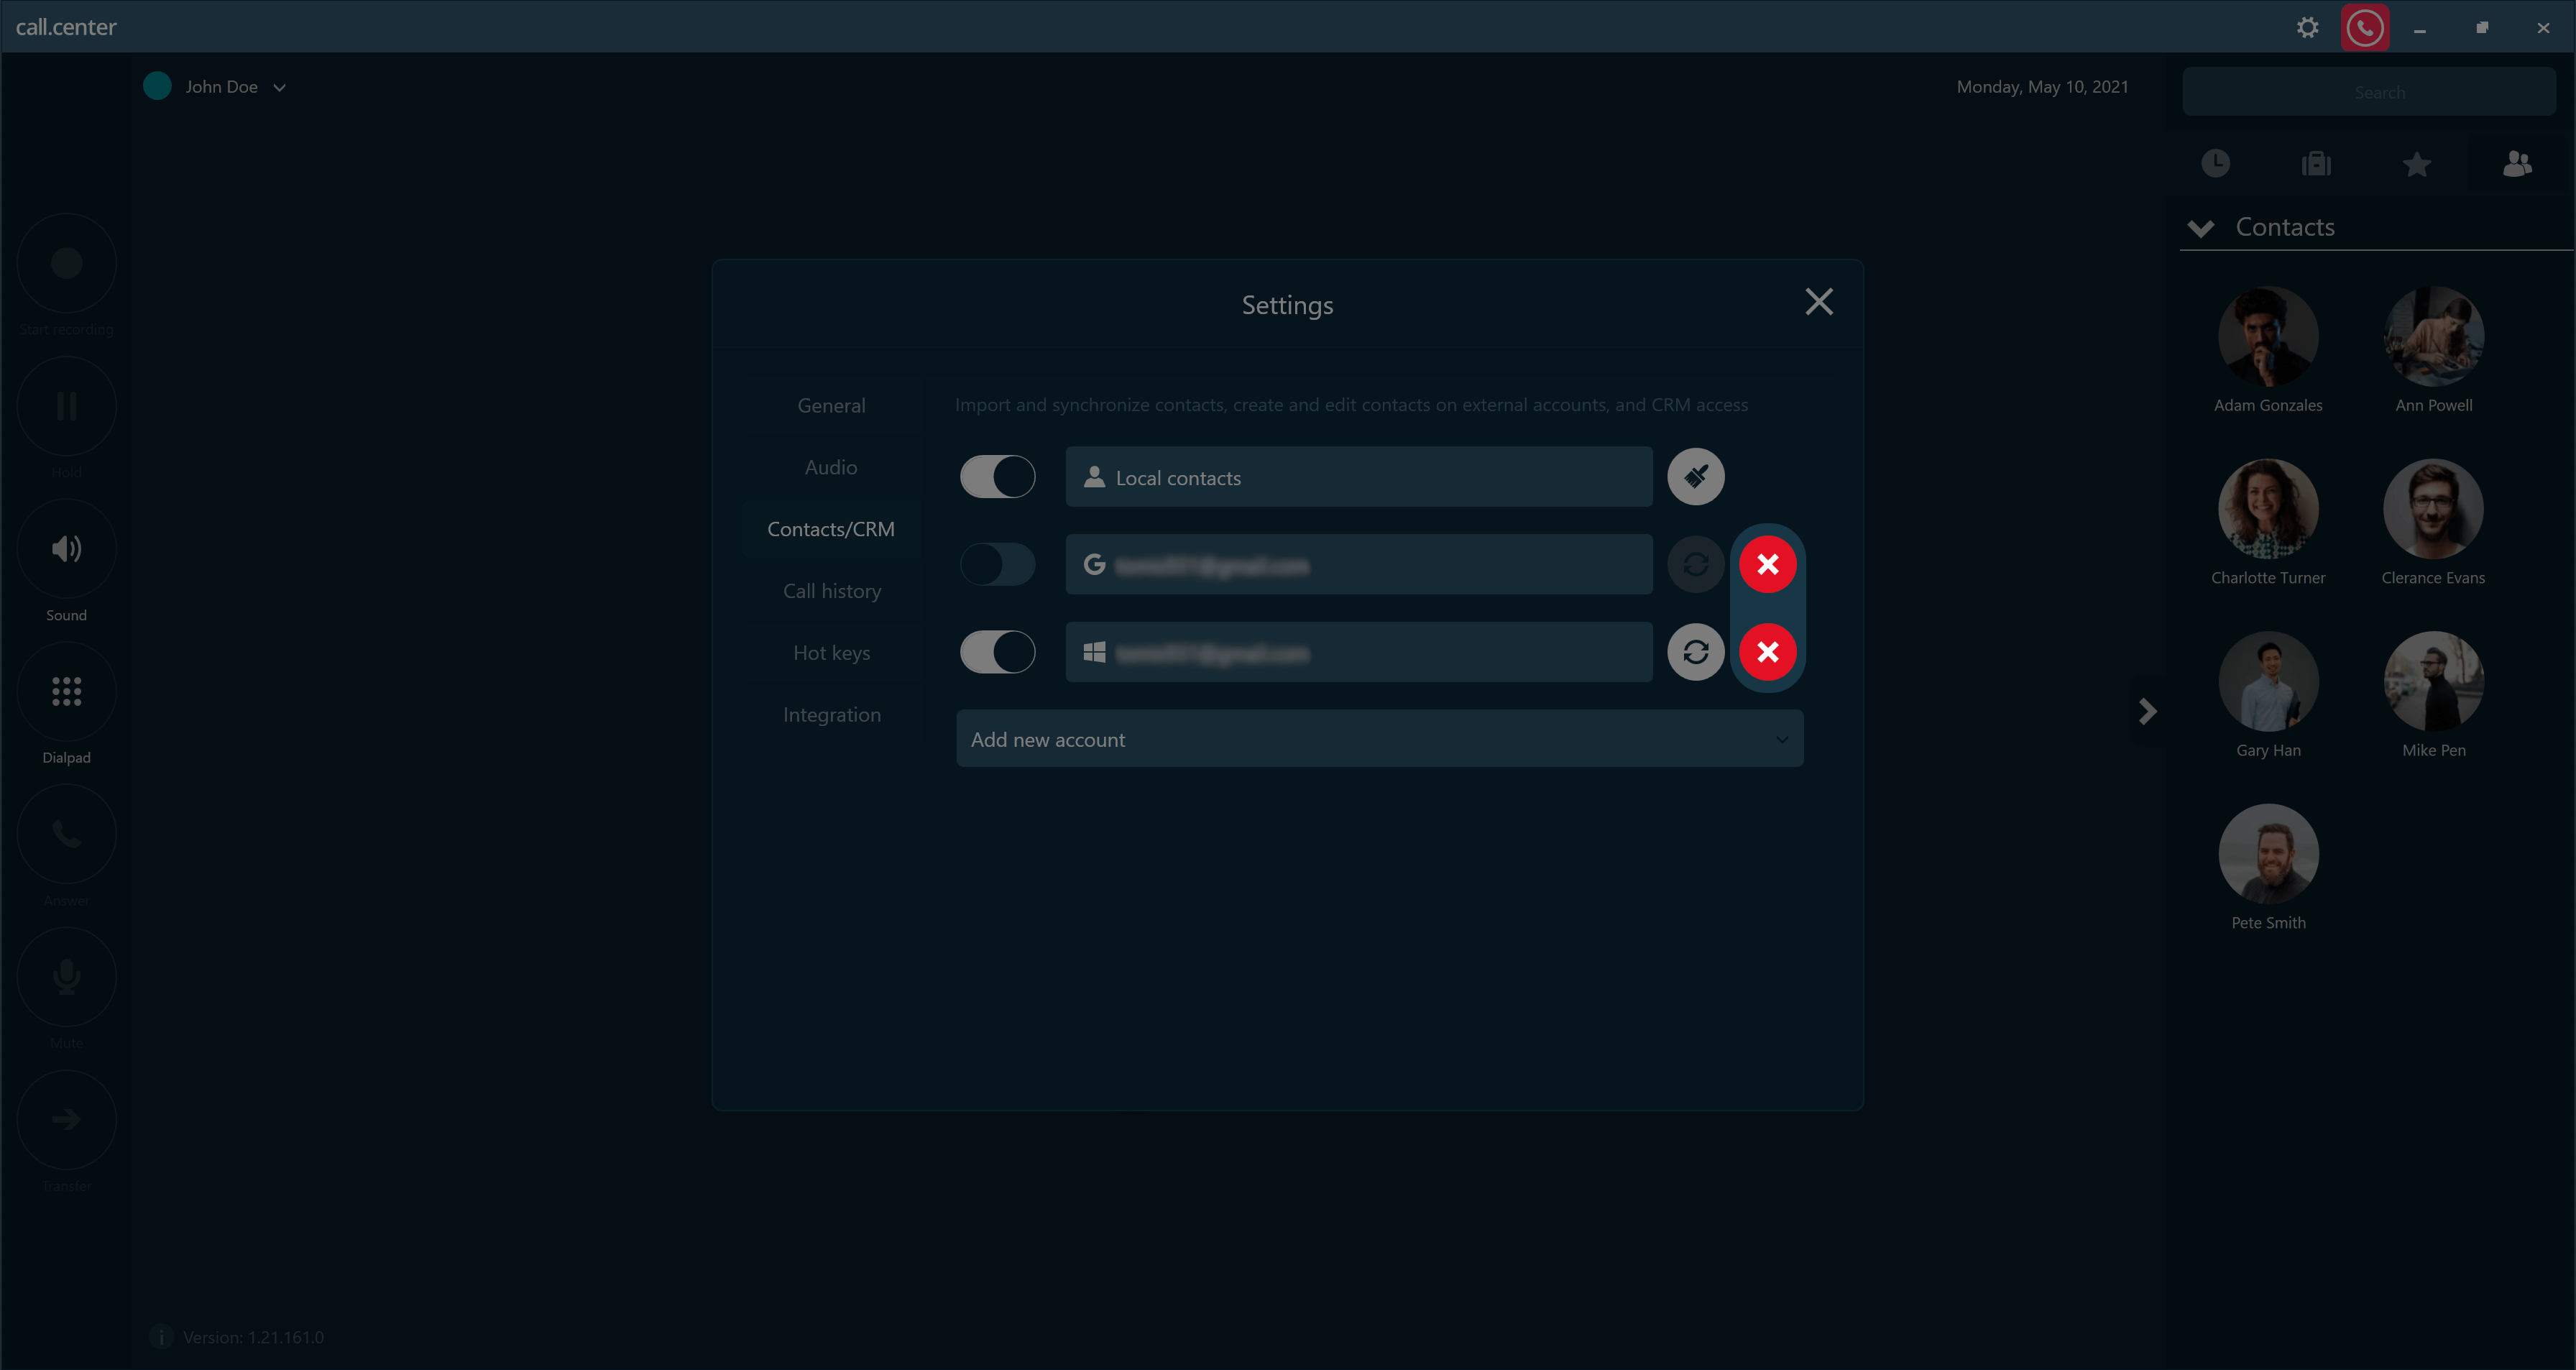
Removing an external account/CRM
Access to imported contacts may be permanently disabled by pressing the “Remove” button, and then confirming that you wish to delete the external account.
 Back to the top
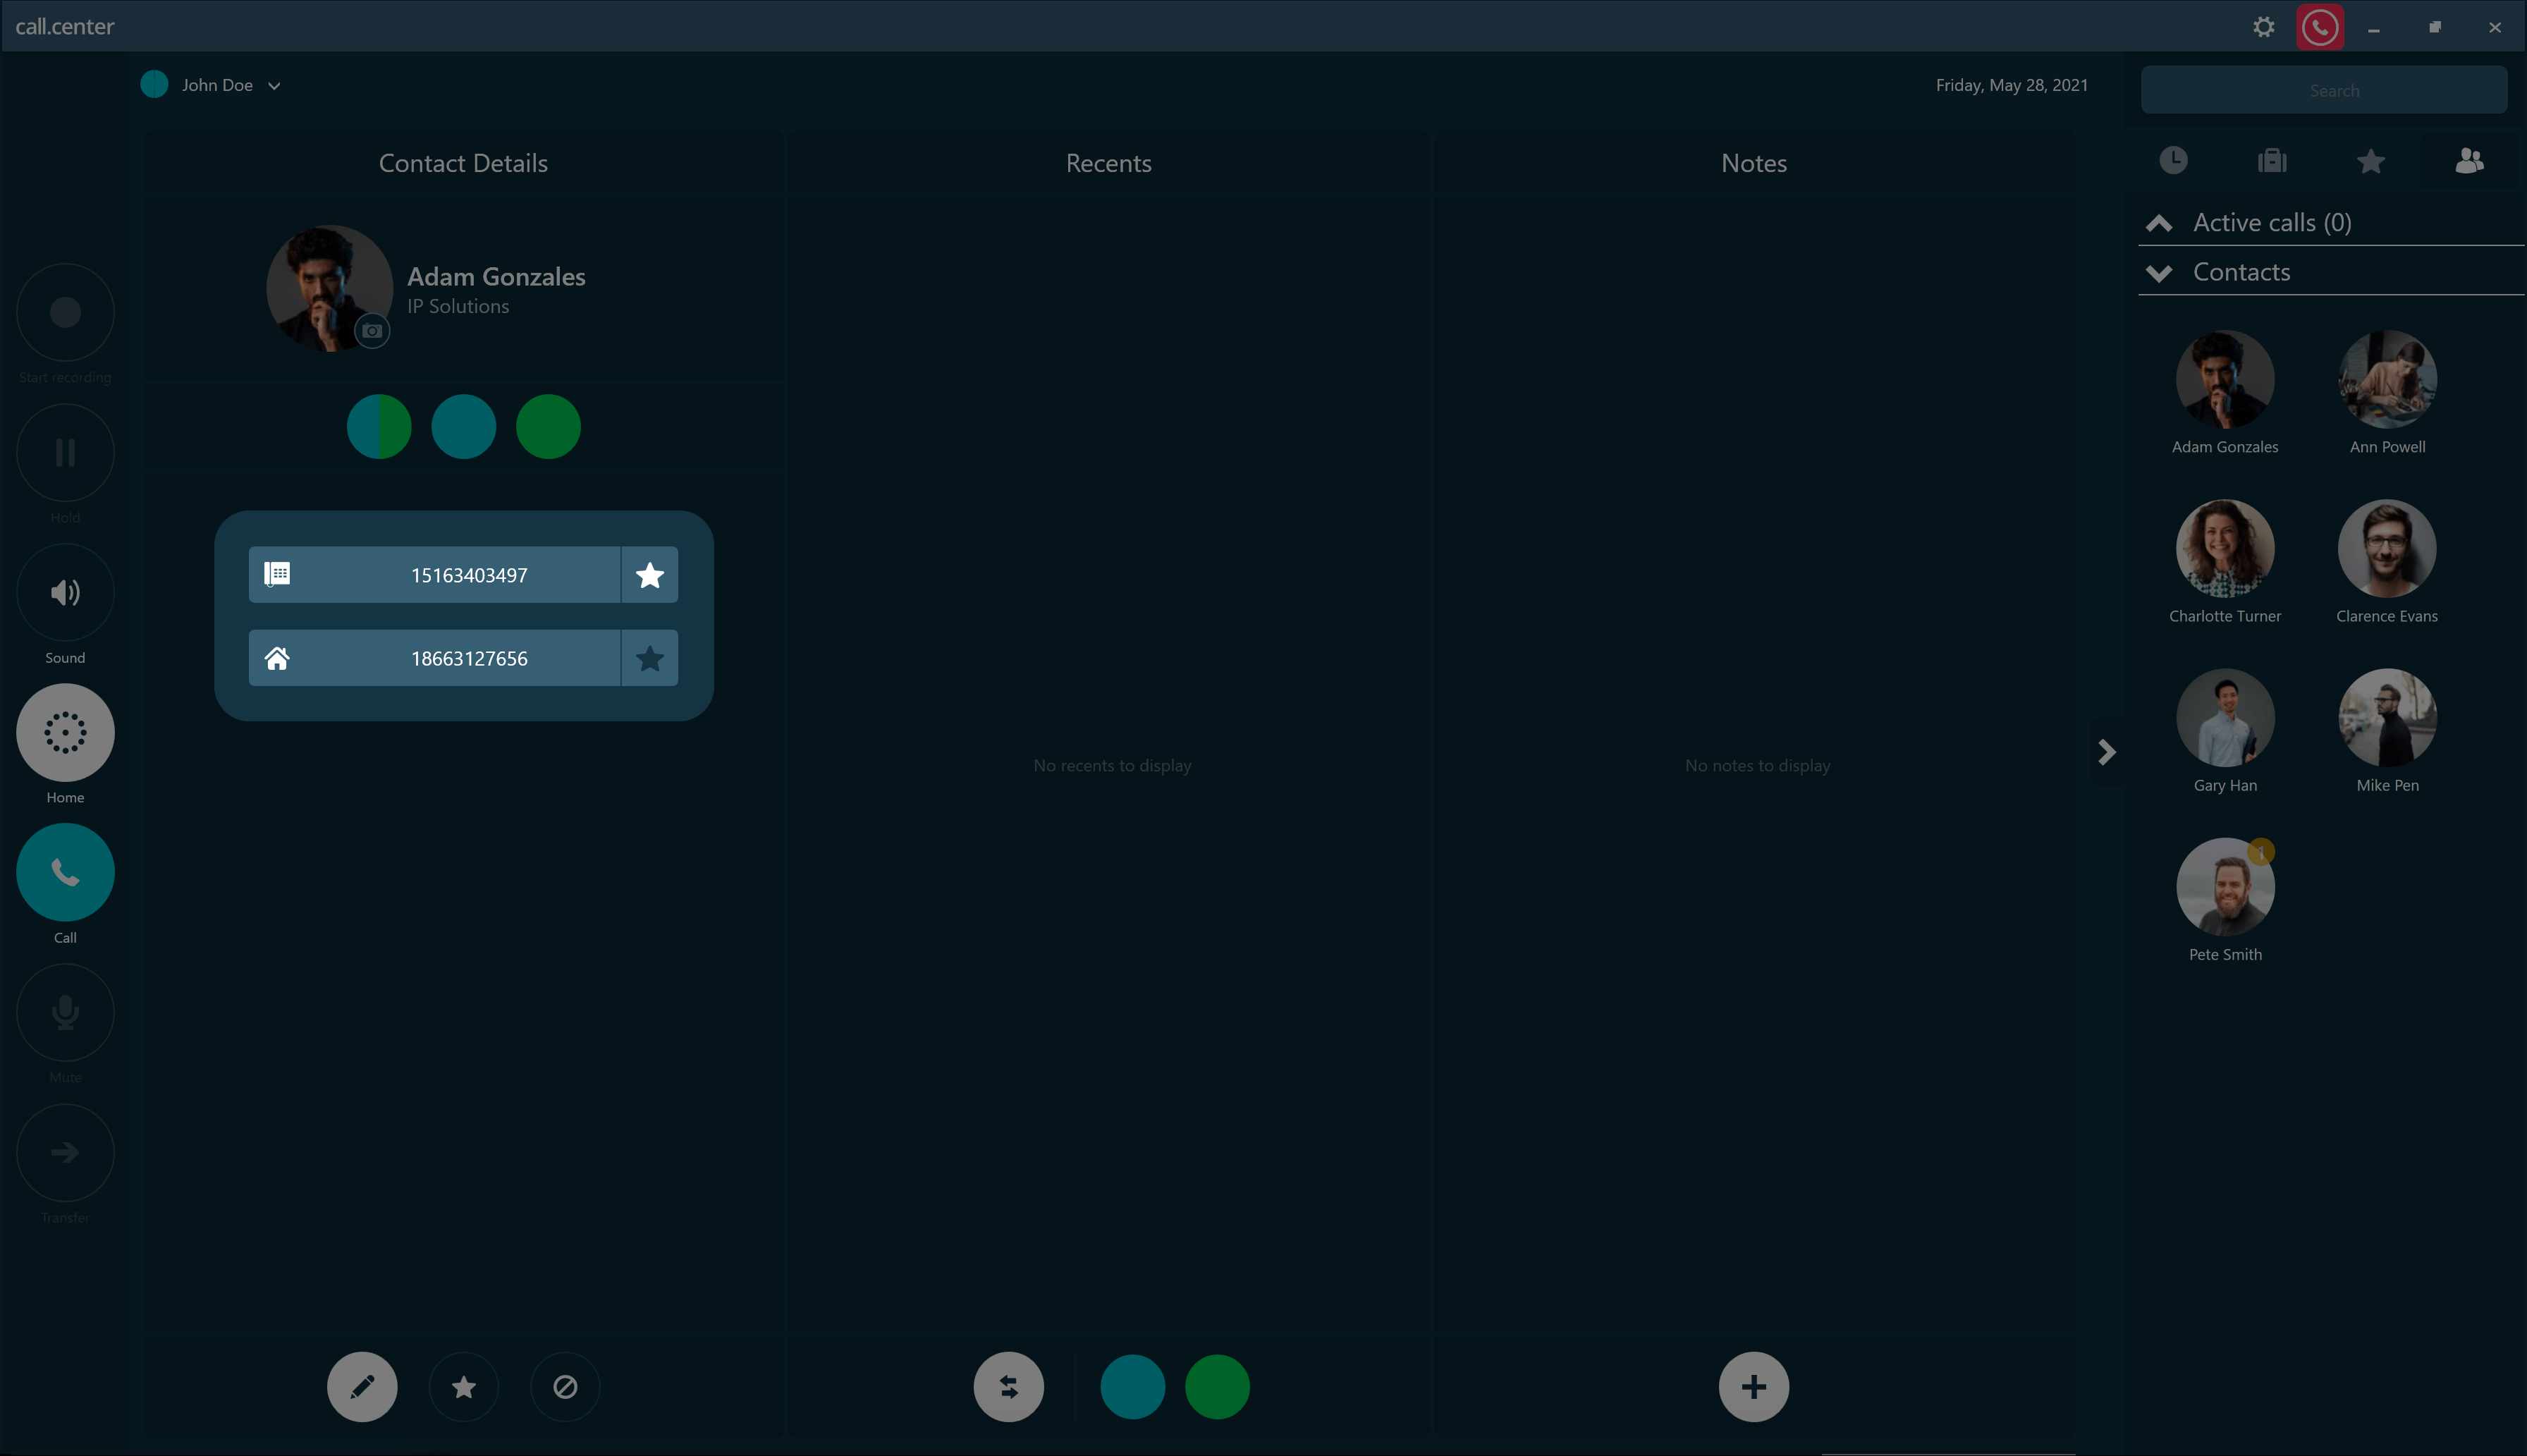
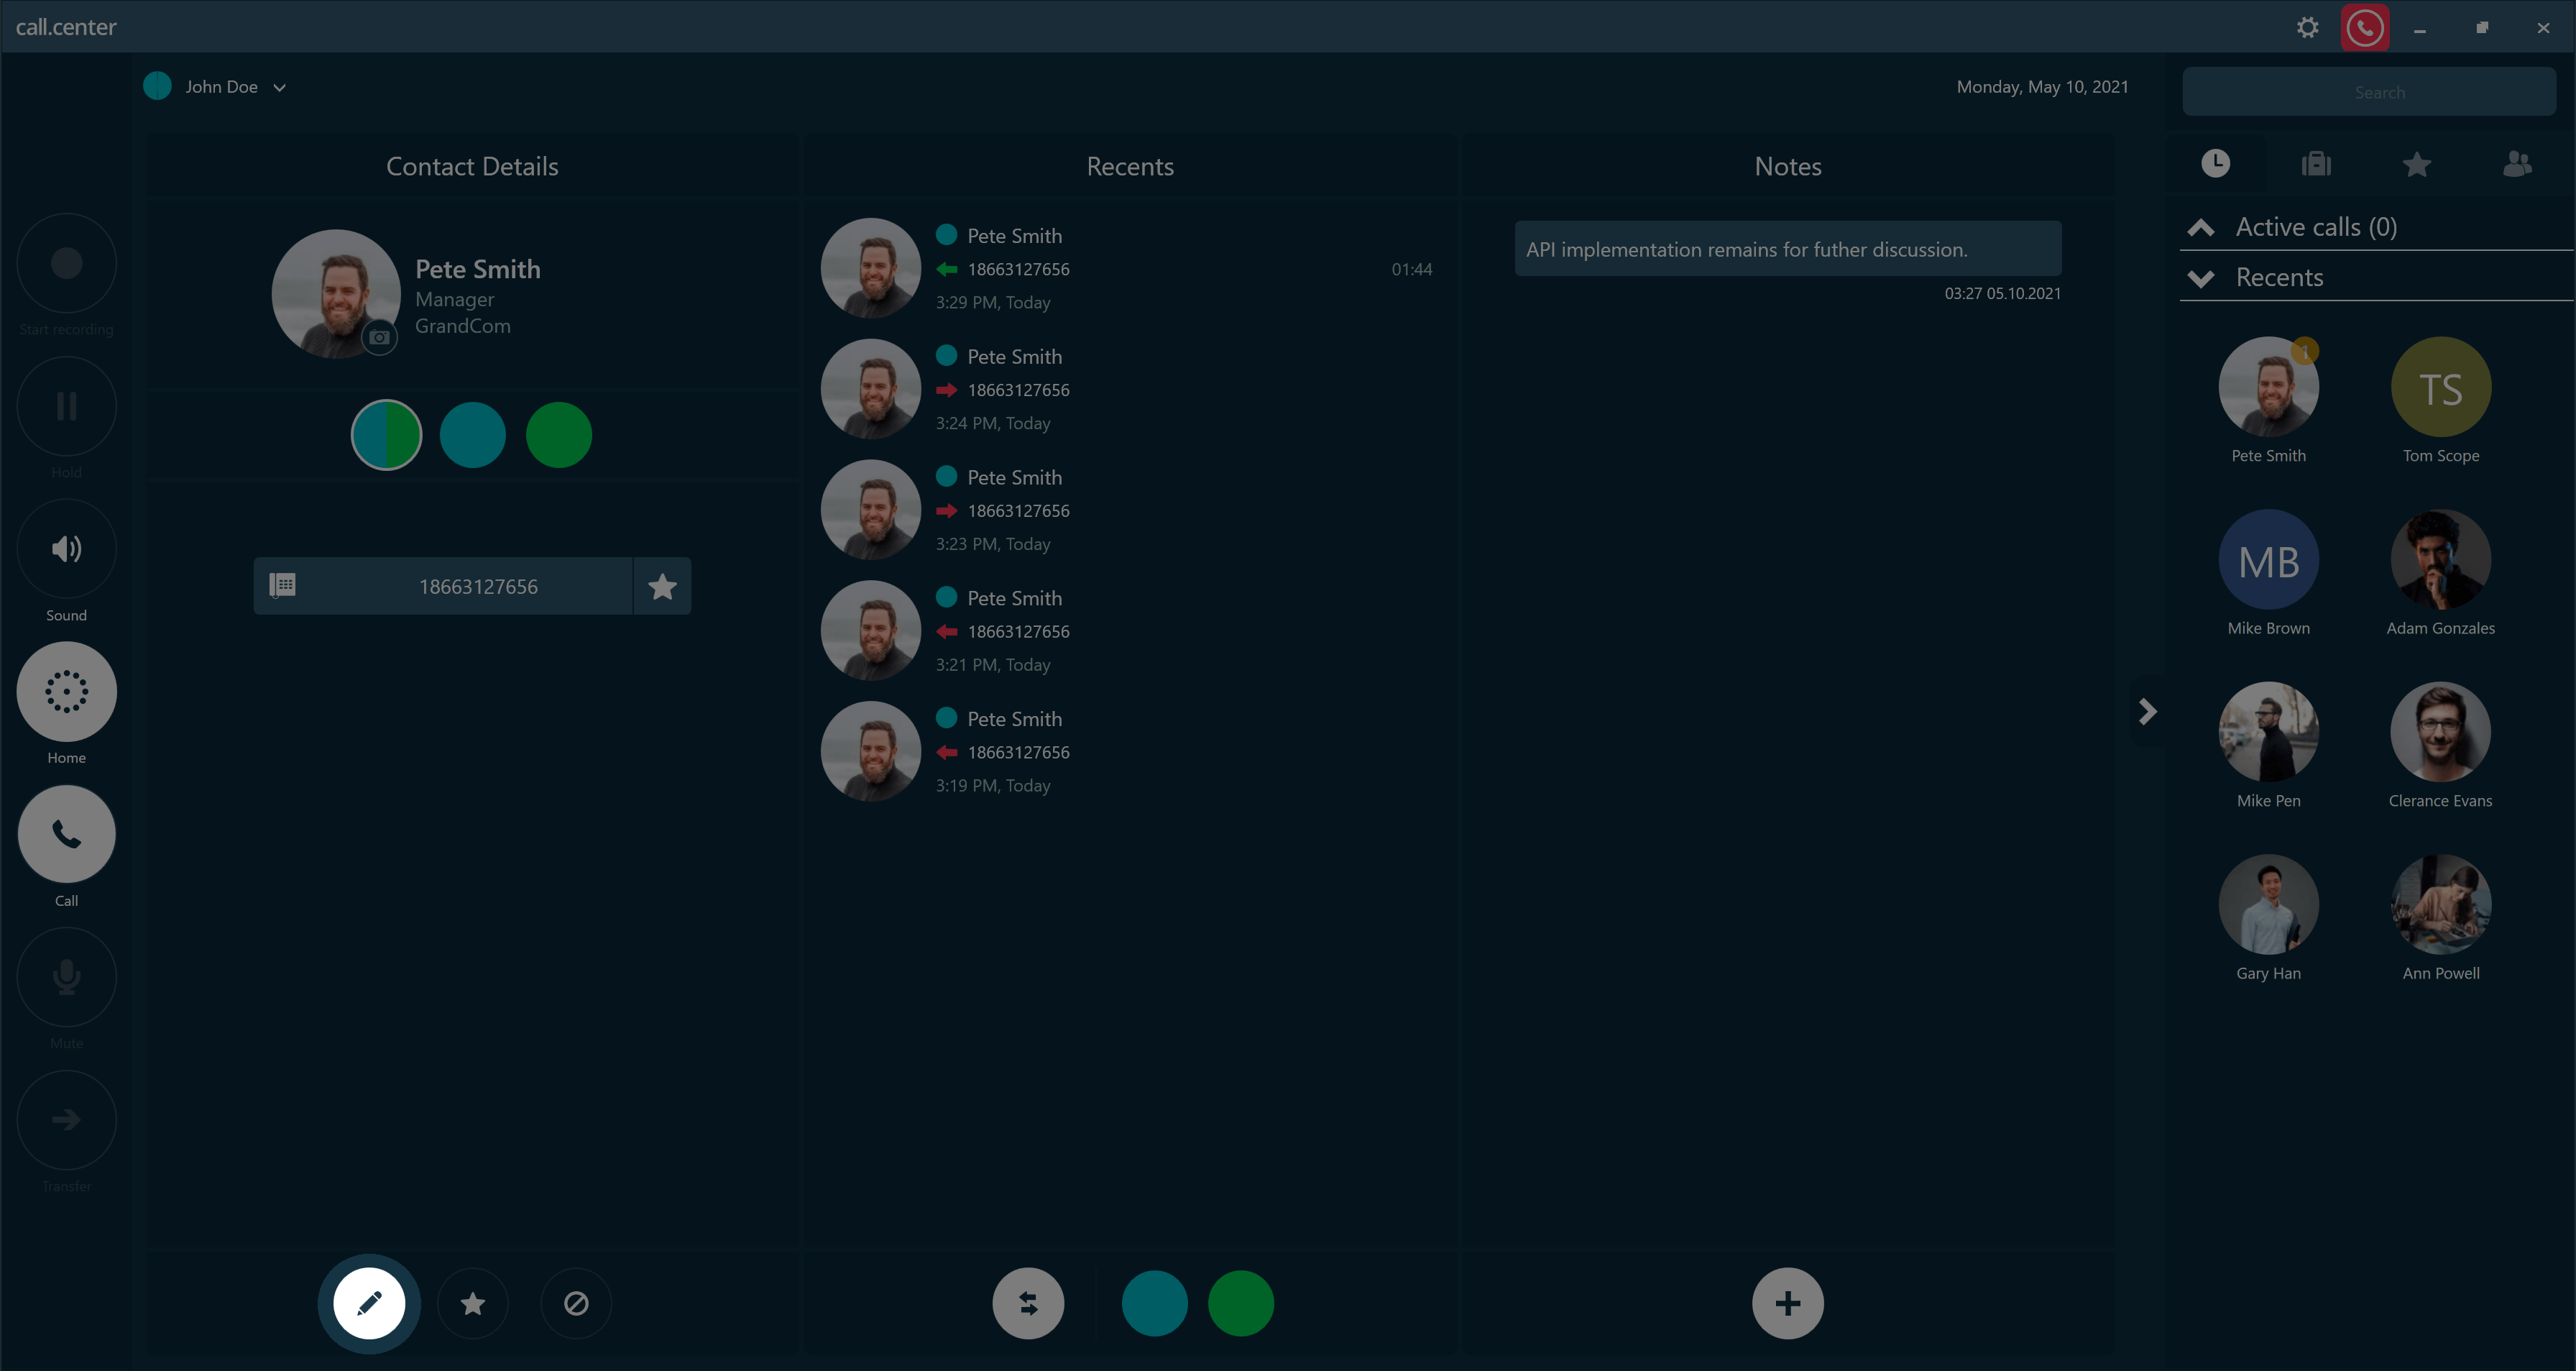
Contact Info window
To access the Contact Info window, click on the specific contact’s avatar.
In the Contacts Info window you are able to:
- Review and filter your recent calls with that contact
- Add, edit and delete personal notes
- Play call recordings
- Add Contact to Favorites
- Block a Contact
- Select default SIP line
- Select default phone number
Review your call history with that contact, with the ability to display specific results by using the filters provided at the bottom of the Recents section.
Manage notes that are associated with this contact.
Recorded calls are designated by a recording icon being displayed next to the phone numbers that are listed in the Recents section. To listen to a recorded call, right-click on that call and select Play.
A Contact may be added to Favorites from the Contacts Info window, by clicking on the Star icon/button.
A Contact may be blocked from the Contacts Info window, by clicking on the Block icon/button.
If you have multiple SIP lines, you may select the SIP line that will be used by default when making outgoing calls to this contact.
If the contact has more than one phone number assigned, you may select which one of those phone numbers will be used by default when calling that contact.
If your contact has more than one phone number assigned, you may select which one of those phone numbers will be used by default when calling this contact.
 Back to the top
Editing contact details
- To edit contact details, click on the relevant contact’s avatar from the Home screen to display the Contact Info window.
- Click the Edit button located in the Account Details section to display the Edit Contact dialog box.
- Edit the information as required and then click the Confirm button to save.

Note that the forms and screens used to manage contact information are dependent on your operating system, and also on where the contact information has been saved.
Deleting a contact
- To delete a contact, click the relevant contact’s avatar from the Home screen to display the Contact Info window.
- Click the Edit button to display the Edit Contact dialog box.
- Click the Delete button and the contact will be deleted.

If the contact was imported from external sources (such as an existing database), then that contact must be deleted on the service side. Thereafter, the contacts should be synchronized in the call.center™ application.
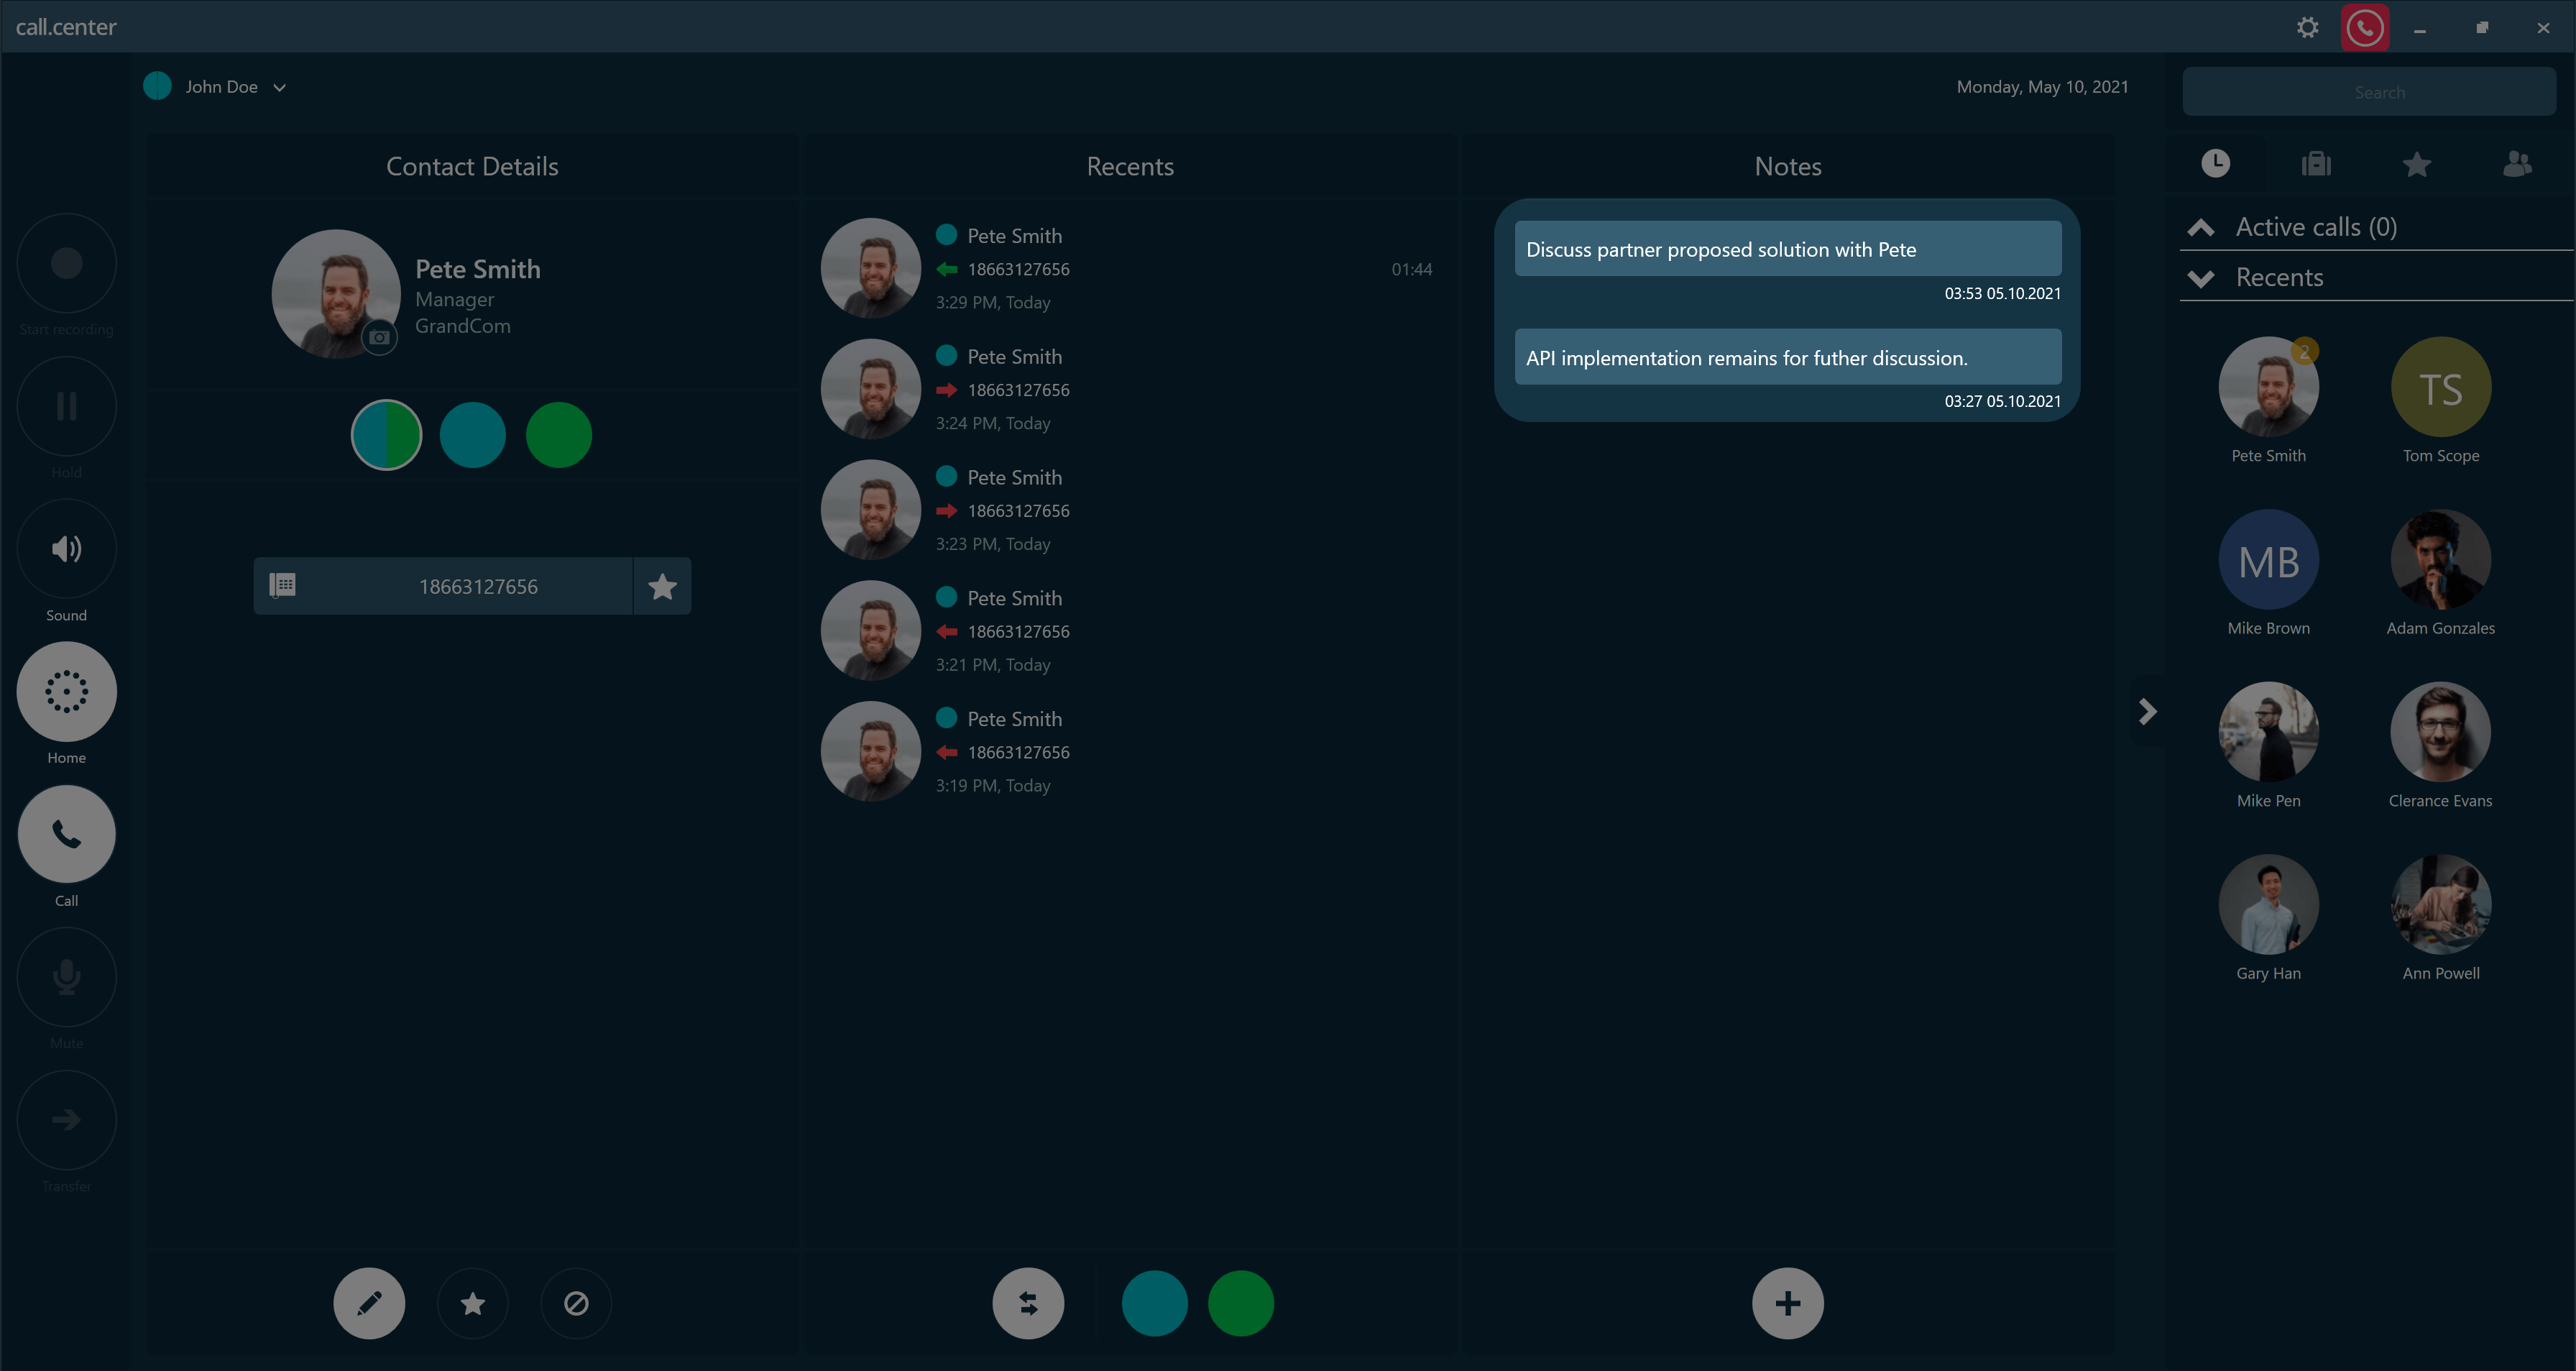
Managing Notes
You can add to, edit, archive or delete a contact or personal notes.
The number shown in a yellow circle on the top right edge of a contact’s avatar indicates the number of notes compiled for that contact.
Adding a Note
- To add a note, click the “PLUS” button located in the Notes section to display the Edit Note dialog box.
- Enter the note text and click the Confirm button to save the text. That note will then be displayed on the Notes panel in the Contact Details window.
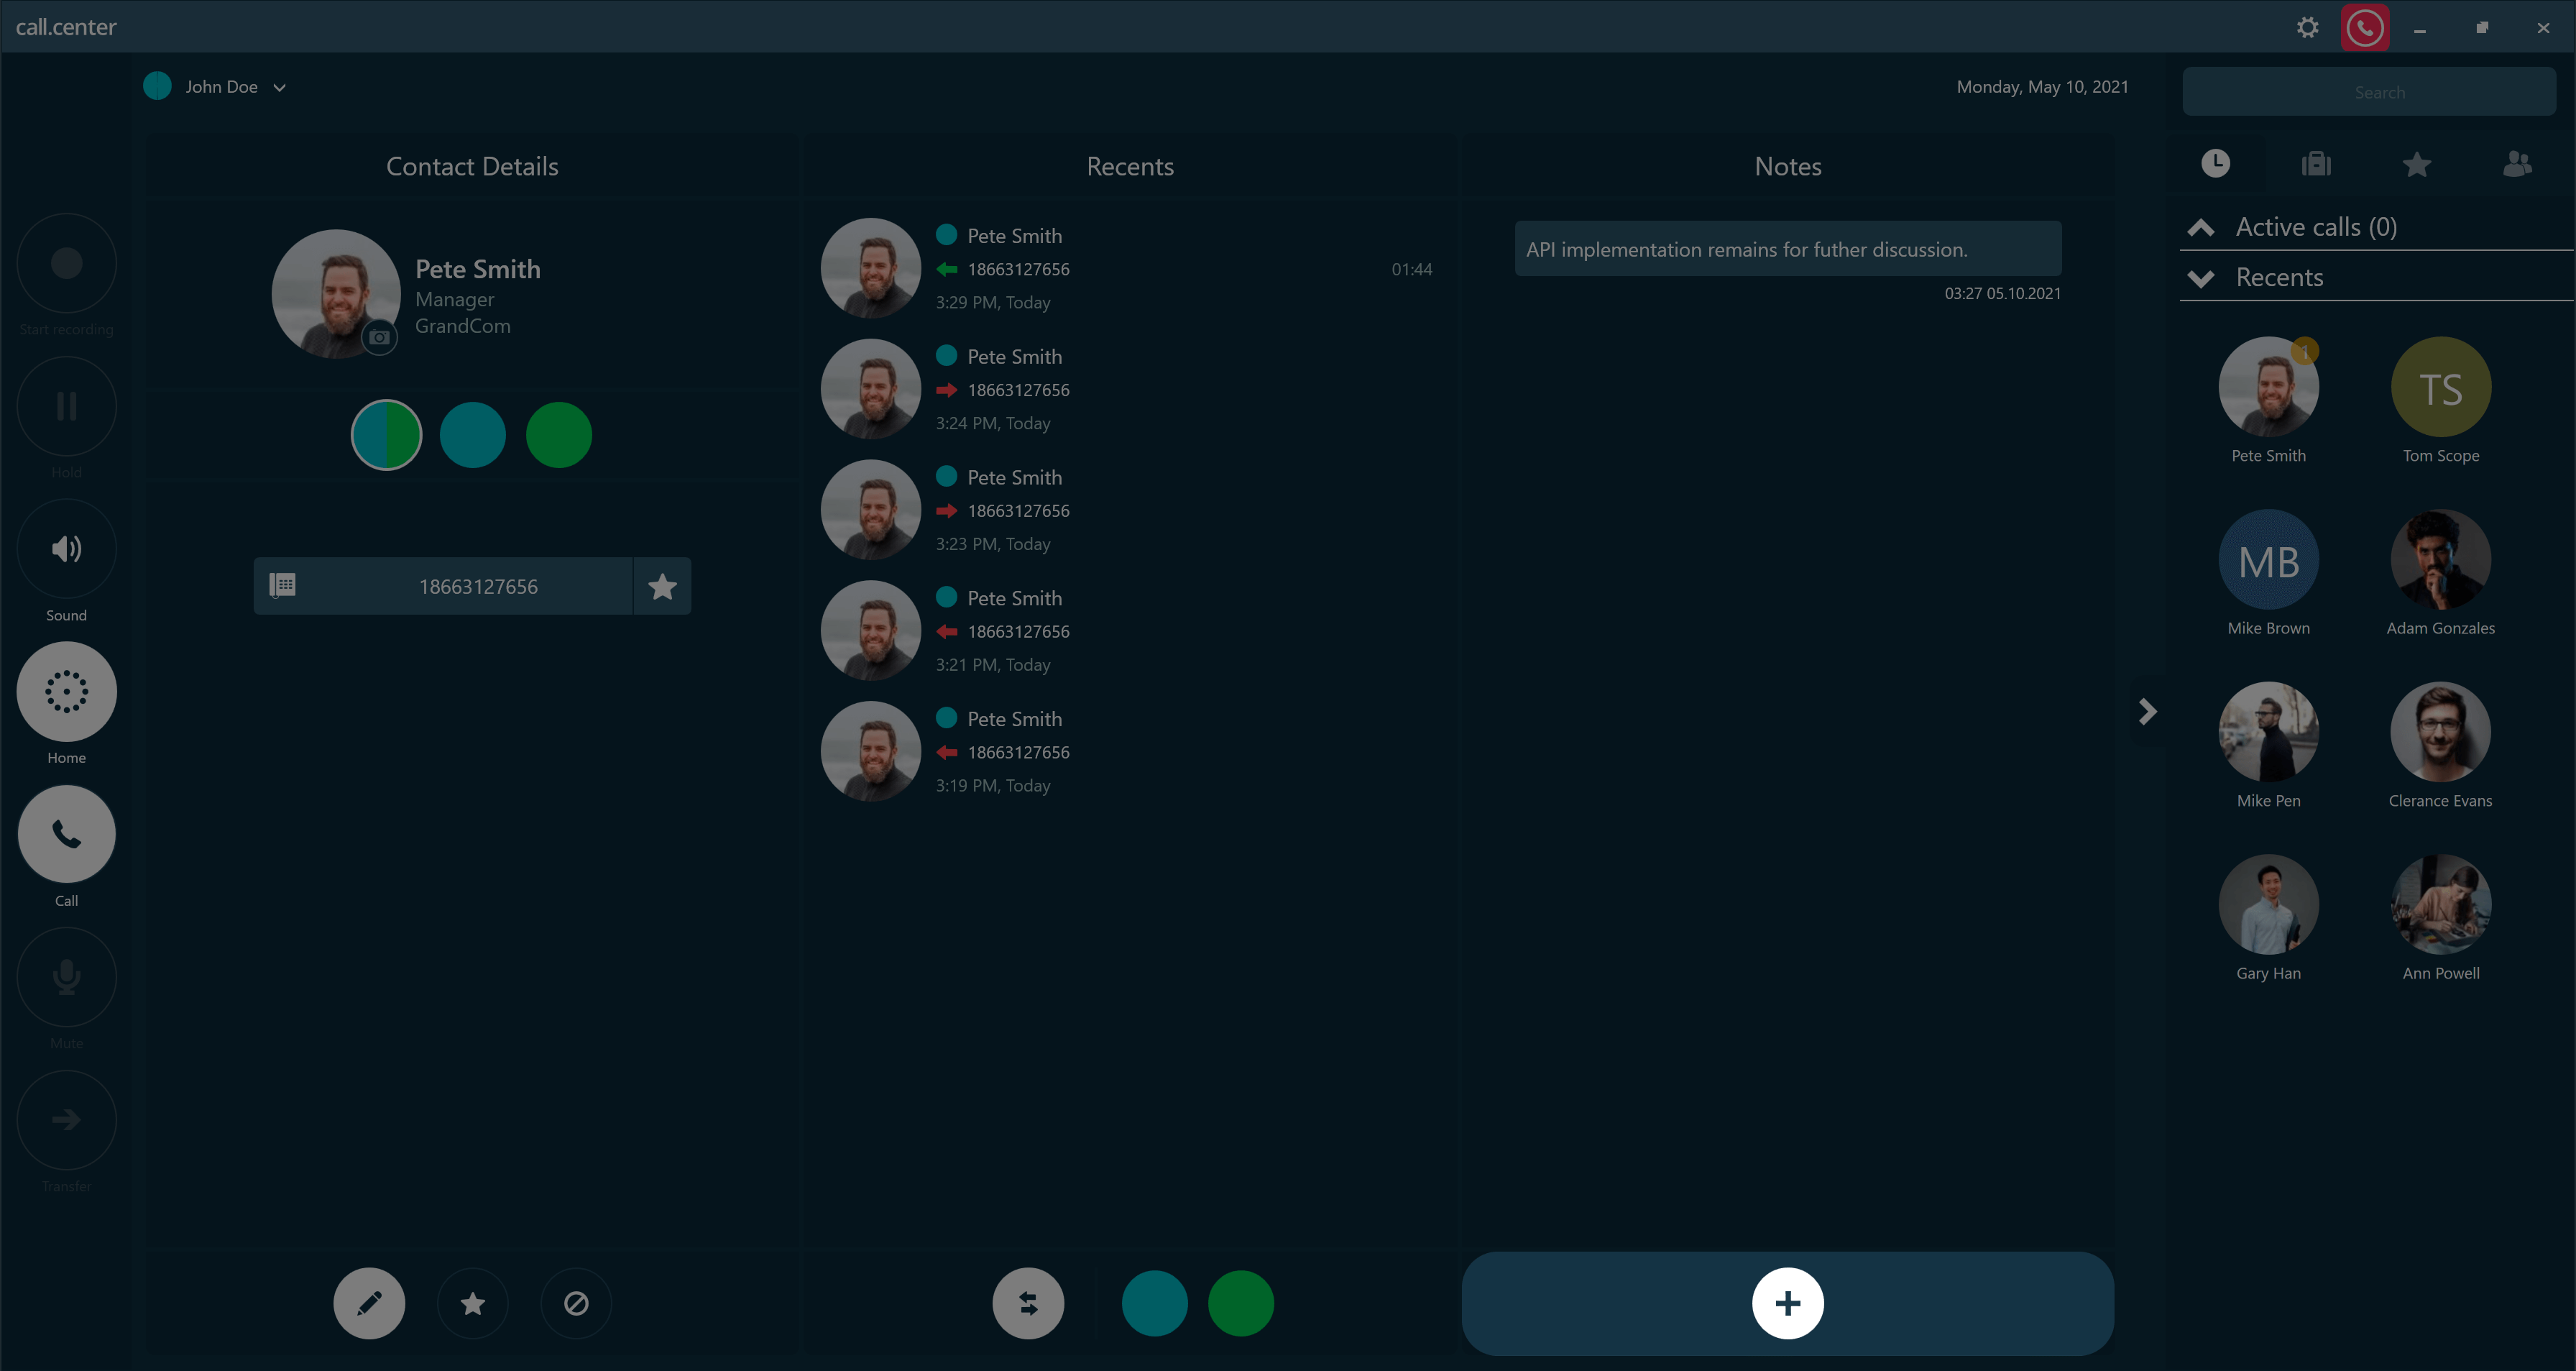
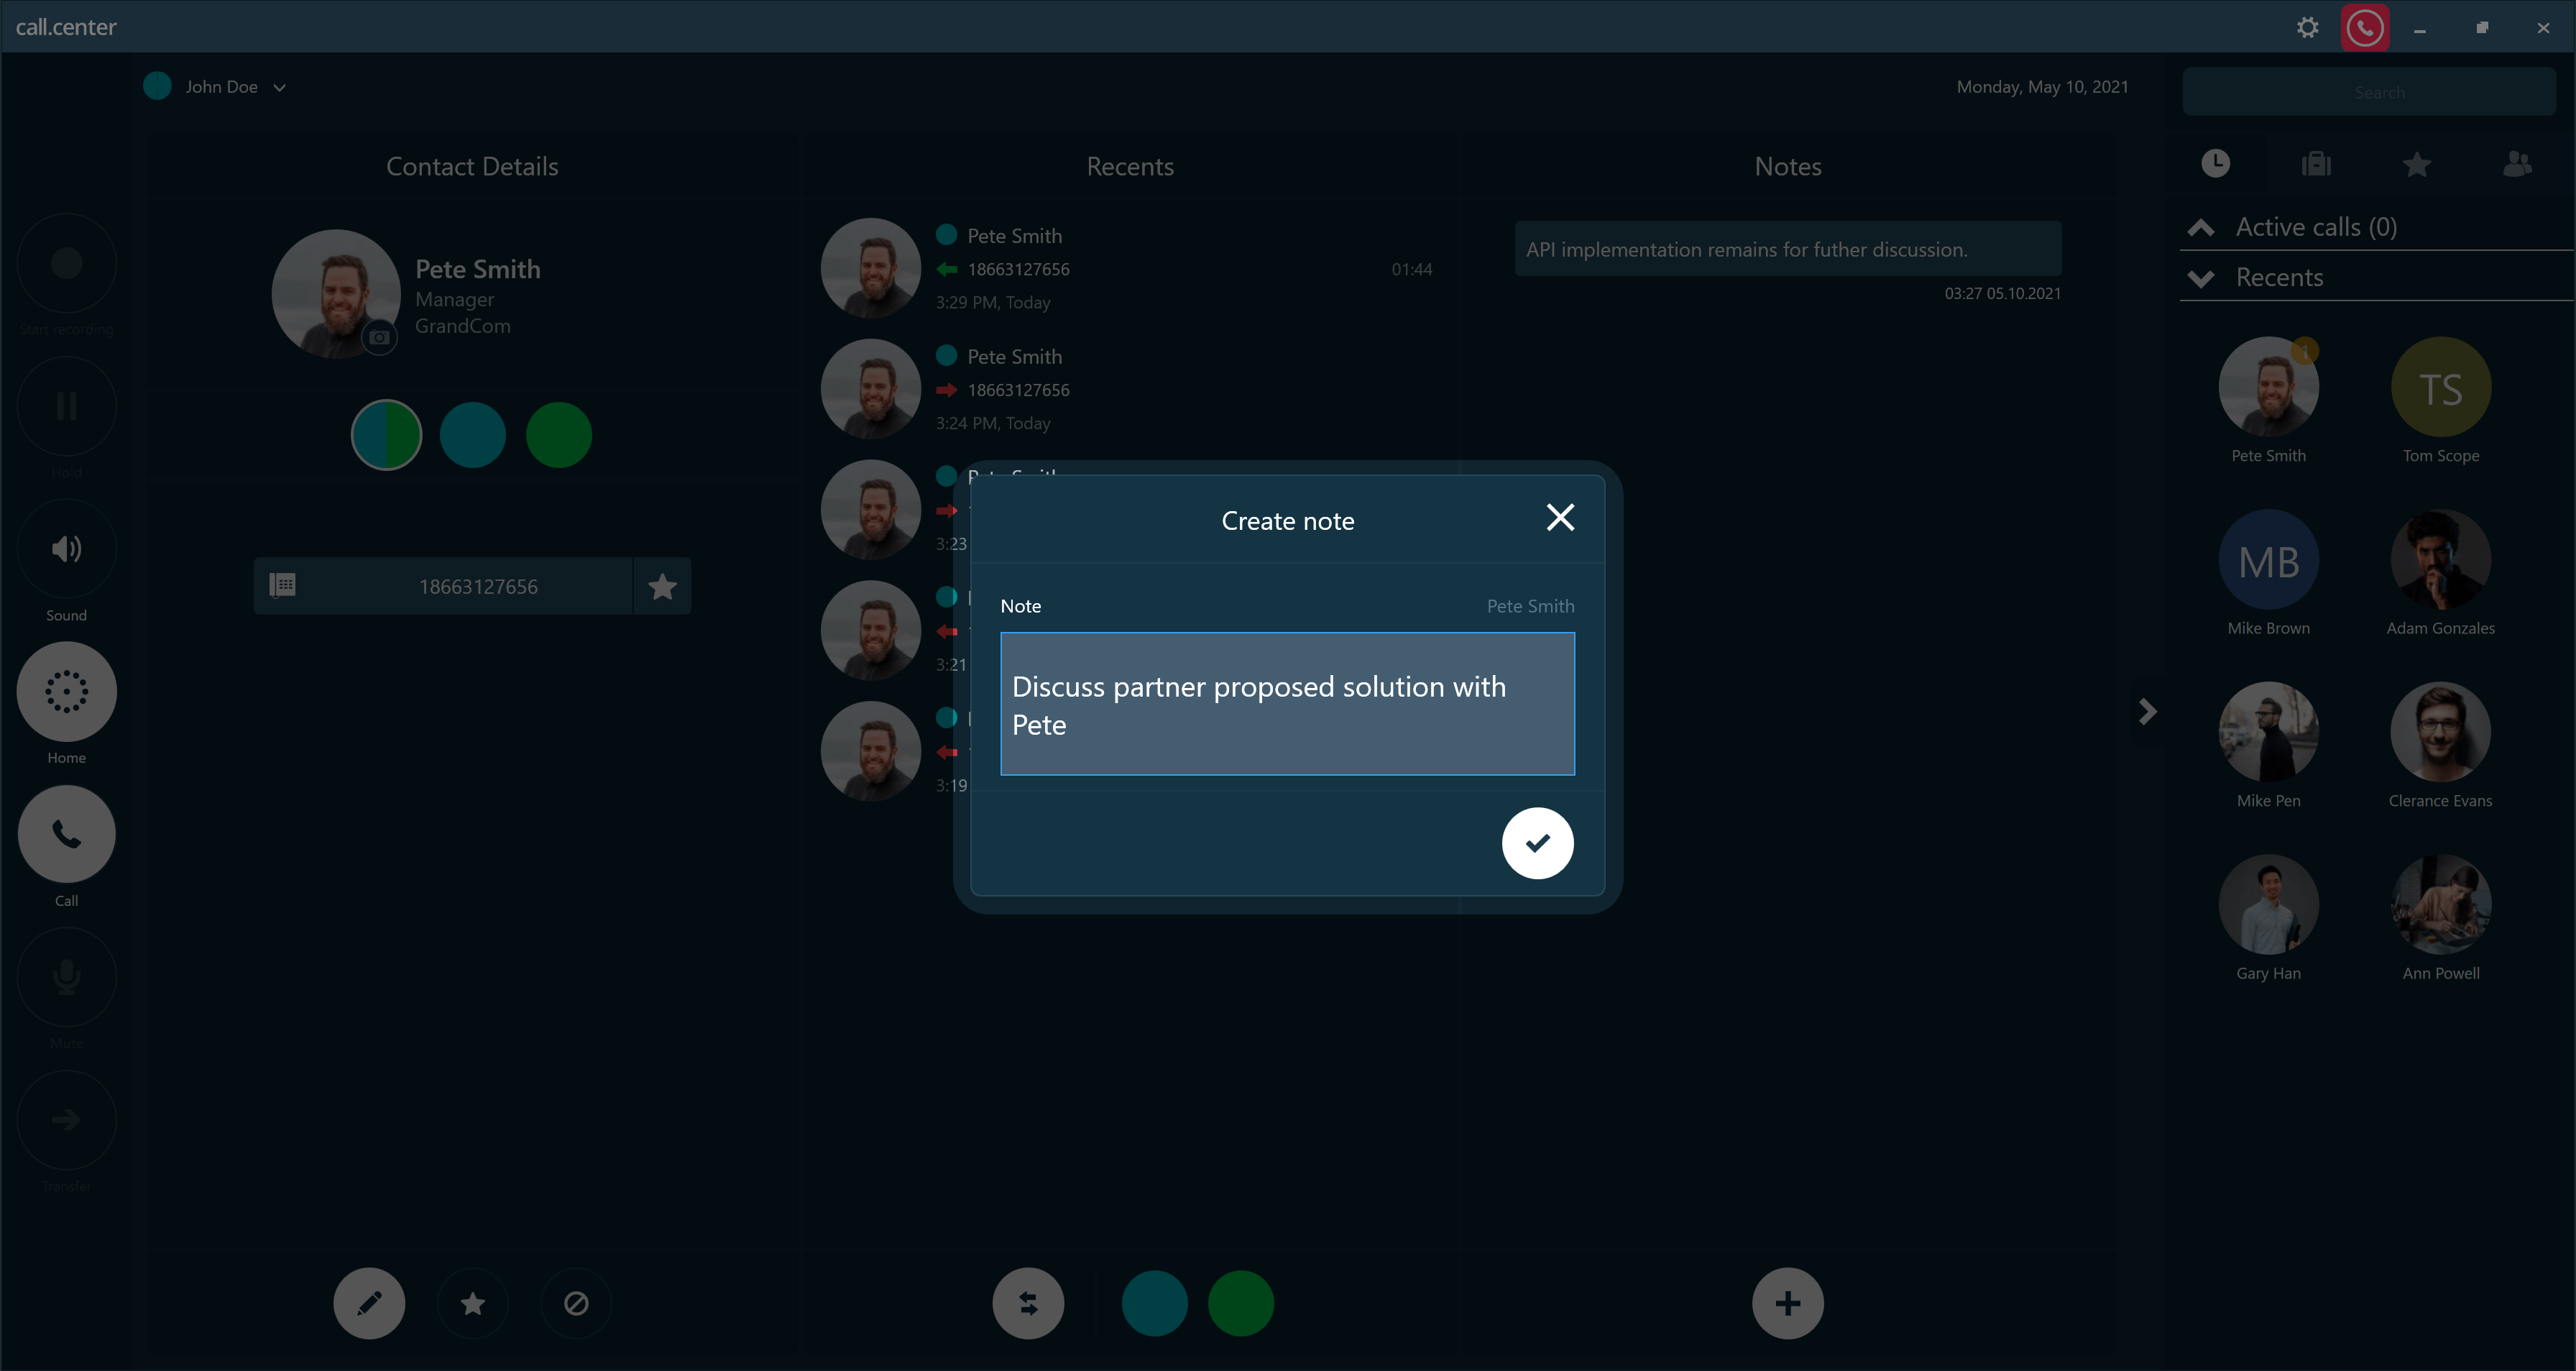
Each added note includes a date and time stamp.
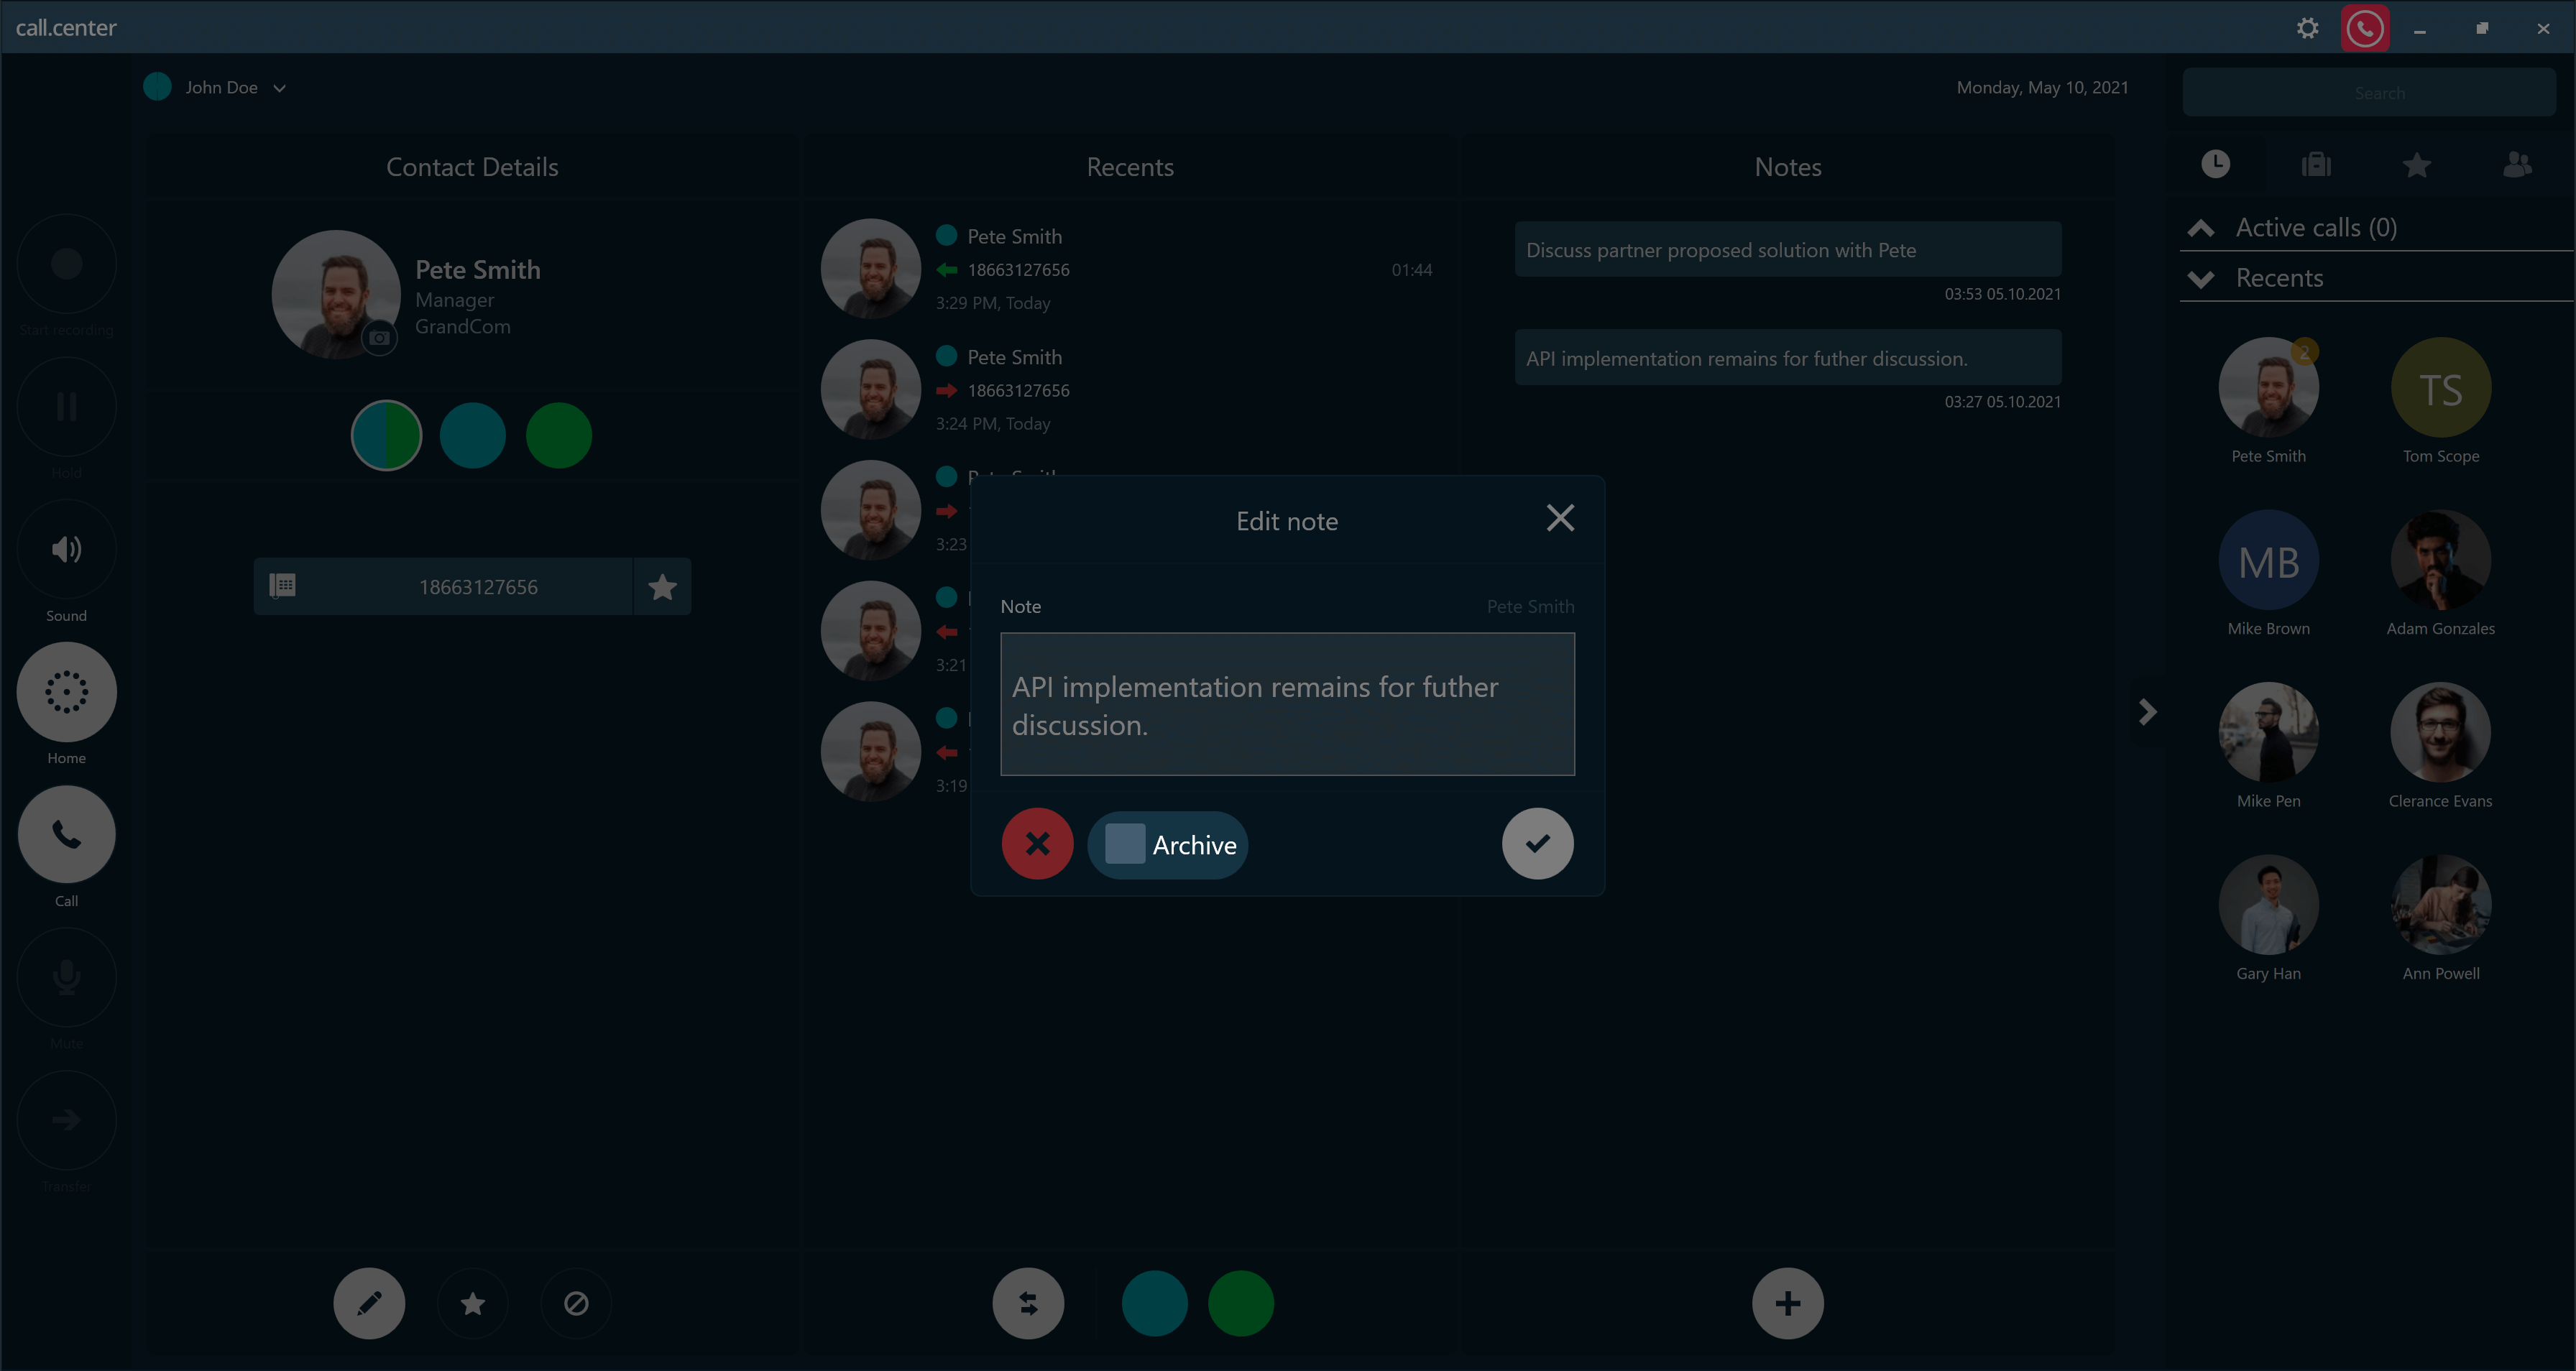
Editing a note
- Click on the note you wish to change to activate the Edit Note dialog box.
- After making changes to the note, click the Confirm button to save.
Archiving a note
For Windows and macOS
- Click on the note you wish to archive to activate the Edit Note dialog box.
- Check the Archive option in the Edit Note dialog box, and click the Confirm button to save the changes. Your note will be archived.
Notes that are archived are grayed out to indicate their status.
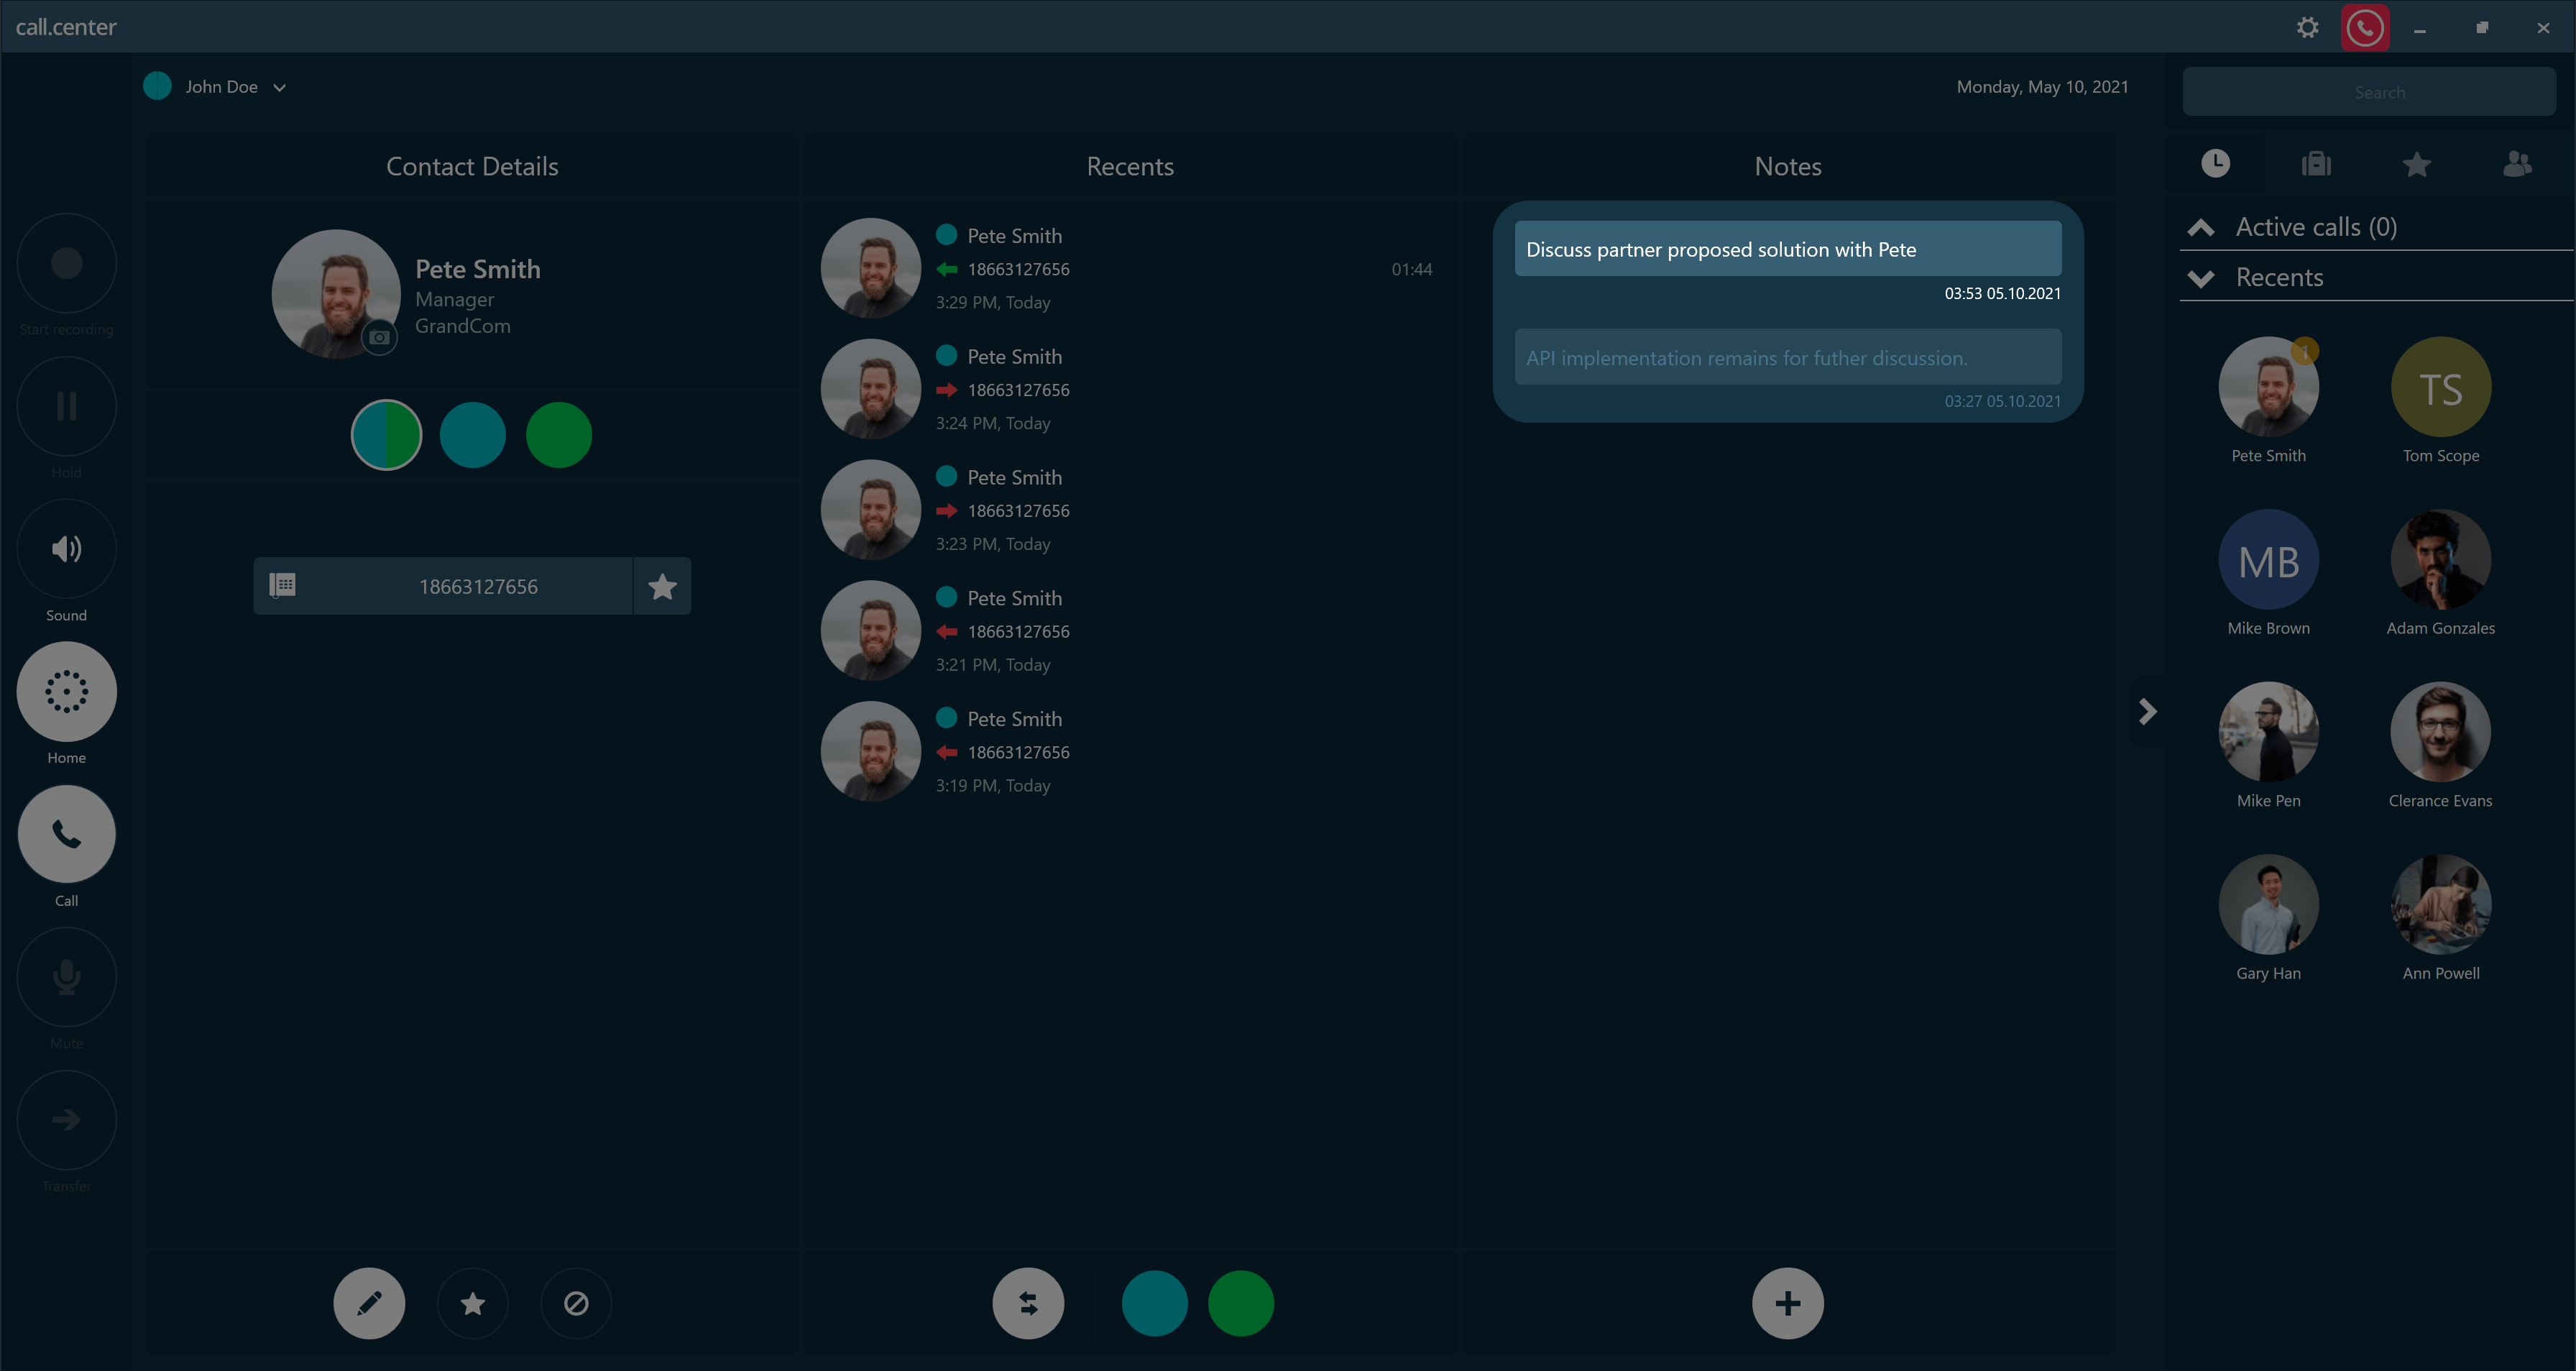
To remove a note from the archived status, repeat the same steps as listed above, but uncheck the Archive option.
For Android and iOS
Swipe the note to the left of the screen. An option to archive/unarchive that note will be displayed.
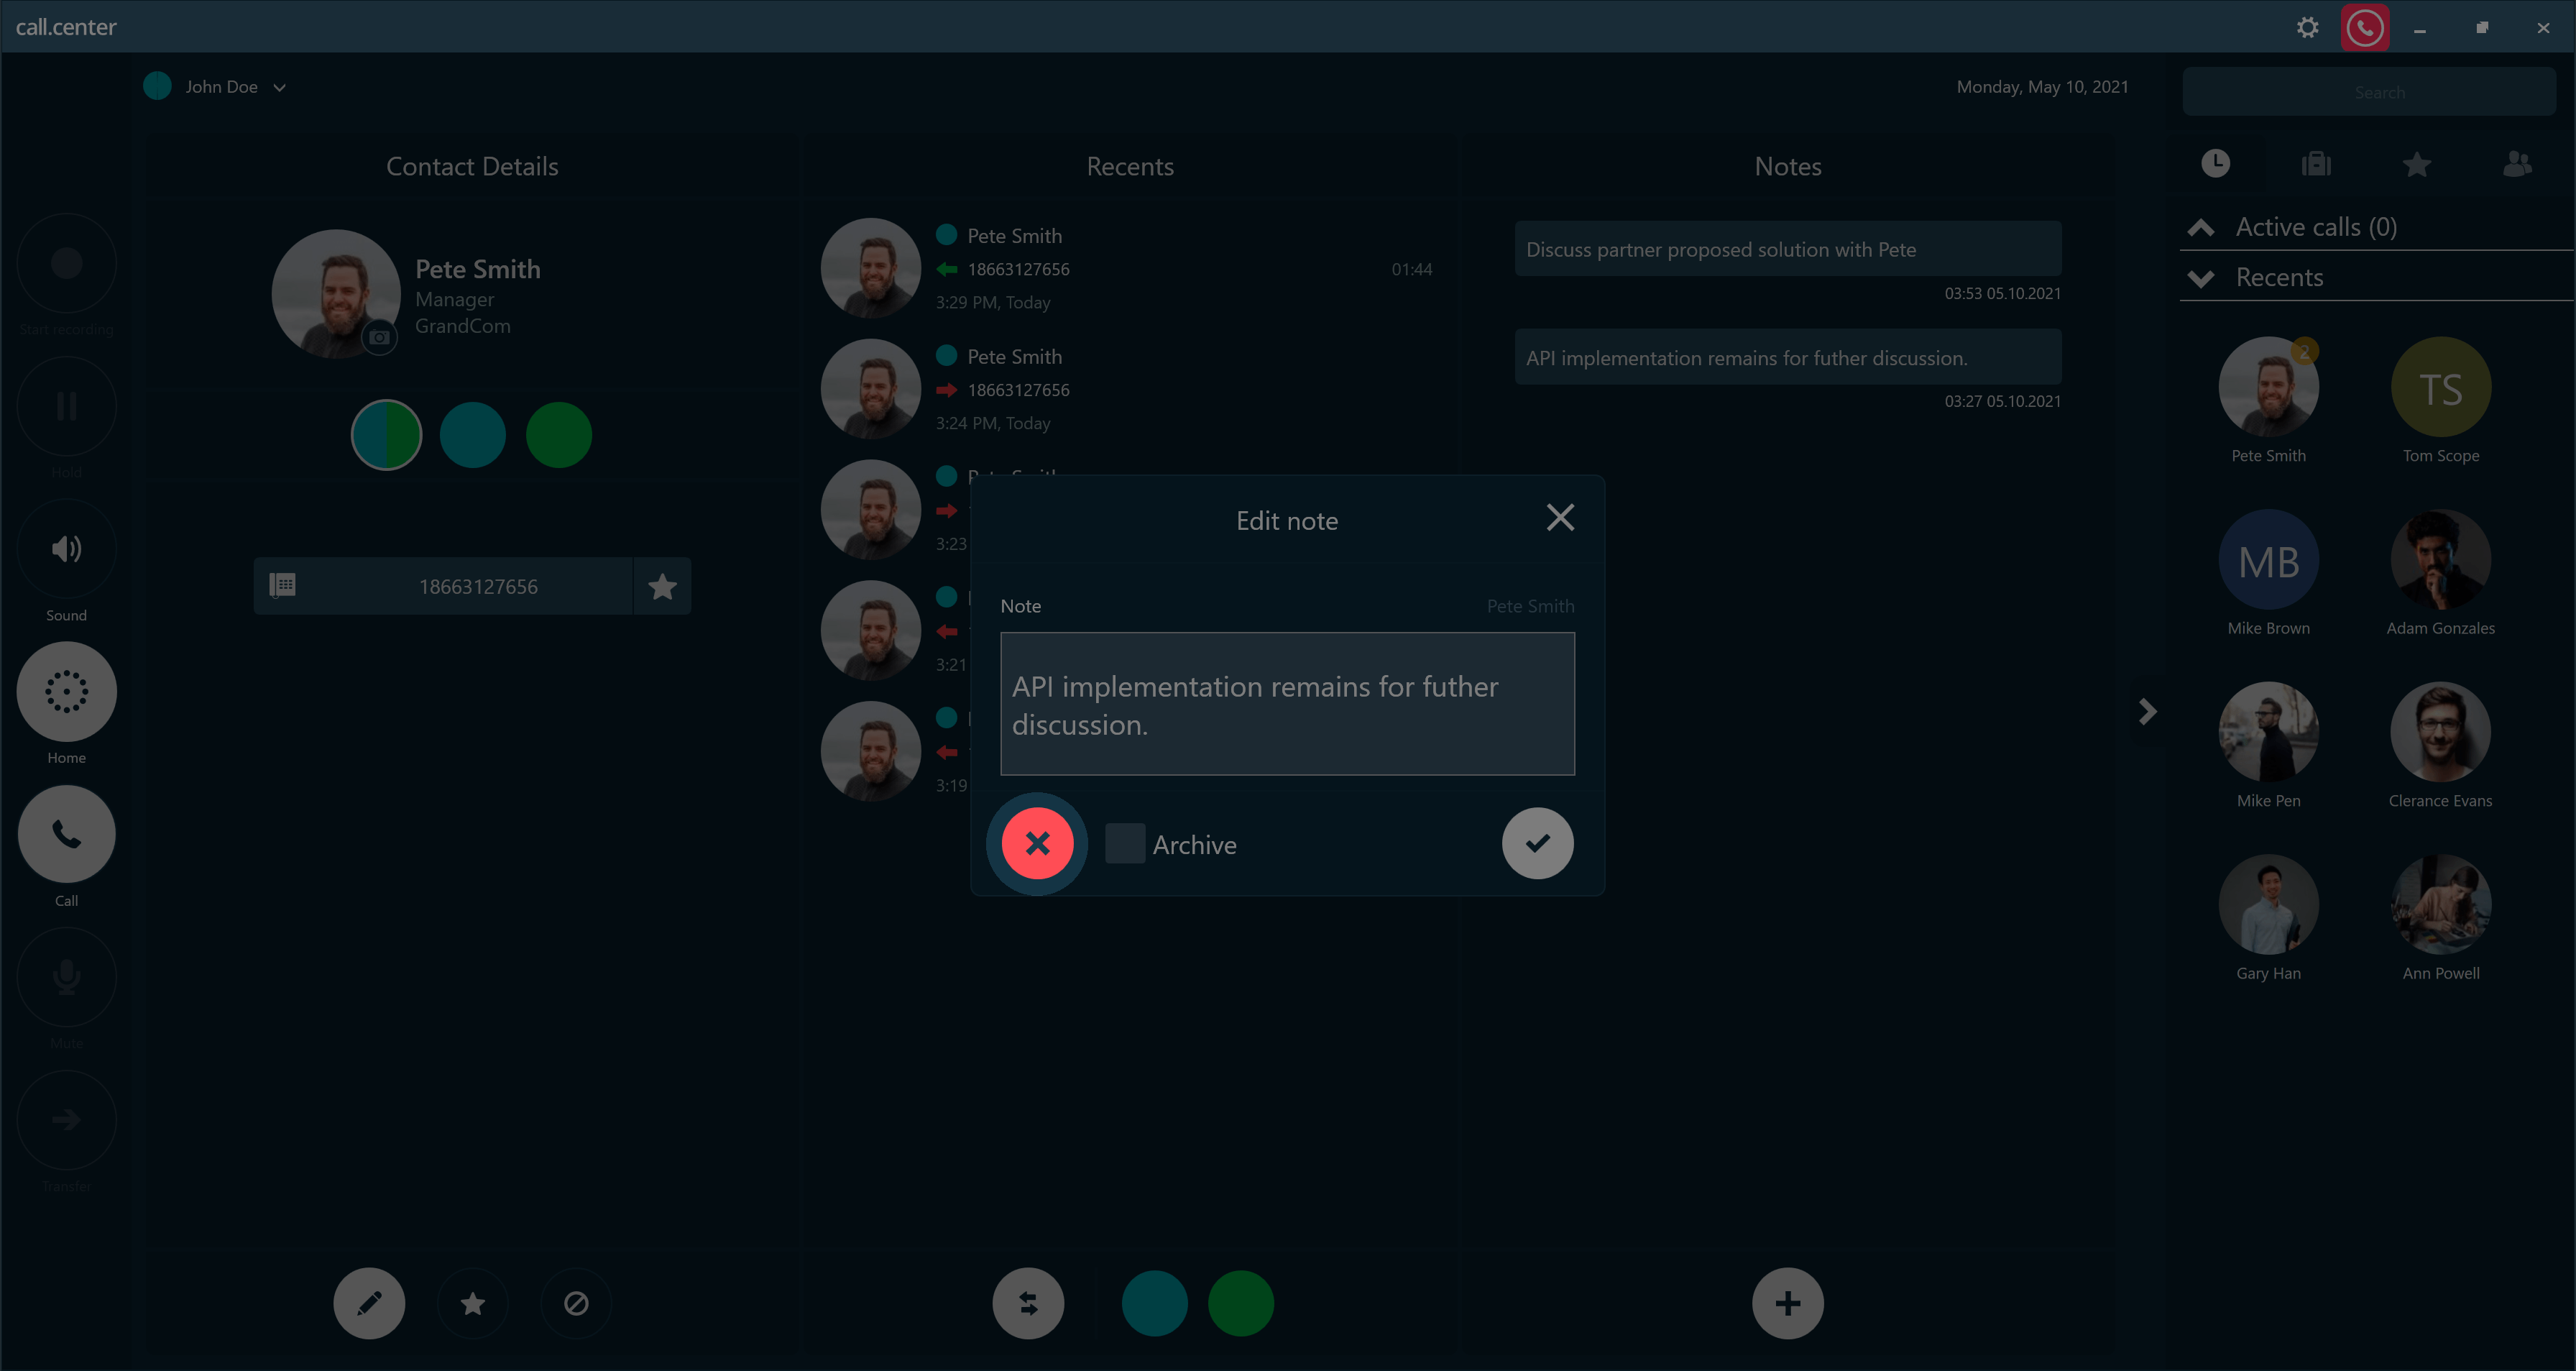
Deleting a note
For Windows and macOS
- Click on the note you wish to delete to activate the Edit Note dialog box.
- Click the Delete button to remove the note.
For Android and iOS
Swipe the note to the left of the screen. An option to delete that note will be displayed.
Back to the topAccessing recent calls
Click on a selected contact’s avatar from any window or tab to display the call history for that contact. Call history is displayed under Recents.
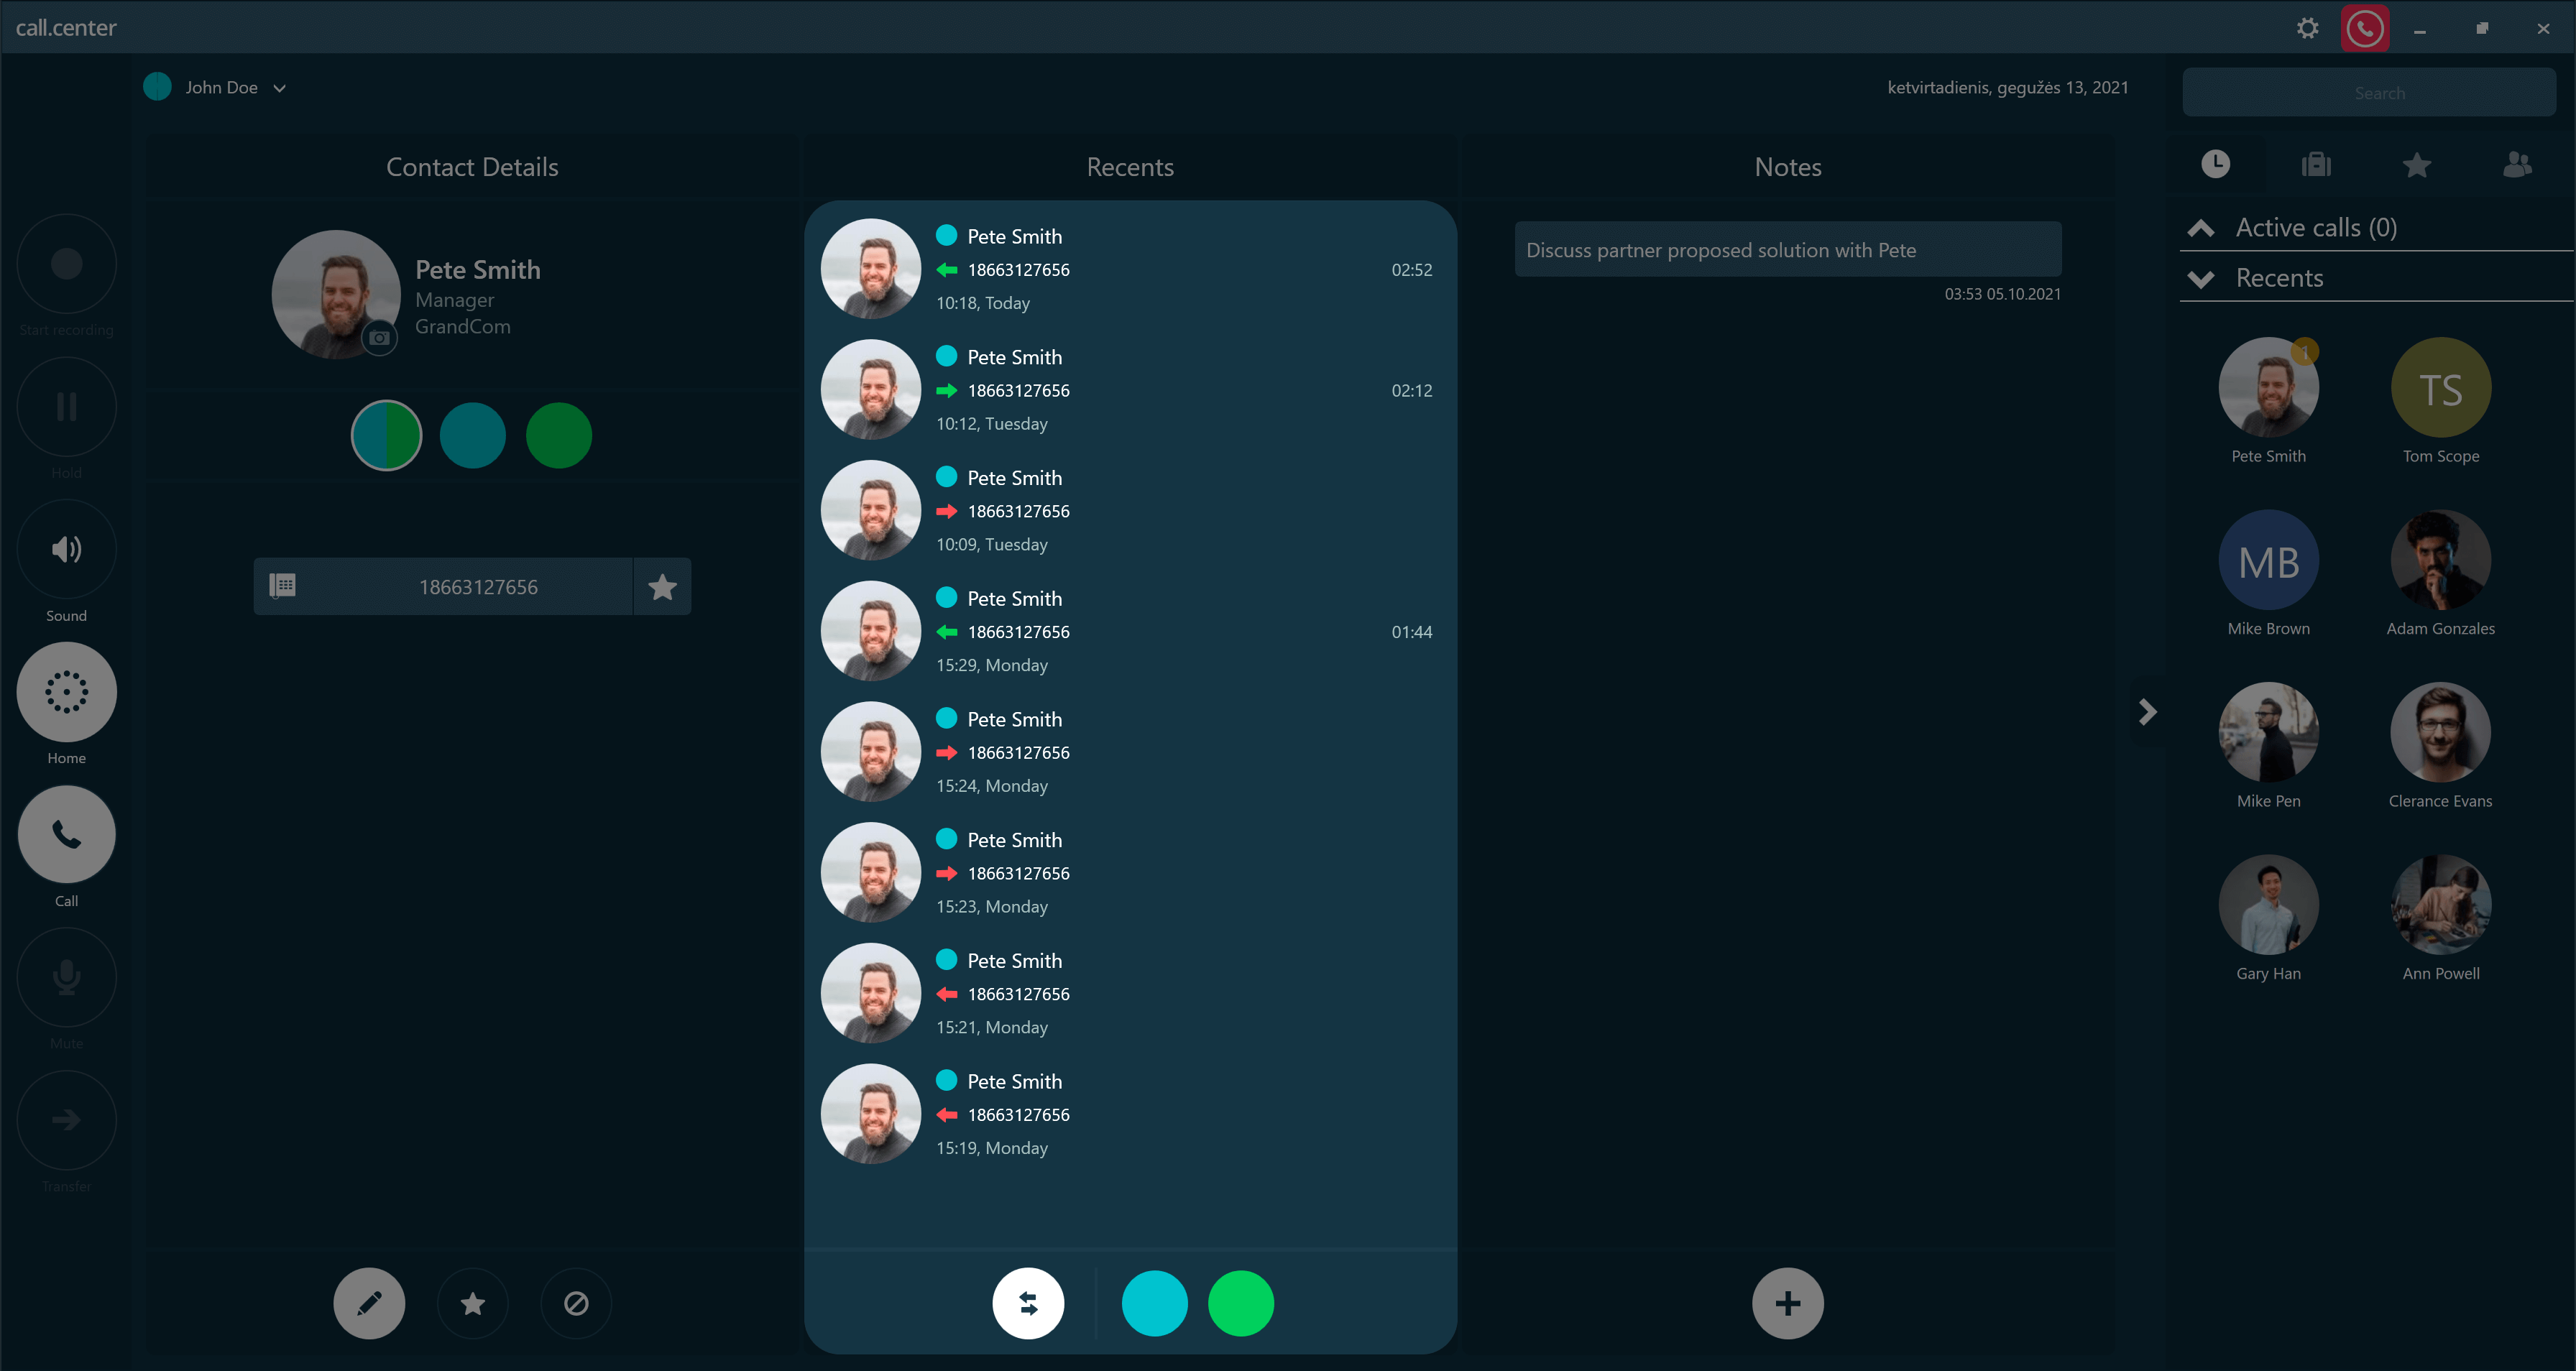
Recents details include:
- The contact or number from/to which the call was received/placed.
- An arrow designating if the call was Inbound or Outbound. The color of the arrow indicates if the call was successful (Green - call successful, Red - call failed).
- The date and time of the call.
- The length of the call (if applicable) in the format minutes:seconds.
Call records may be individually deleted from the Recents history. The process required for deletion is dependant on the operating system platform as follows:
- For Windows and macOS, right-click a call record to open a menu that includes an option to delete the record.
- For Android and iOS, swipe the record to the left to delete that call record.
Managing Contacts in the call.center™ app Mobile
Creating a contact
The call.center™ app integrates with the native contact information already present on your device on which the app is installed. For some operating system platforms such as Android, you may import contacts from a Google account or create a private contact database specifically for the call.center™ app.
Note that when an incoming call is received, the call.center™ app attempts to match the caller’s number with a phone number listed for an existing contact on your device. If no match is found, then a question mark icon together with the caller’s phone number are displayed in the Recents tab.
A new contact may be created by either:
- Entering the complete contact information from scratch or
- By adding contact information to a recently used phone number. This phone number is generally associated with an incoming call received from an unknown or unlisted contact.
Creating a new Contact from scratch
- Click on the Dialpad button in the Phone Function Menu to display the Dial screen.
- Click the “PLUS” button to display a Create Contact dialog box.
- Select the type of account from the Account drop-down list, for example, Local contacts.
- The Contact name must be entered, and then click the Add phone number button to add a phone number for that contact.
- Optional details for the fields Position, Department and Company may be entered.
-
Click the
 button
to save the information. The new contact that you have created will now be displayed in the
Contacts area.
button
to save the information. The new contact that you have created will now be displayed in the
Contacts area.
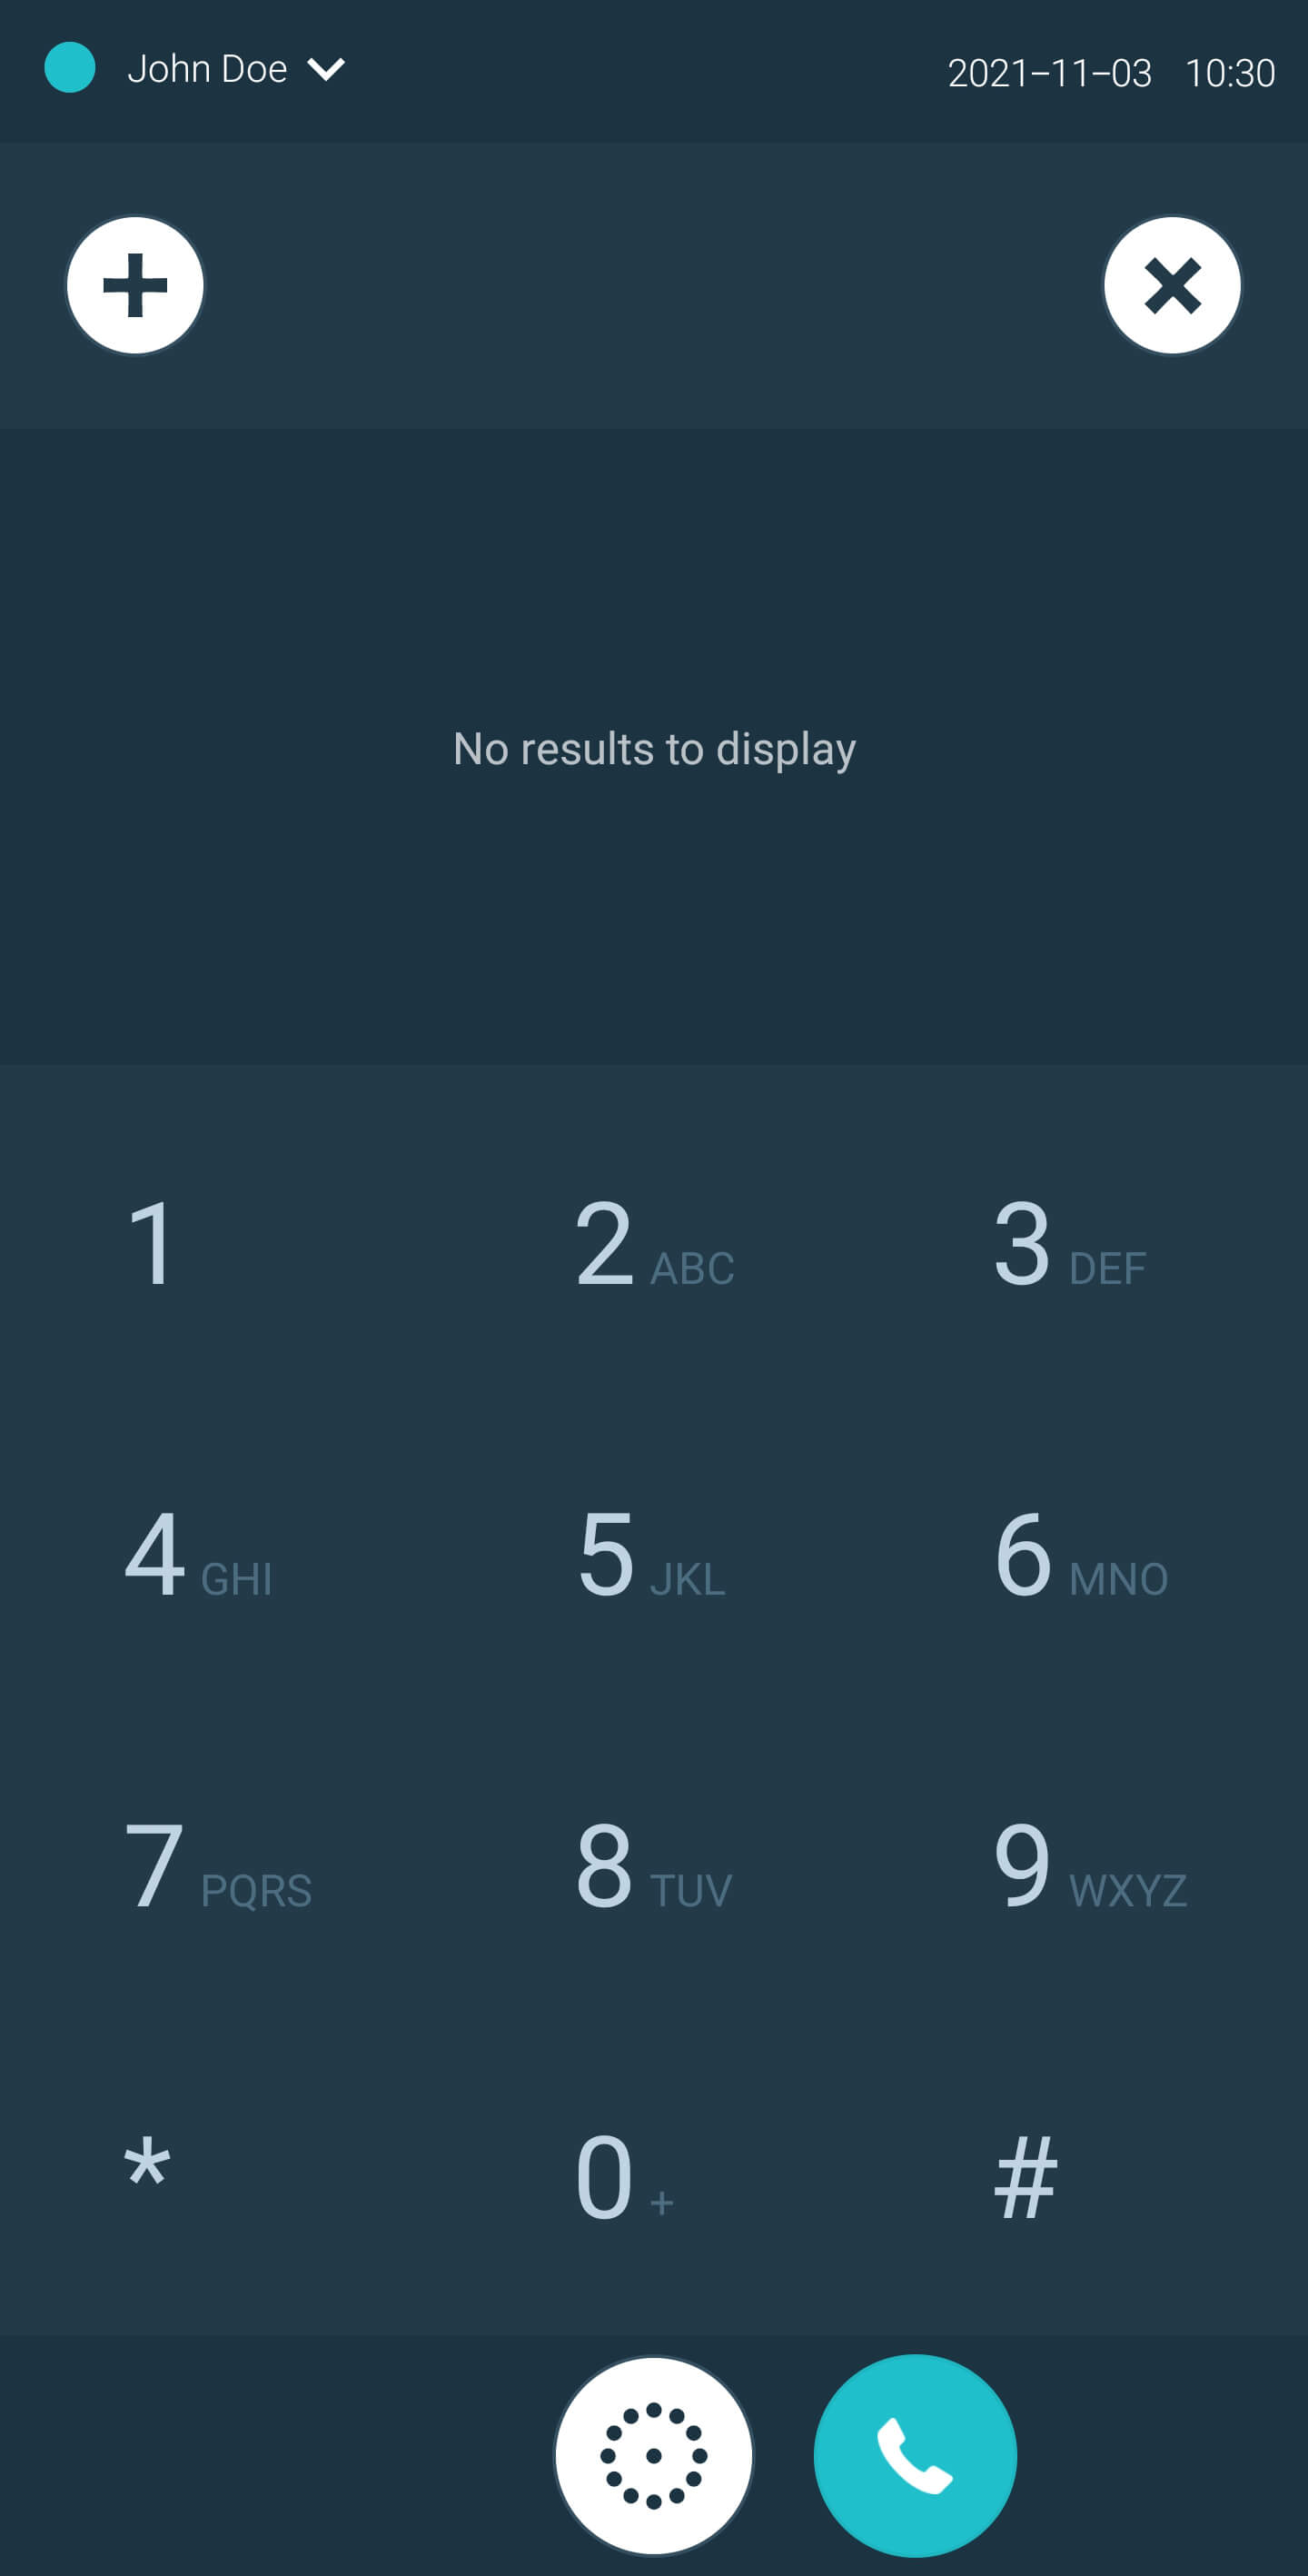
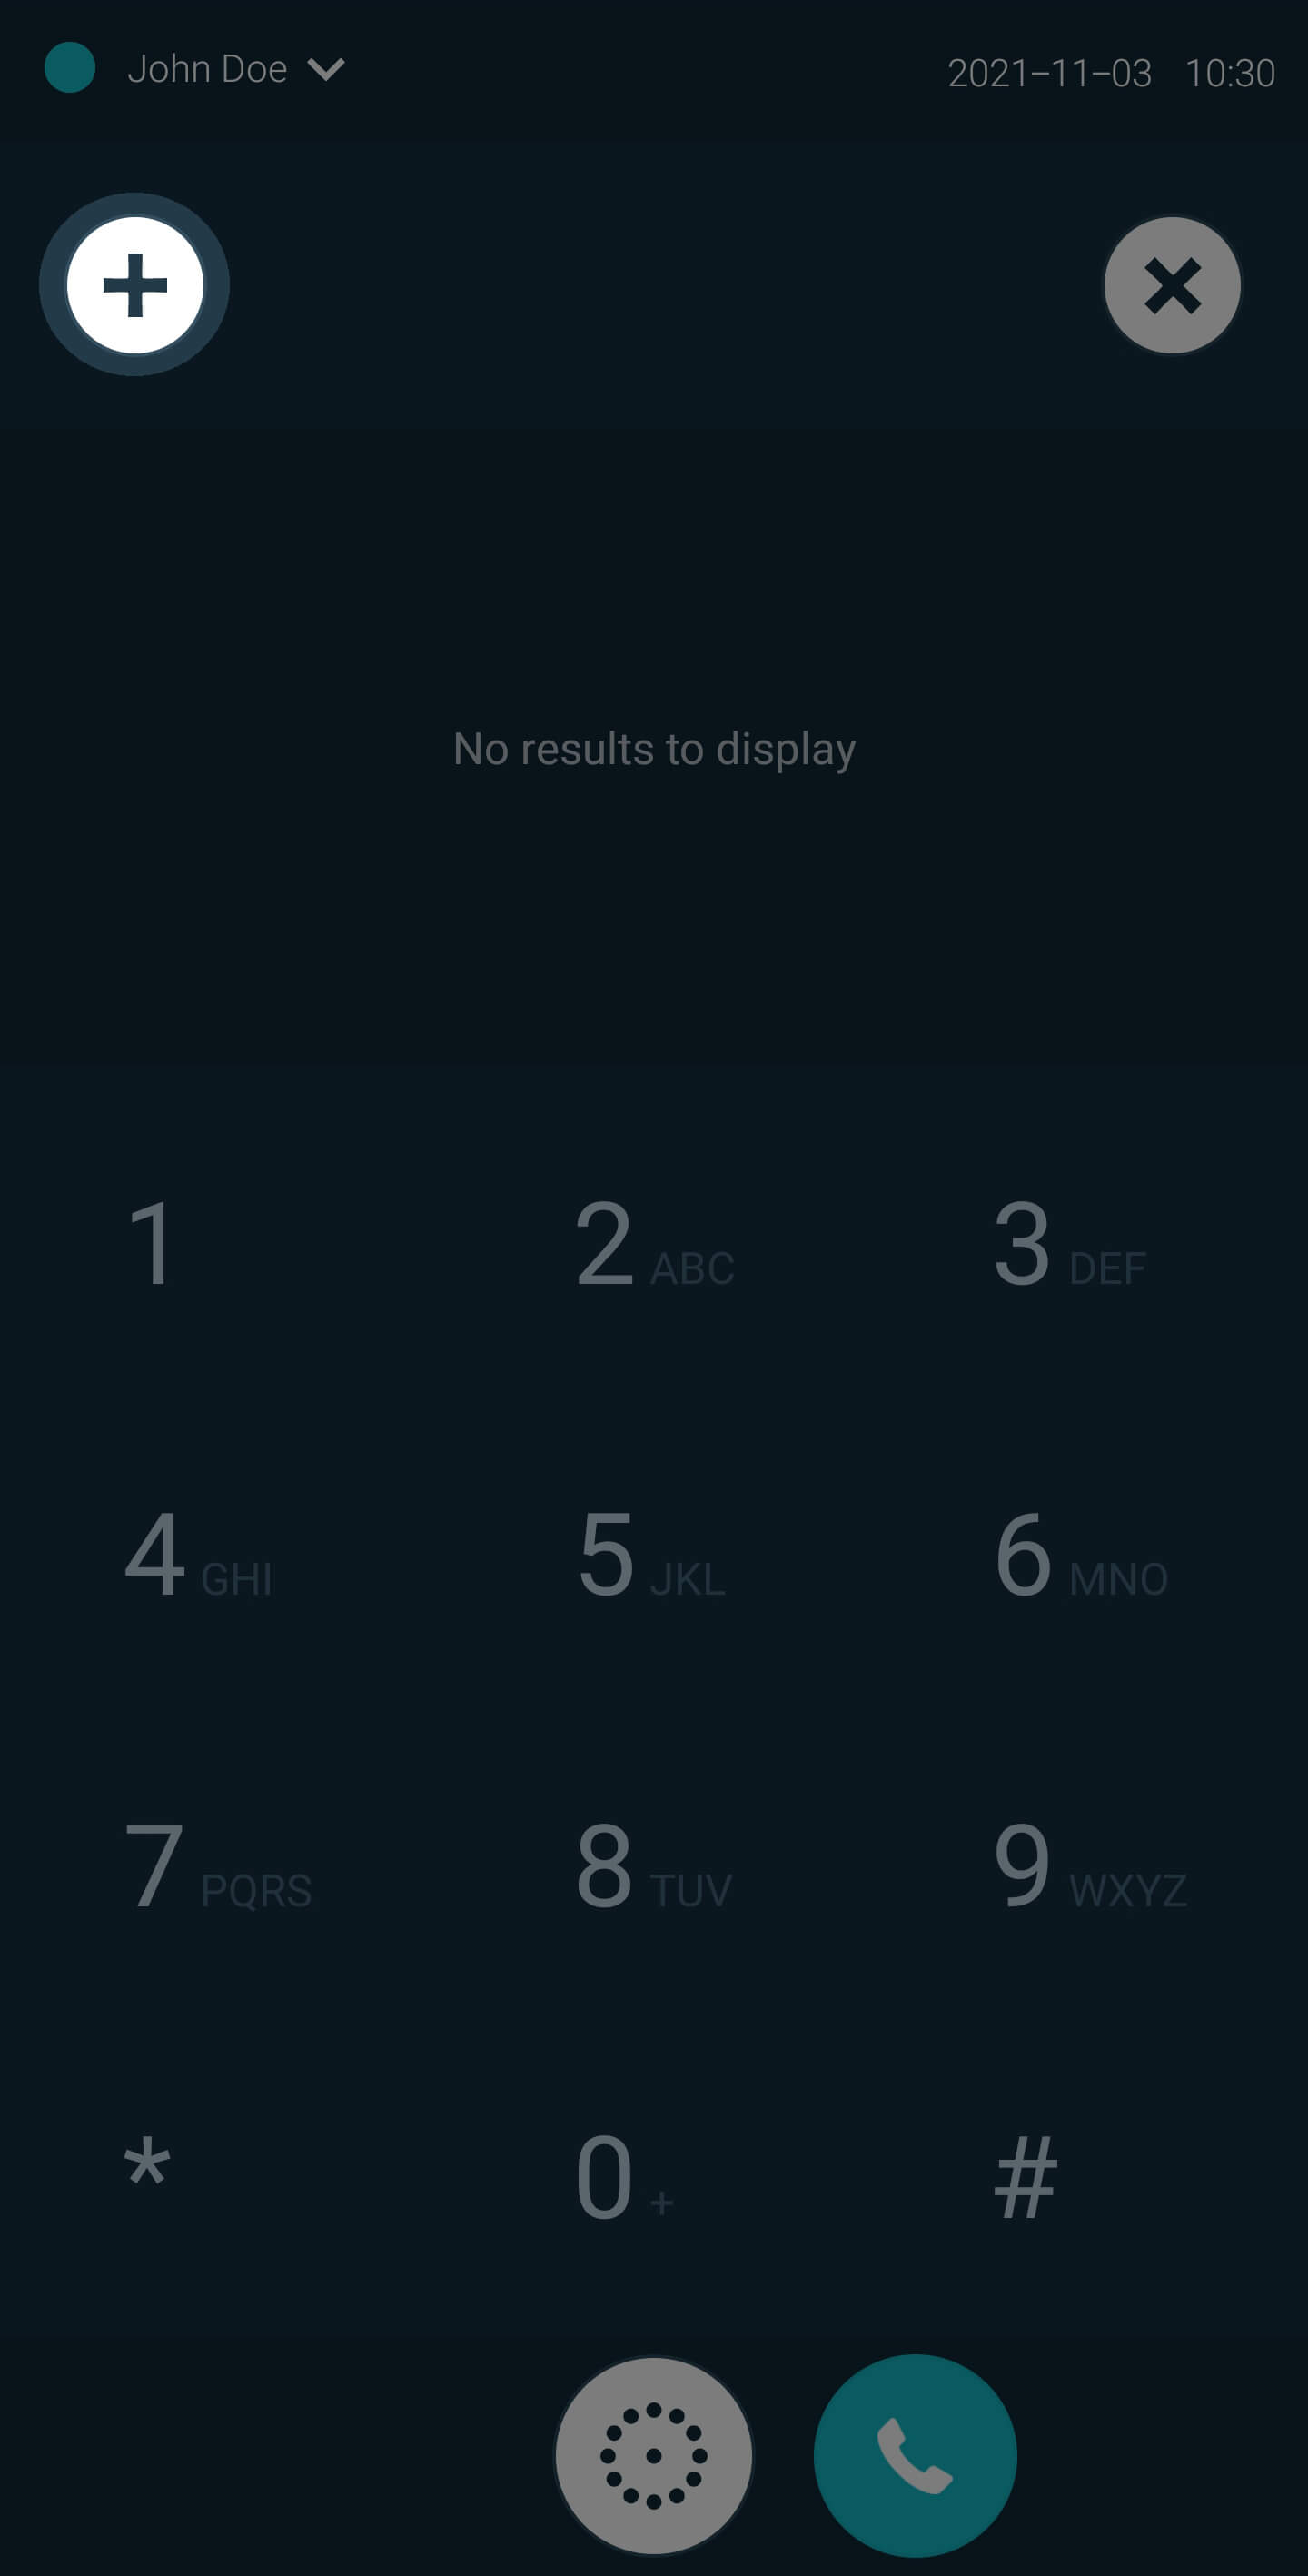
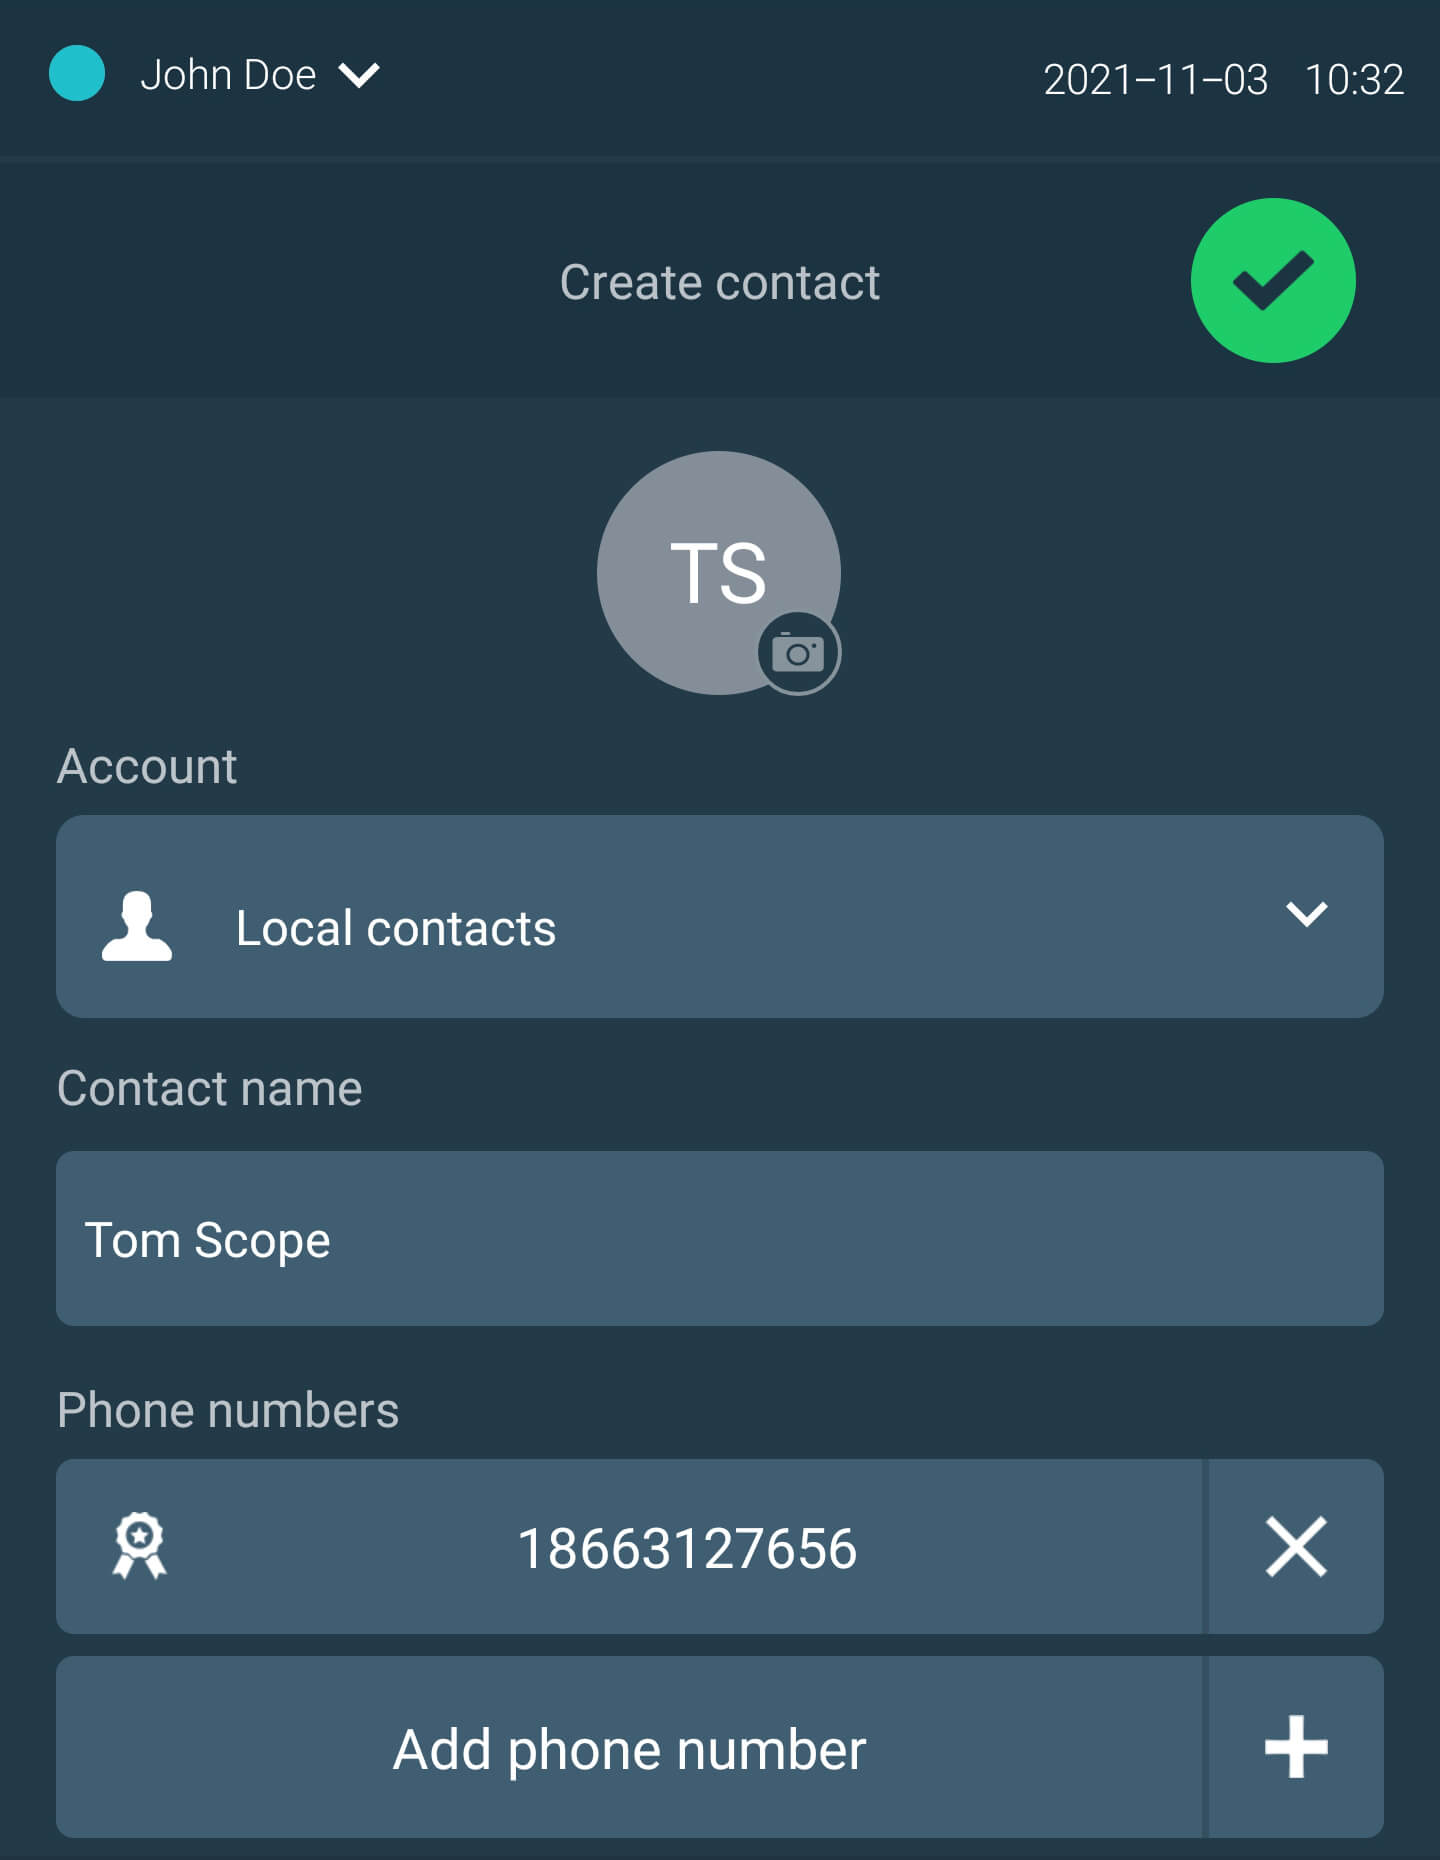
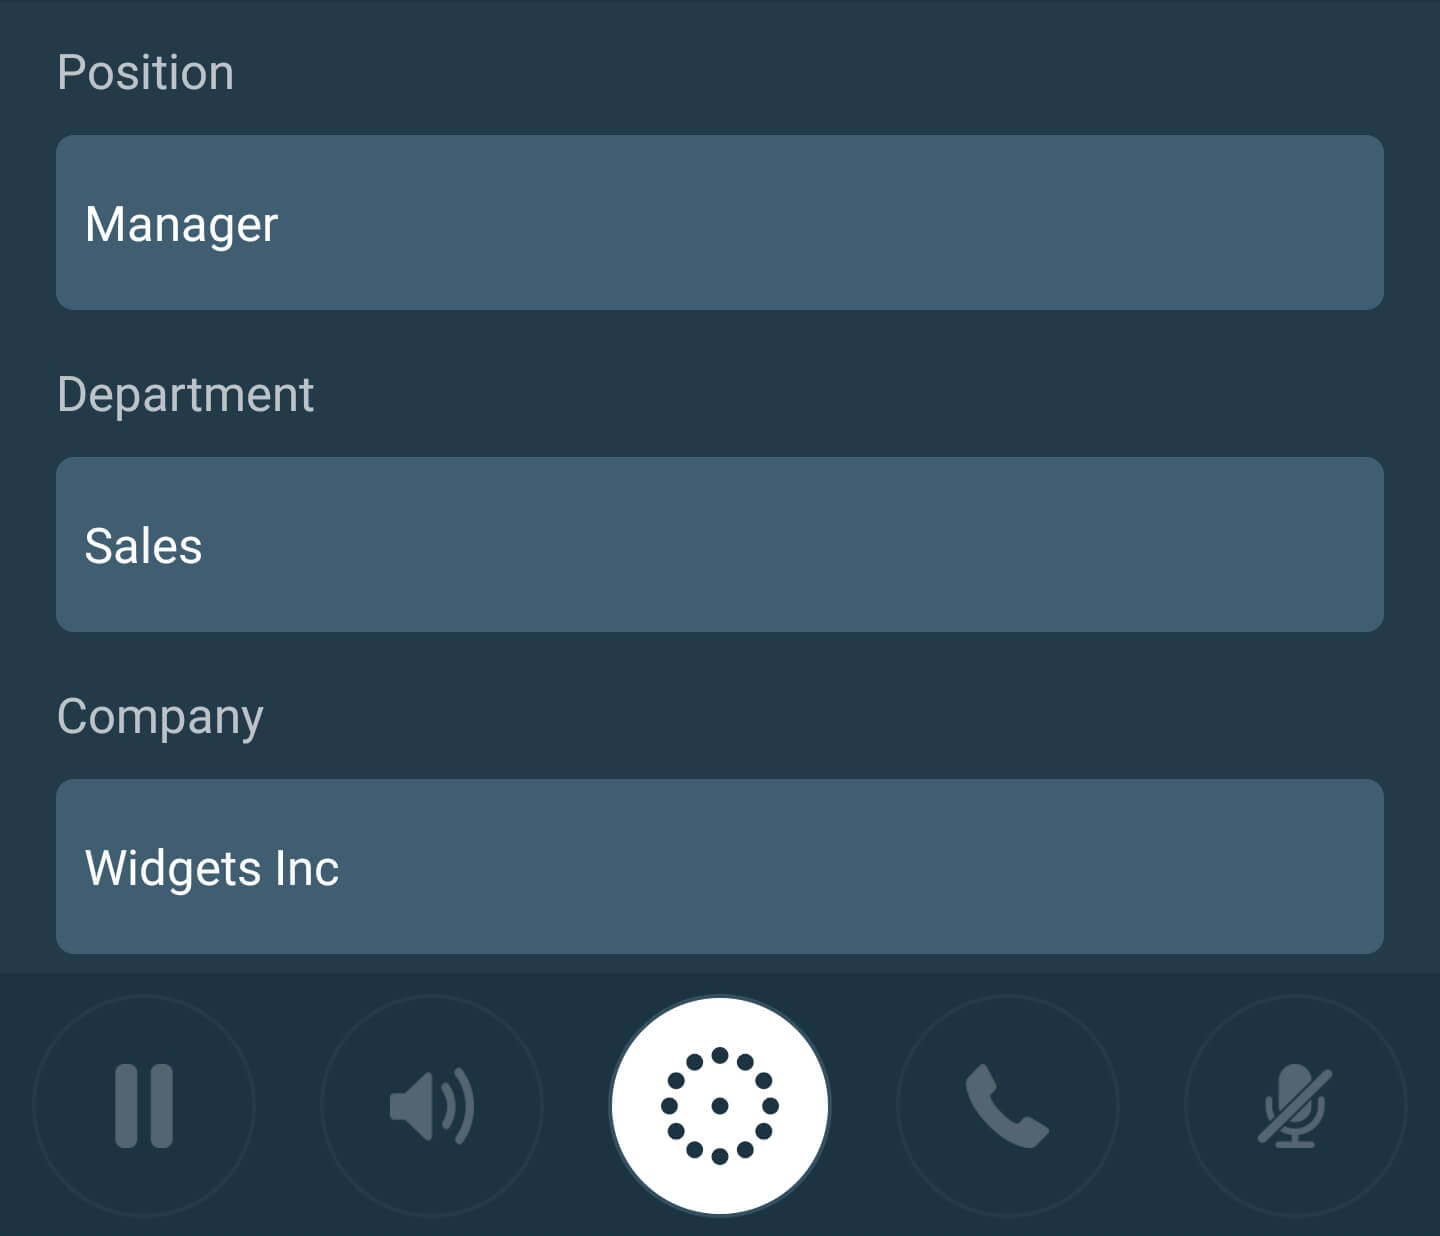
Creating a contact from a recently used phone number
- Click on the selected phone number from the Activities Wheel or from the Recents tab to display the Contact Details tab.
- Click on “Settings & Details”
- Click on the “PLUS” button to display a Create Contact dialog box.
- Select the type of account from the Account drop-down list.
- The Contact name must be entered, and then click the Add phone number button to add a Phone number for that contact.
- Optional details for the fields Position, Department and Company may be entered.
-
Click the
button
to save the information. The new contact that you have created will now be displayed in the
Contacts area.

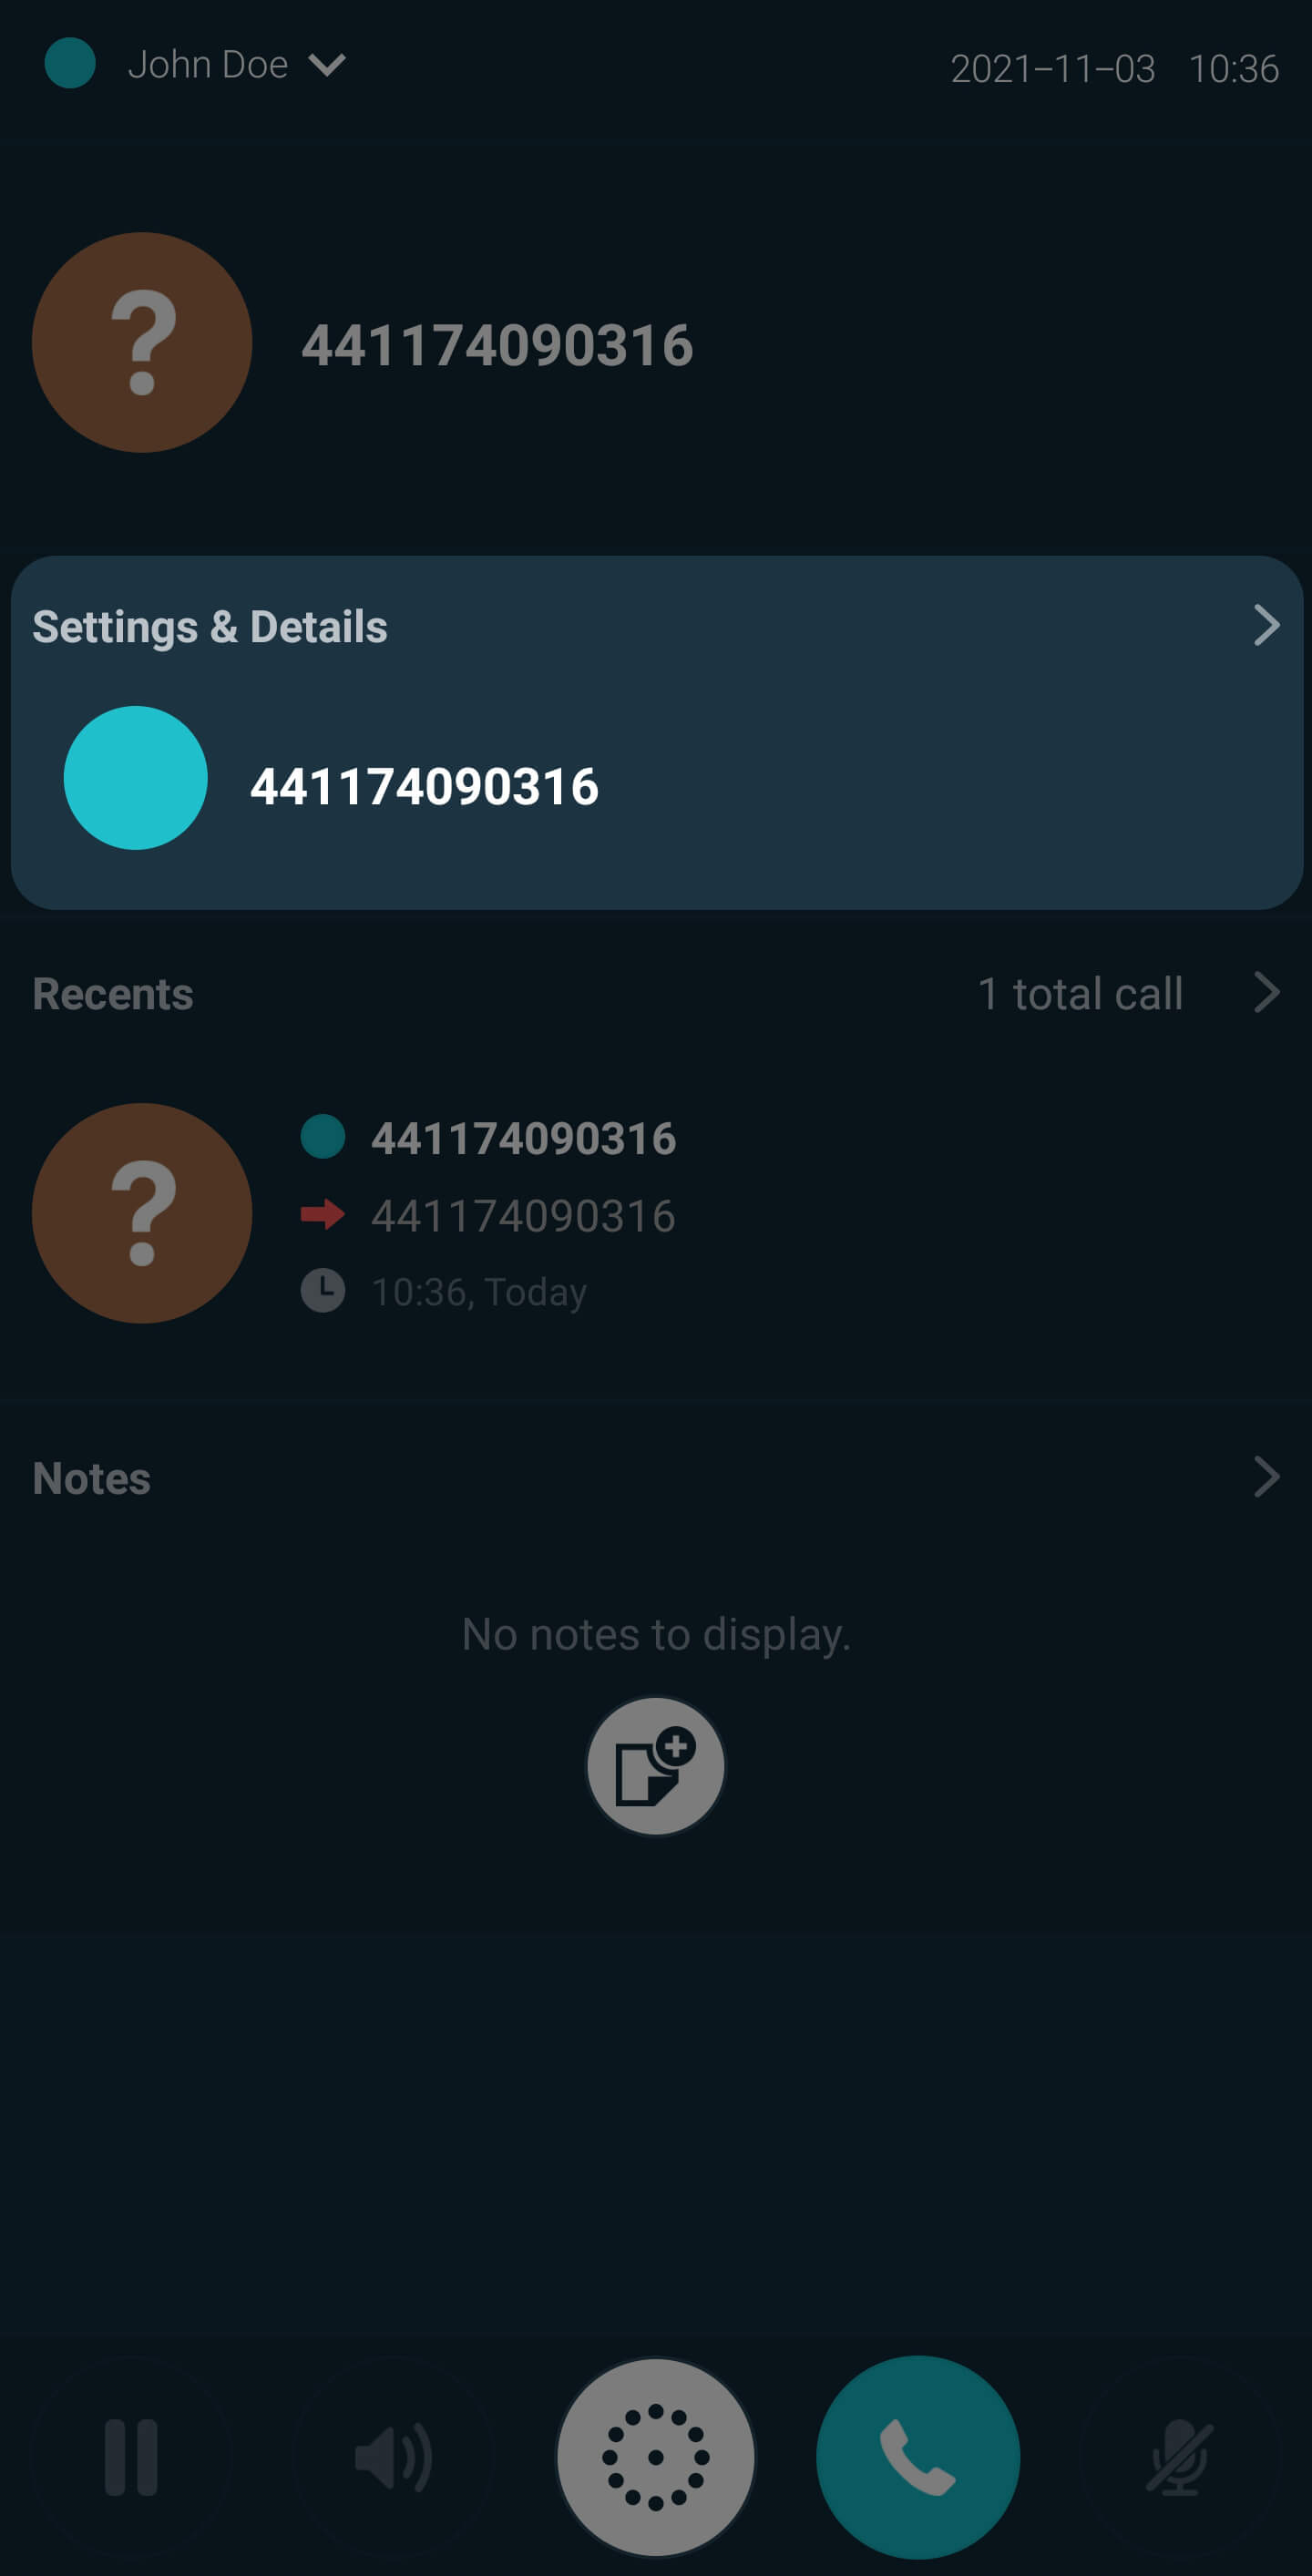

Importing contacts from external accounts or CRM systems
The call.center™ app allows the importing of contacts from external accounts or CRM (Customer Relationship Management) systems. Contacts that have been imported from external sources may then be edited, removed and re-synchronized on your device. New contacts can also be created and synchronized between a call.center™ device and external contacts.
Currently, users can import contacts from their Google Account.
- Click on your account owner’s Avatar located in the Home Screen.
- Select Settings & Details.
- Click on the Gear icon.
- Select the Contacts/CRM tab.
- Select Add new account.
- Select Google Account.
- Log in using the external account credentials to import the contacts.
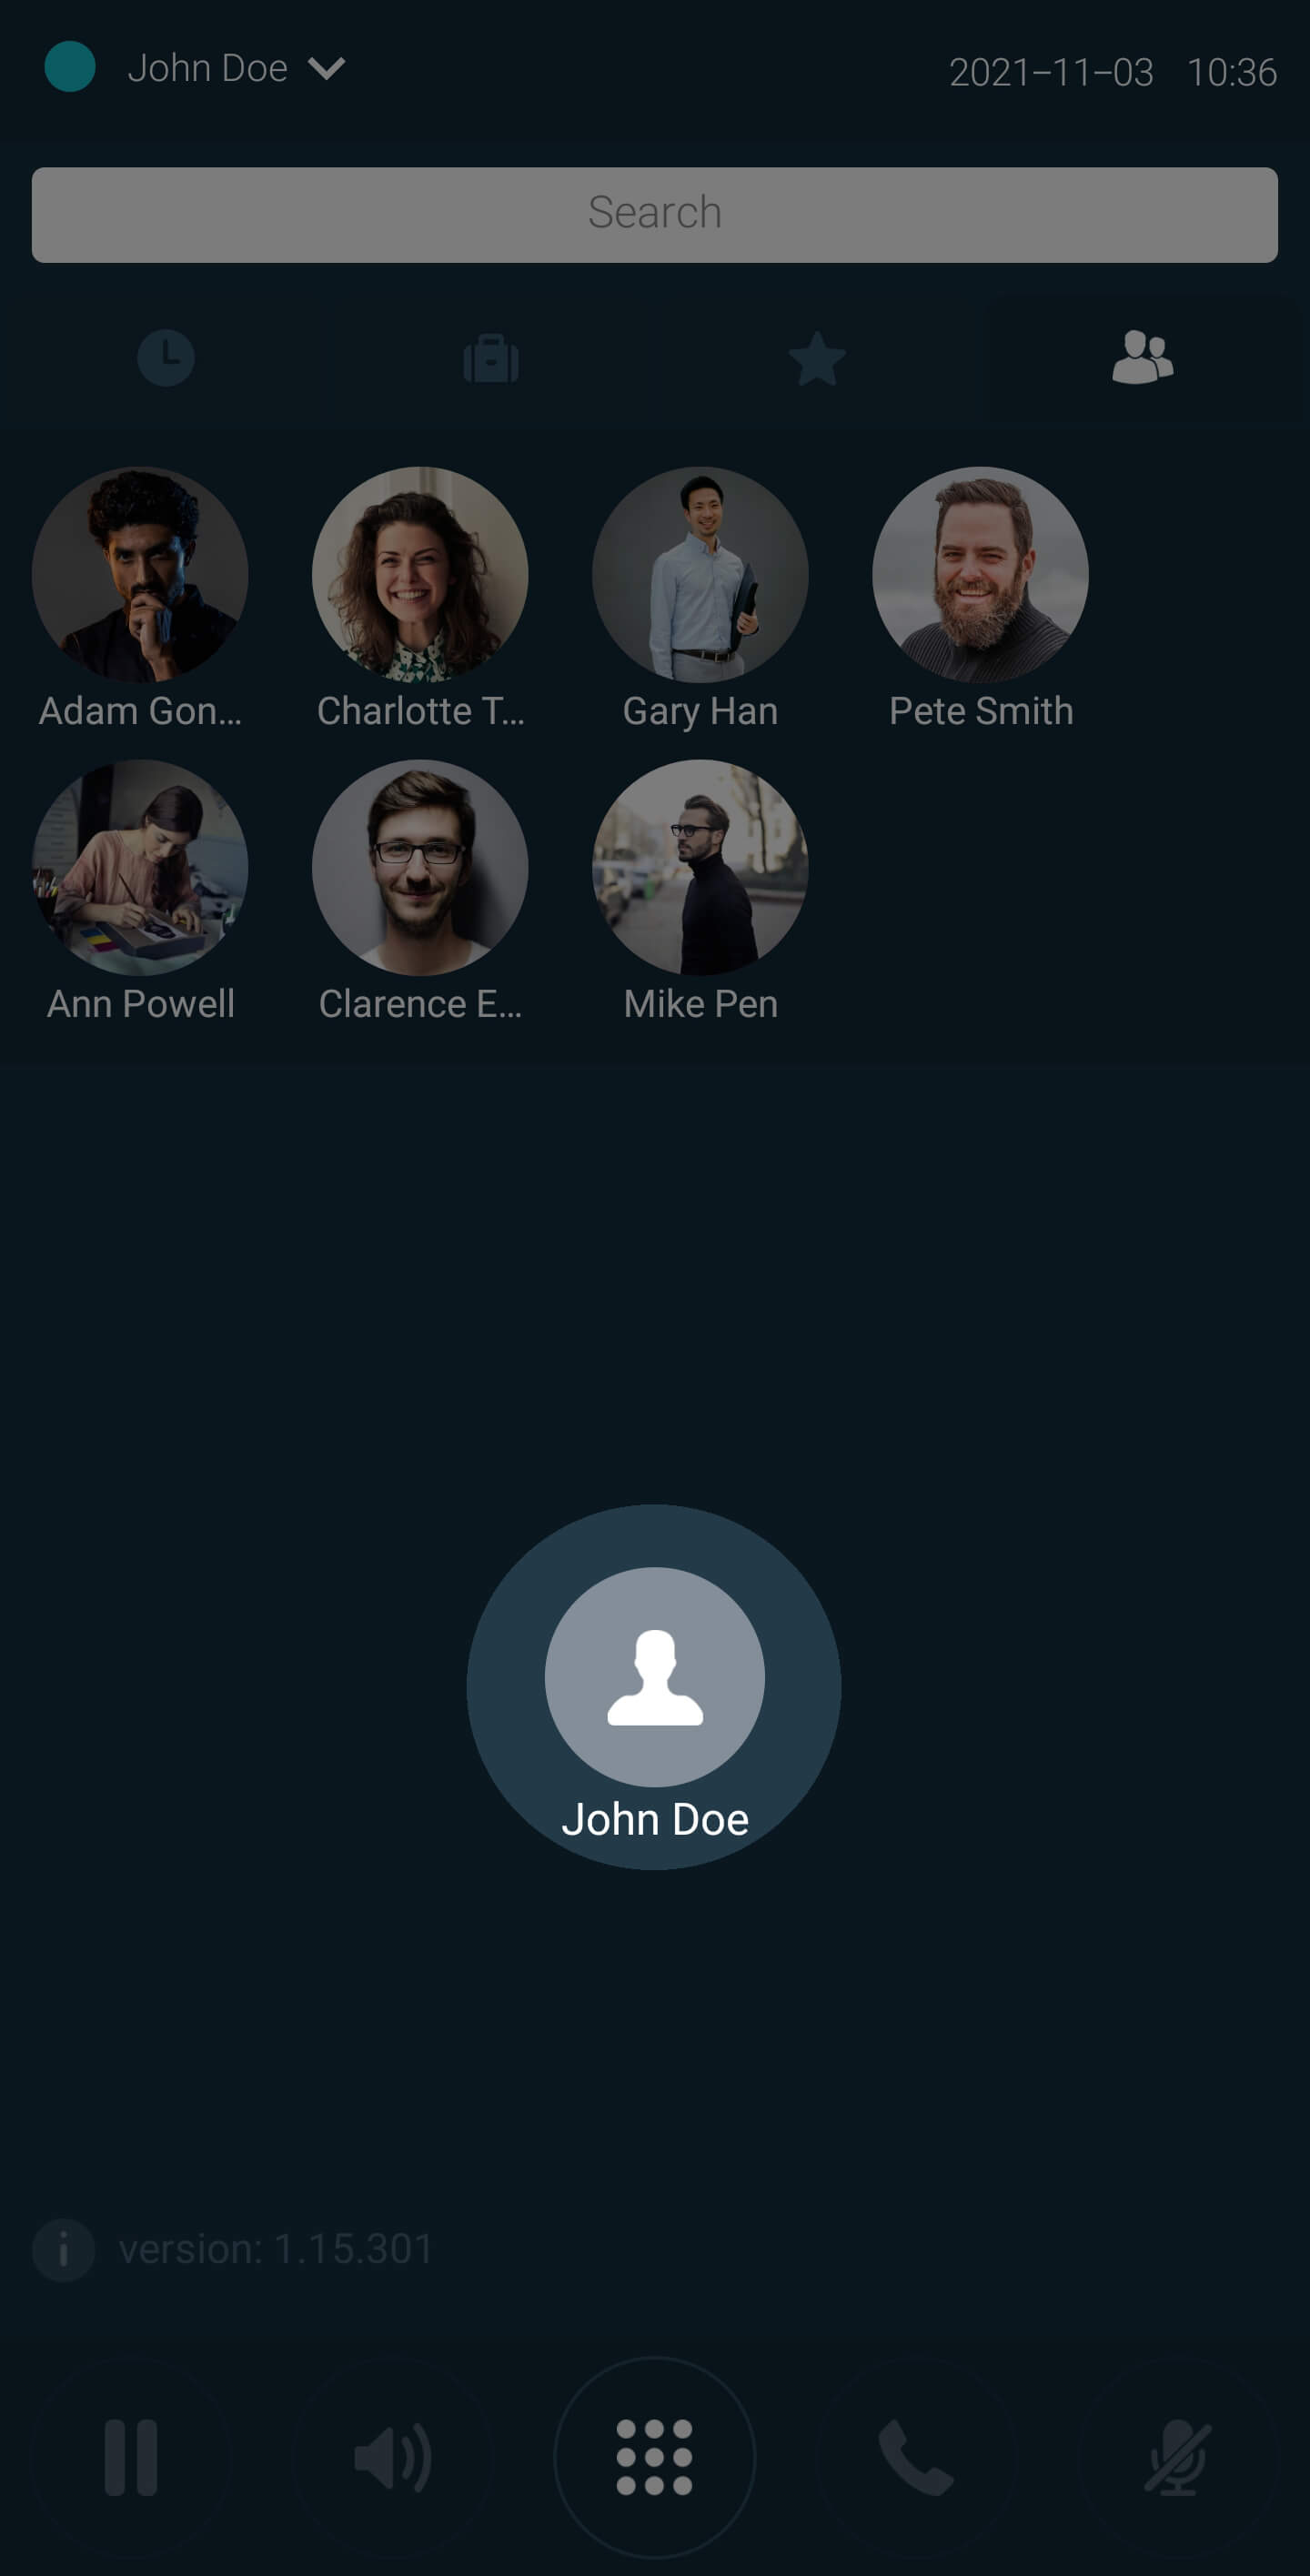
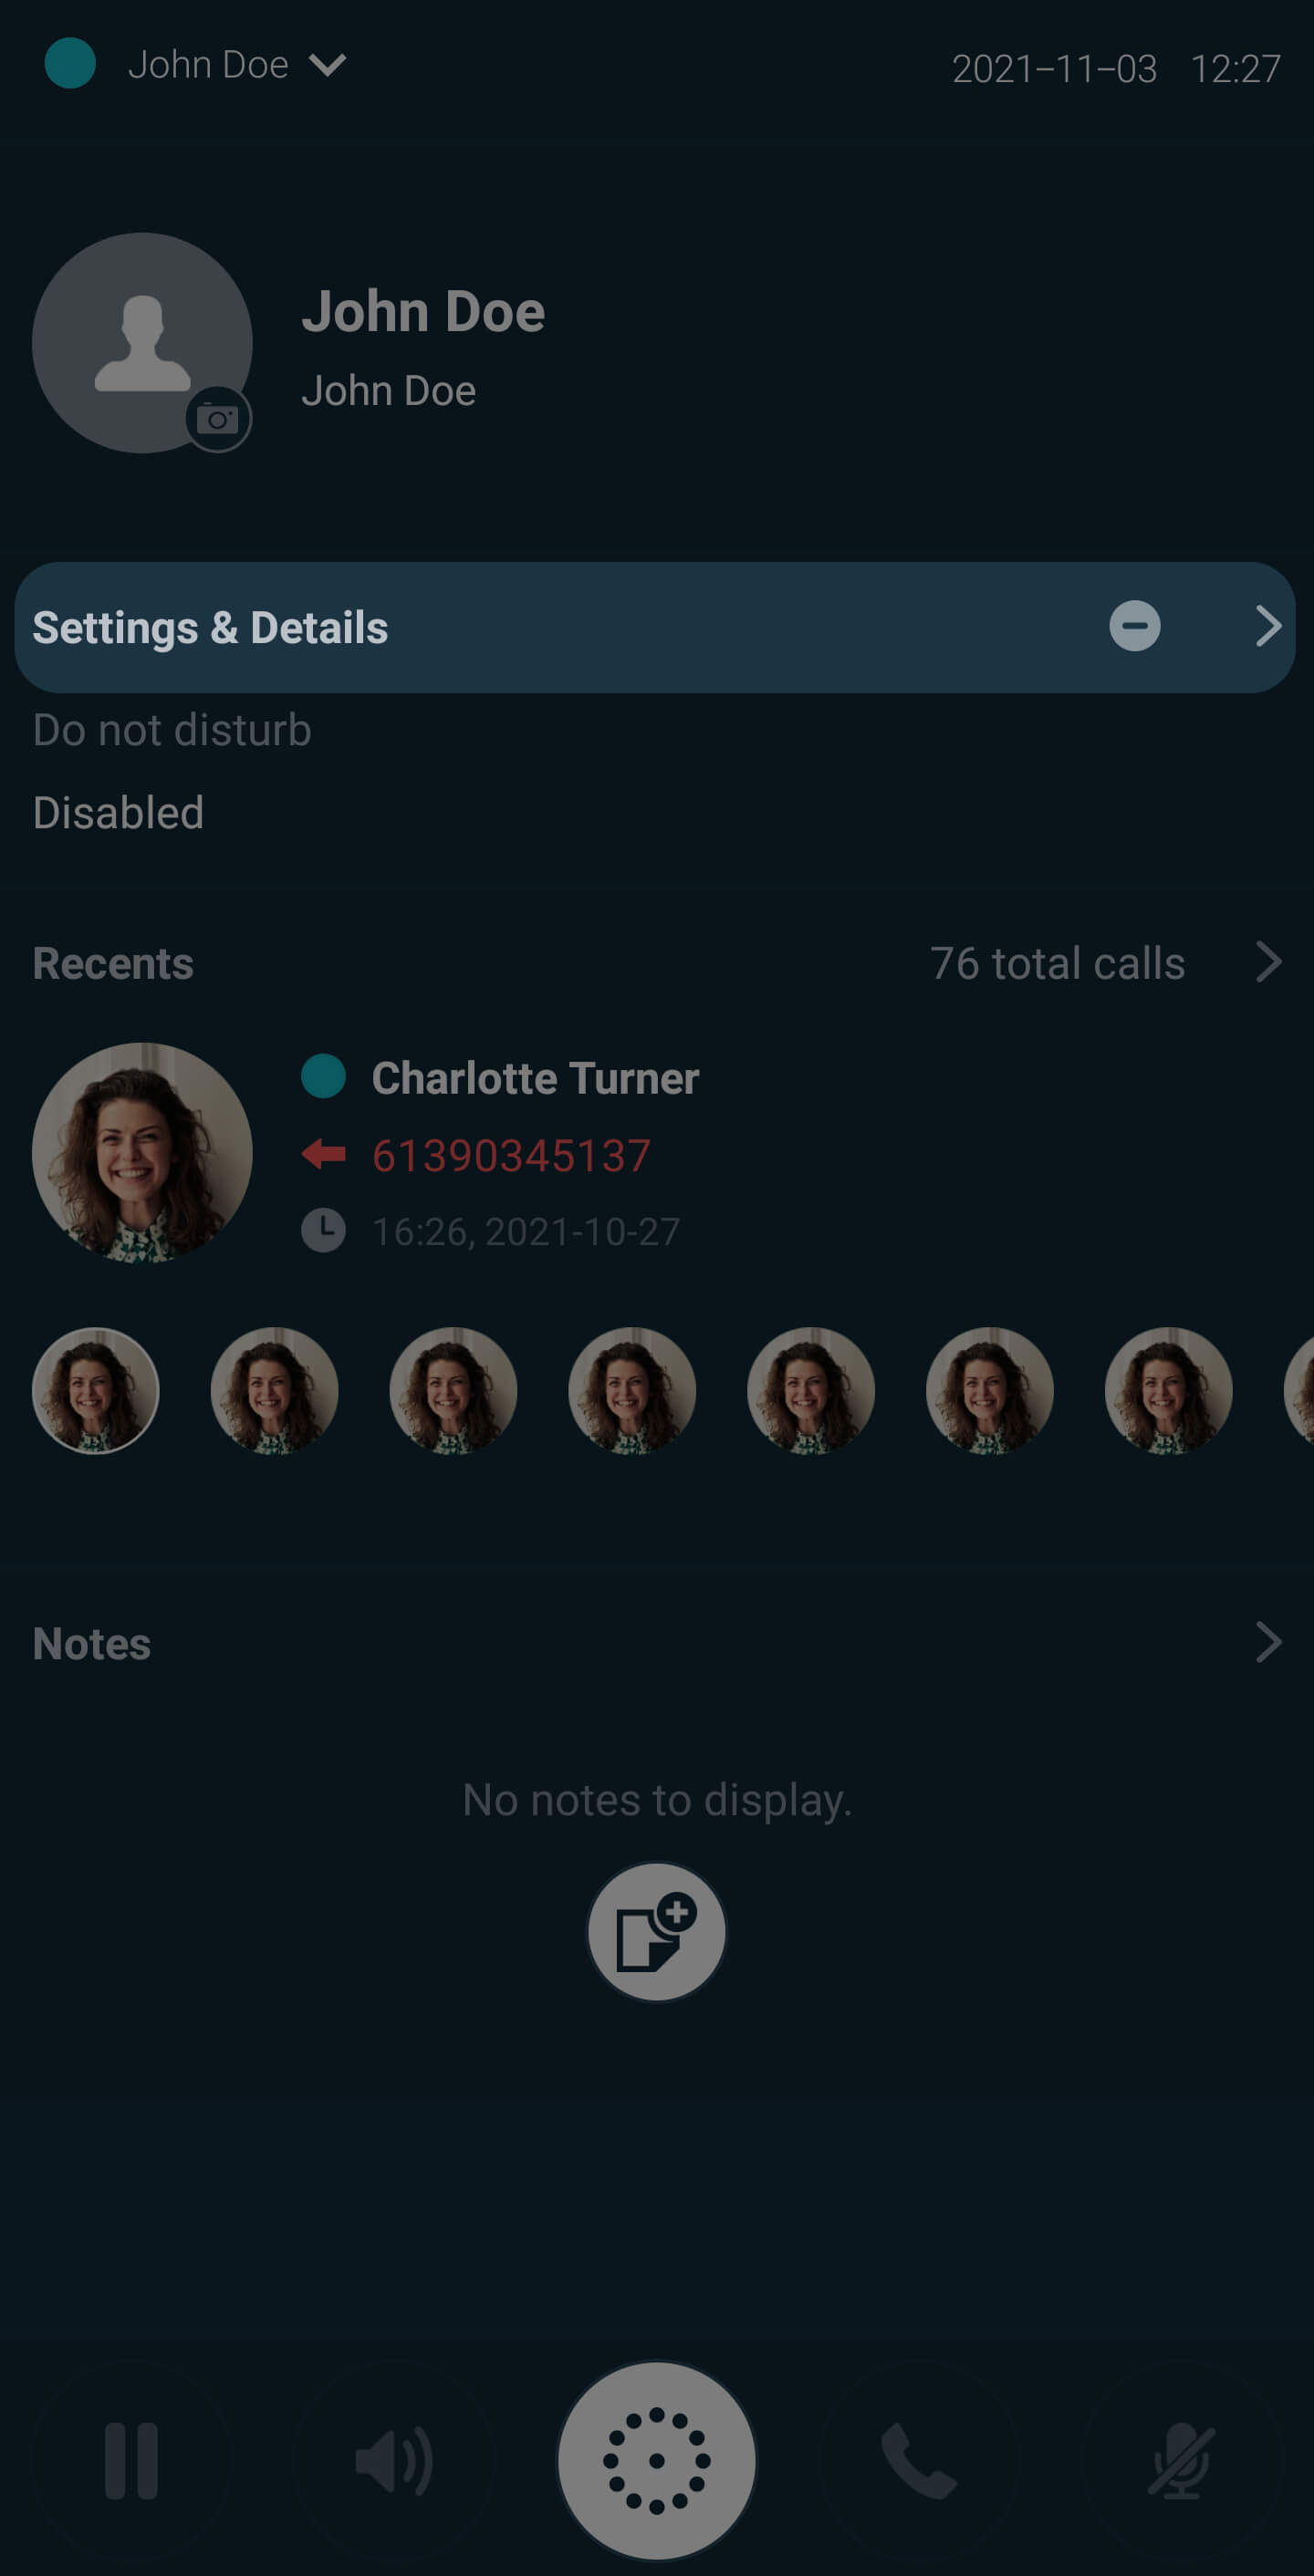
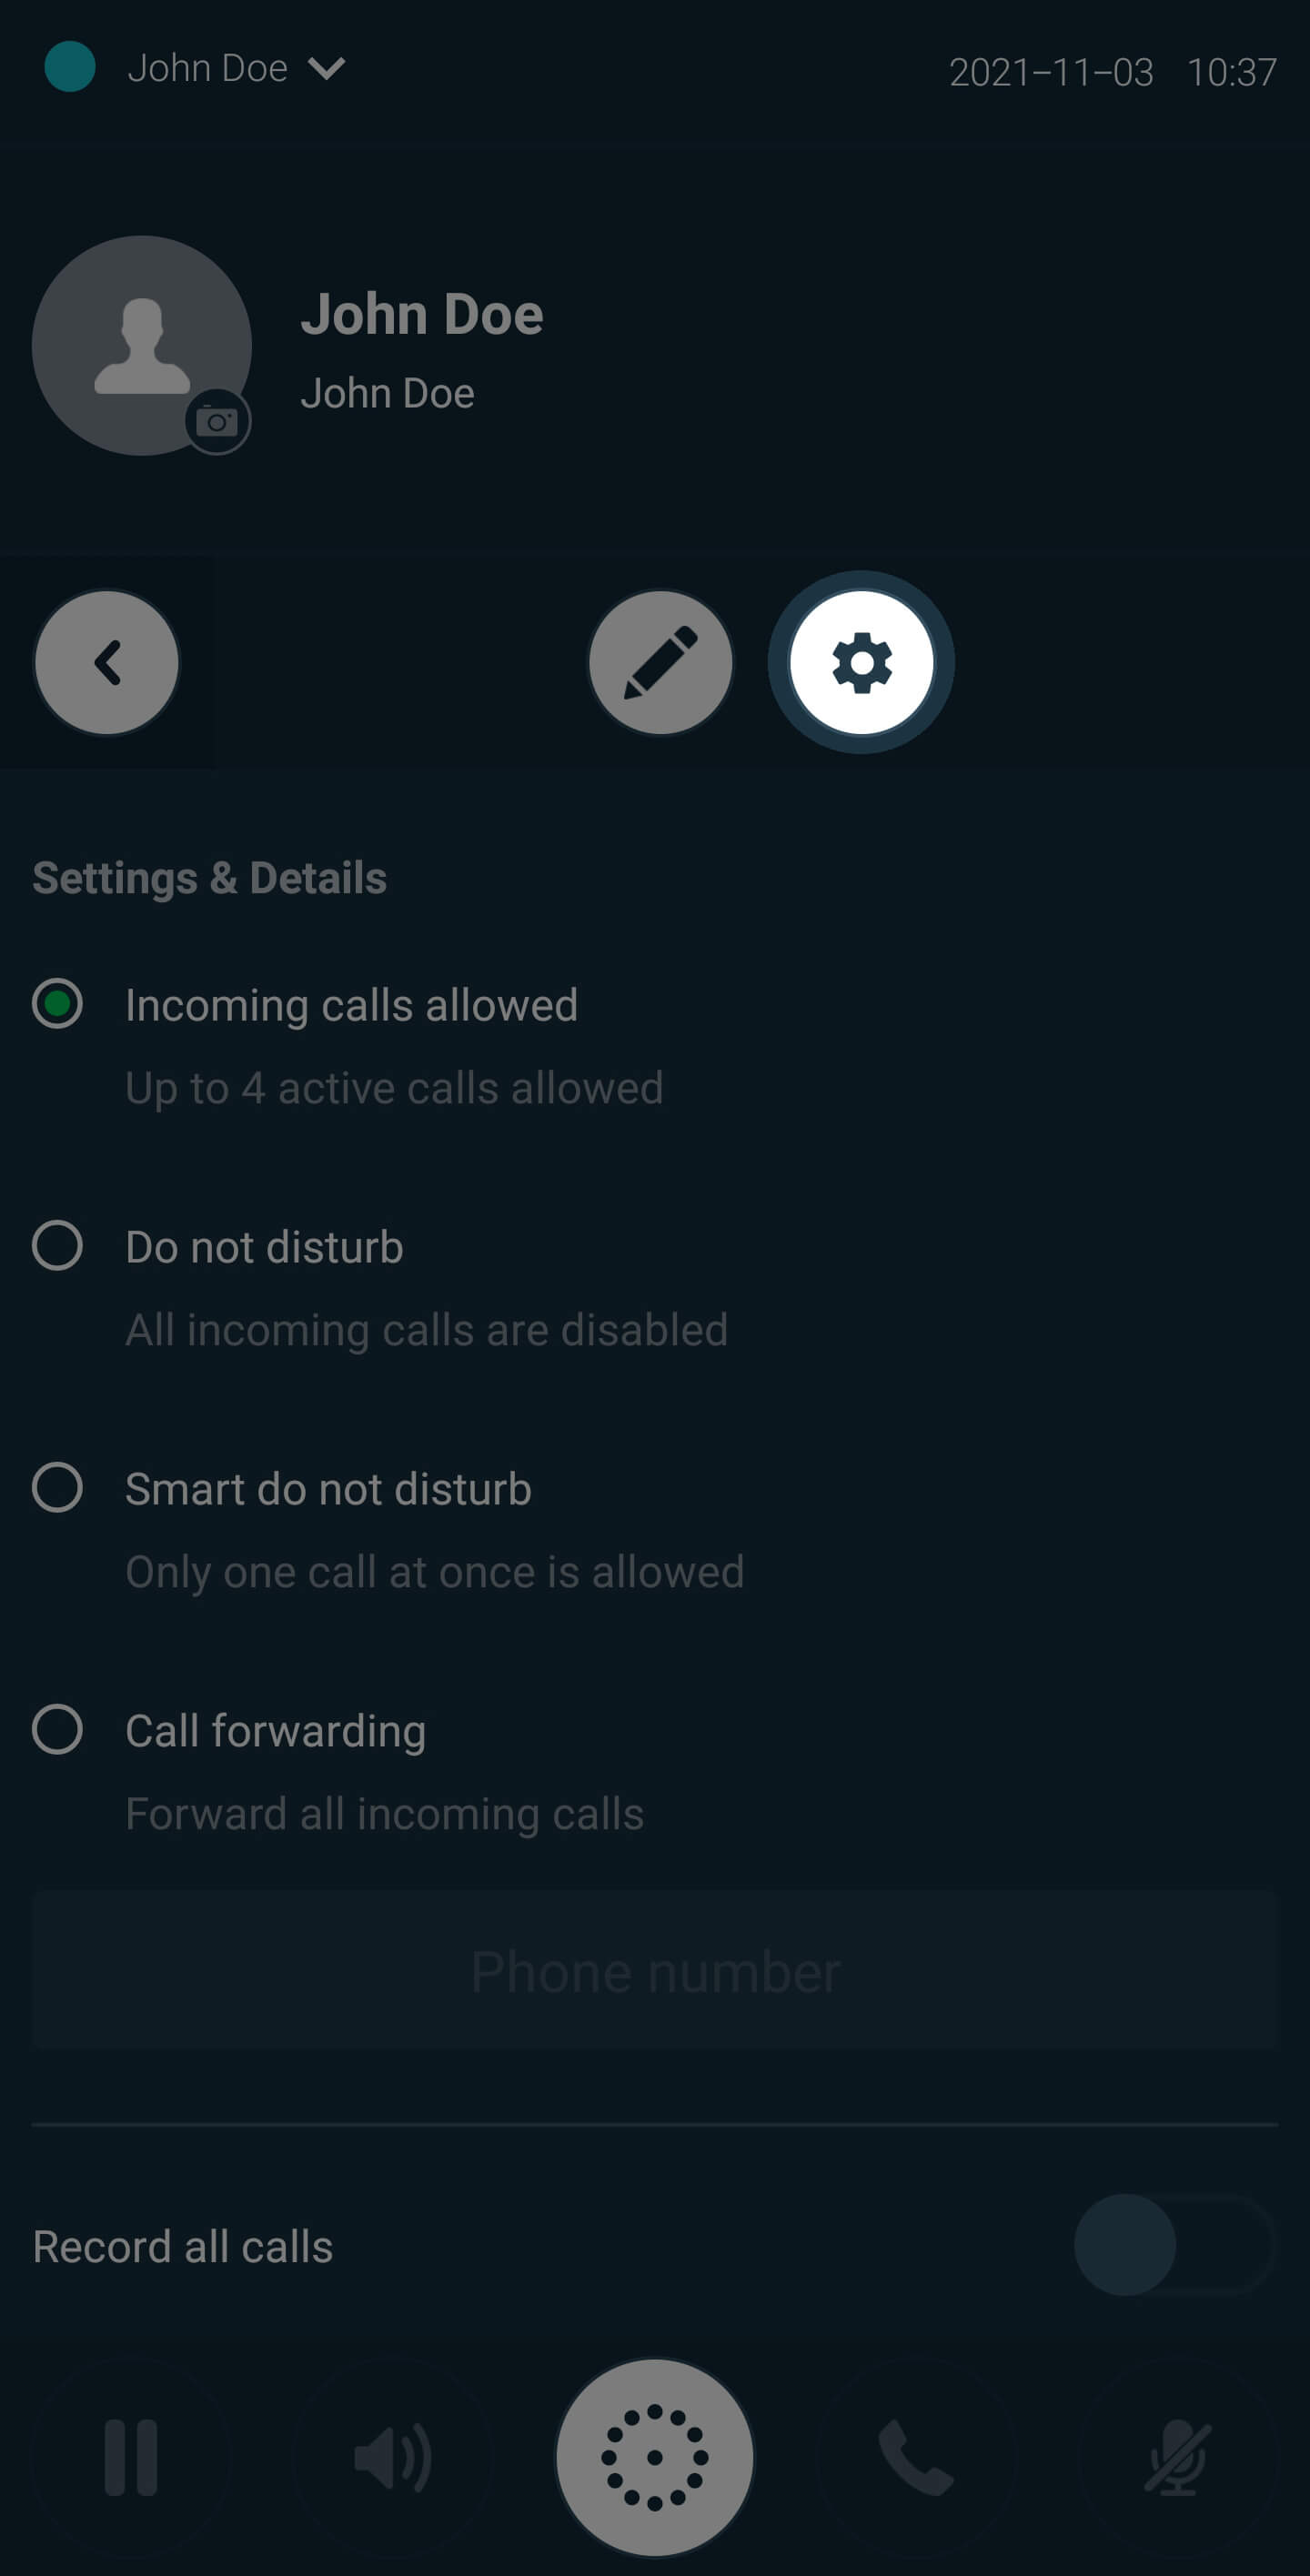
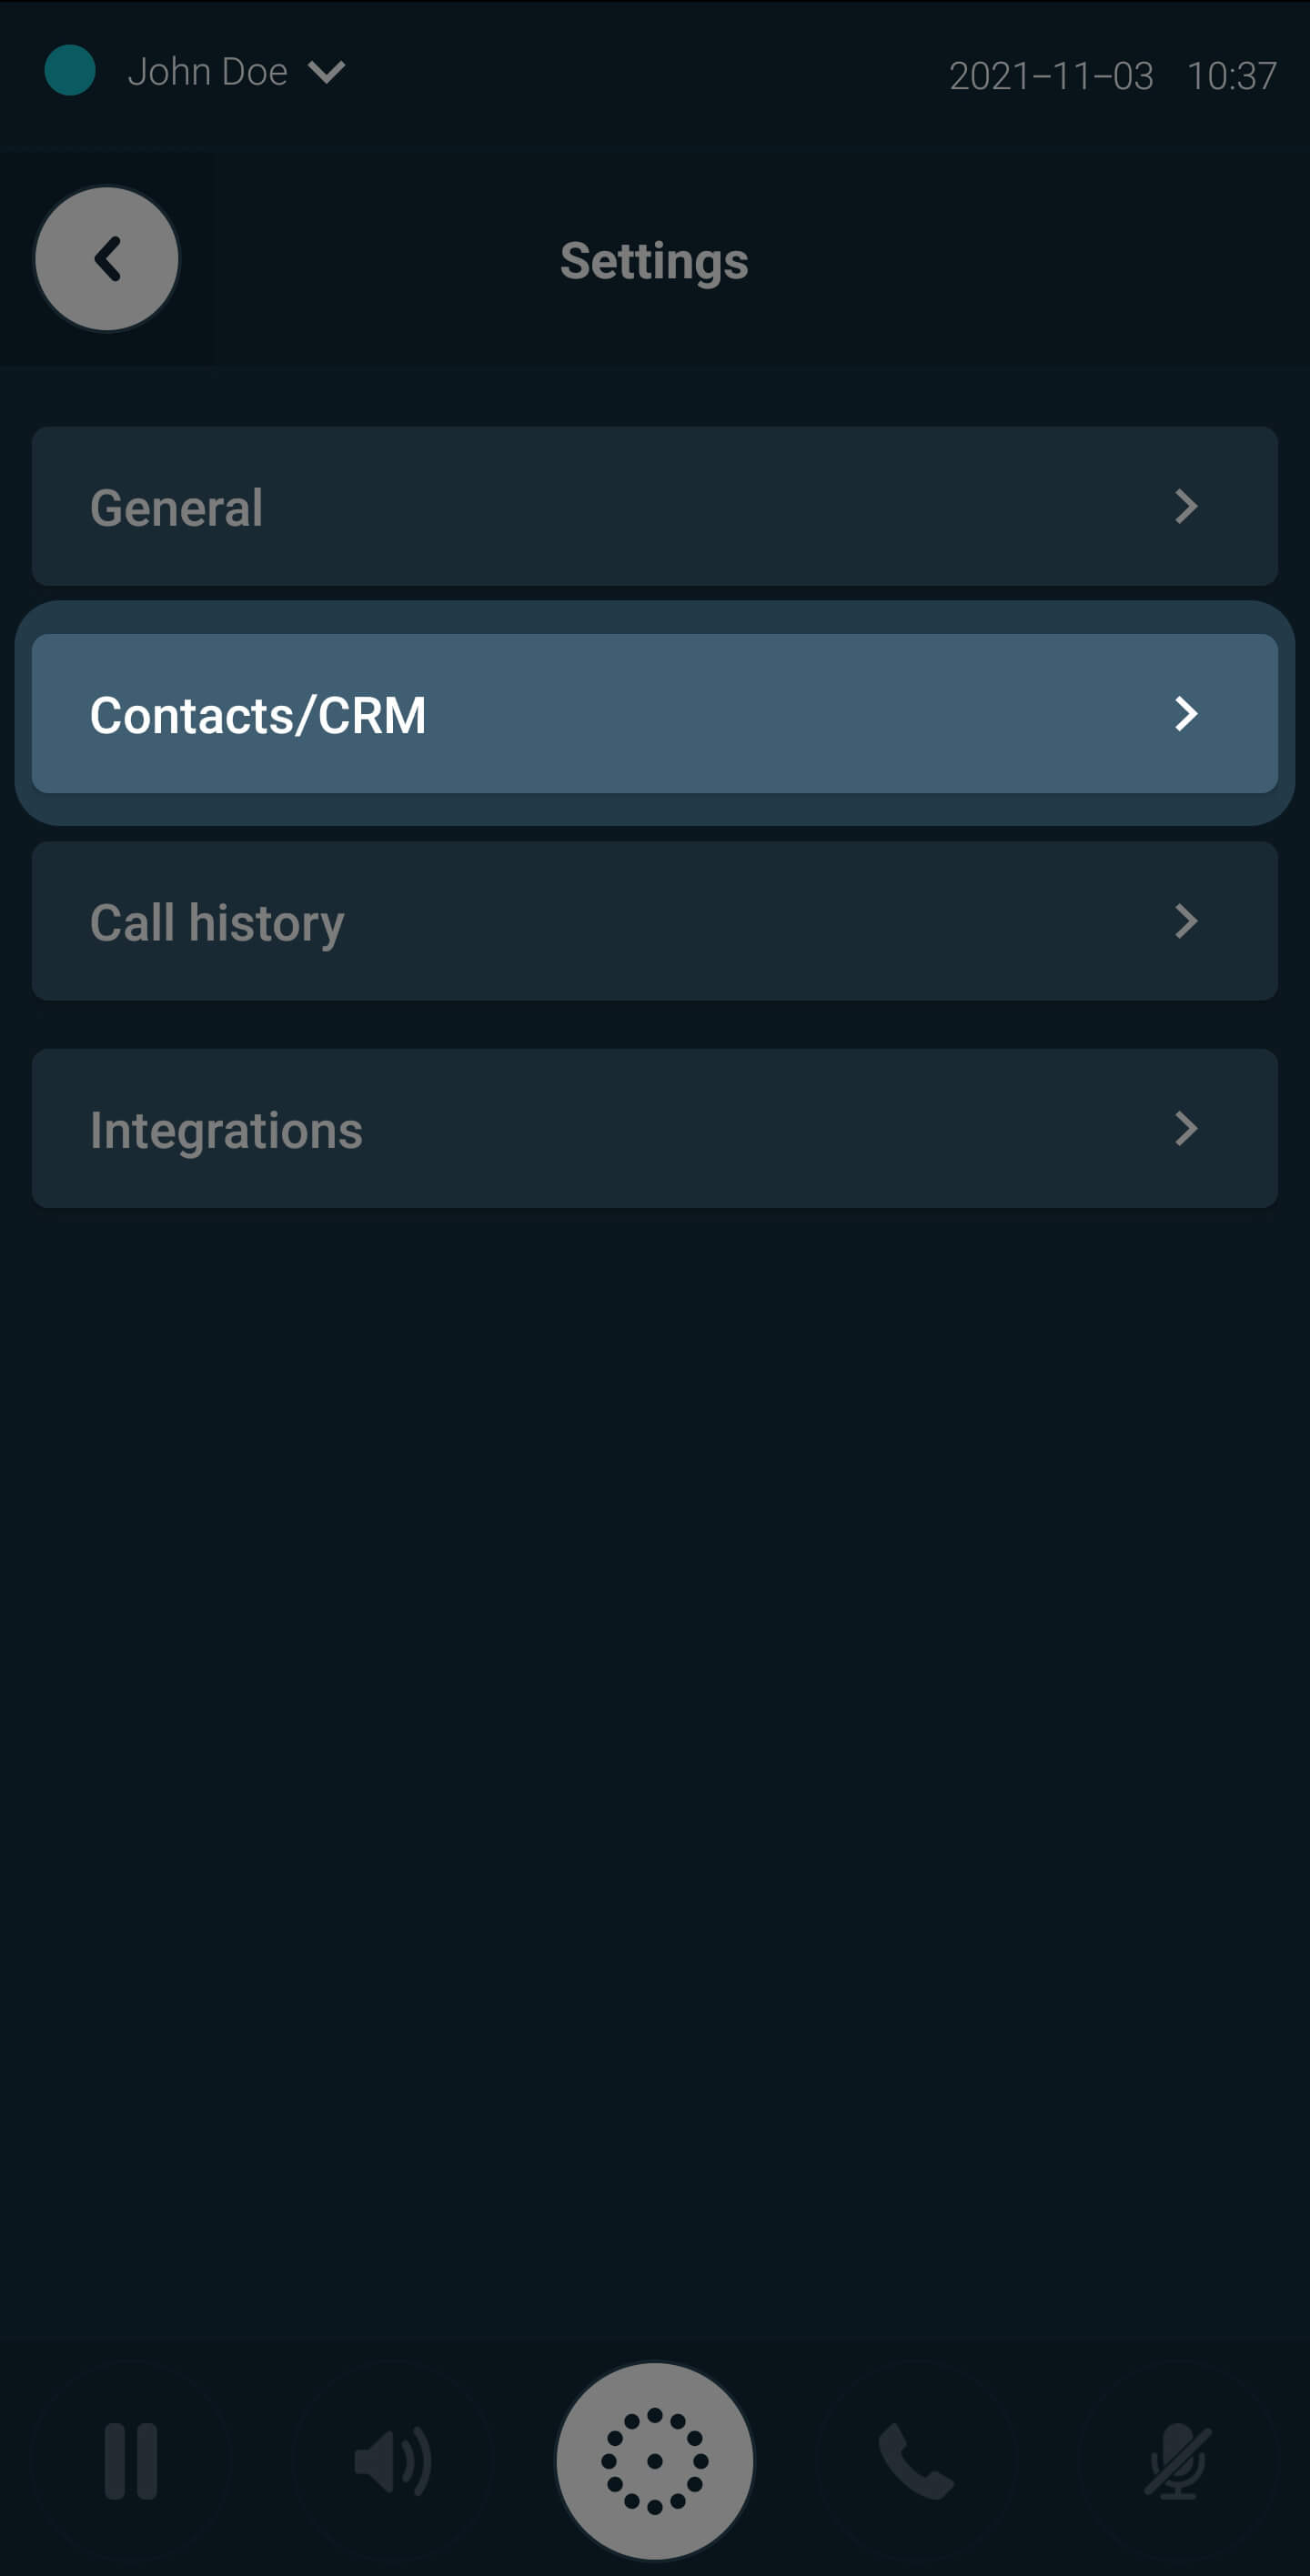
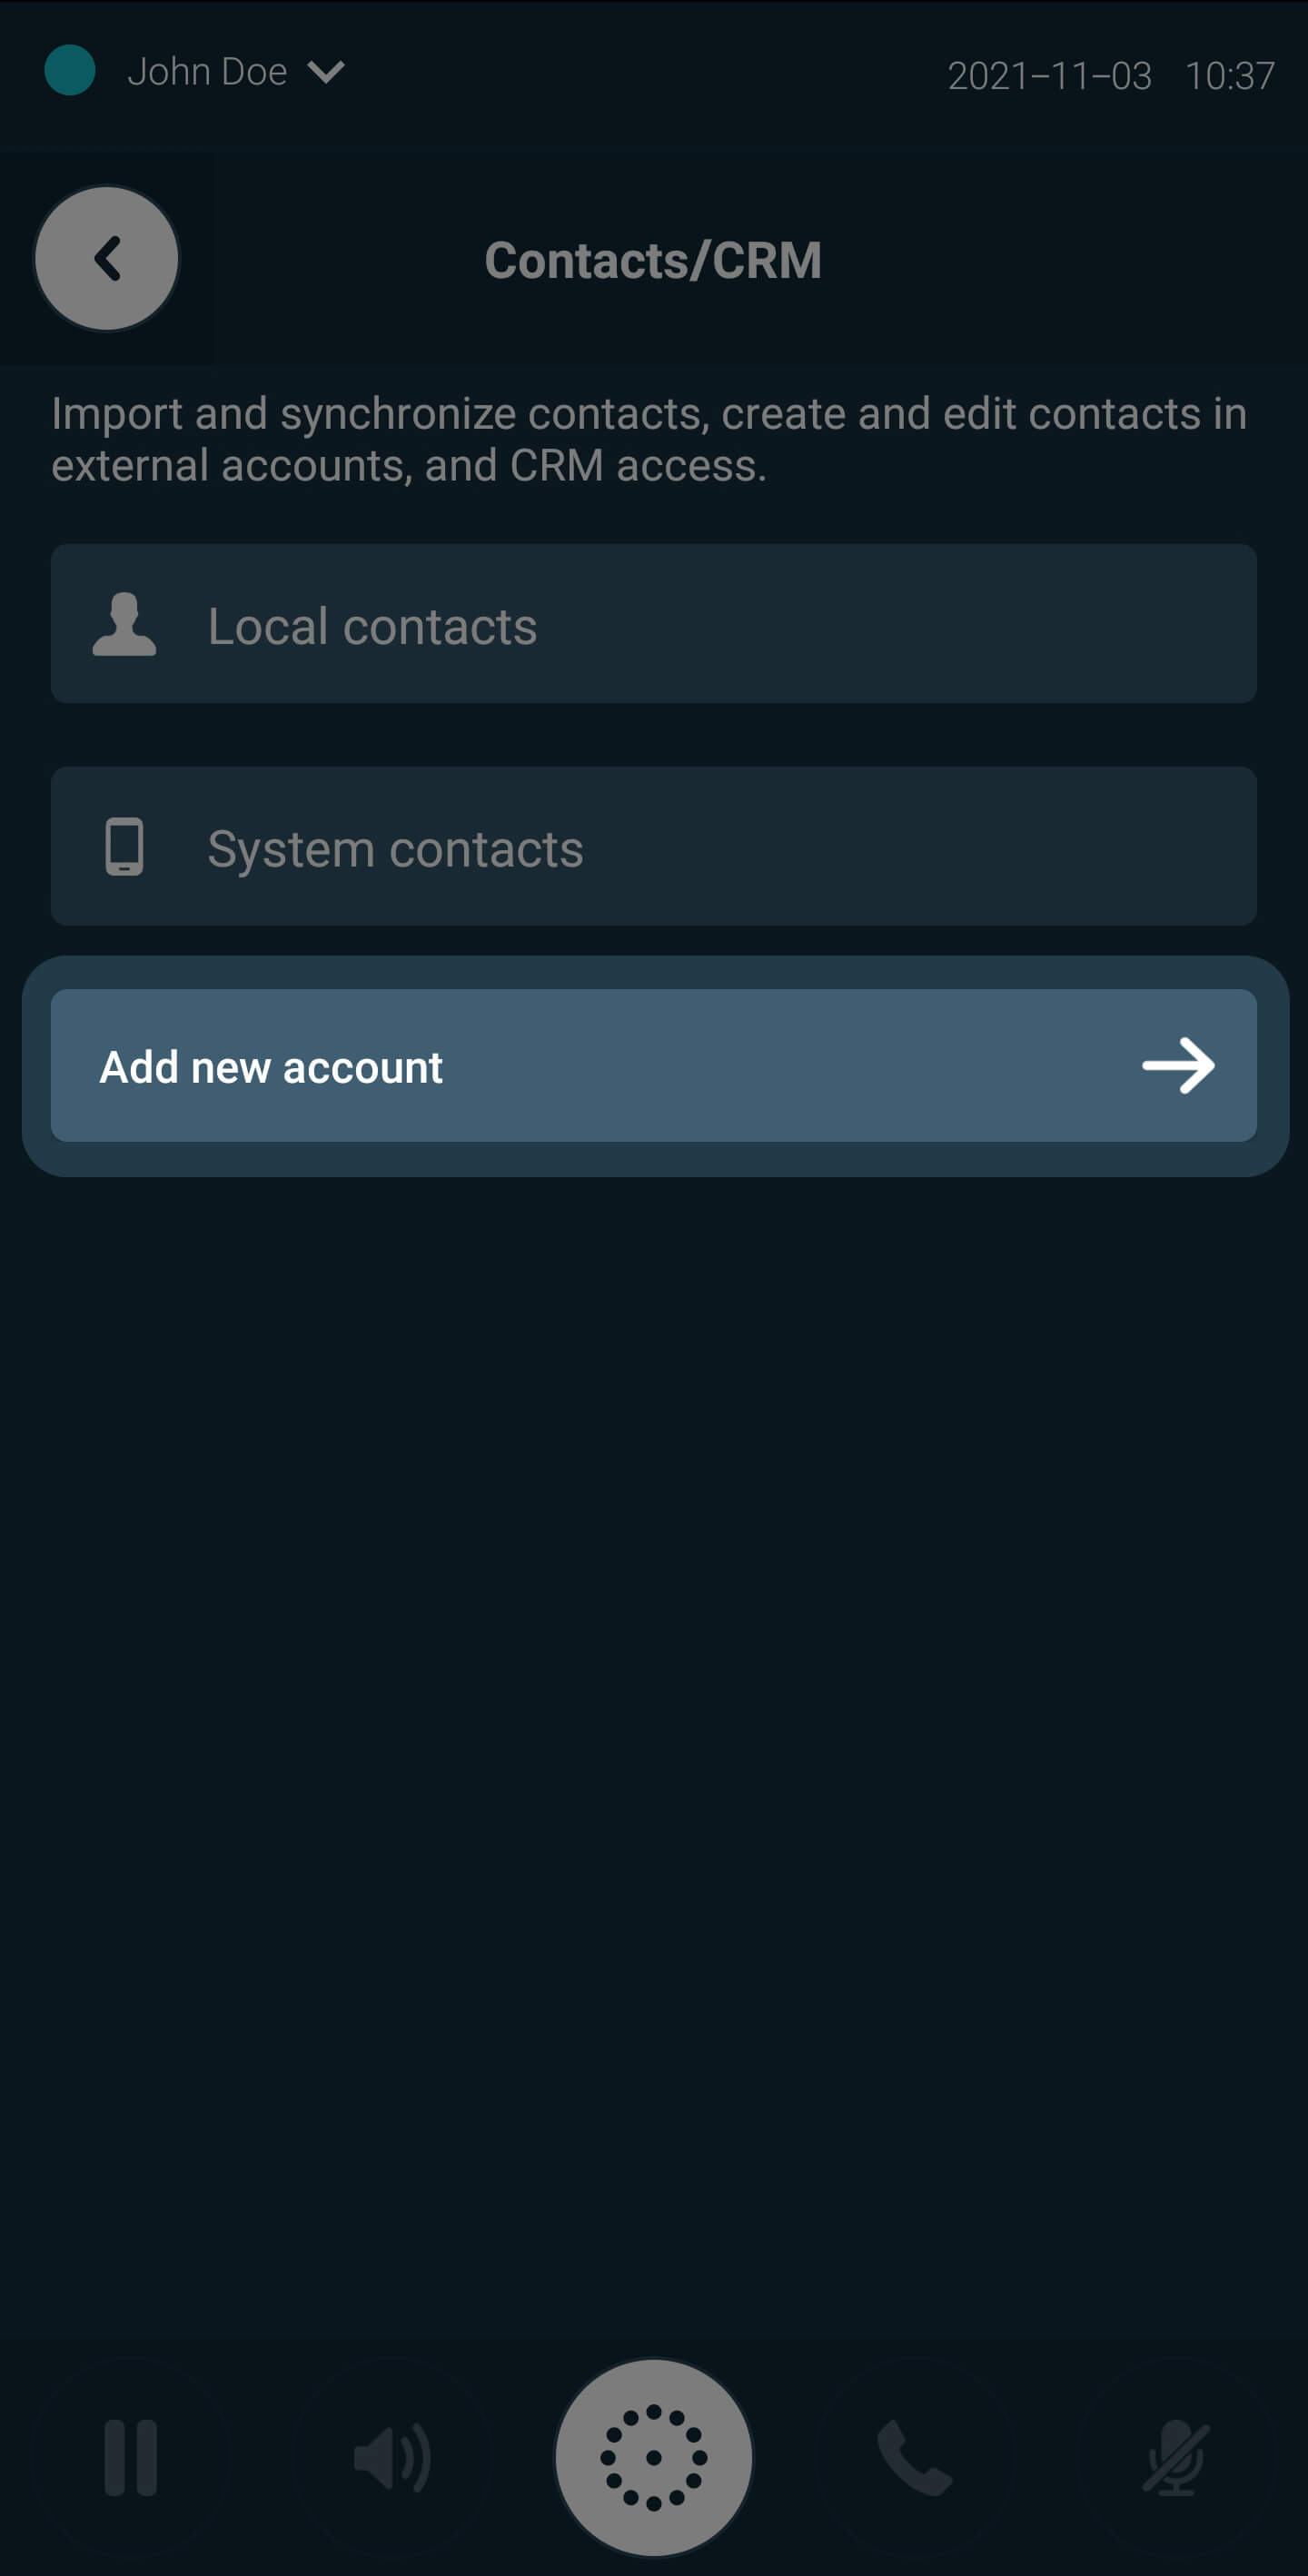
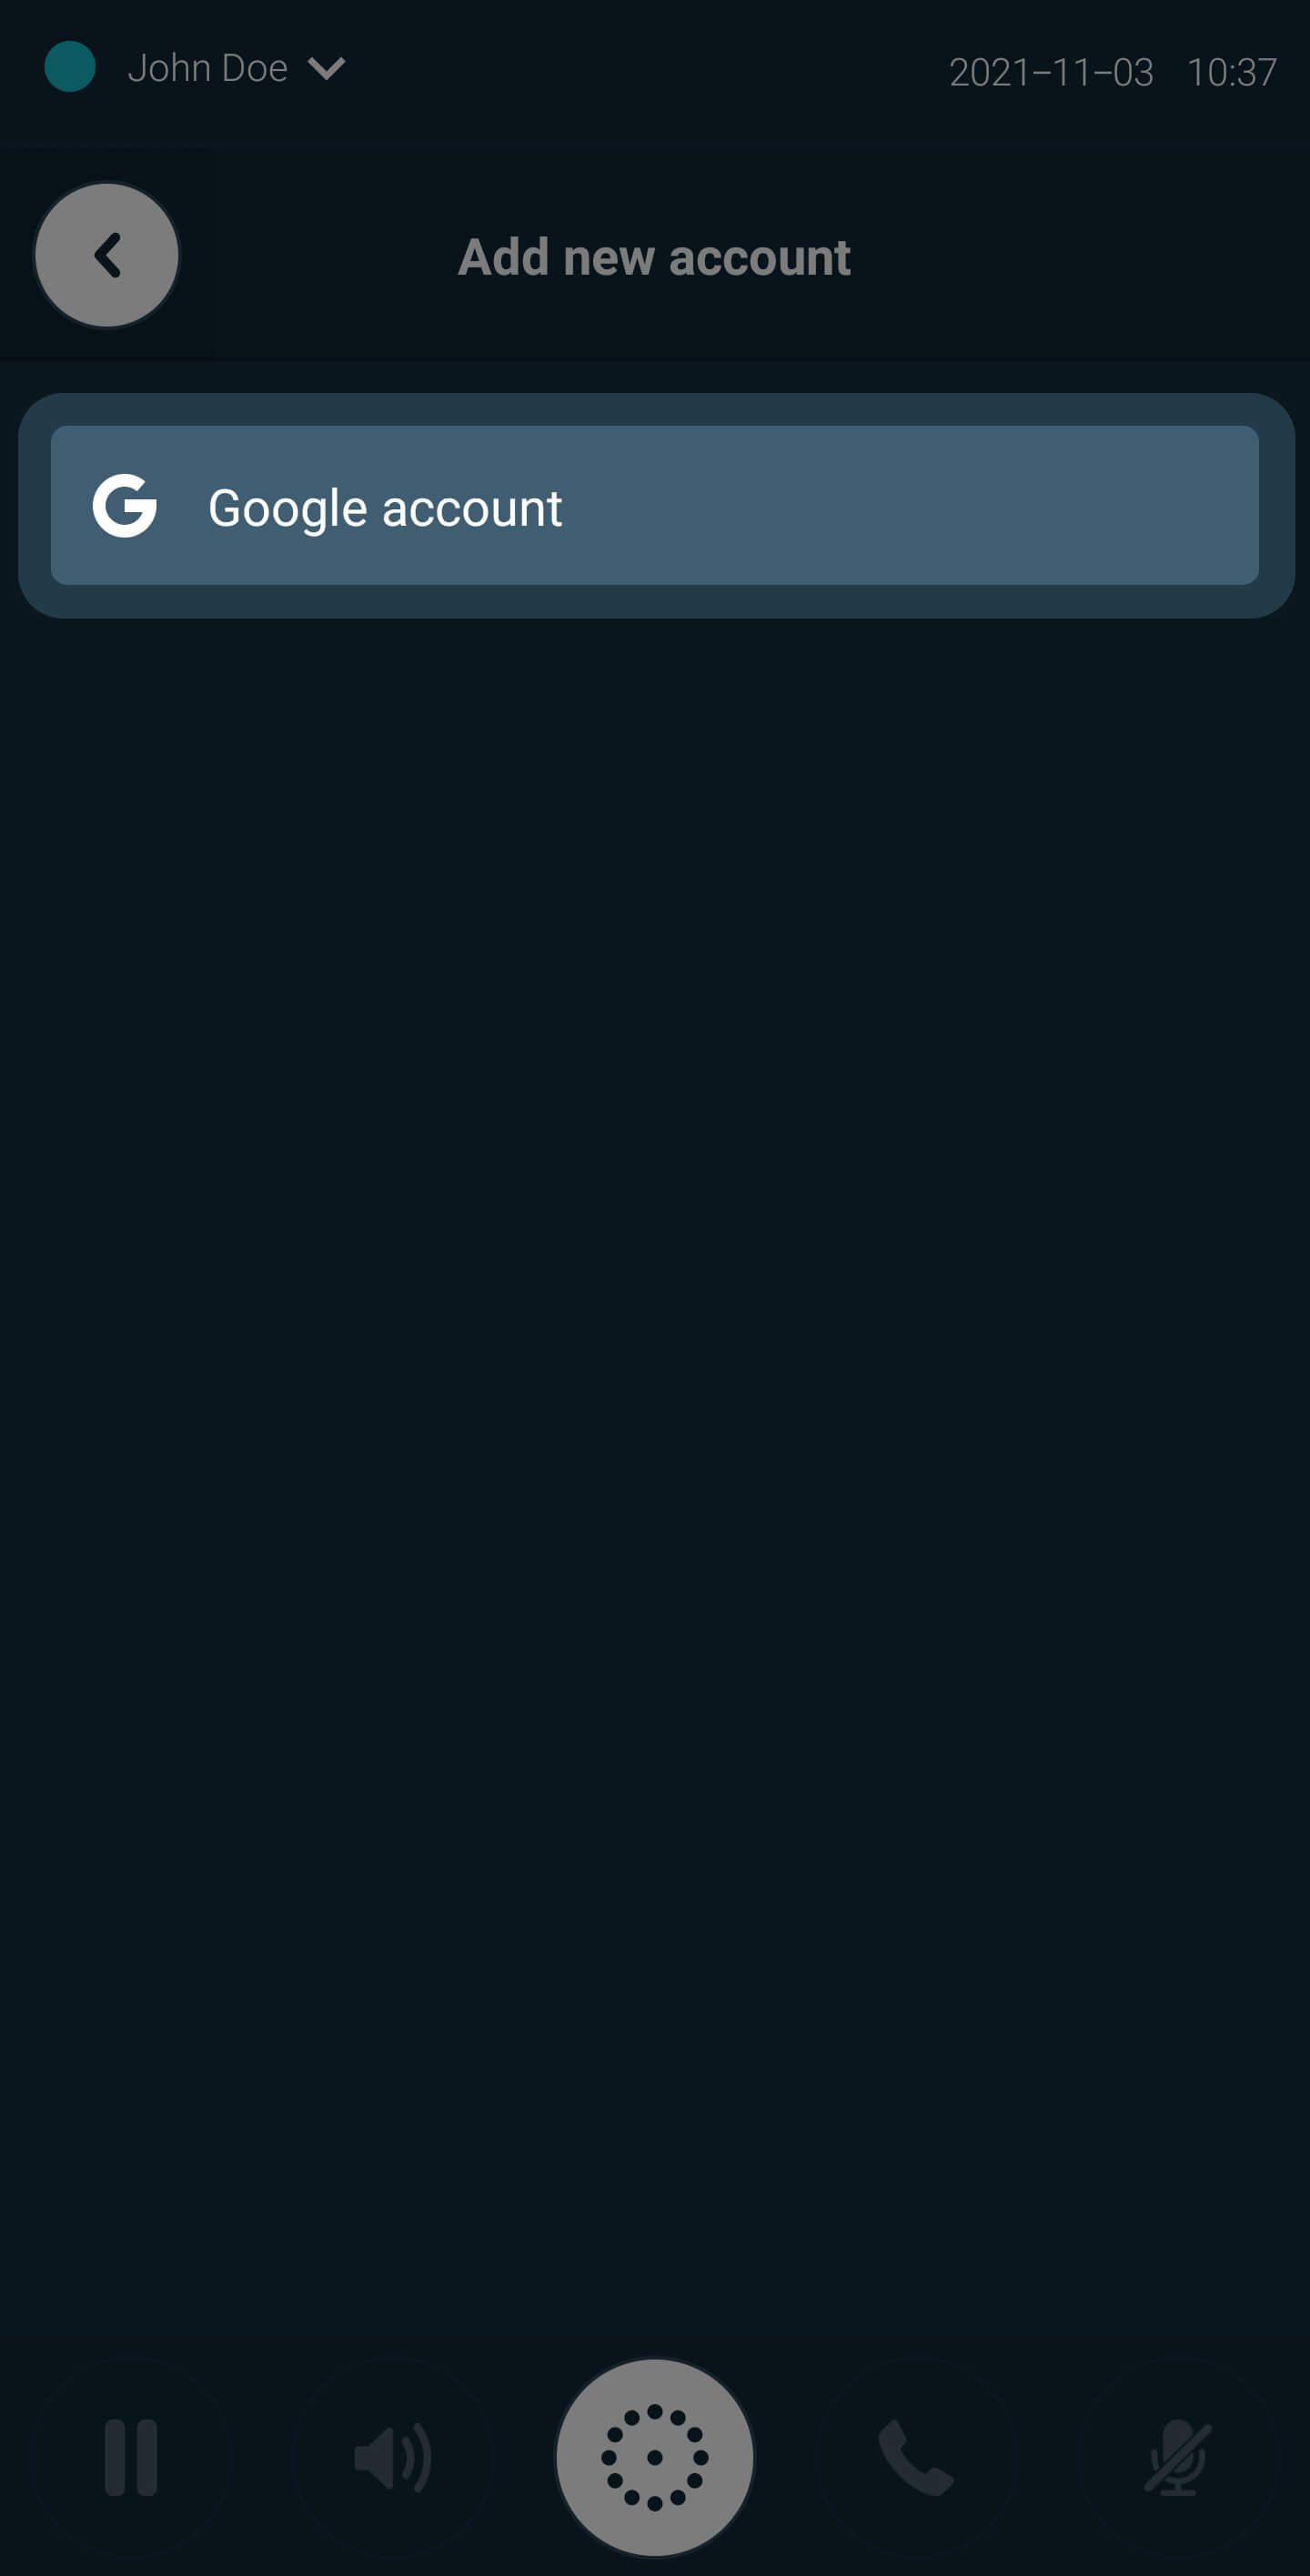
Managing imported contacts
Enabling or disabling an external account/CRM
The use of imported contacts can be temporarily disabled without removing the external account from the call.center™ app. This can be done by sliding the Enable Account toggle button to the left.
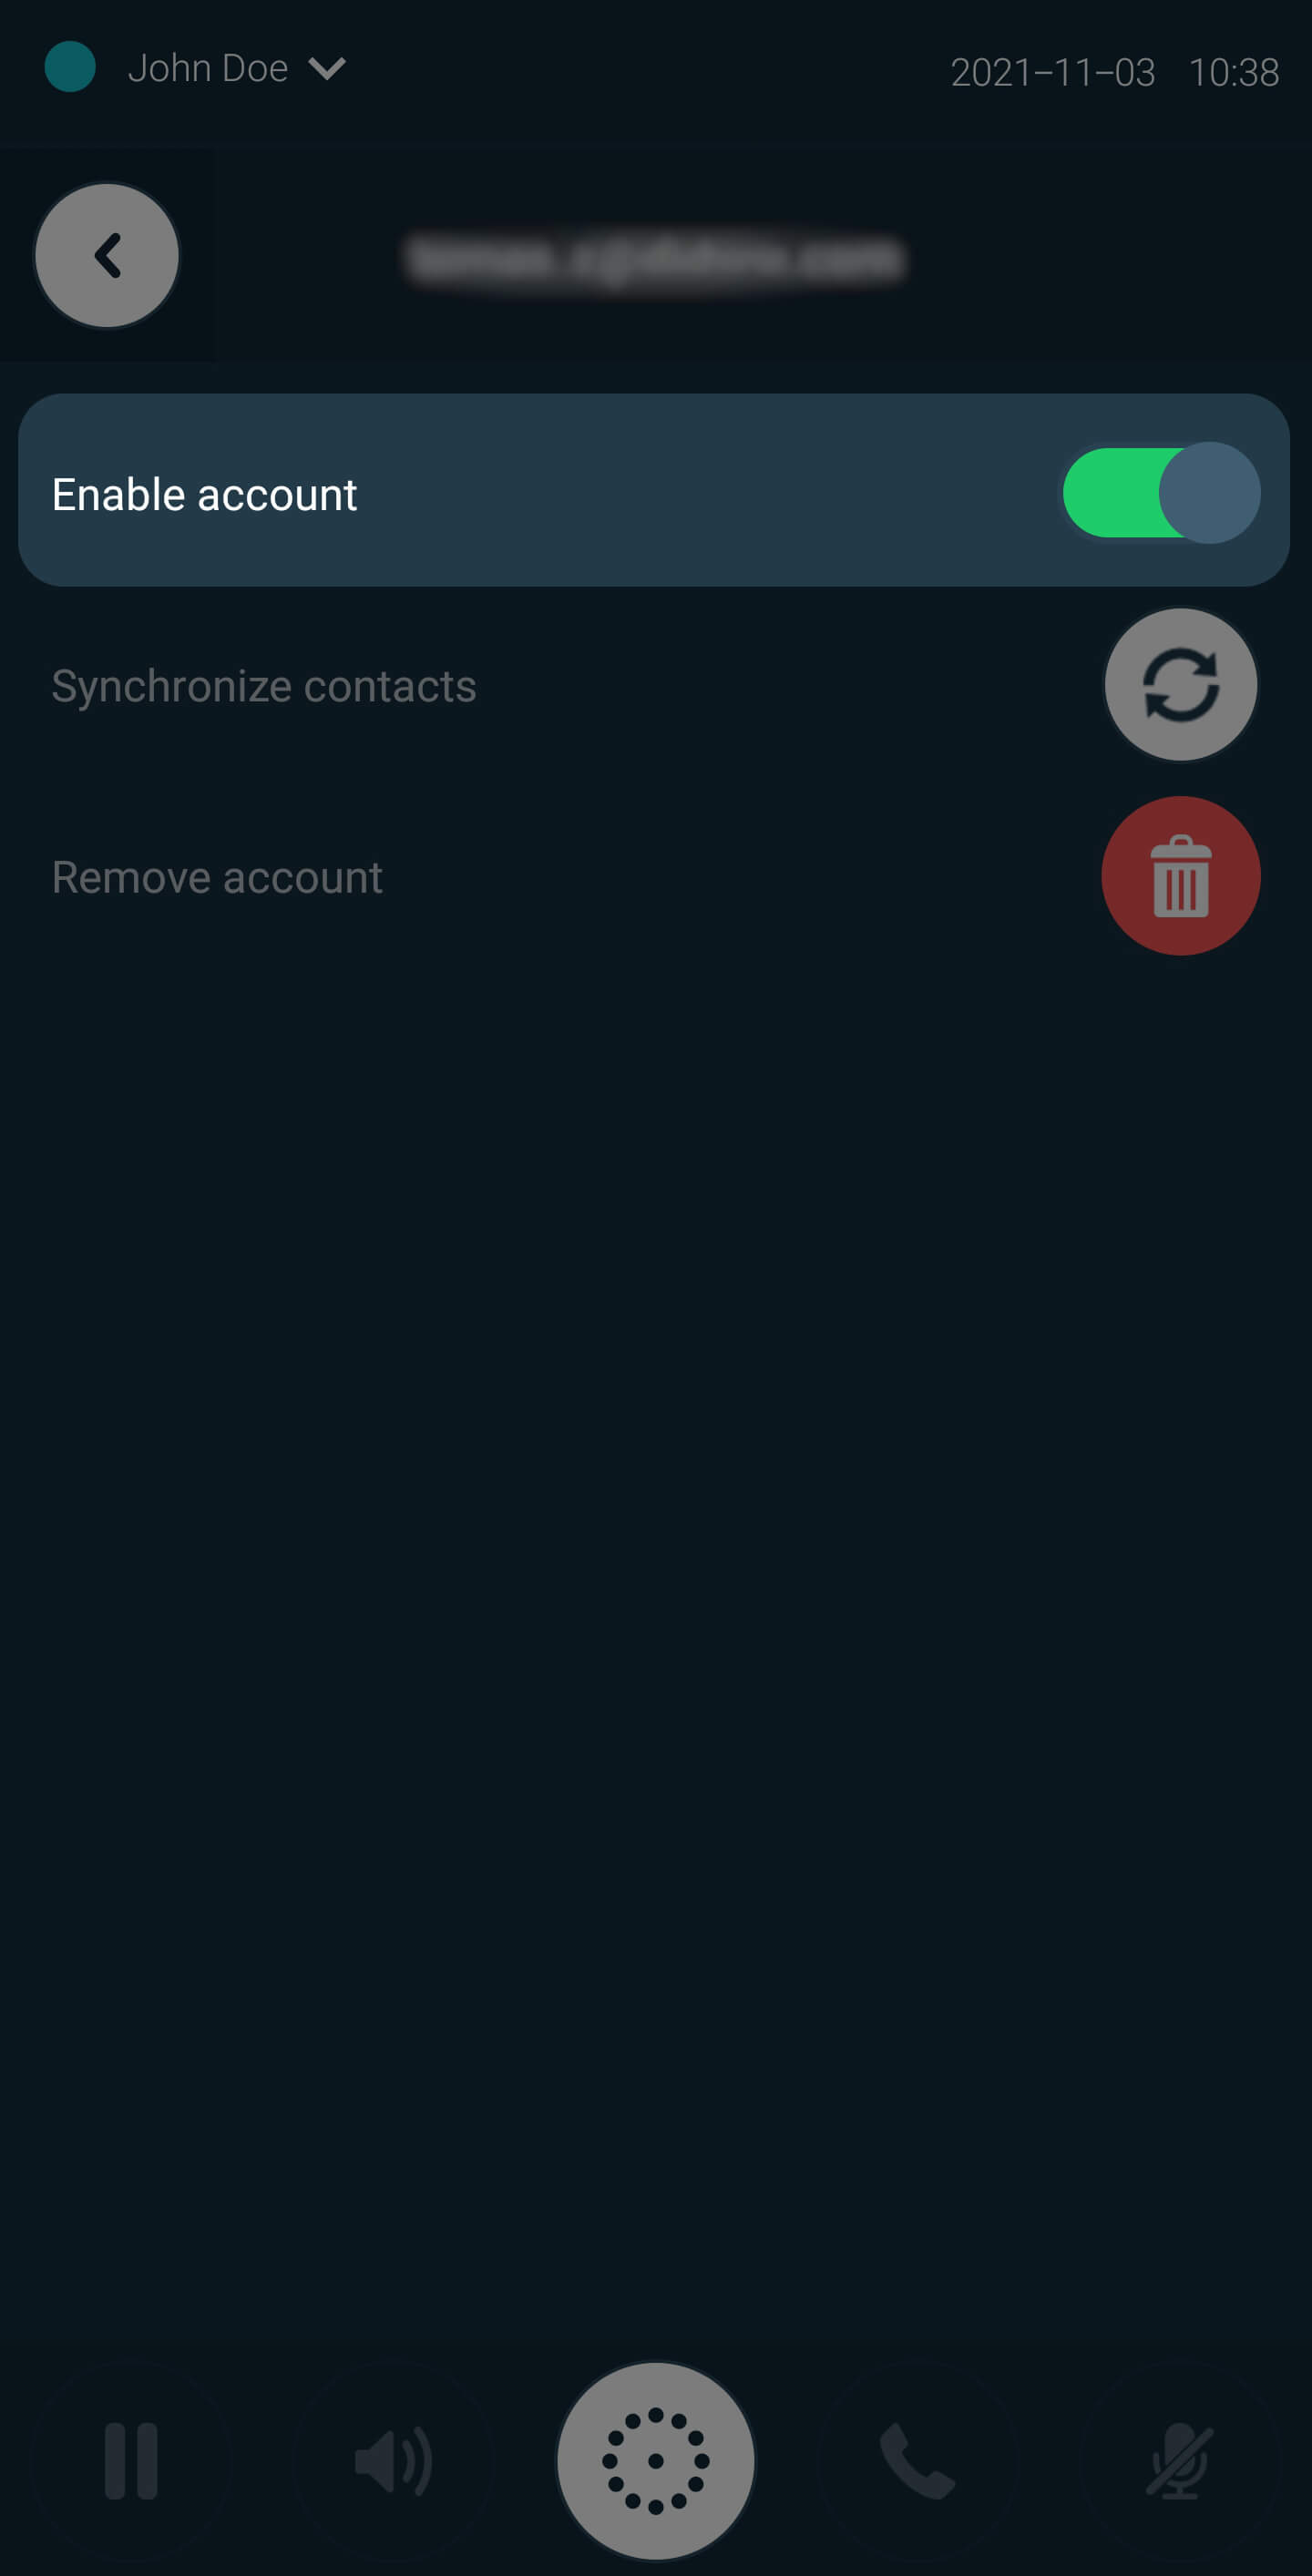
Re-synchronizing the external account/CRM
When using contacts from an external account or CRM system, those contacts are synchronized every time the call.center™ application is launched. However, it may be necessary to re-synchronize the contact details between call.center™ and a third-party account/CRM if changes were made to the contact information. This action will update the contact information on both the call.center™ device and the external account.
To re-synchronize contacts, press the “Re-sync” button located next to the external account listing.
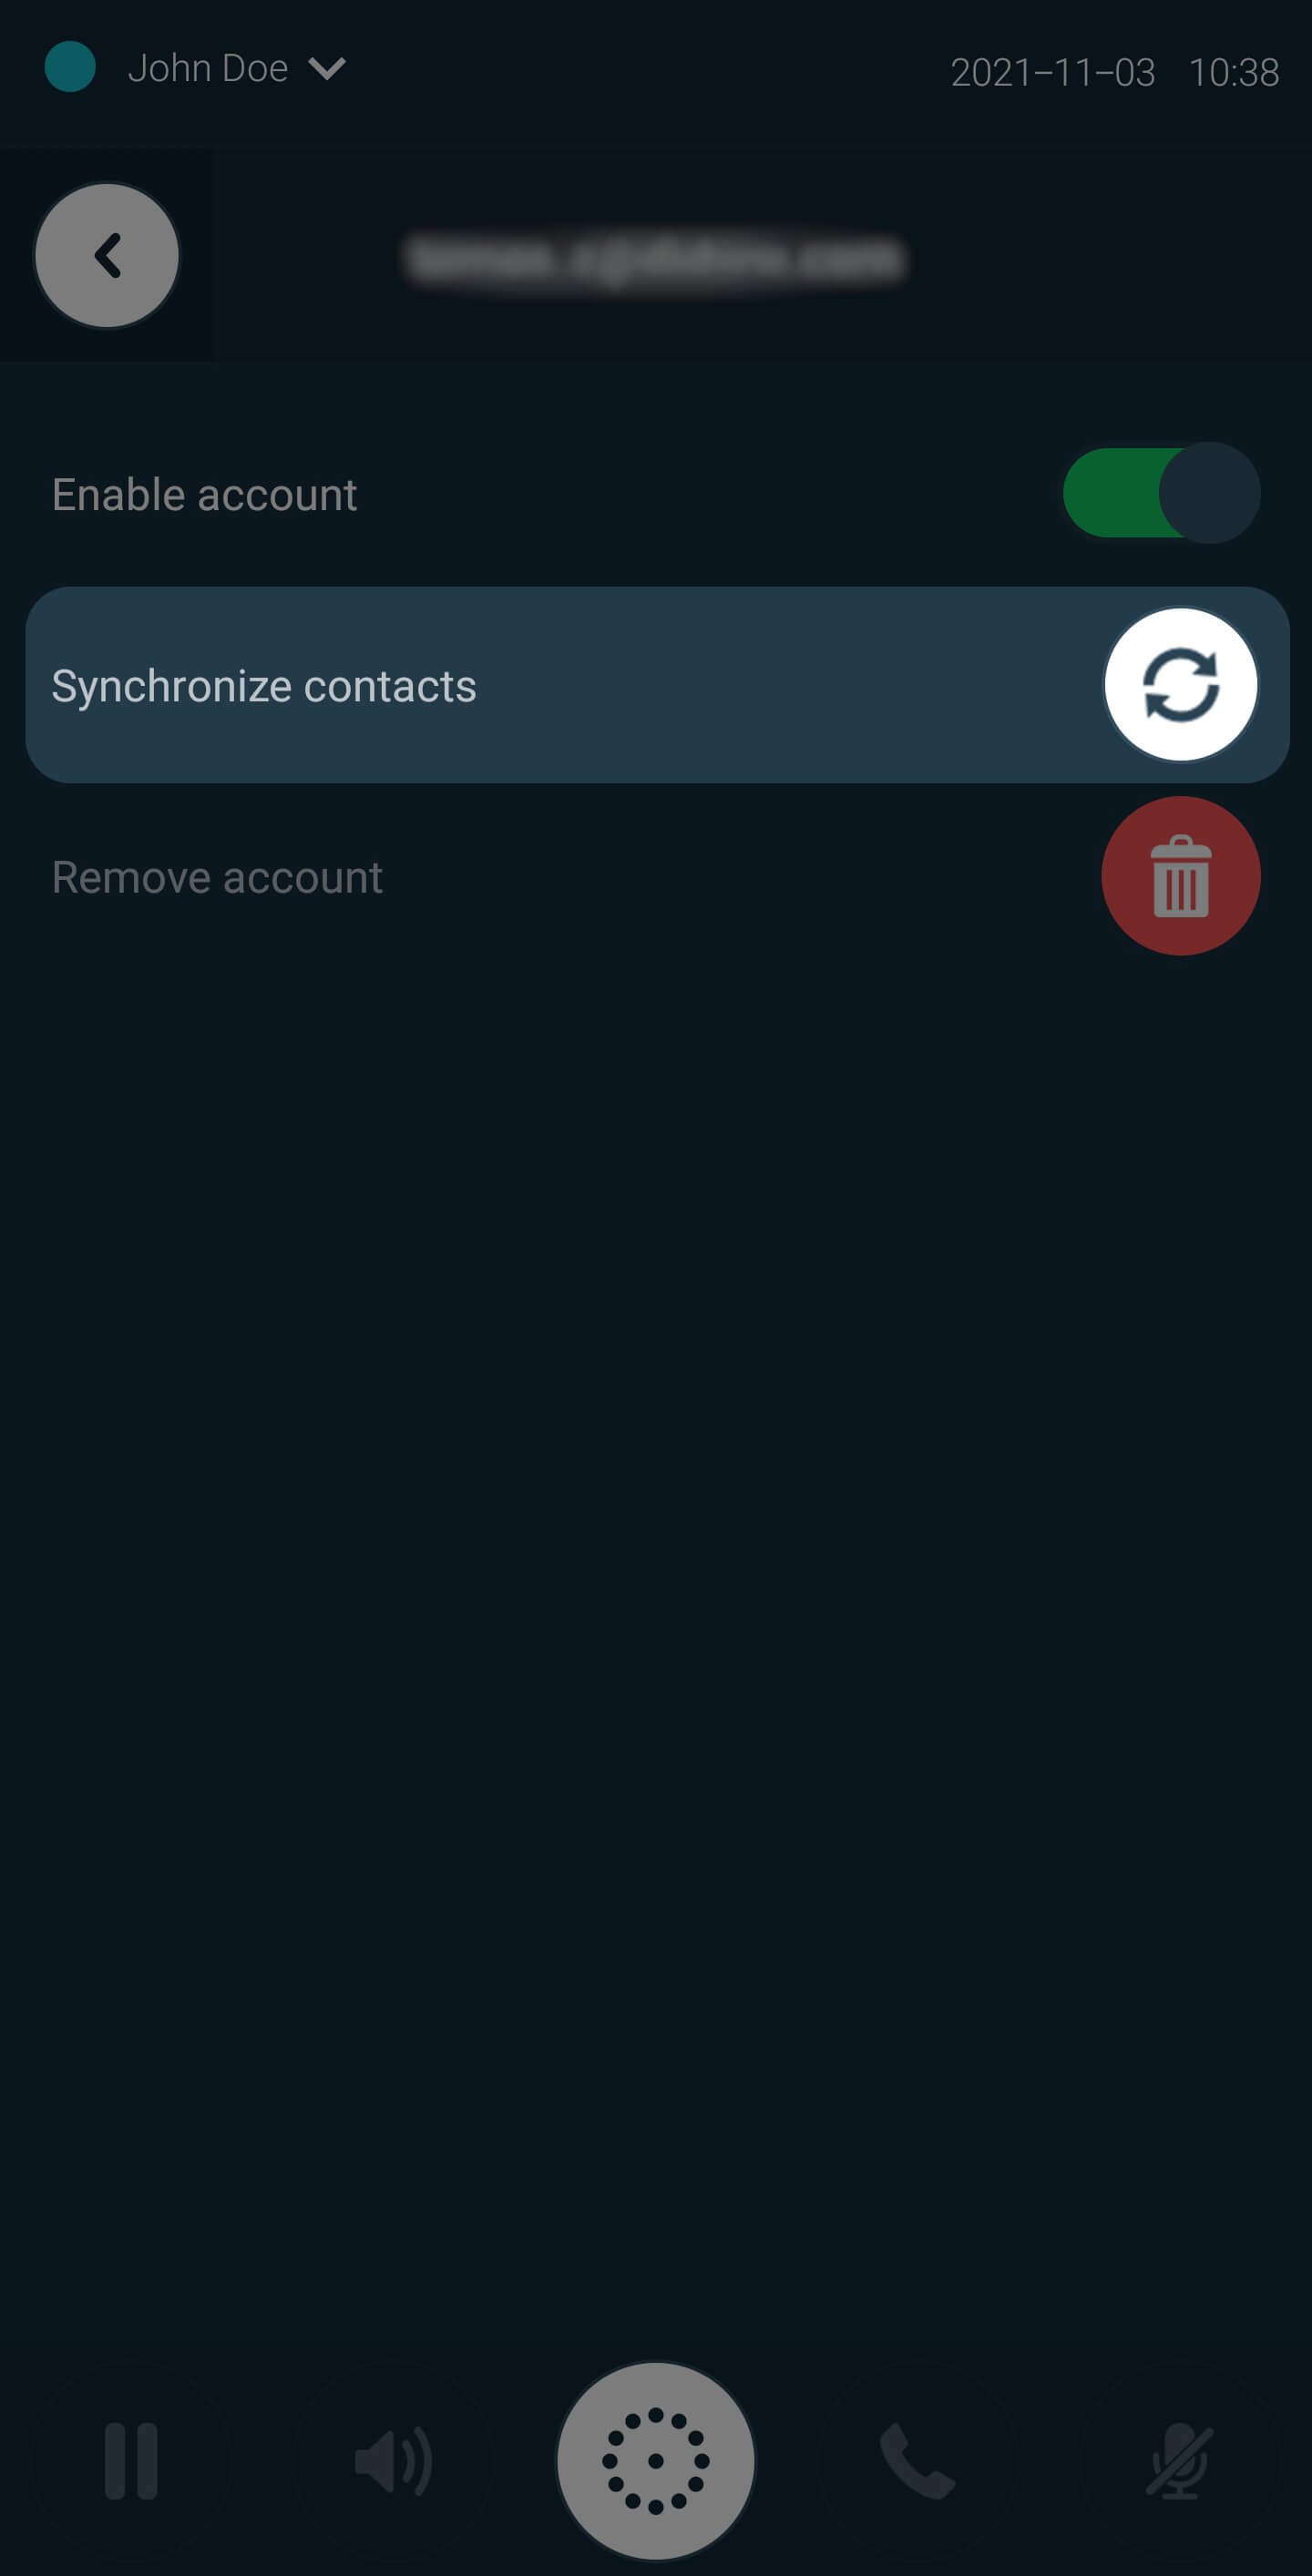
Removing an external account/CRM
Access to imported contacts may be permanently disabled by pressing the “Remove” button, and then confirming that you wish to no longer have access to the external account.
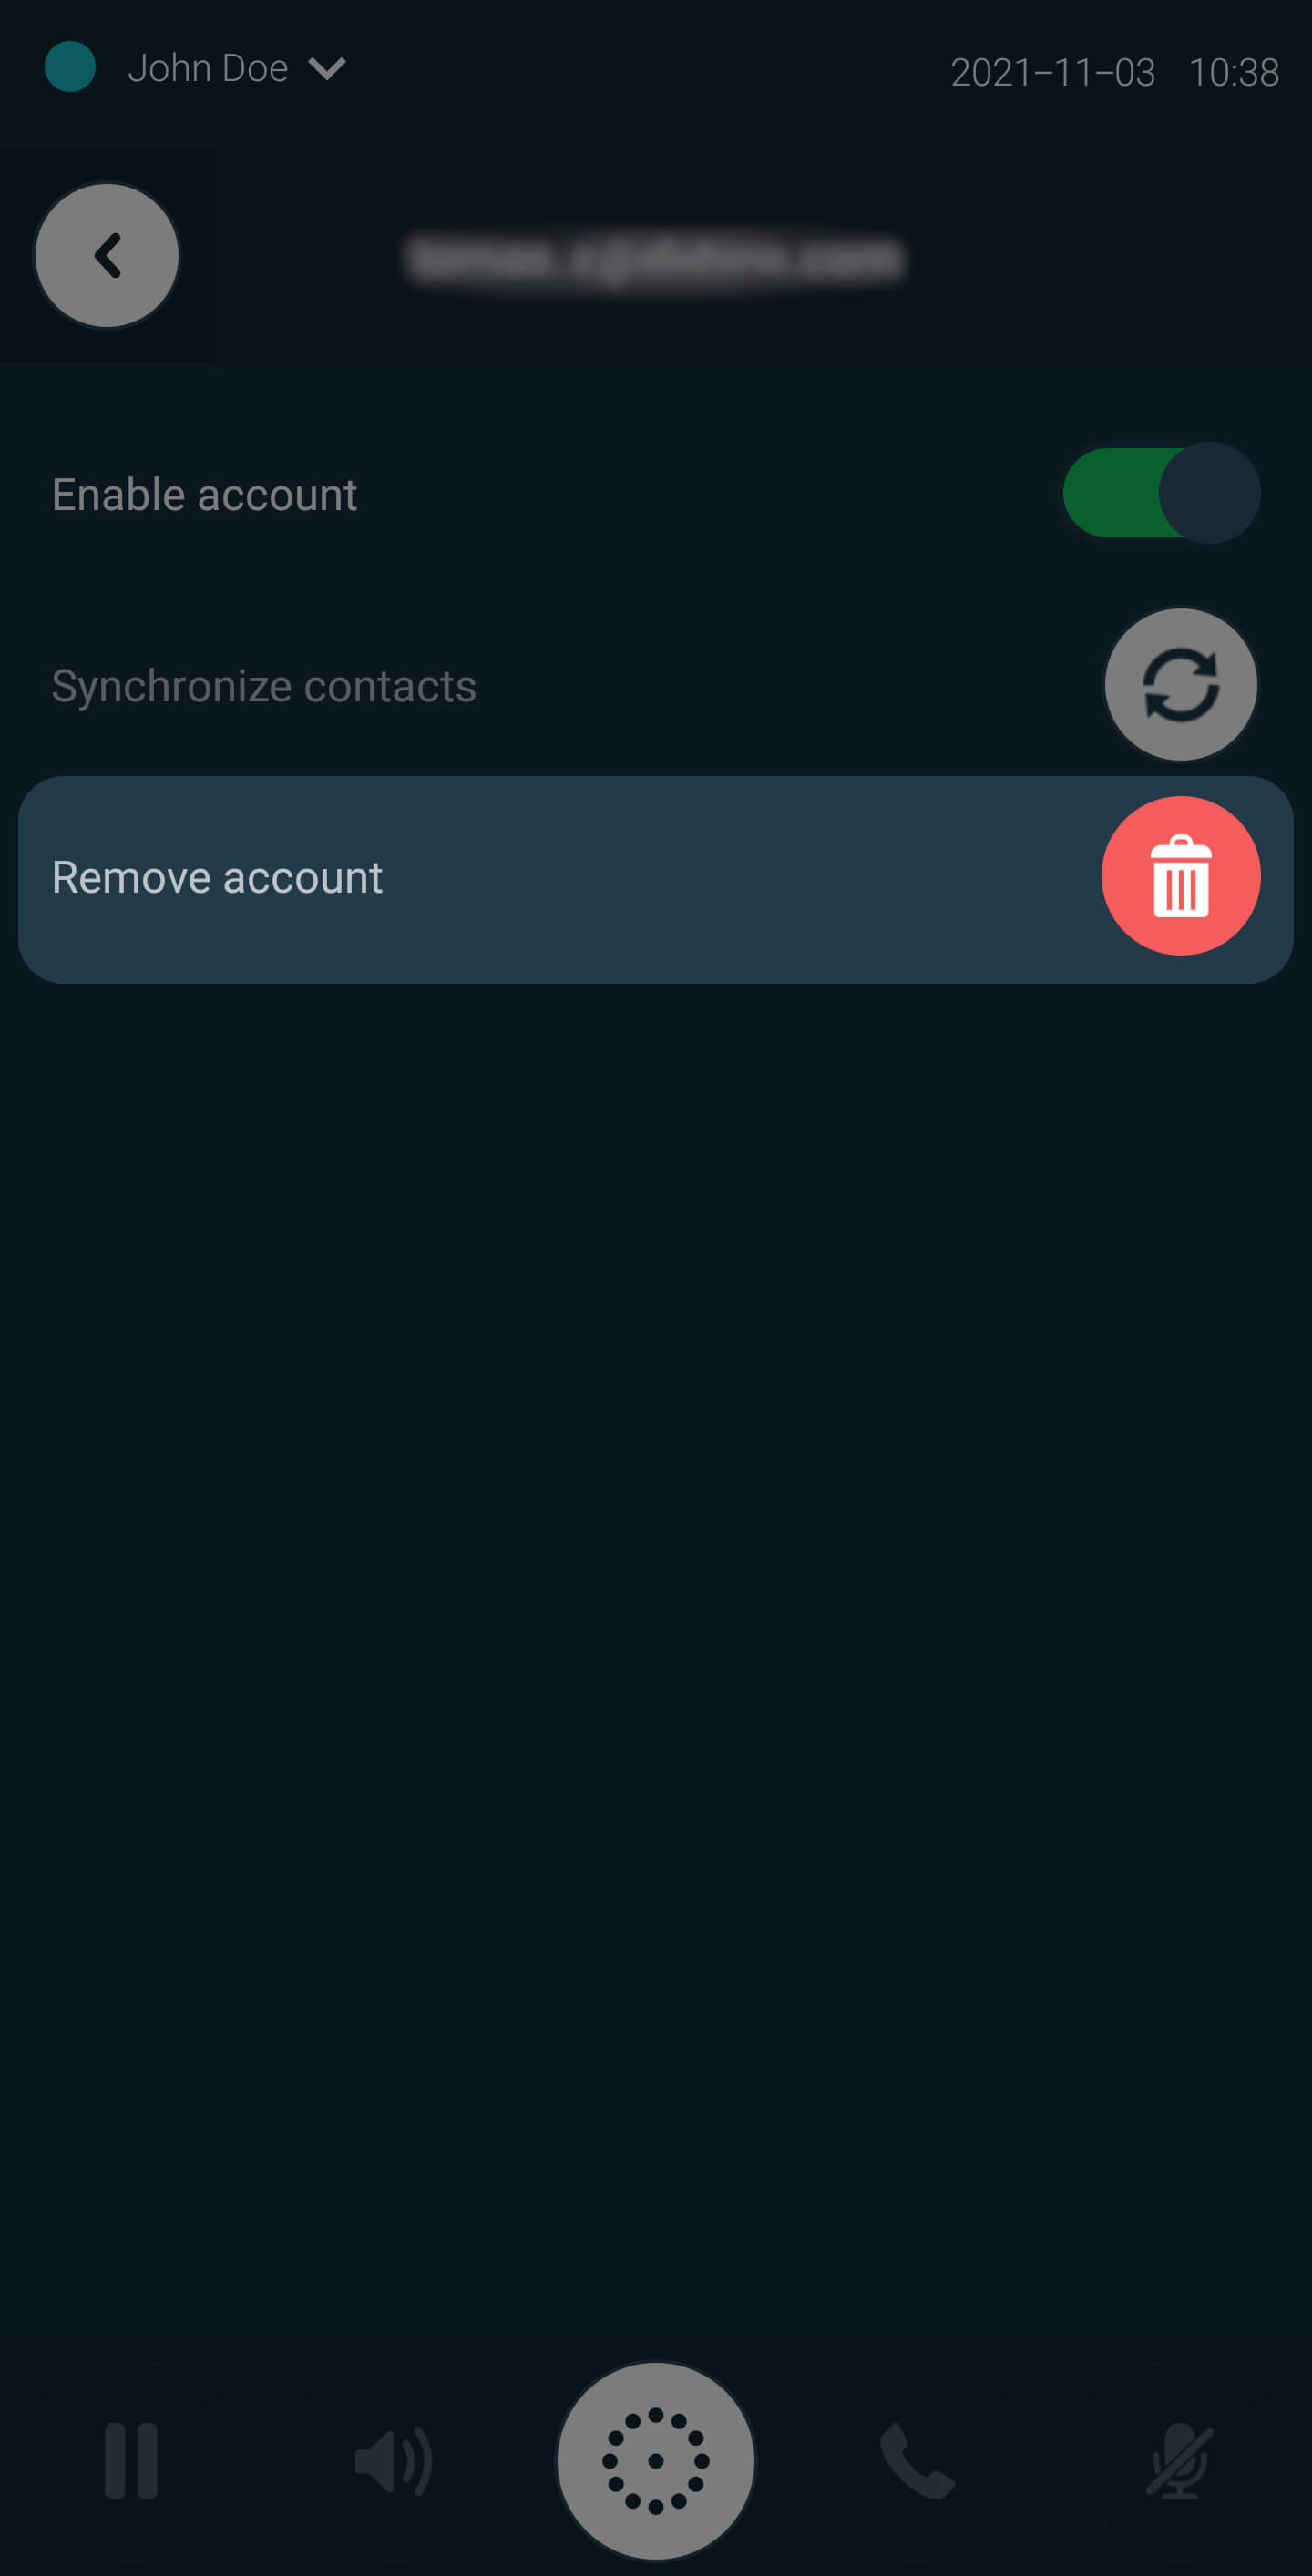 Back to the top
Contact Info window
To access the Contact Info window, click on the specific contact’s avatar.
In the Contacts Info window you are able to:
-
Review and filter your recent calls with that contact
Review your call history with that contact, with the ability to display specific results by using the filters provided at the bottom of the Recents section.
-
Add, edit and delete personal notes
Manage notes that are associated with this contact.
-
Play call recordings
Recorded calls are designated by a recording icon
displayed next
to the phone numbers that are listed in the Recents section. To listen to a recorded
call, press and hold on to that call and select Play Record.
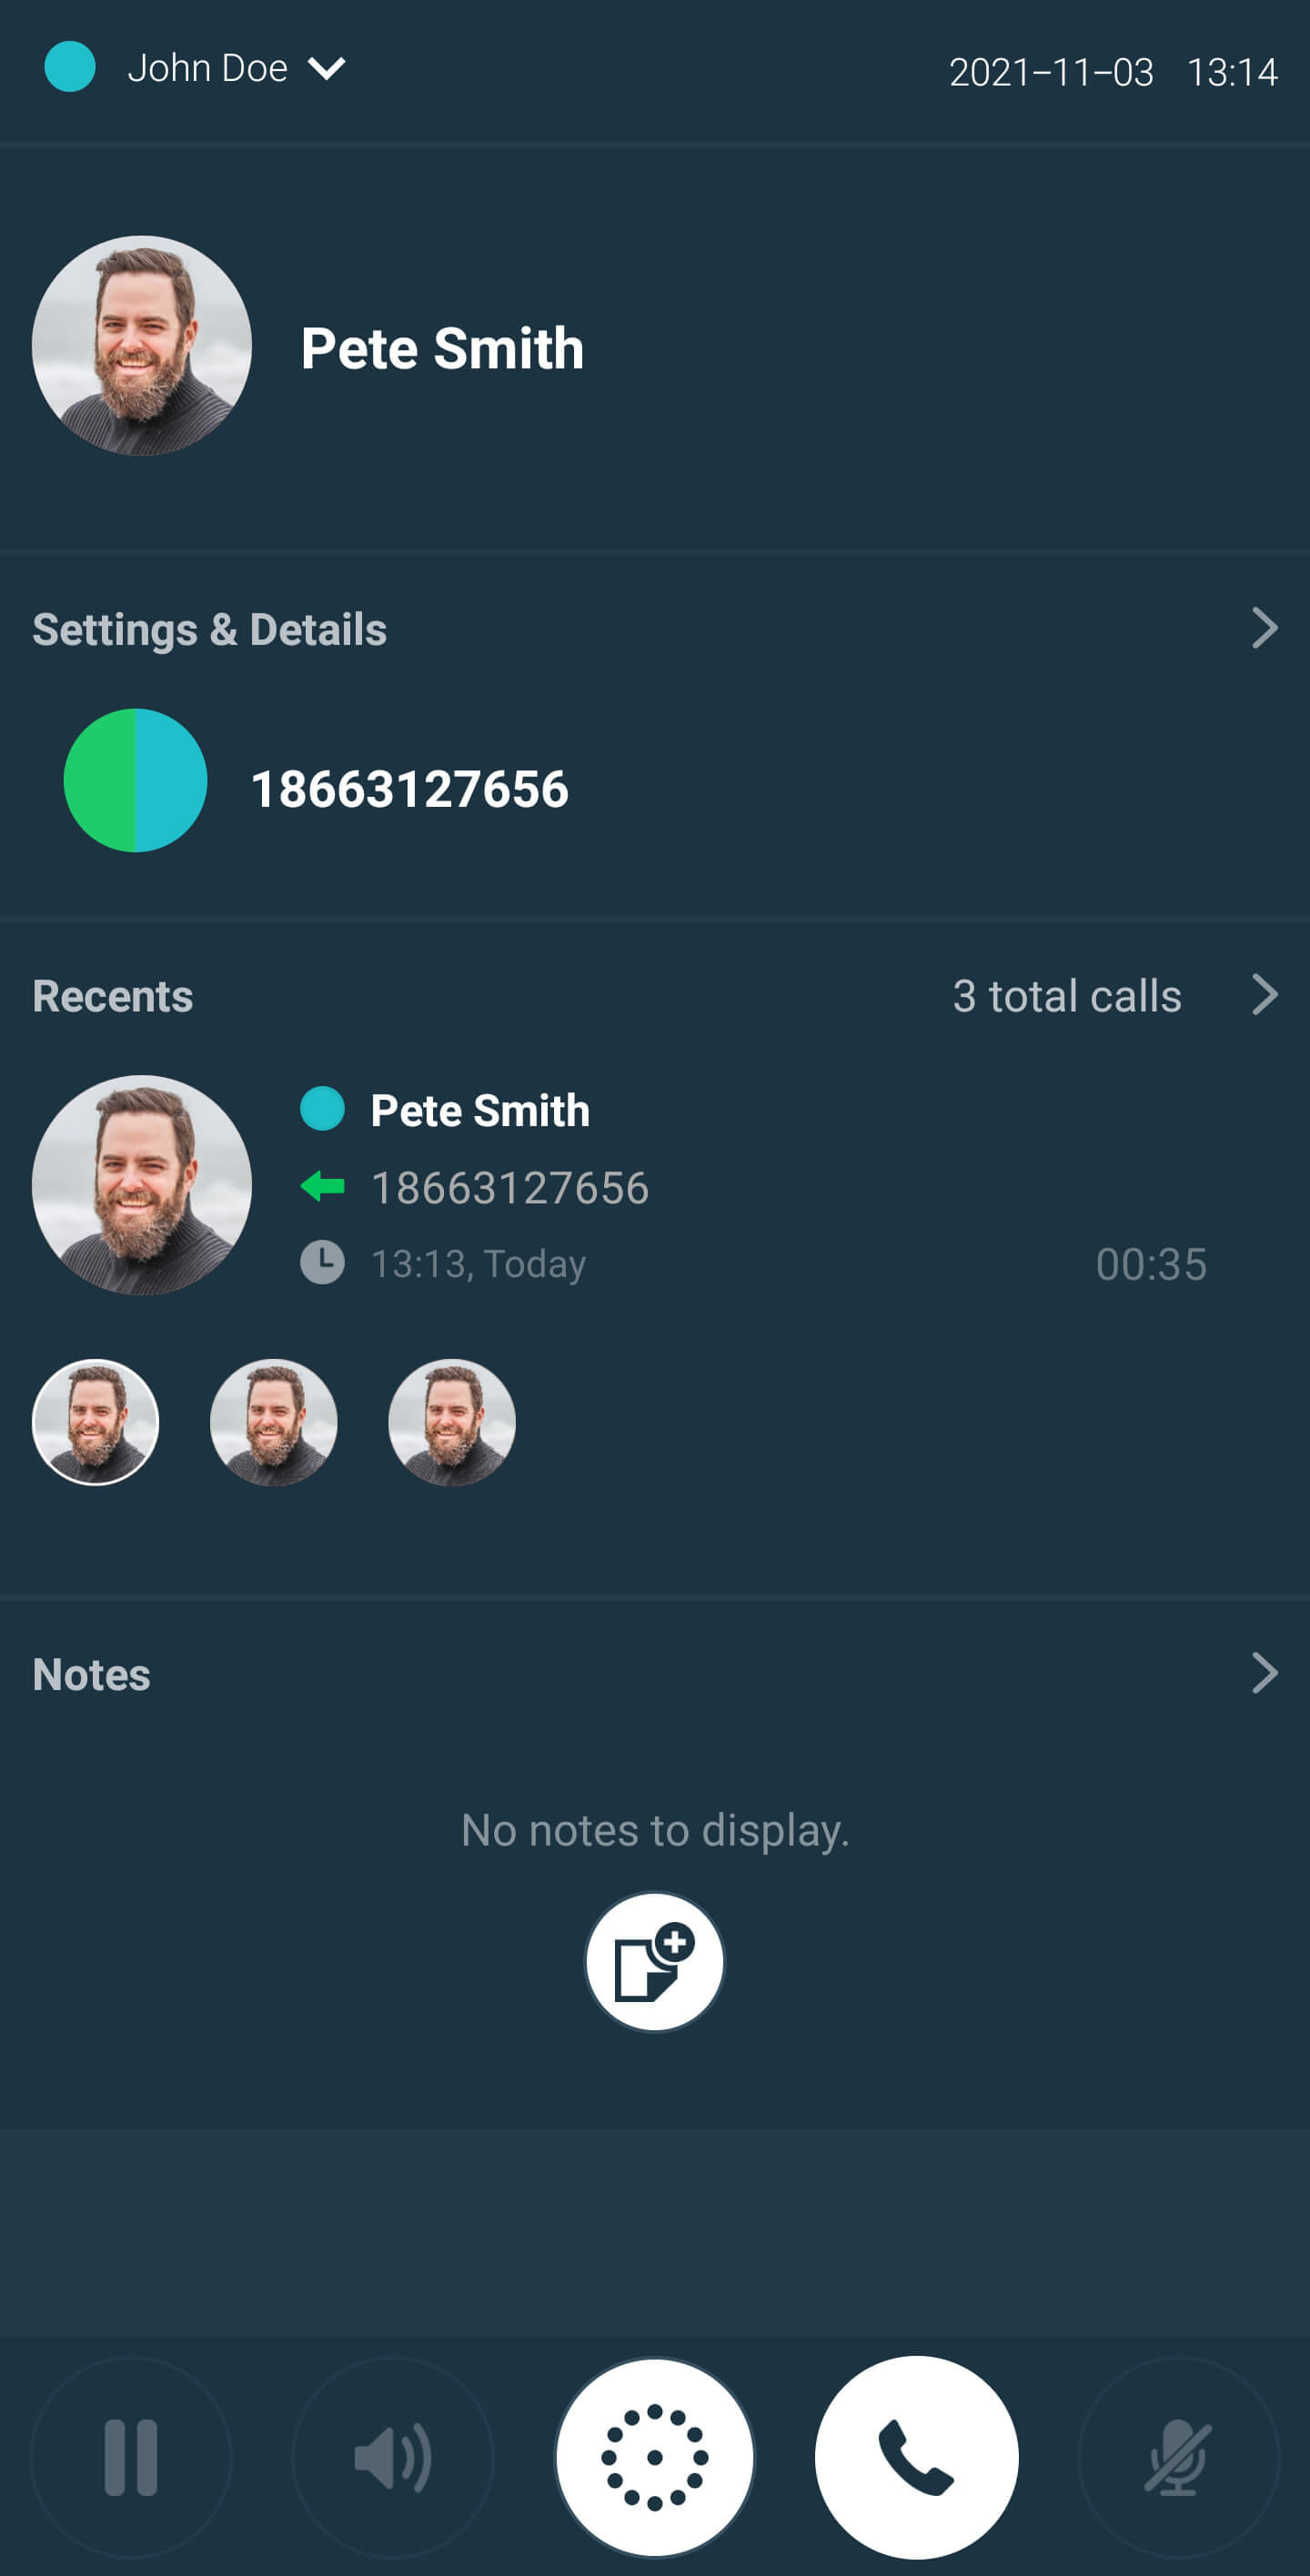
In the Settings & Details window you are able to:
-
Add Contact to Favorites
A Contact may be added to Favorites from the Contacts Info window, by clicking on the Star
 button.
-
Block a Contact
A Contact may be blocked from the Contacts Info window, by clicking on the Block
 button.
-
Select default SIP line
If you have multiple SIP lines, you may select the SIP line that will be used by default when making outgoing calls to this contact.
-
Select default phone number
If the contact has more than one phone number assigned, you may select which one of those phone numbers will be used by default when calling that contact.

Editing contact details
- To edit contact details, click on the relevant contact’s avatar from the Contact Tab to display the Contact Info window.
- Click the Settings & Details button located in the Contact info window to display the Edit Contact dialog box.
-
Edit the information as required and then click the
button
to save.
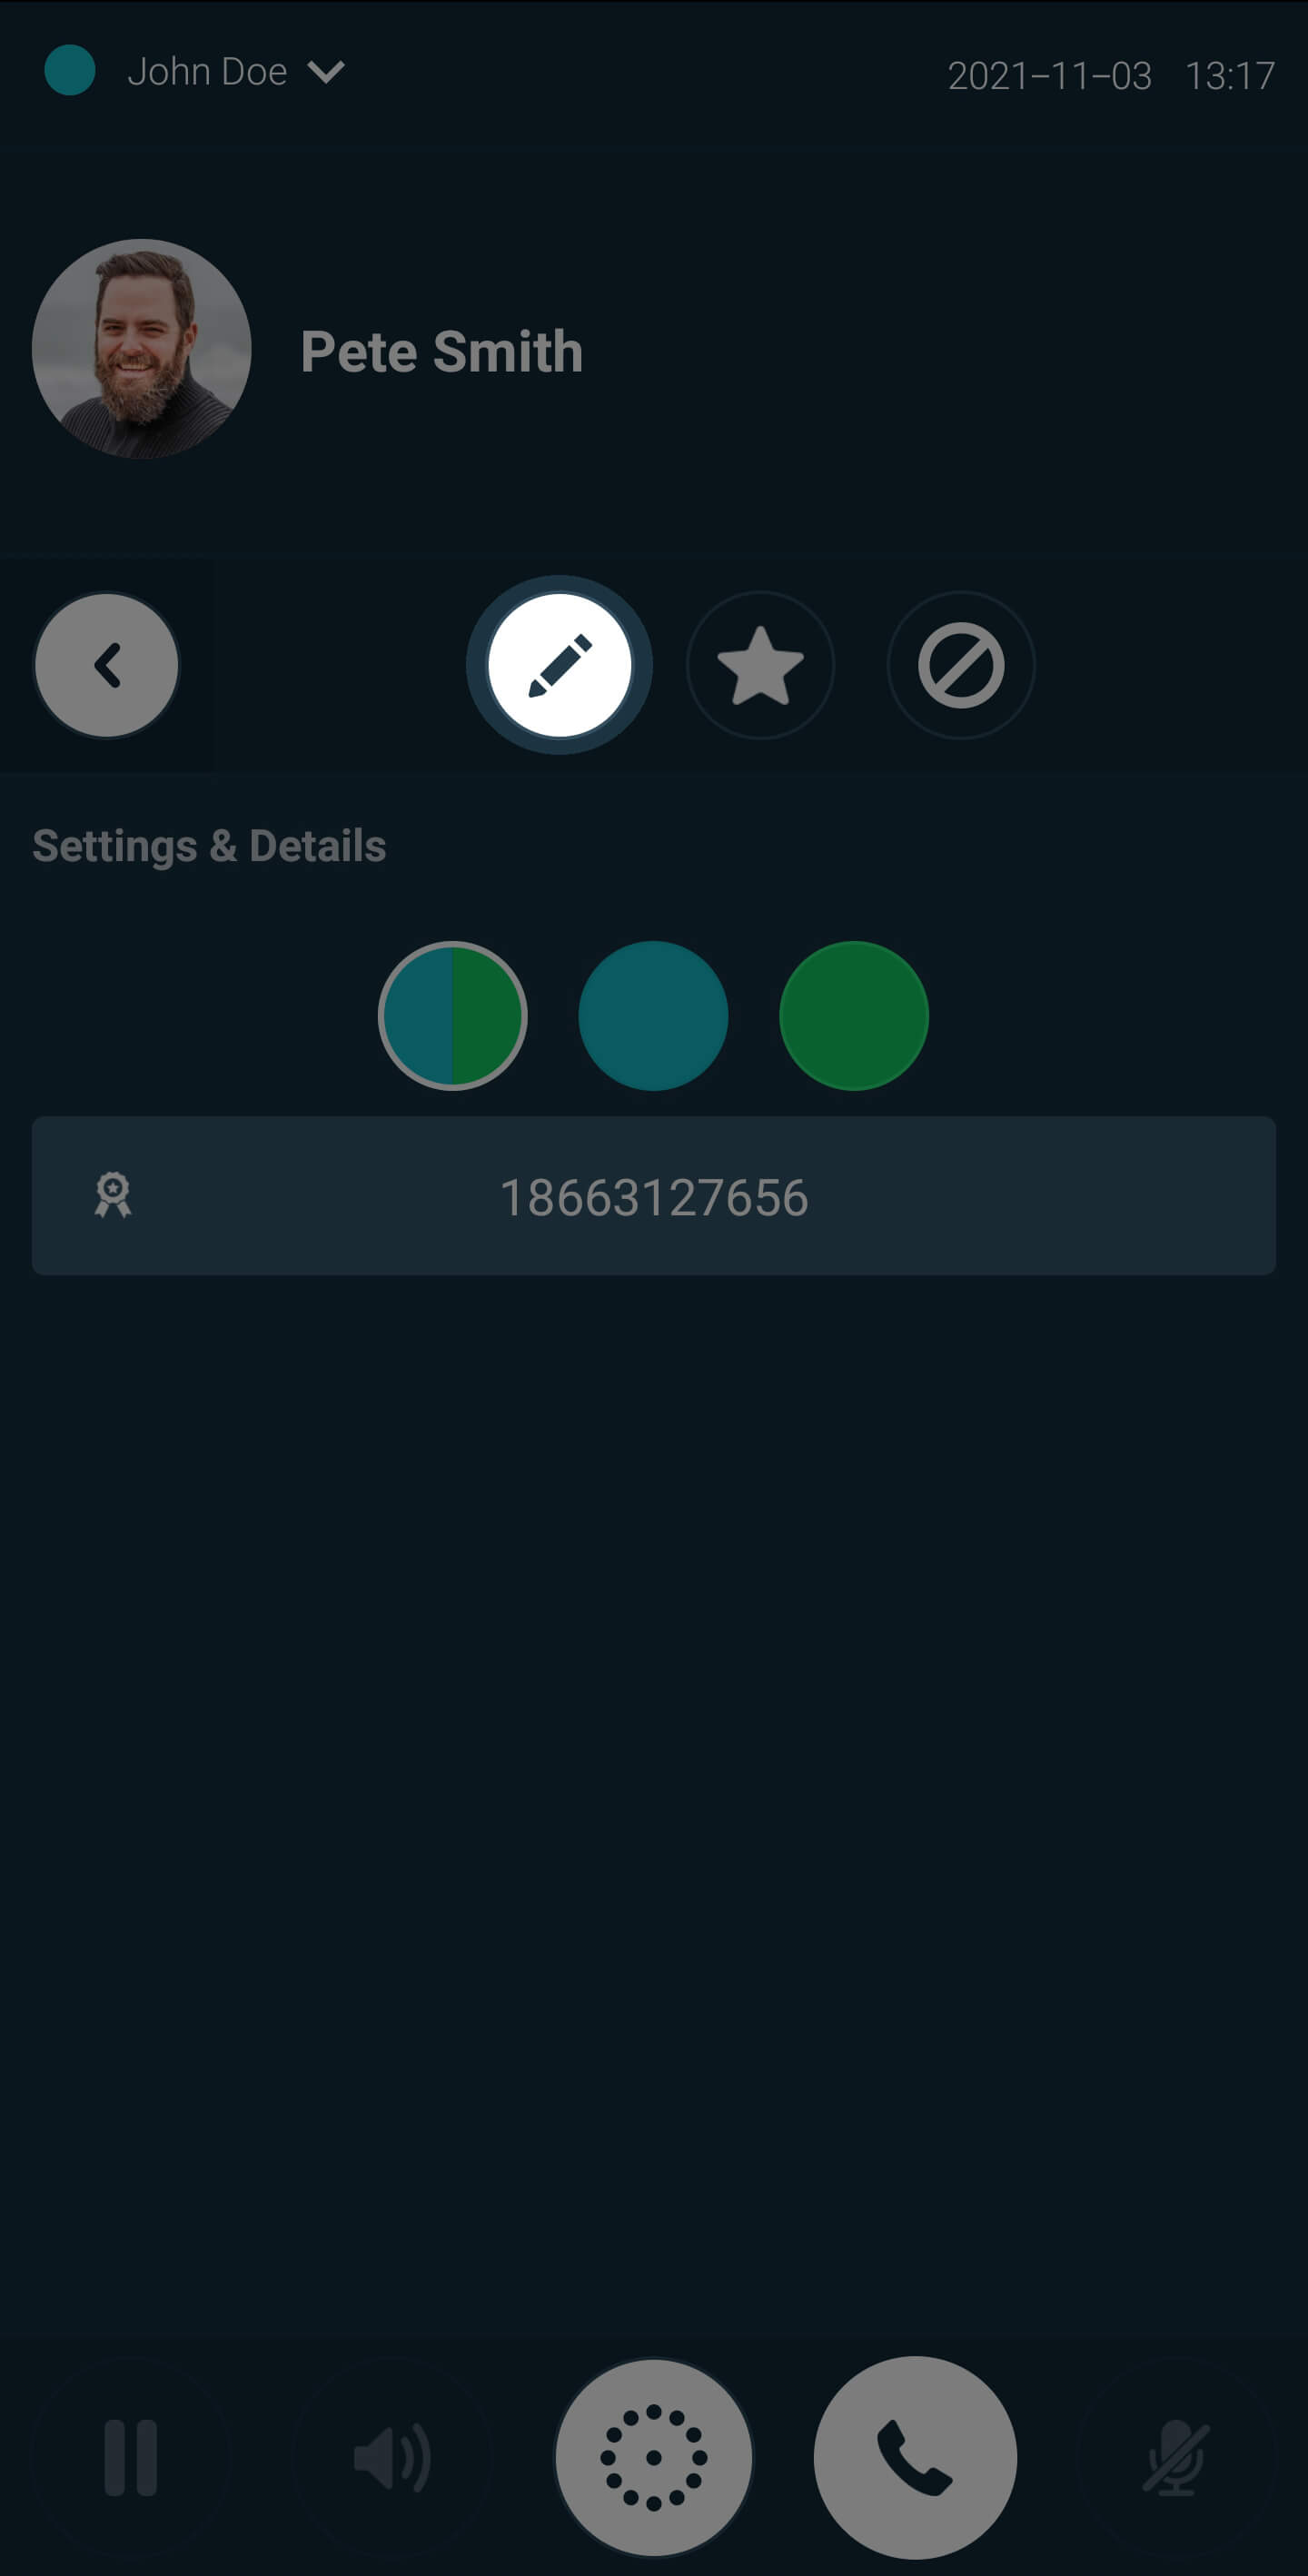
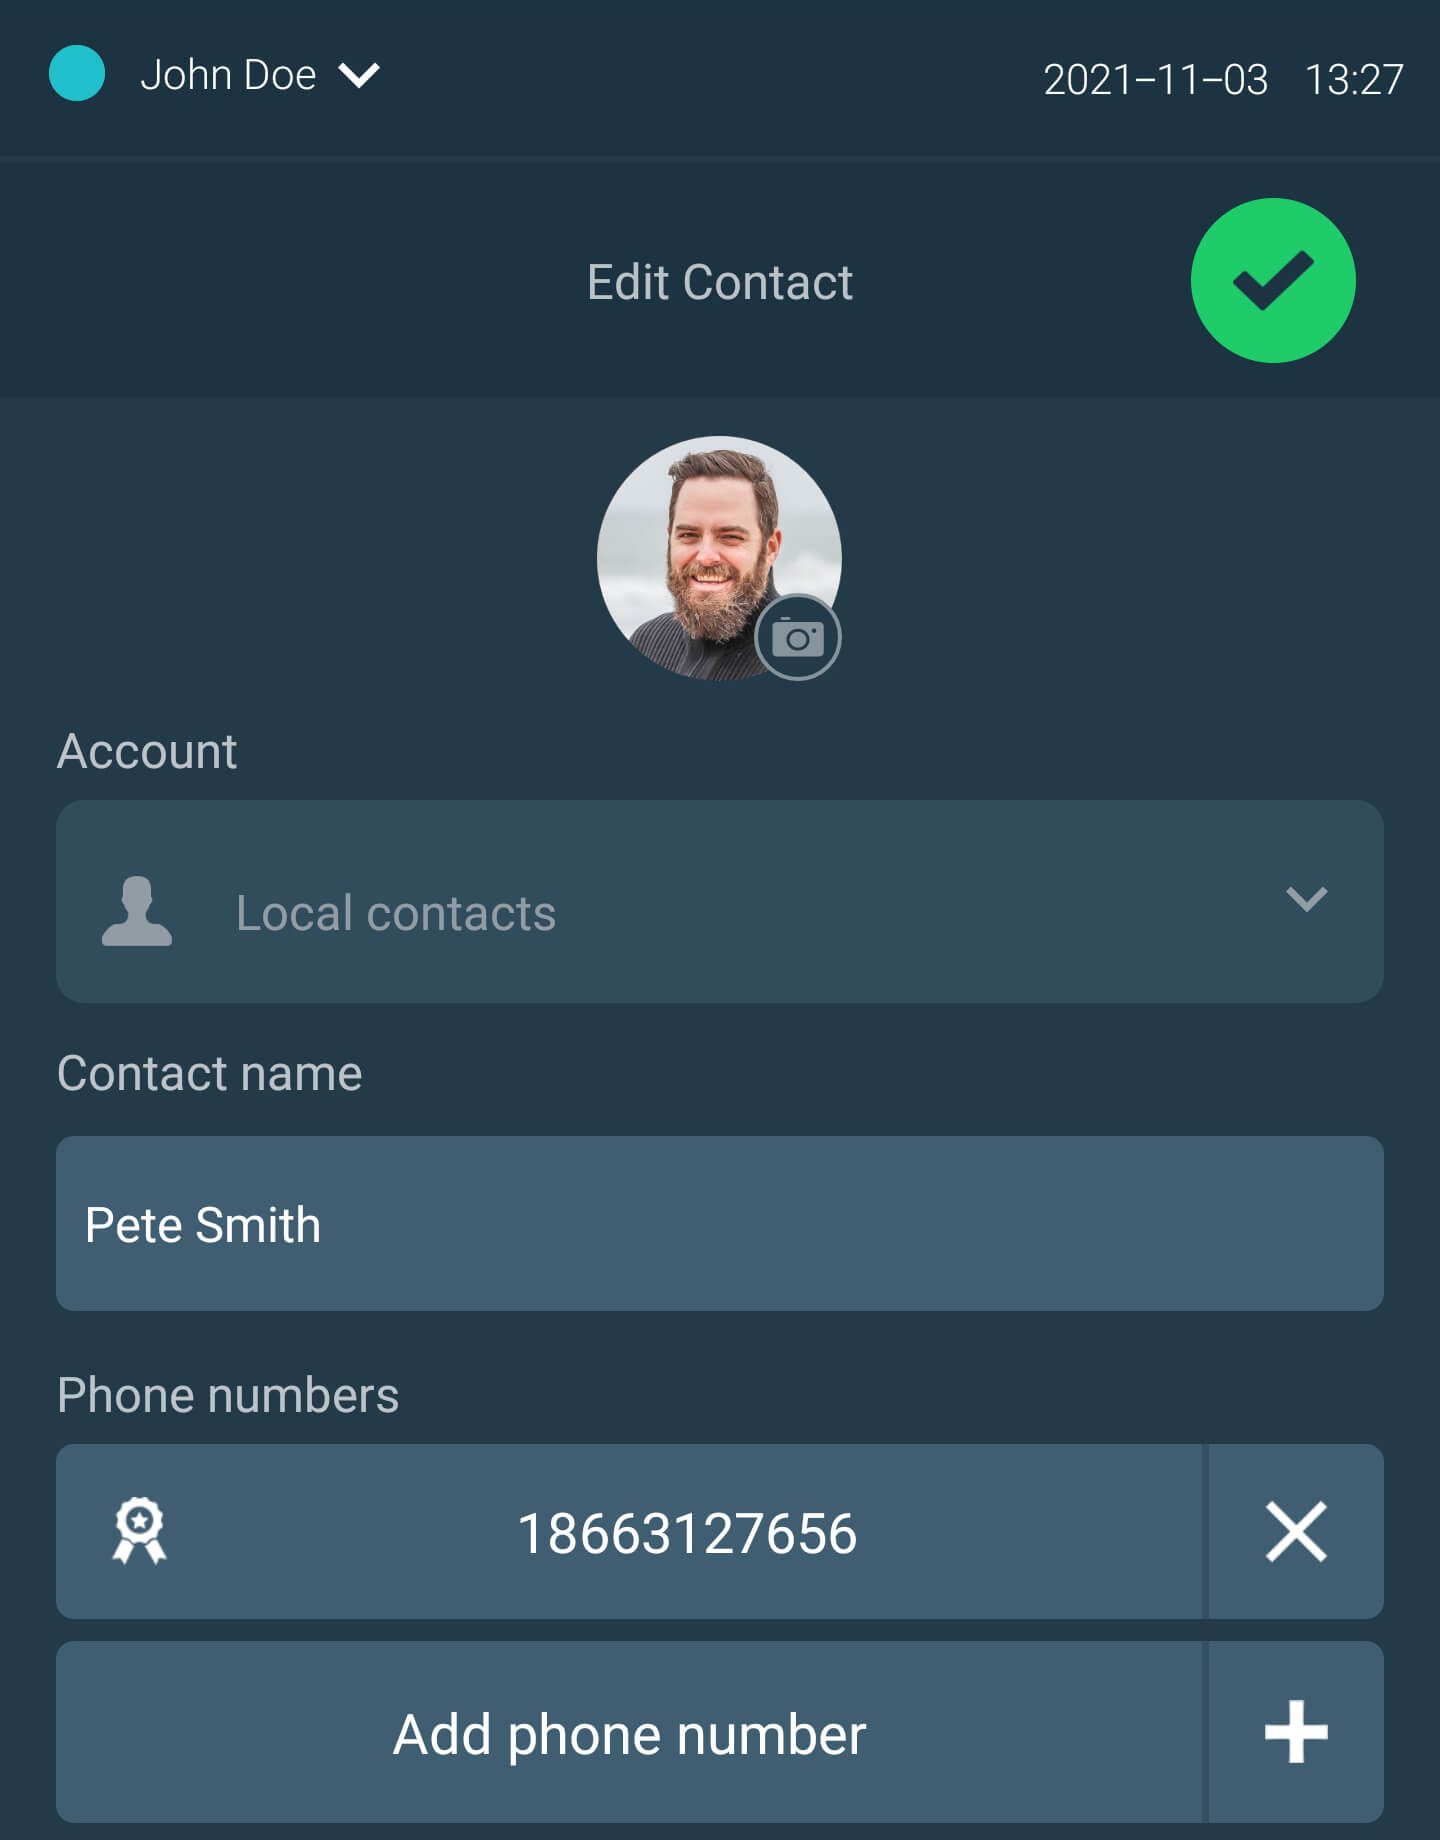
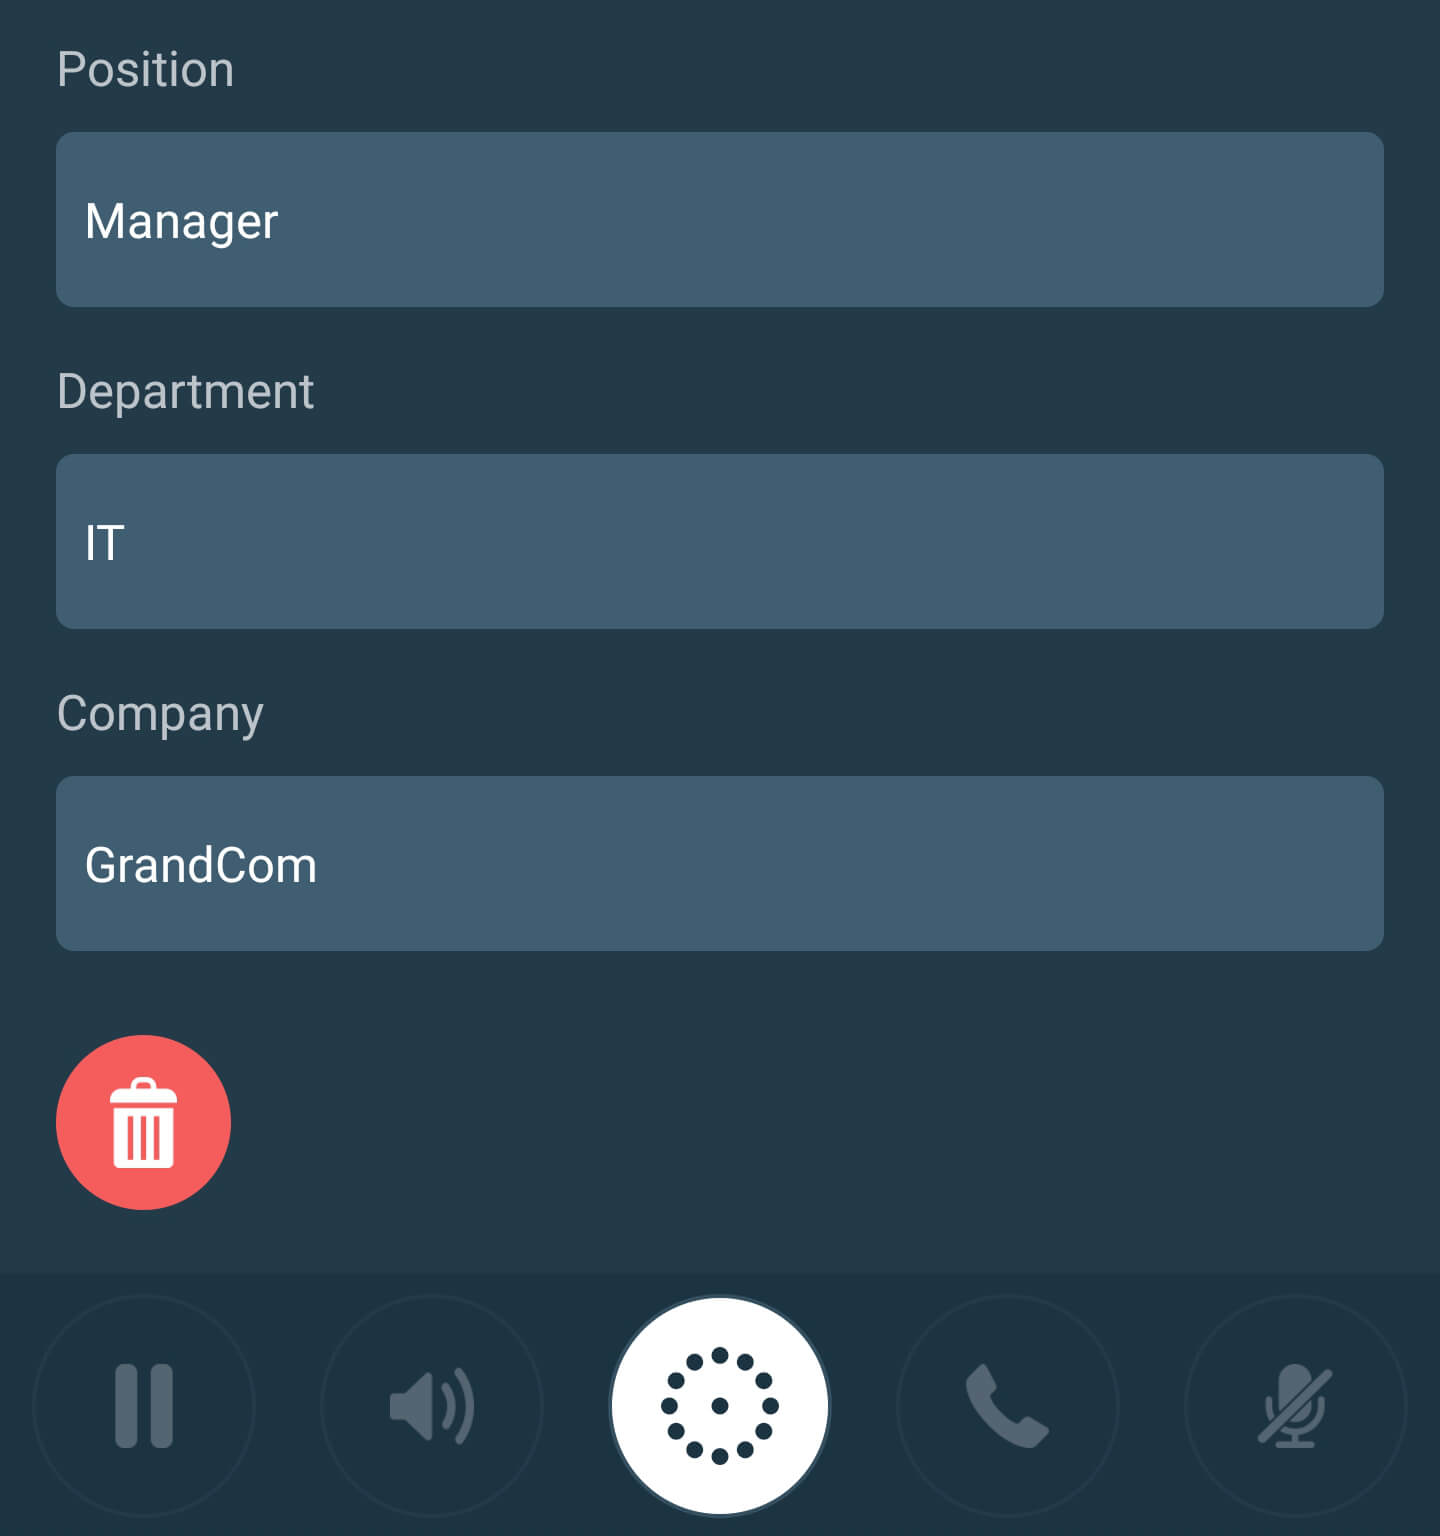
Note that the format of the screens used to manage contact information are dependent on your operating system, and also on where the contact information has been saved.
Deleting a contact
- To delete a contact, click on the relevant contact’s avatar from the Contact Tab to display the Contact Info window.
- Click the Edit button to display the Edit Contact dialog box.
- Click the Delete button and the contact will be deleted.

If the contact was imported from external sources (such as an existing database), then that contact cannot be deleted by the call.center™ application. Instead, deletion of the contact may only be accomplished by modifying the original database on the service side. Thereafter, contacts should be synchronized in the call.center™ application.
Managing Notes
You can add to, edit, archive or delete a contact or personal notes.
The number shown in a yellow circle on the top-right edge of a contact’s avatar indicates the number of notes compiled for that contact.
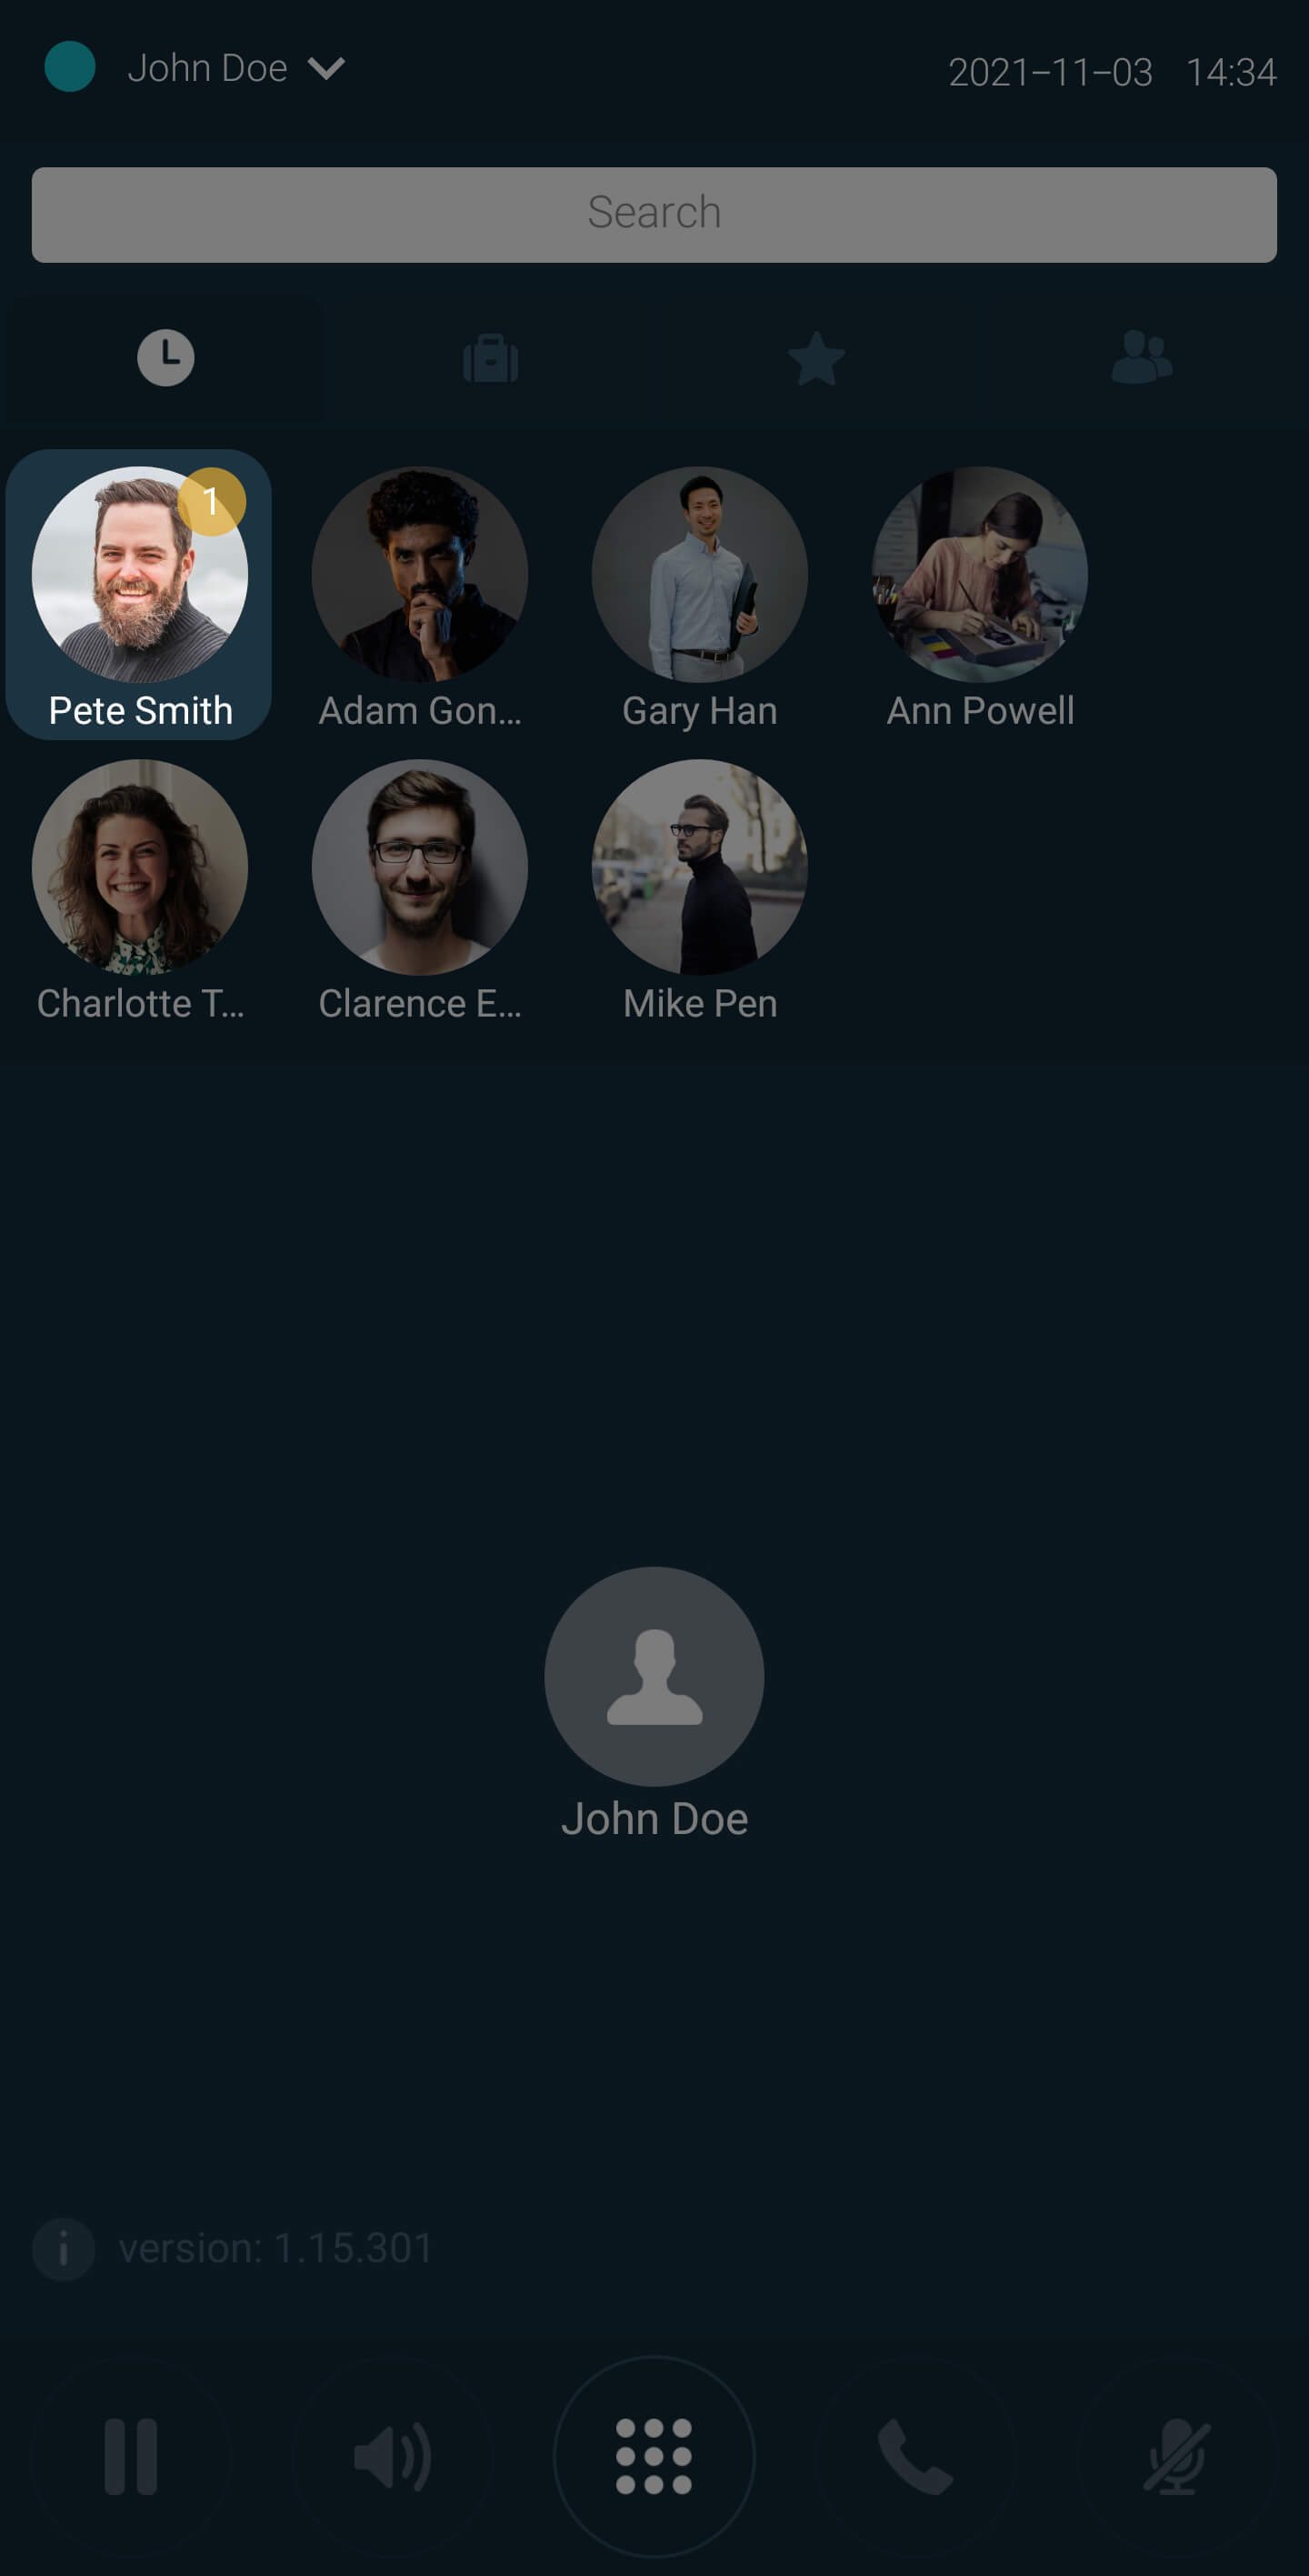
Adding a Note
- To add a note, click the “Notes” section to display the Note dialog box.
-
Enter the note text and click the
 button to save the text. That note will then be displayed on the Notes panel in the
Contact Details window.
button to save the text. That note will then be displayed on the Notes panel in the
Contact Details window.
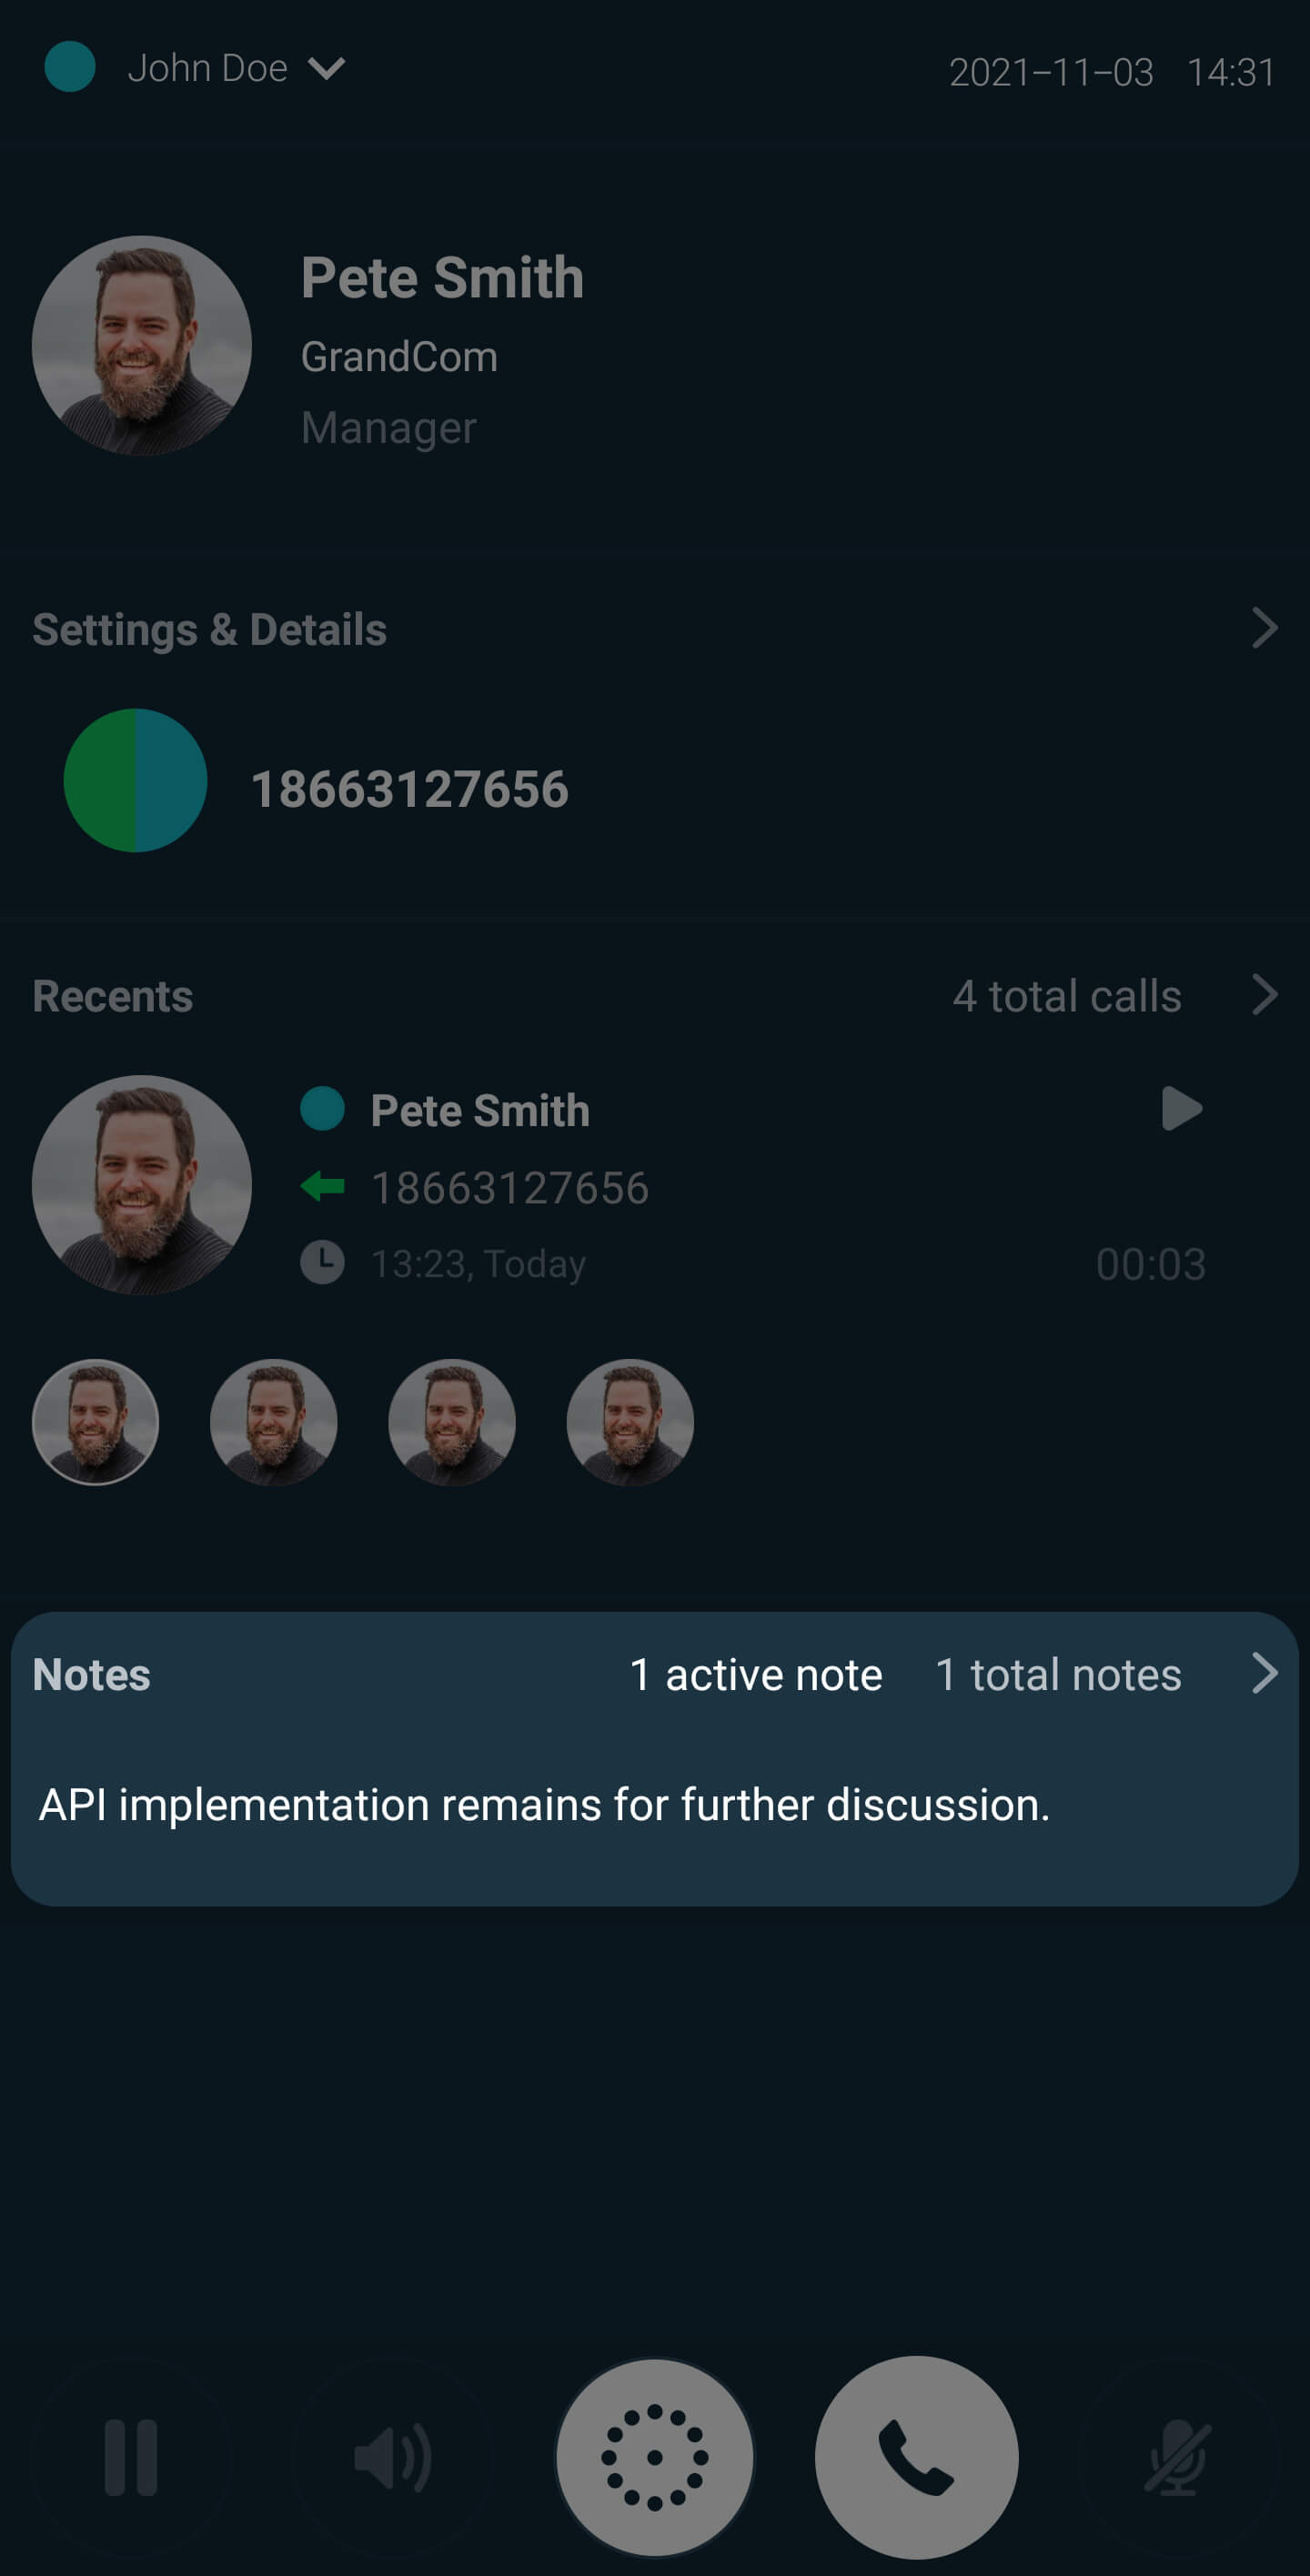
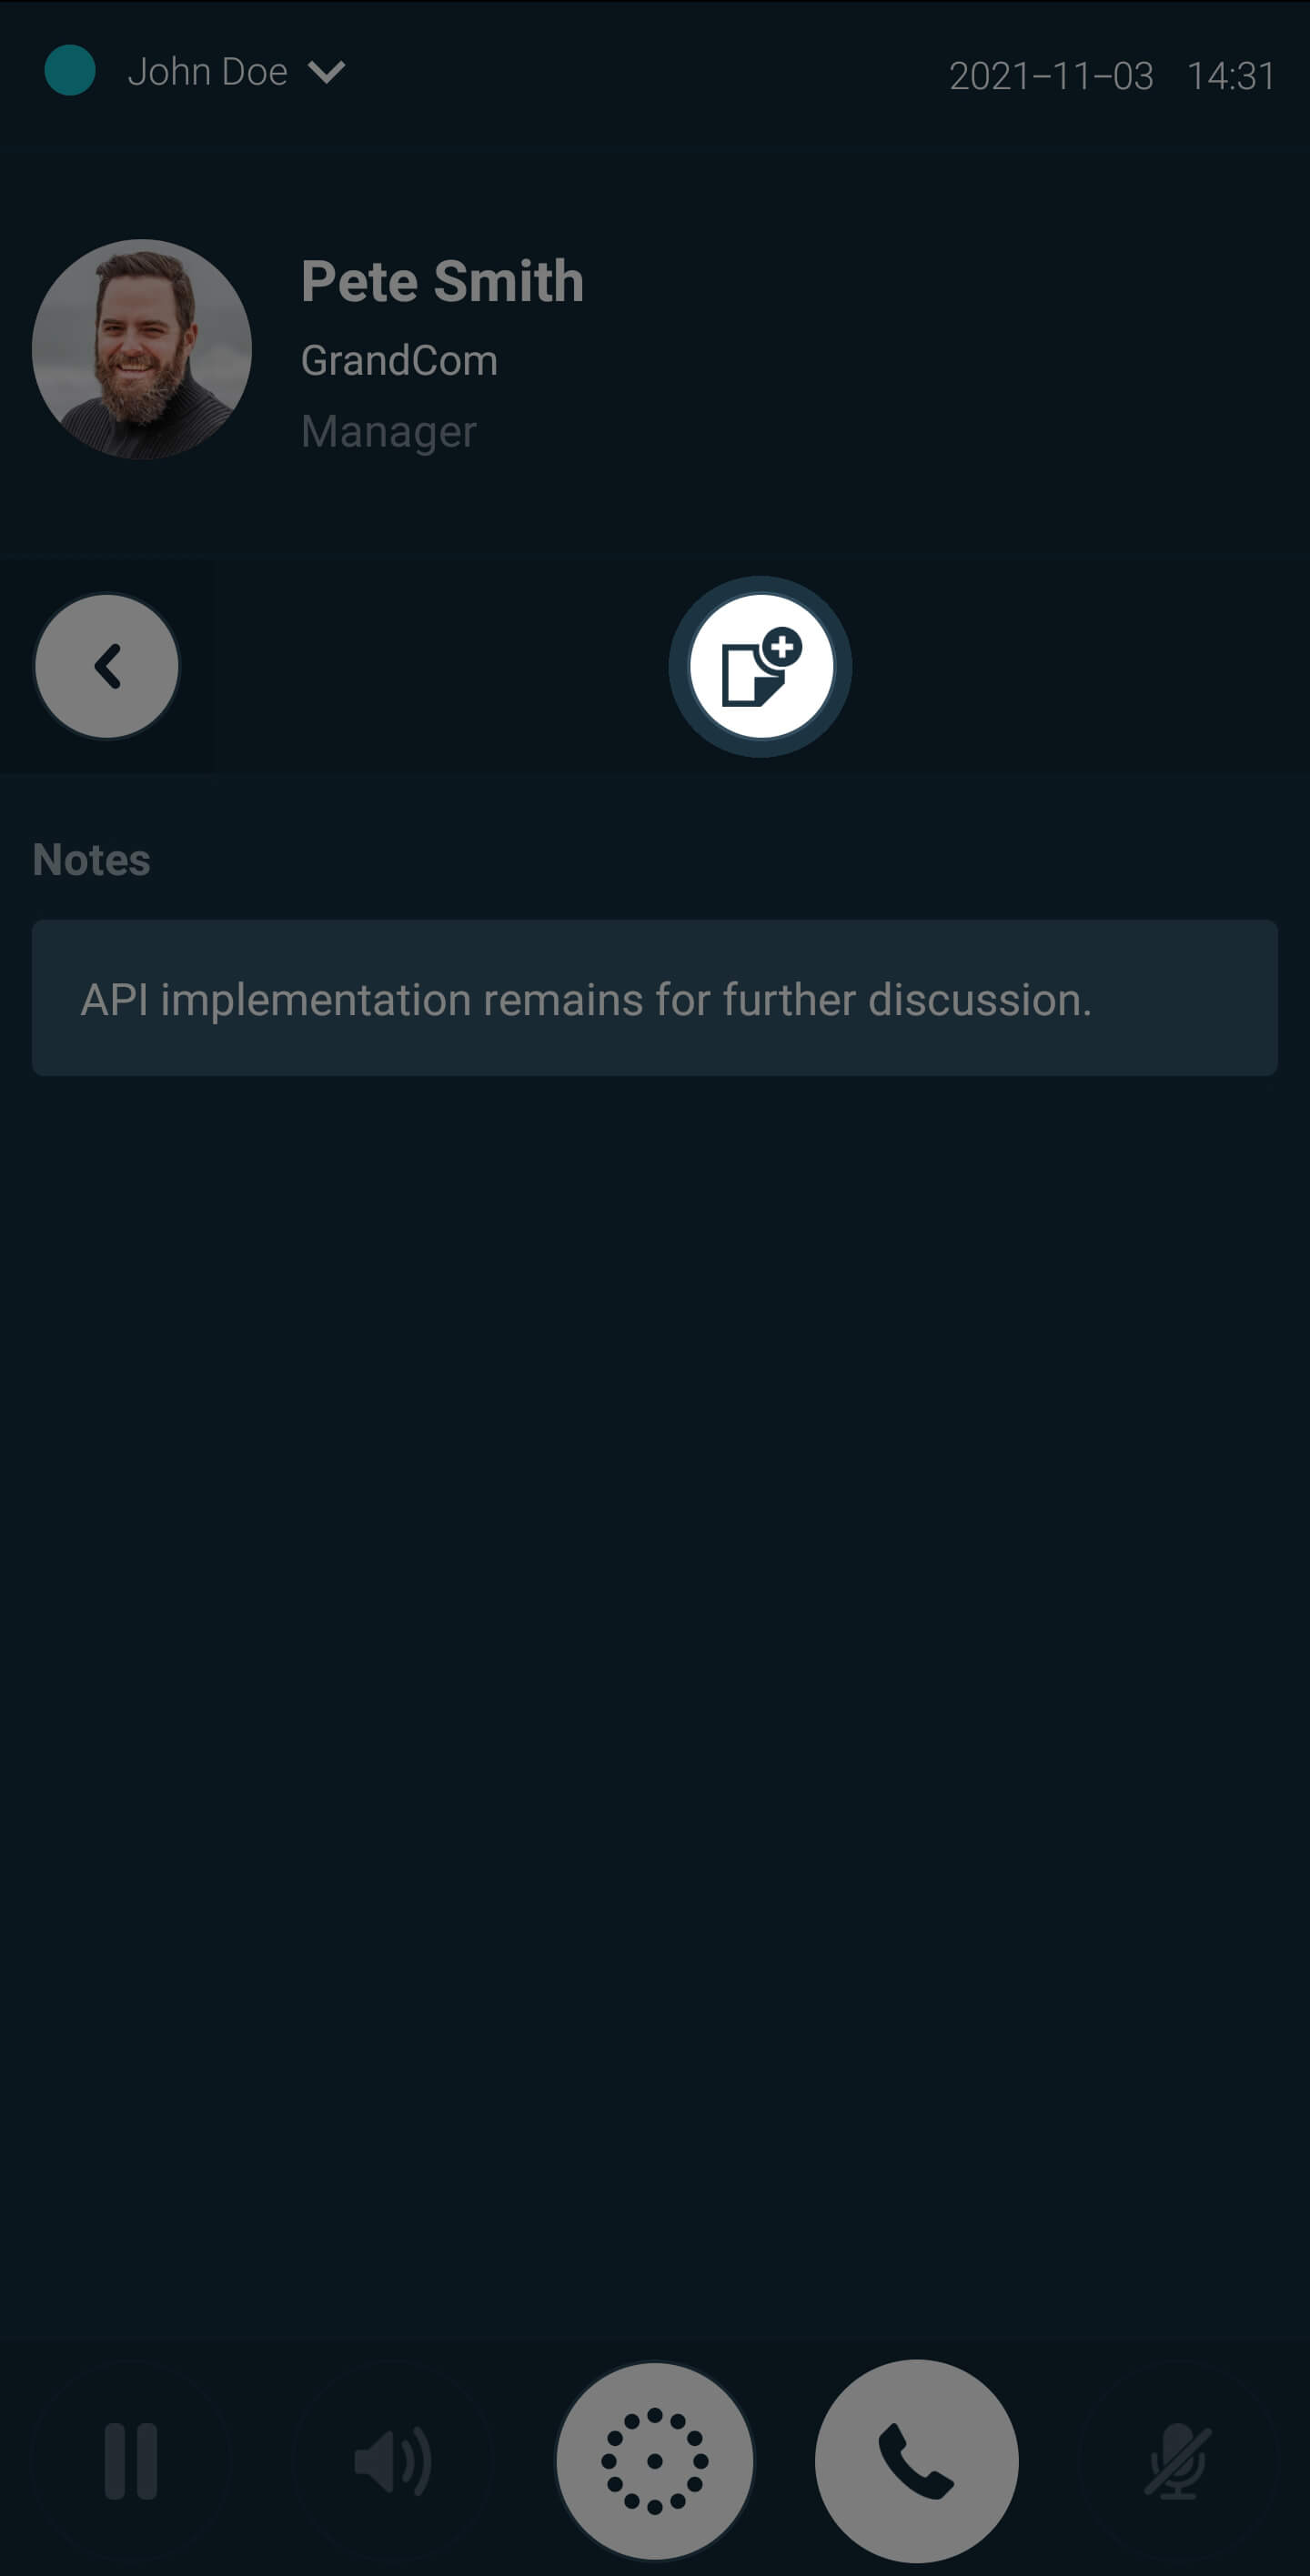
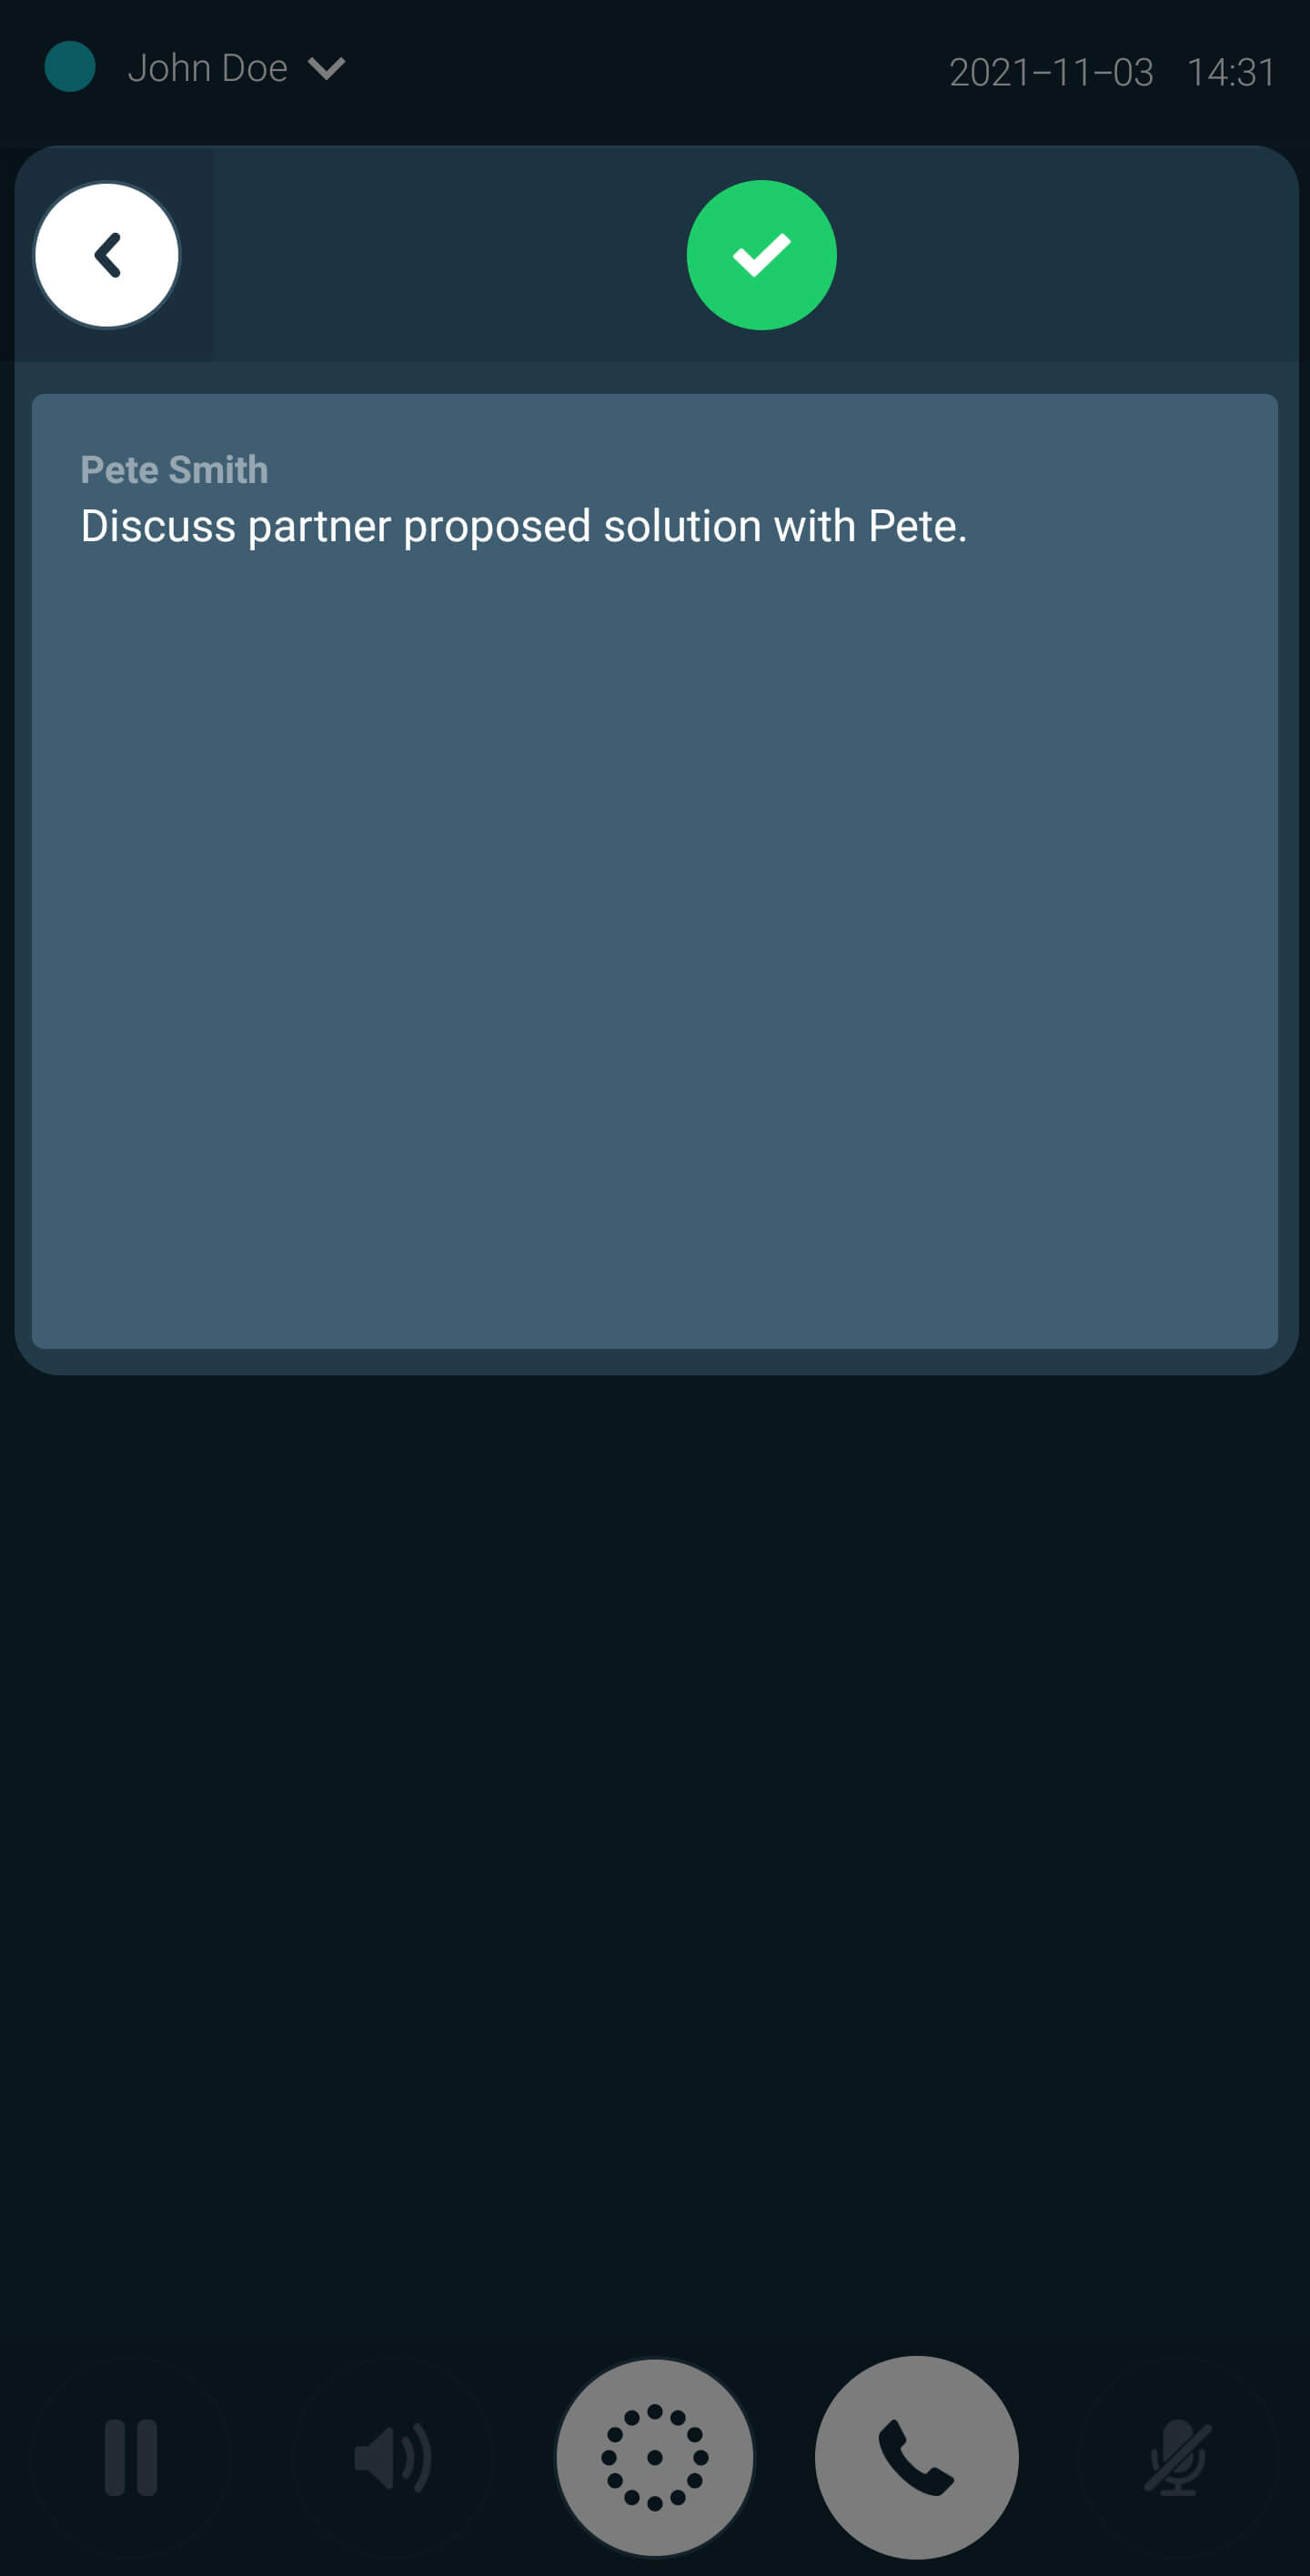
Editing a note
- Click on the note you wish to change to activate the Edit Note dialog box.
- After making changes to the note, click the Confirm button to save.
Archiving a note
Swipe the note to the left of the screen. An option to archive/unarchive that note will be displayed.
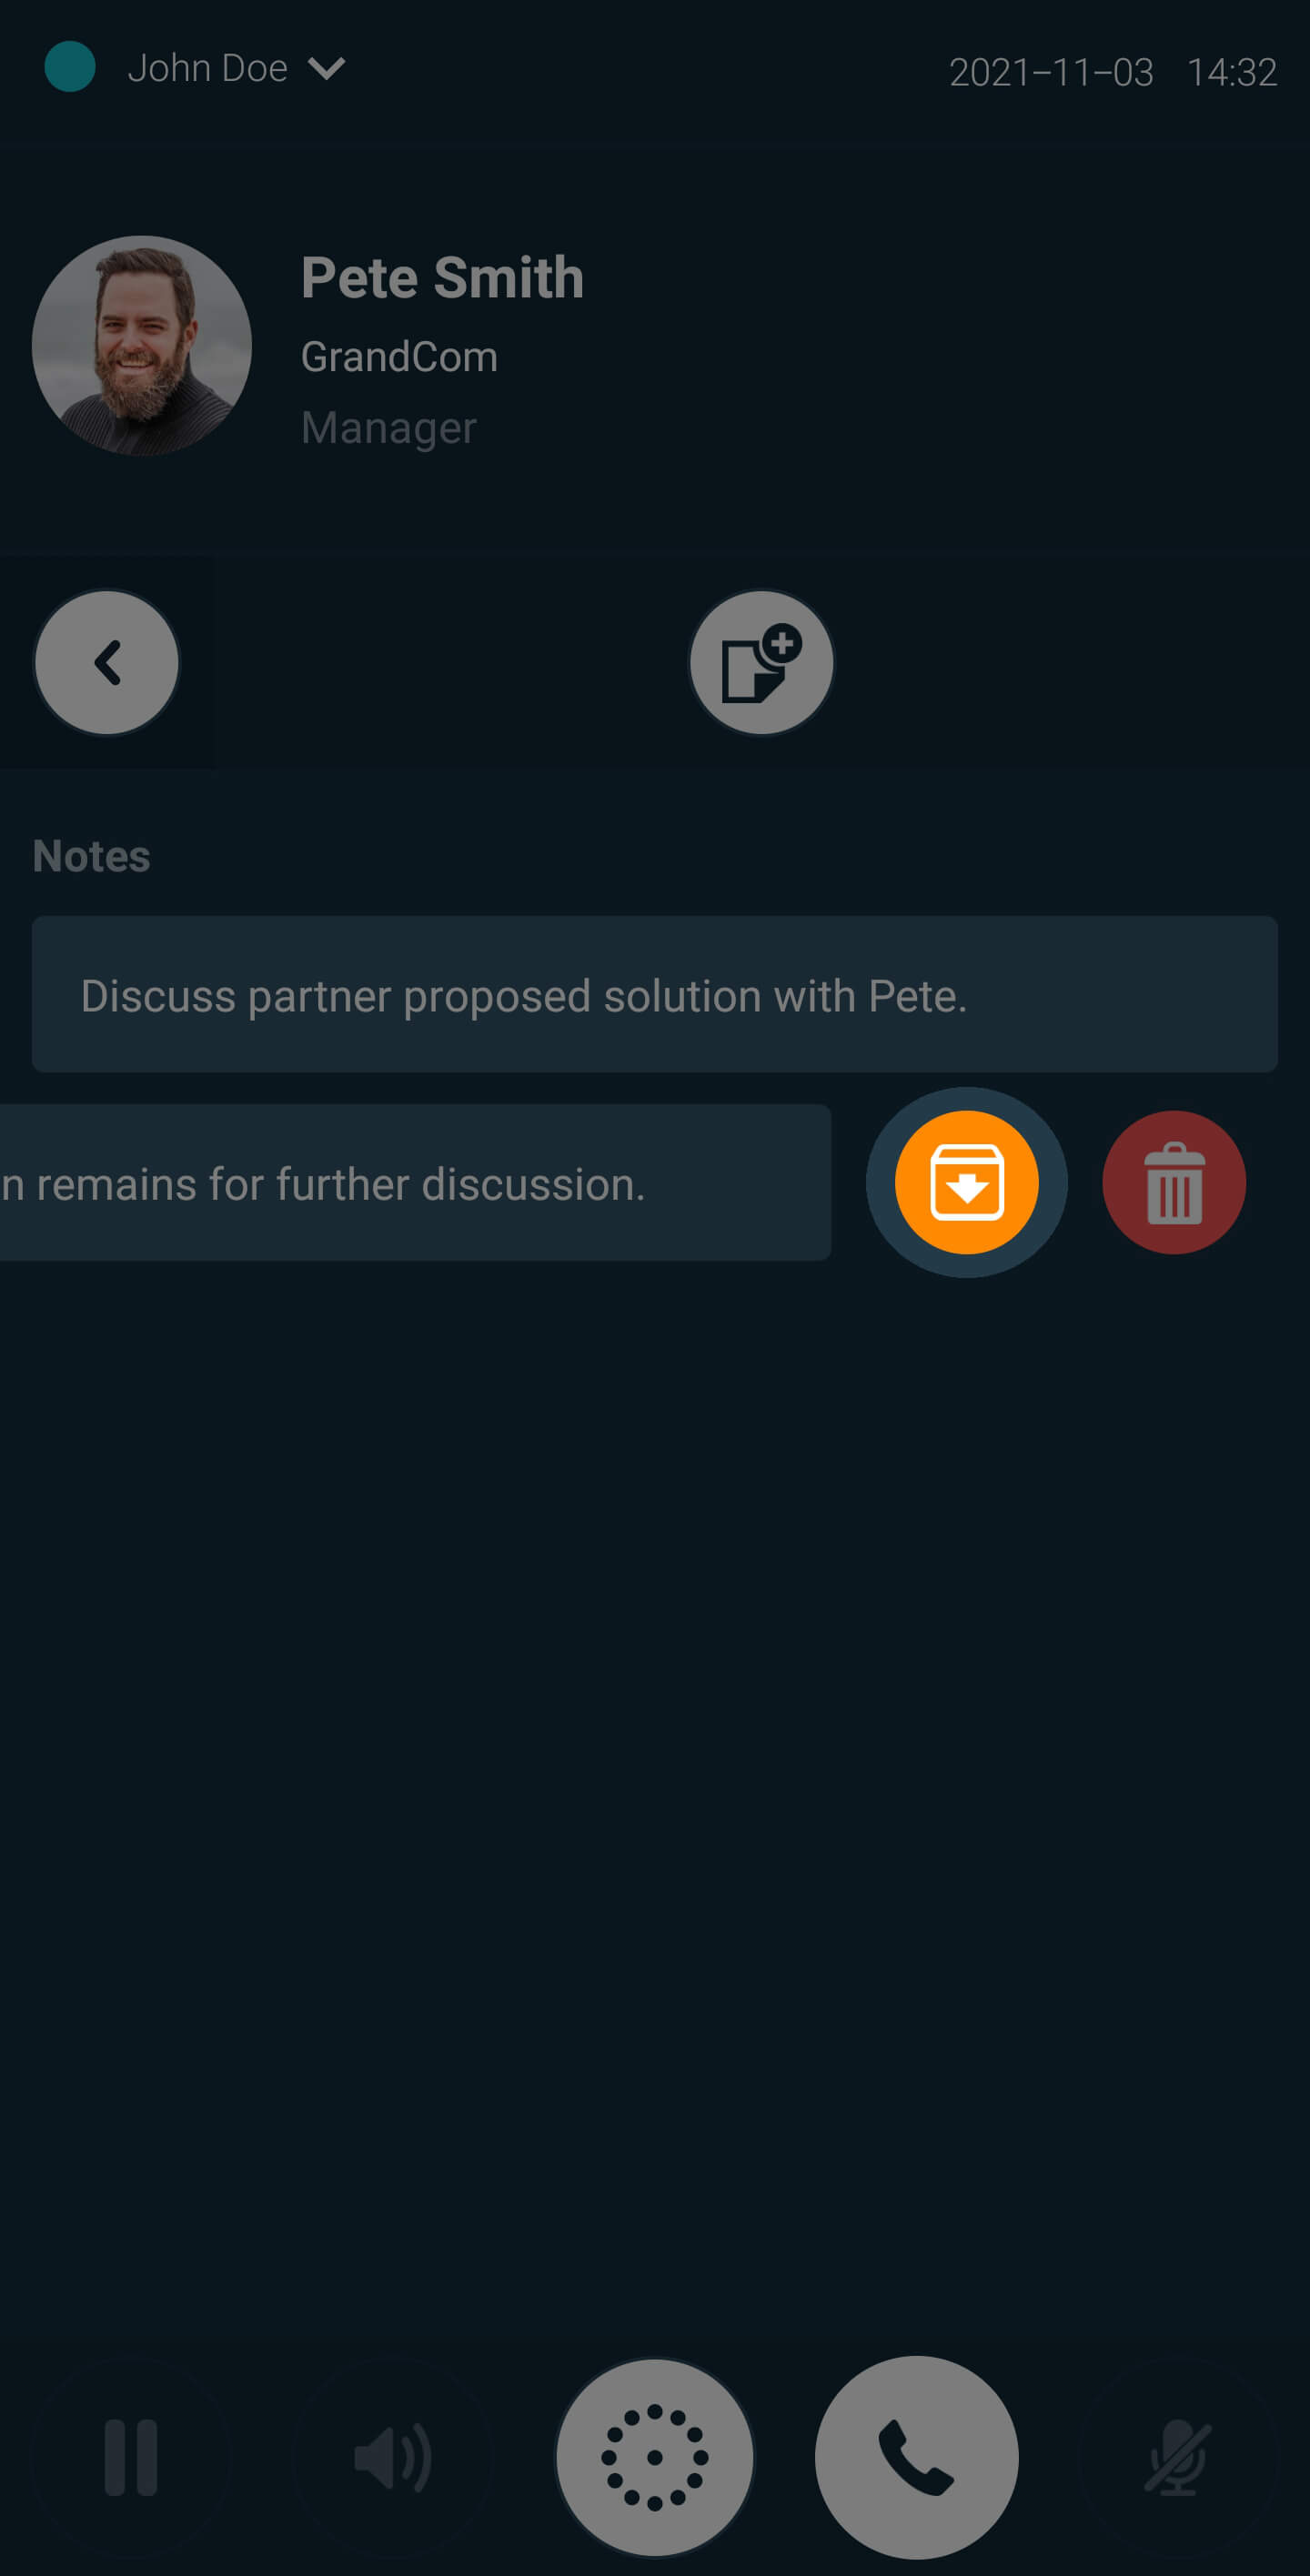
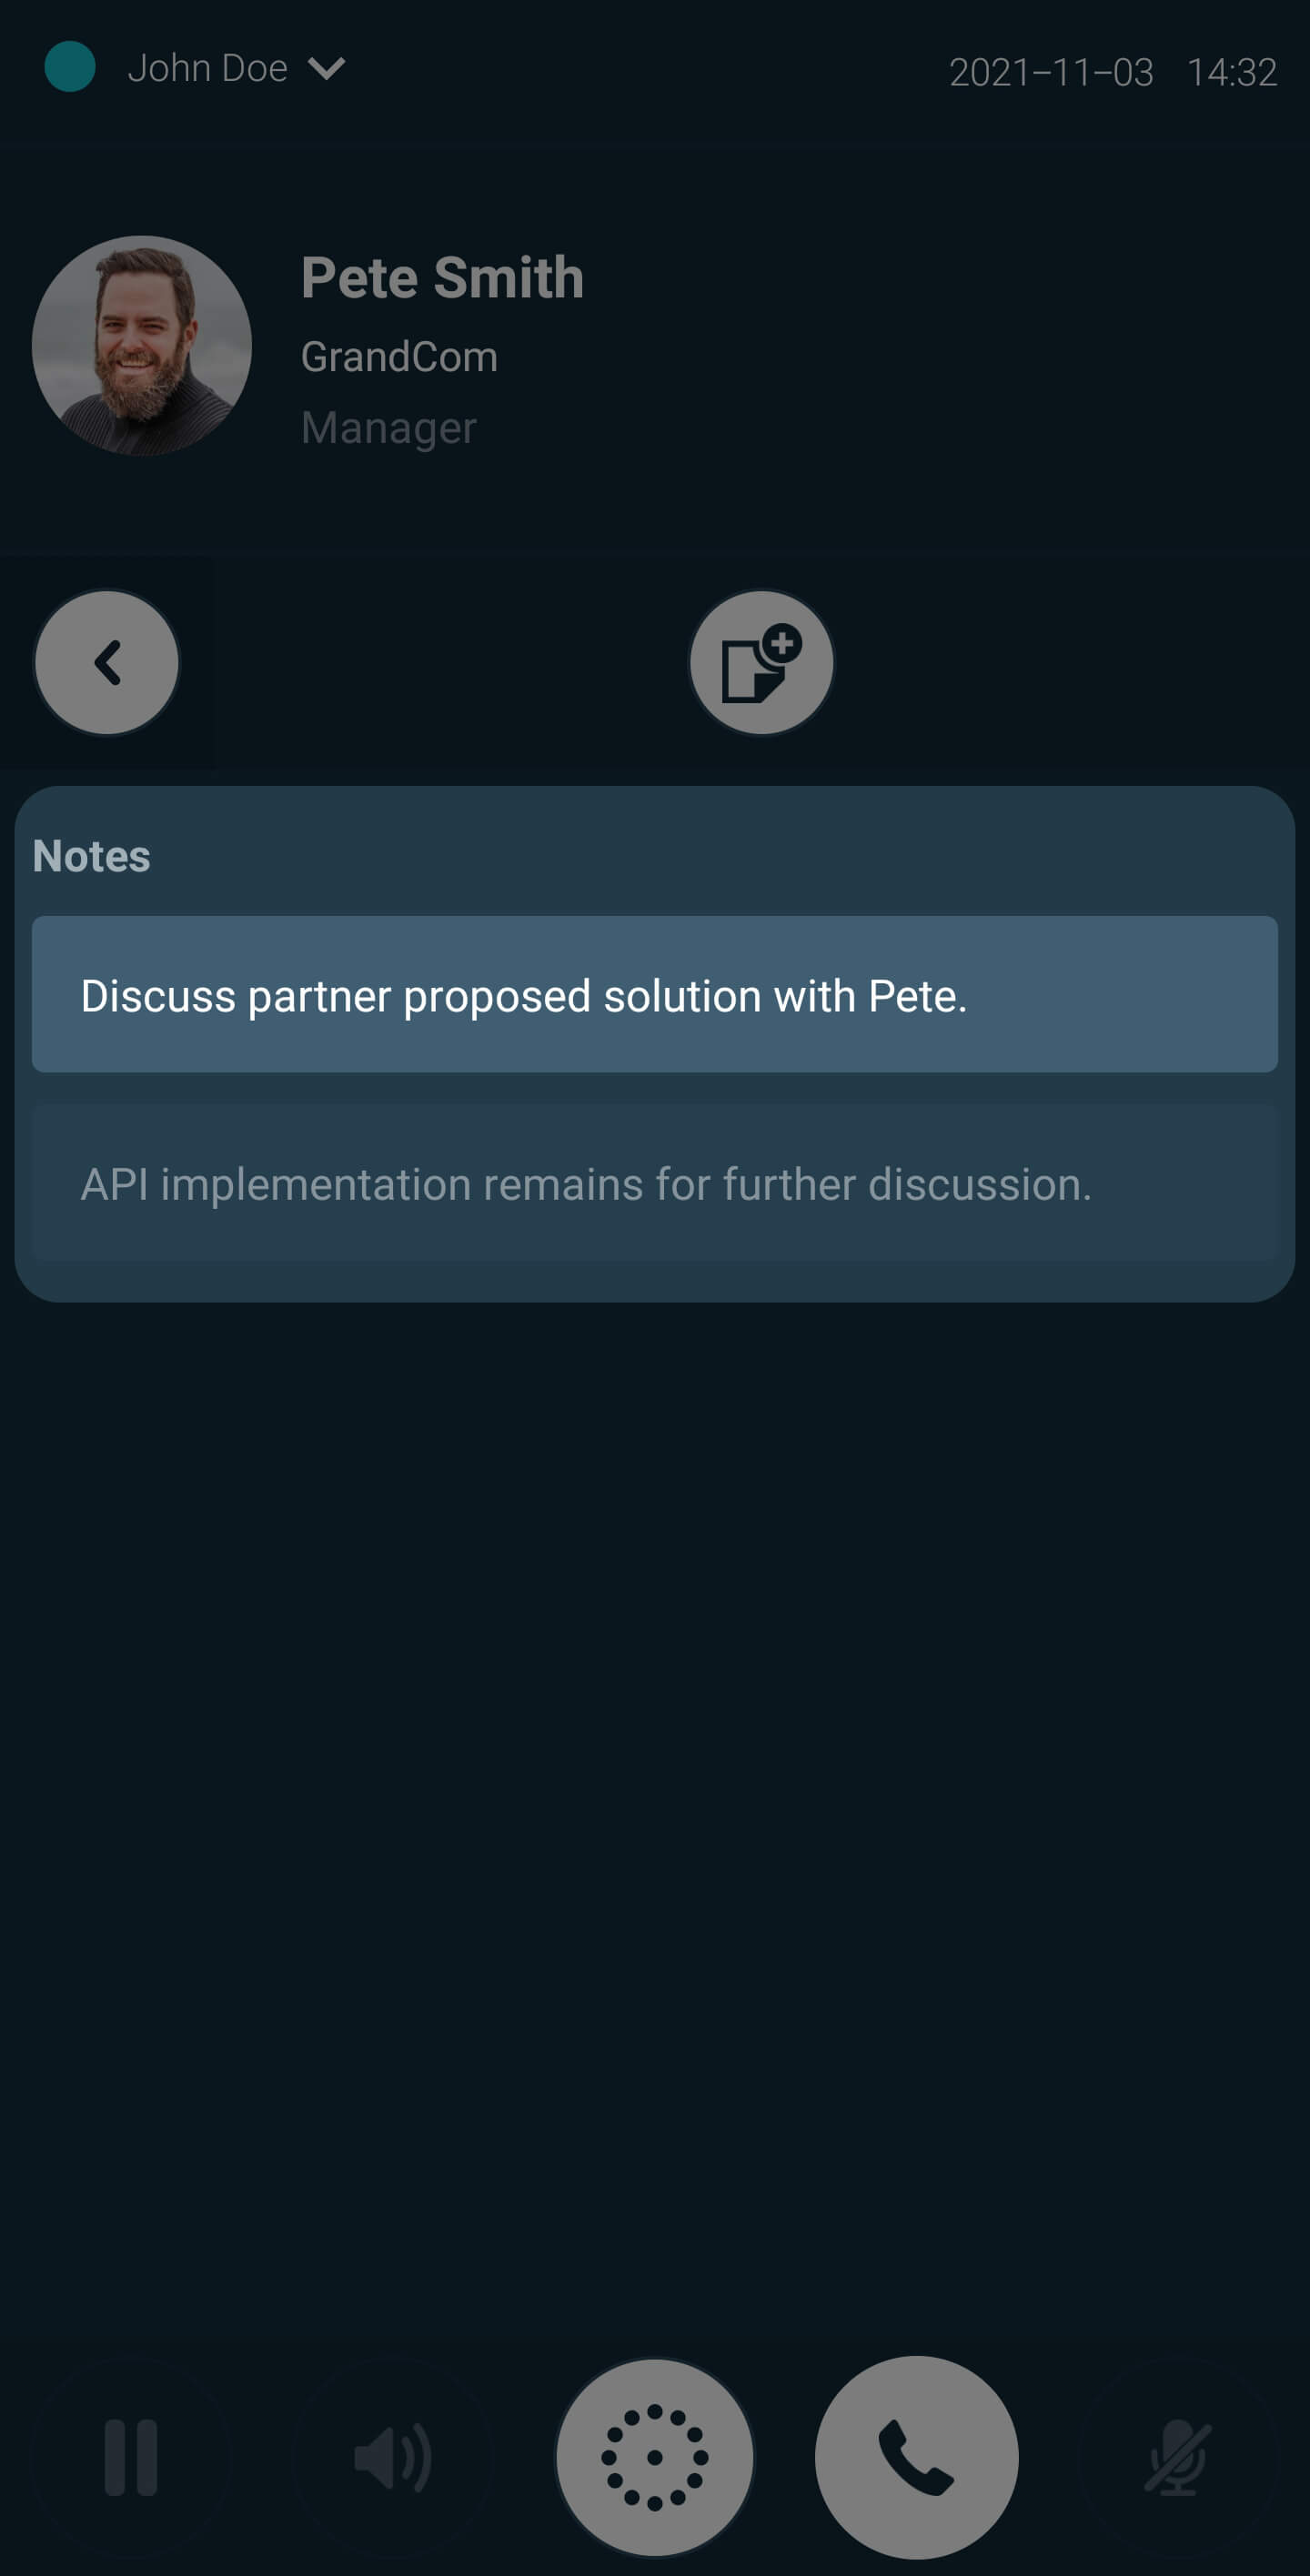
Deleting a note
Swipe the note to the left of the screen. An option to delete that note will be displayed.
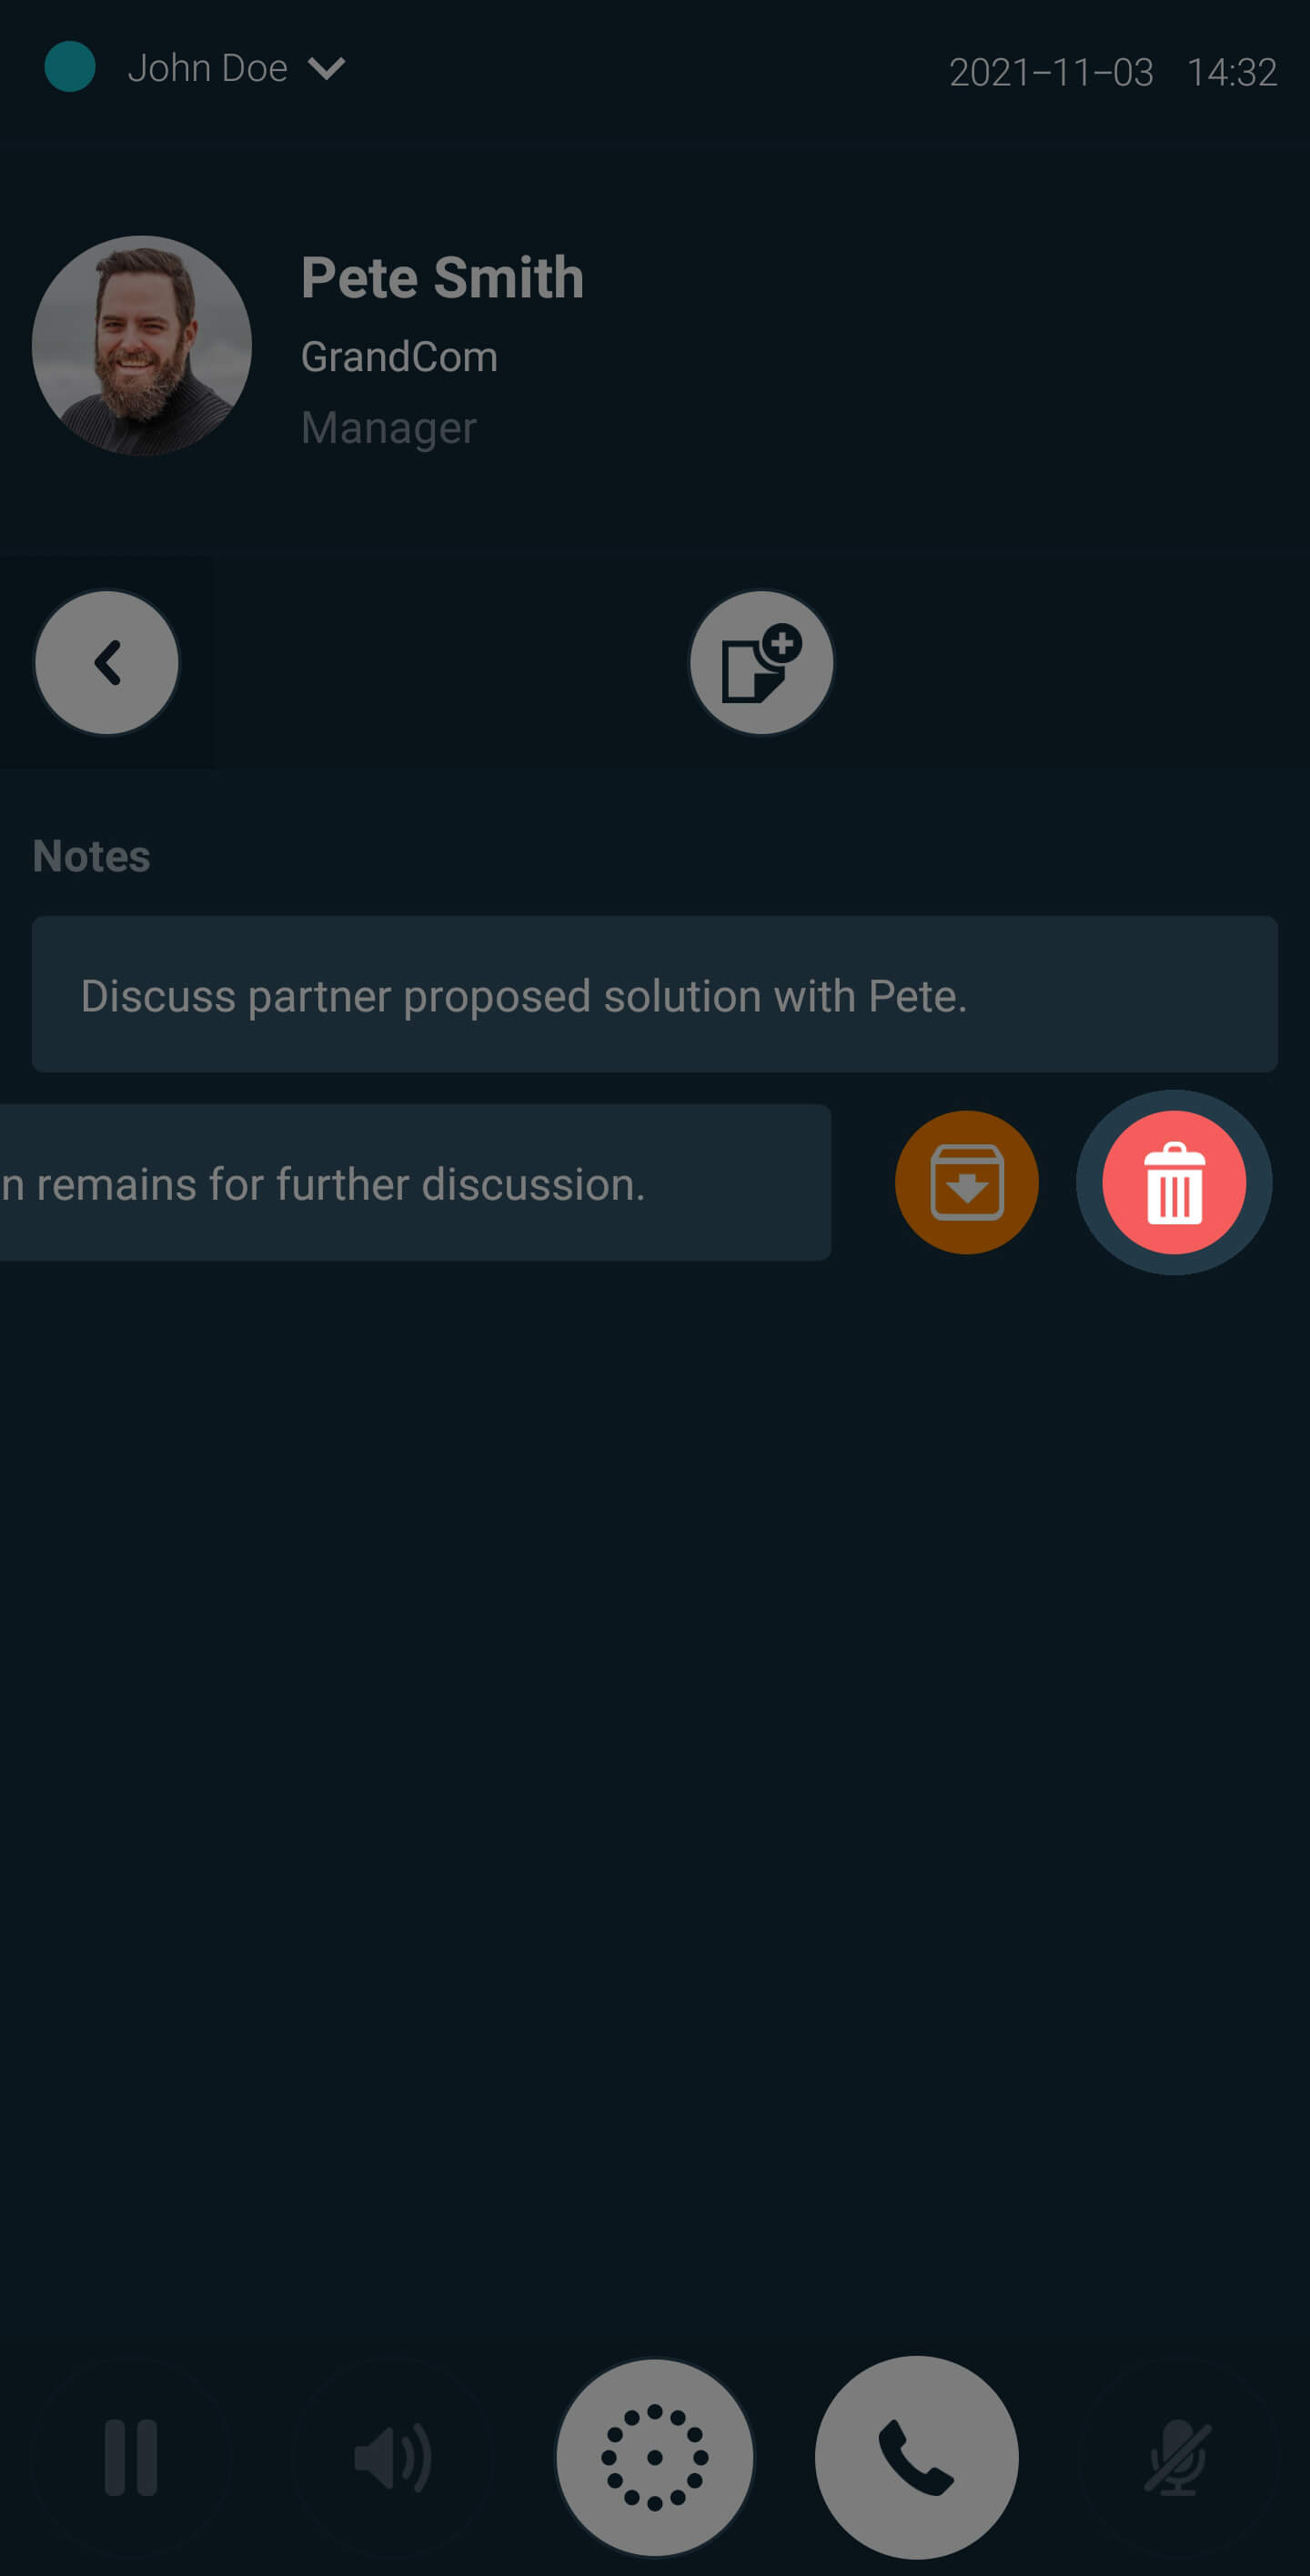 Back to the top
Accessing recent calls
Click on a selected contact’s avatar from any tab to display the call history for that contact. Call history is displayed under Recents.
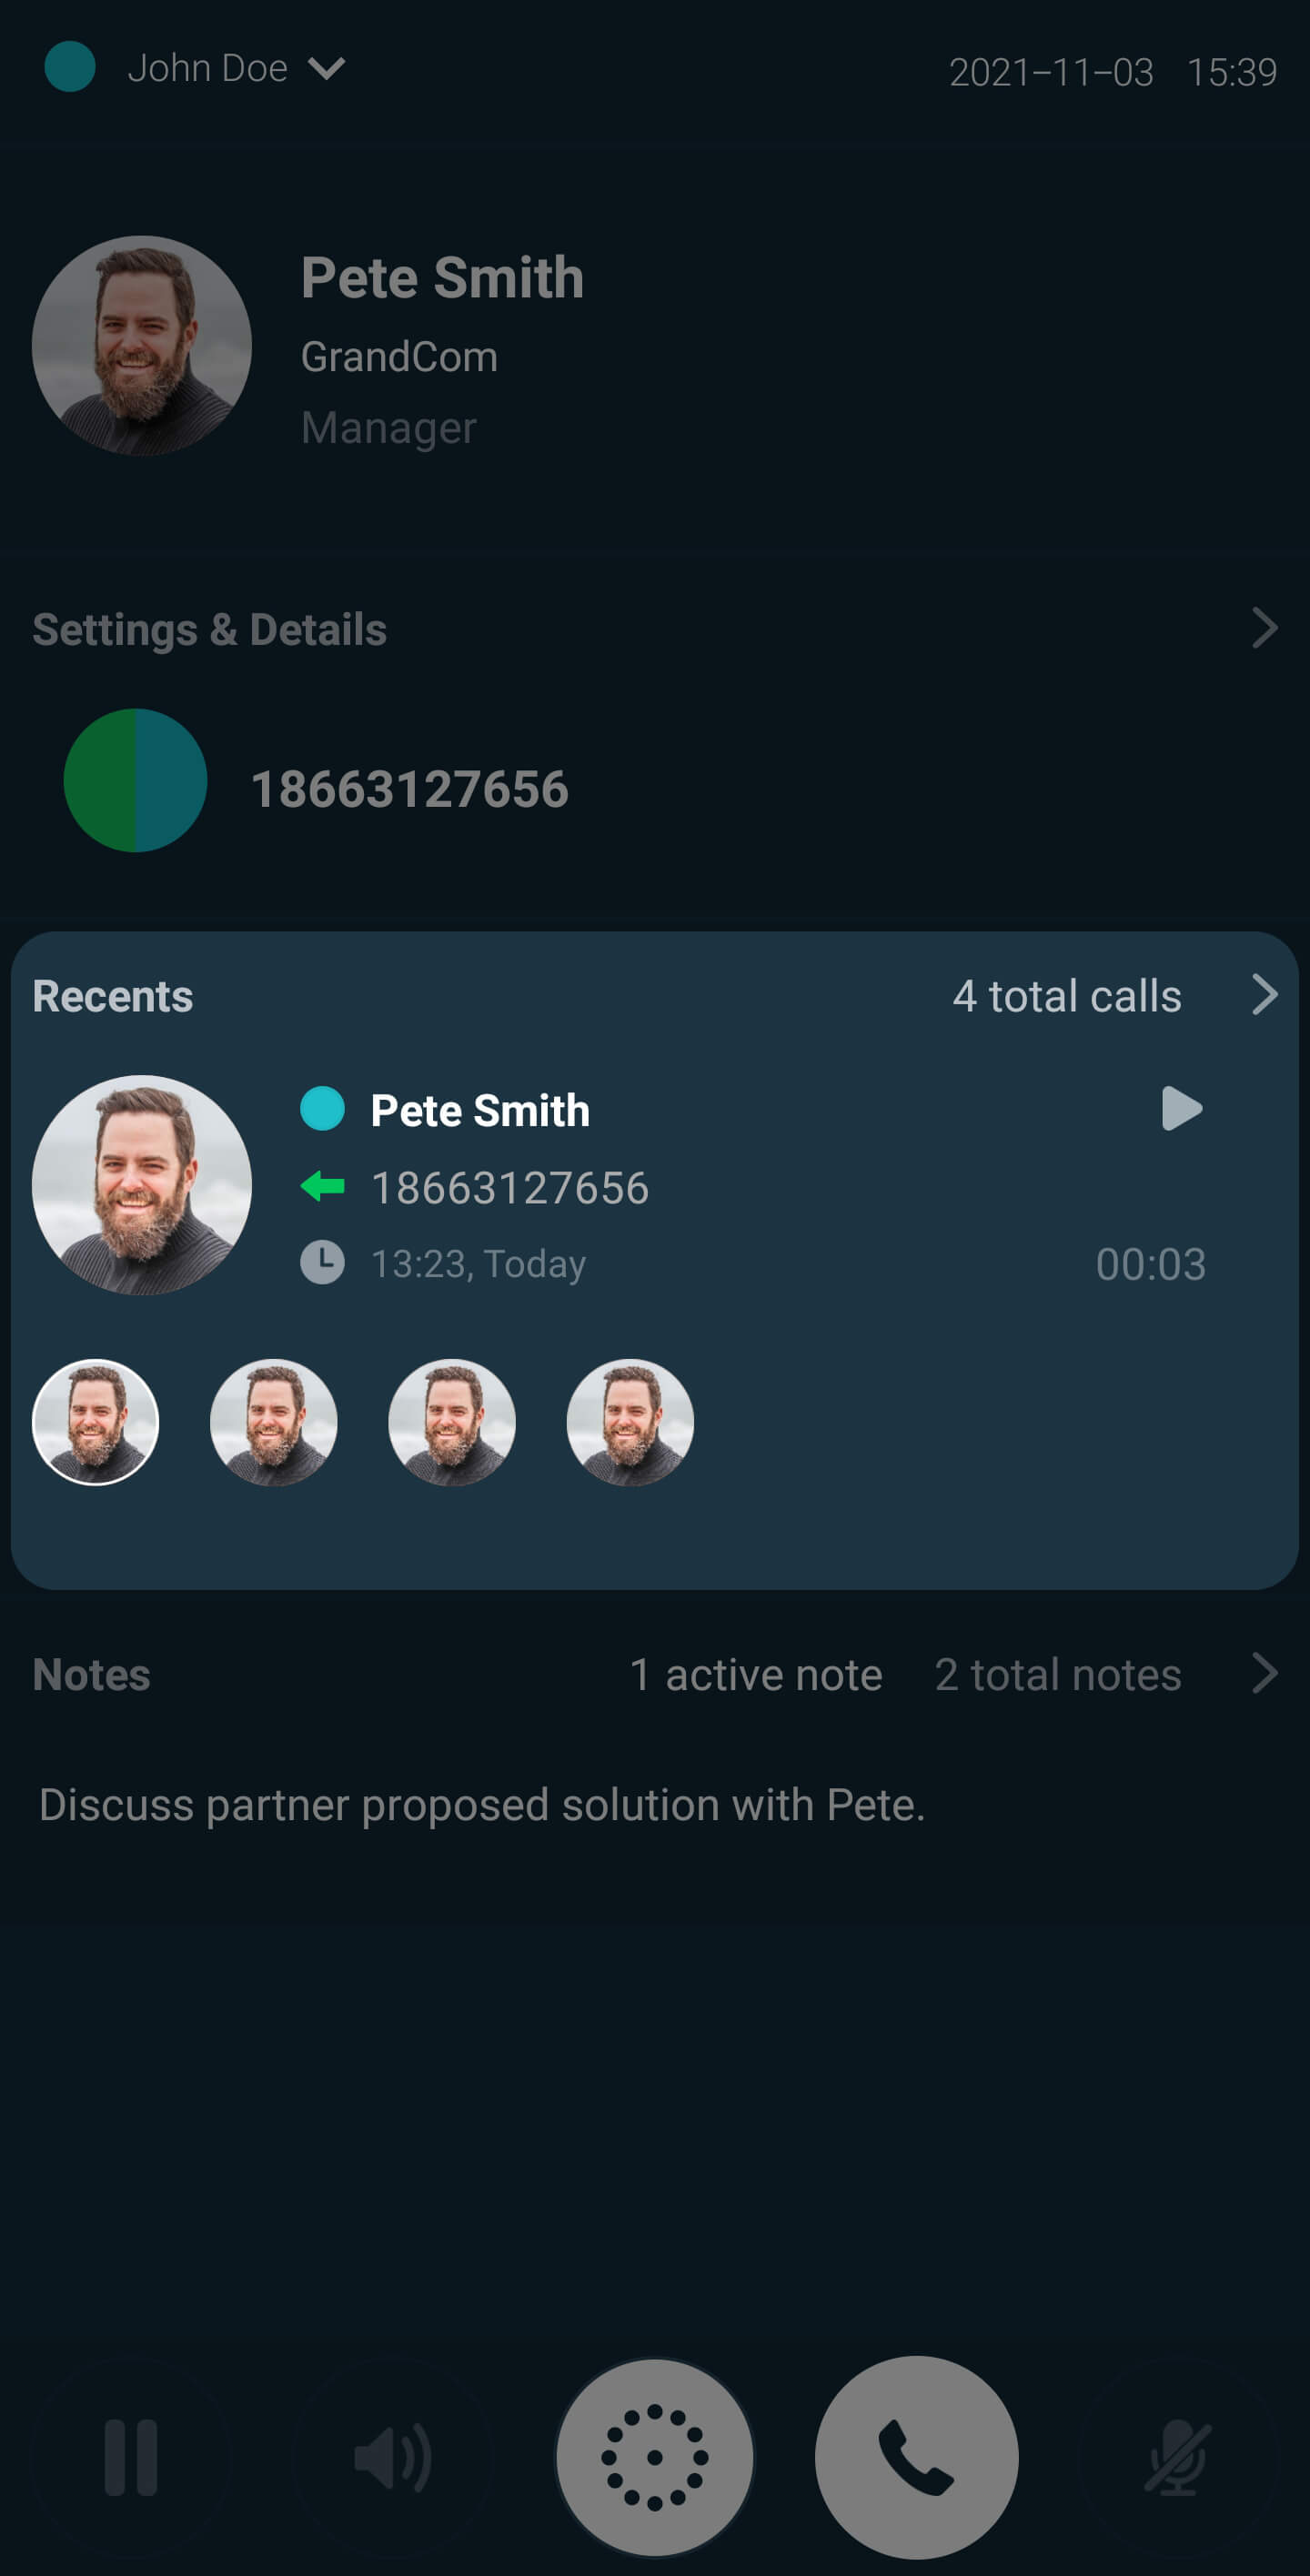

Recents details include:
- The contact or number from/to which the call was received/placed.
- An arrow designating if the call was Inbound or Outbound. The color of the arrow indicates if the call was successful (Green - call successful, Red - call failed).
- The date and time of the call.
- The length of the call (if applicable) in the format minutes:seconds.
Call records may be individually deleted from the Recents history. To delete a record, simply swipe the selected record to the left of the screen.
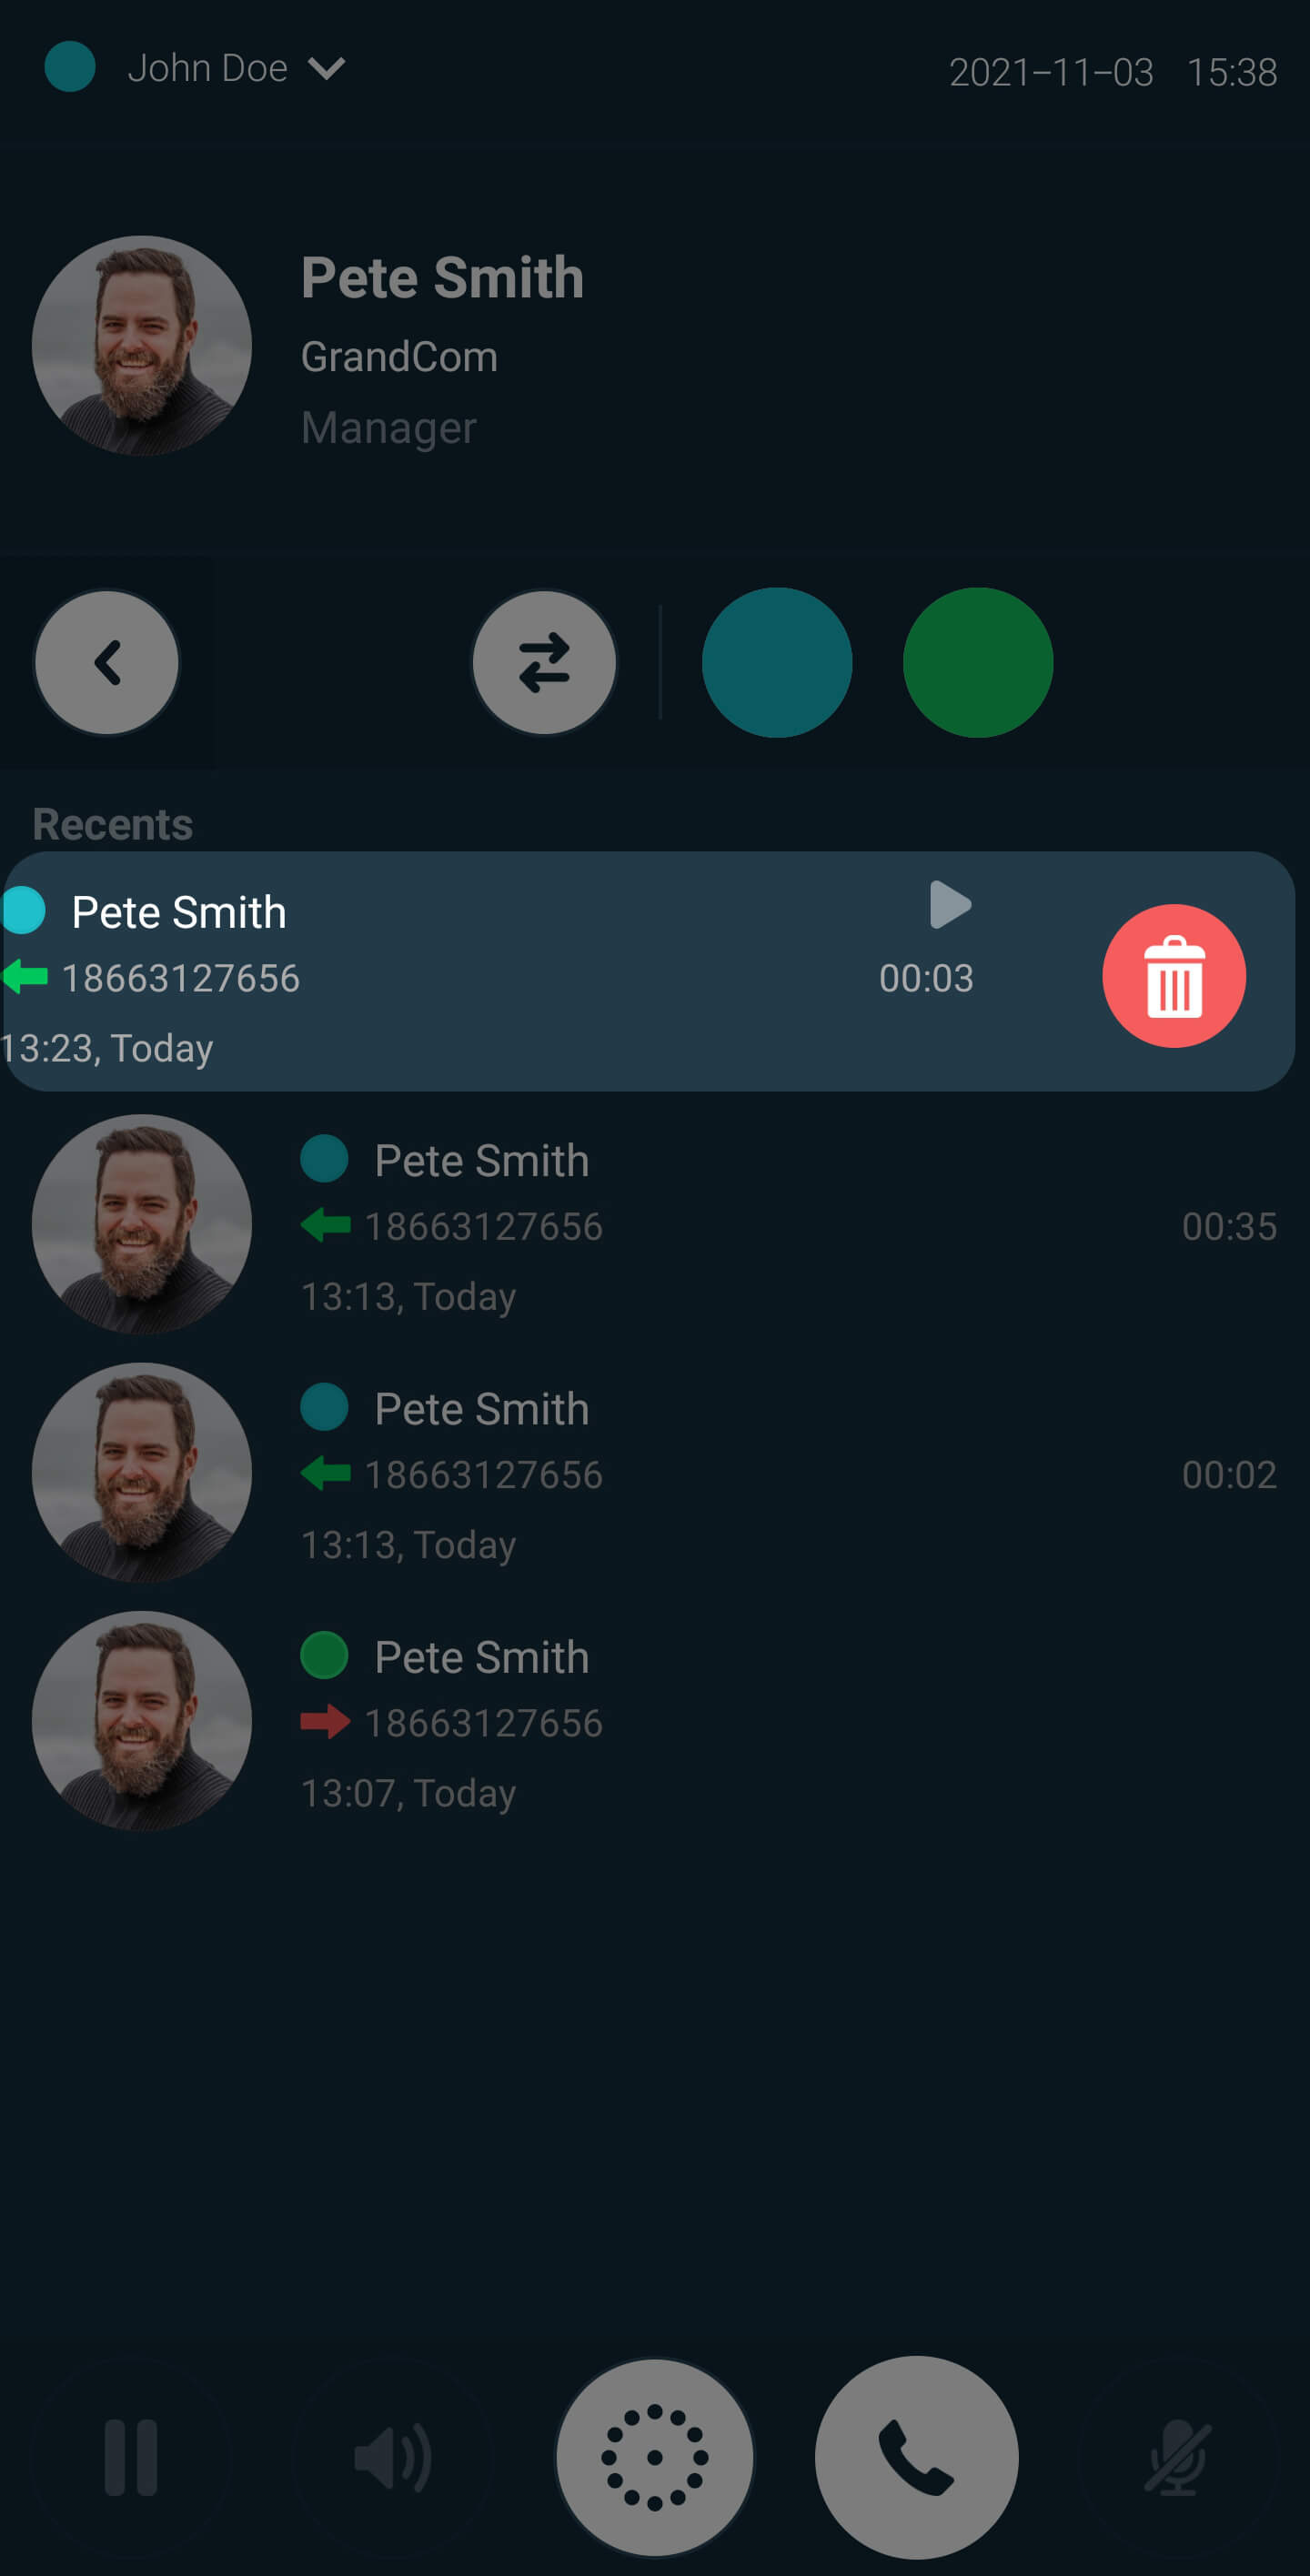 Back to the top
Integration Protocols
Call.center™ Supported URL Protocols
Protocols can be used to speed up the workflow by automating repetitive actions and allowing the end-user to control the actions of the application actions with minimal manual interaction with the interface.
- To access the Integration protocols, click on the Settings button located on the home screen.
- Select the Integration tab.
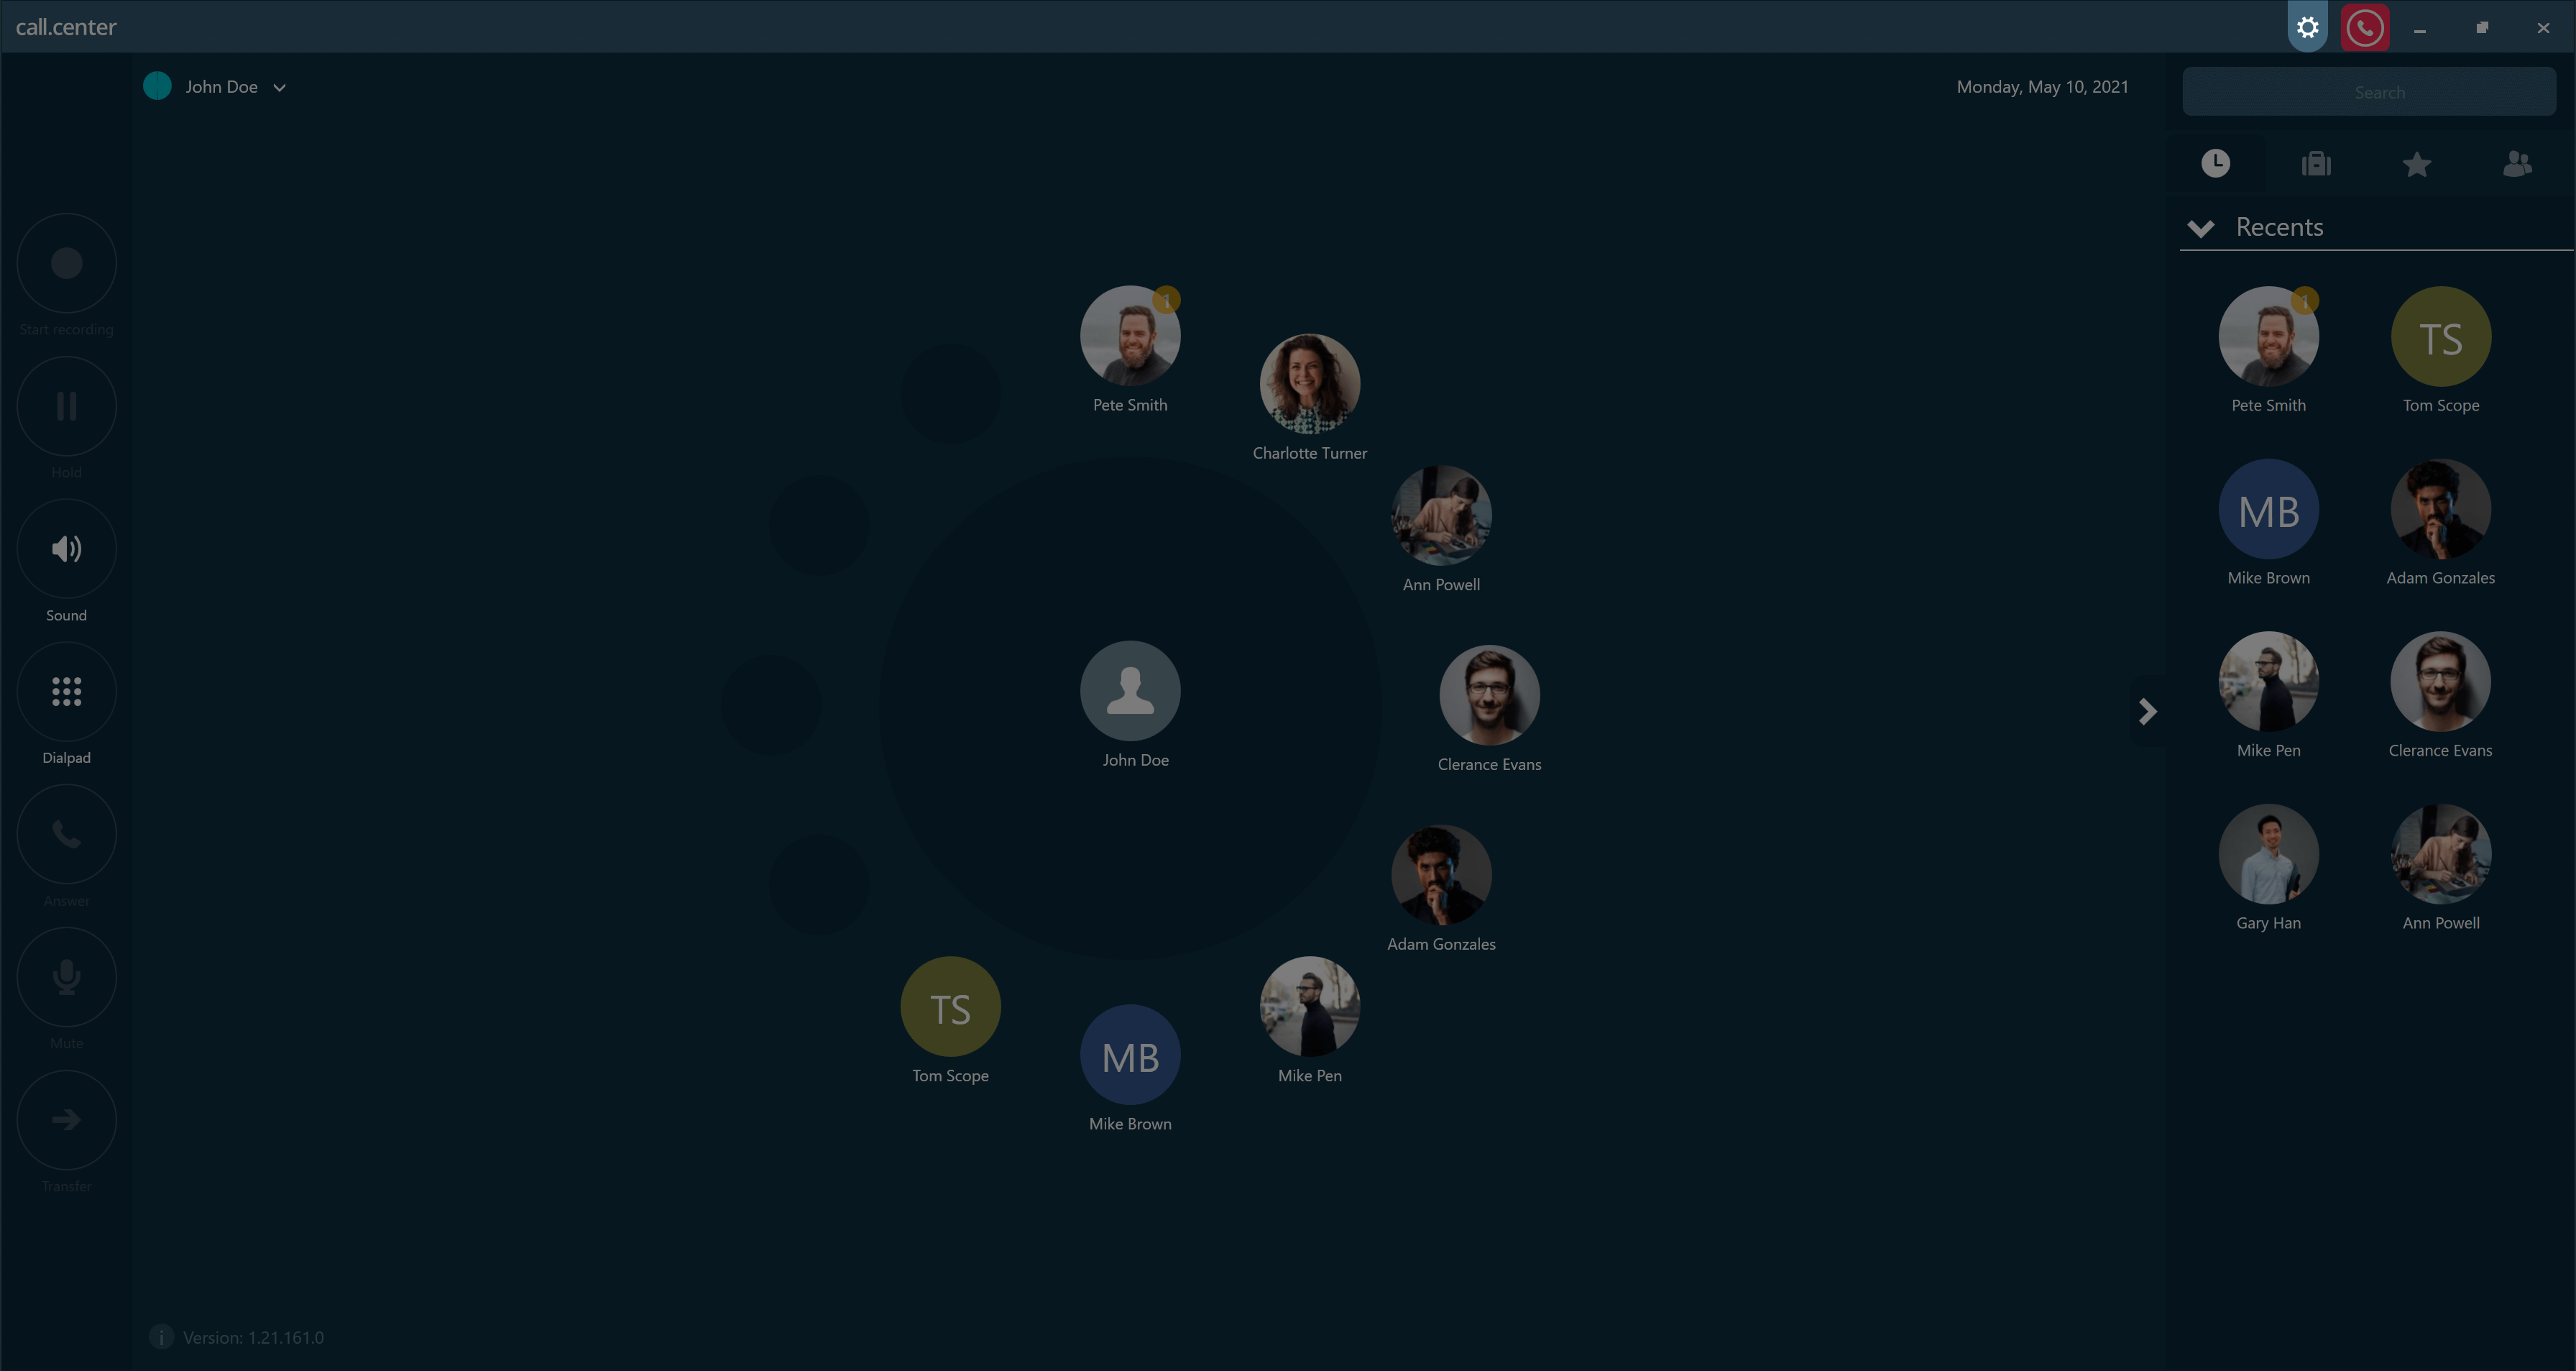
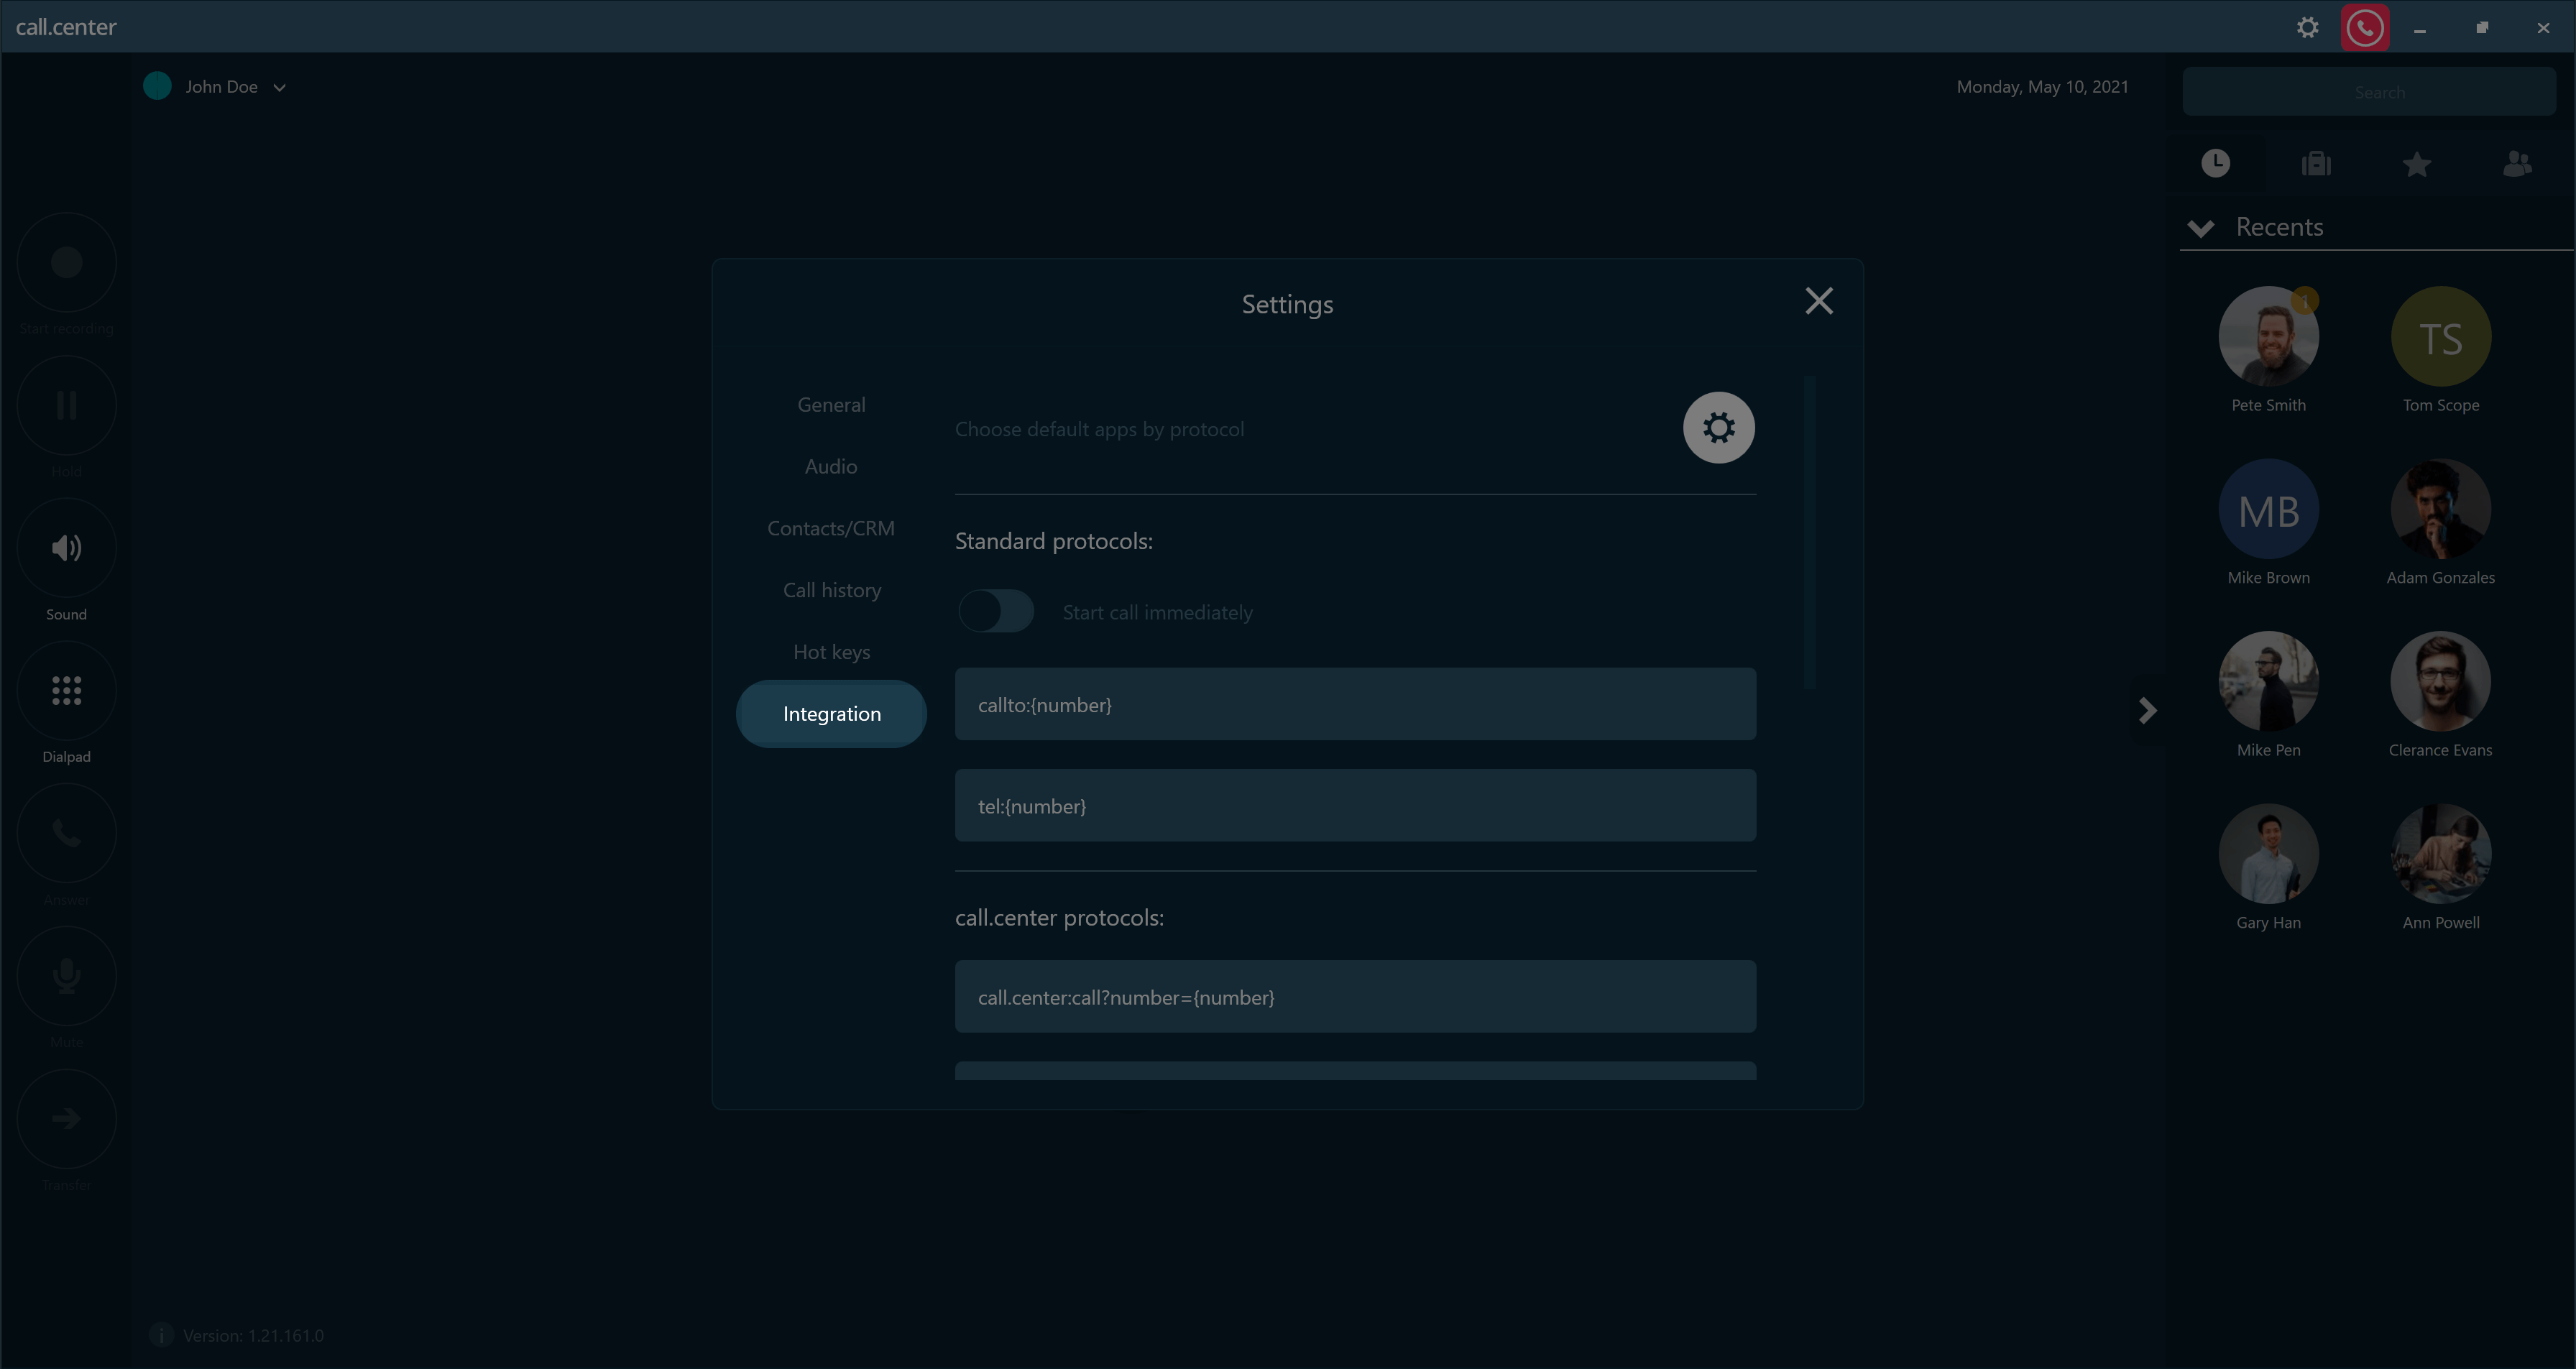
The first two protocols in the list are the default calling codecs used by multiple different operating systems.
- Enabled Start call immediately - the call will be started immediately with call.center™ placing that to a specific phone number
- Disabled Start call immediately - the specific phone number will appear in the call.center™ application
| Protocol | Description | OS |
|---|---|---|
| callto:{PhoneNumber} | Protocol used to initiate a call to a specific phone number | macOS, Windows |
| tel:{PhoneNumber} | Protocol used to initiate a call to a specific phone number | macOS, Windows |
The remaining protocols are the call.center™ application-specific protocols that can be used to control the behavior of the application while it is running in the background. Currently, these protocols are only supported by the Windows OS.
call.center™ supports the following protocols:
| Protocol | Description | OS |
|---|---|---|
| call.center:call?number={PhoneNumber} | call.center protocol used to initiate a call to a specific phone number | Windows |
| call.center:transfer?number={PhoneNumber} | call.center protocol used to transfer the current call to a specific destination number | Windows |
| tcall.center:hold_unhold | call.center protocol used to hold and unhold current active call participants | Windows |
| call.center:mute_unmute | call.center protocol used to mute and unmute current active call participants | Windows |
| call.center:hangup | call.center protocol used to hang up the current active call | Windows |
| call.center:answer | call.center protocol used to answer the current incoming call | Windows |
| call.center:reject | call.center protocol used to decline the current incoming call | Windows |
Configuration & Troubleshooting Tips
Proxy server (for Push notifications)
About proxy
The call.center™ proxy server is responsible for maintaining continuous SIP registration activities, providing a call relay between the SIP service provider and the call.center™ app, as well as for facilitating push notifications.
VoIP apps such as call.center™ are usually required to run continuously in the background for the purpose of displaying notifications regarding incoming calls and other real-time activities. For mobile devices in particular, this background activity results in poor battery life and high mobile data usage on the device.
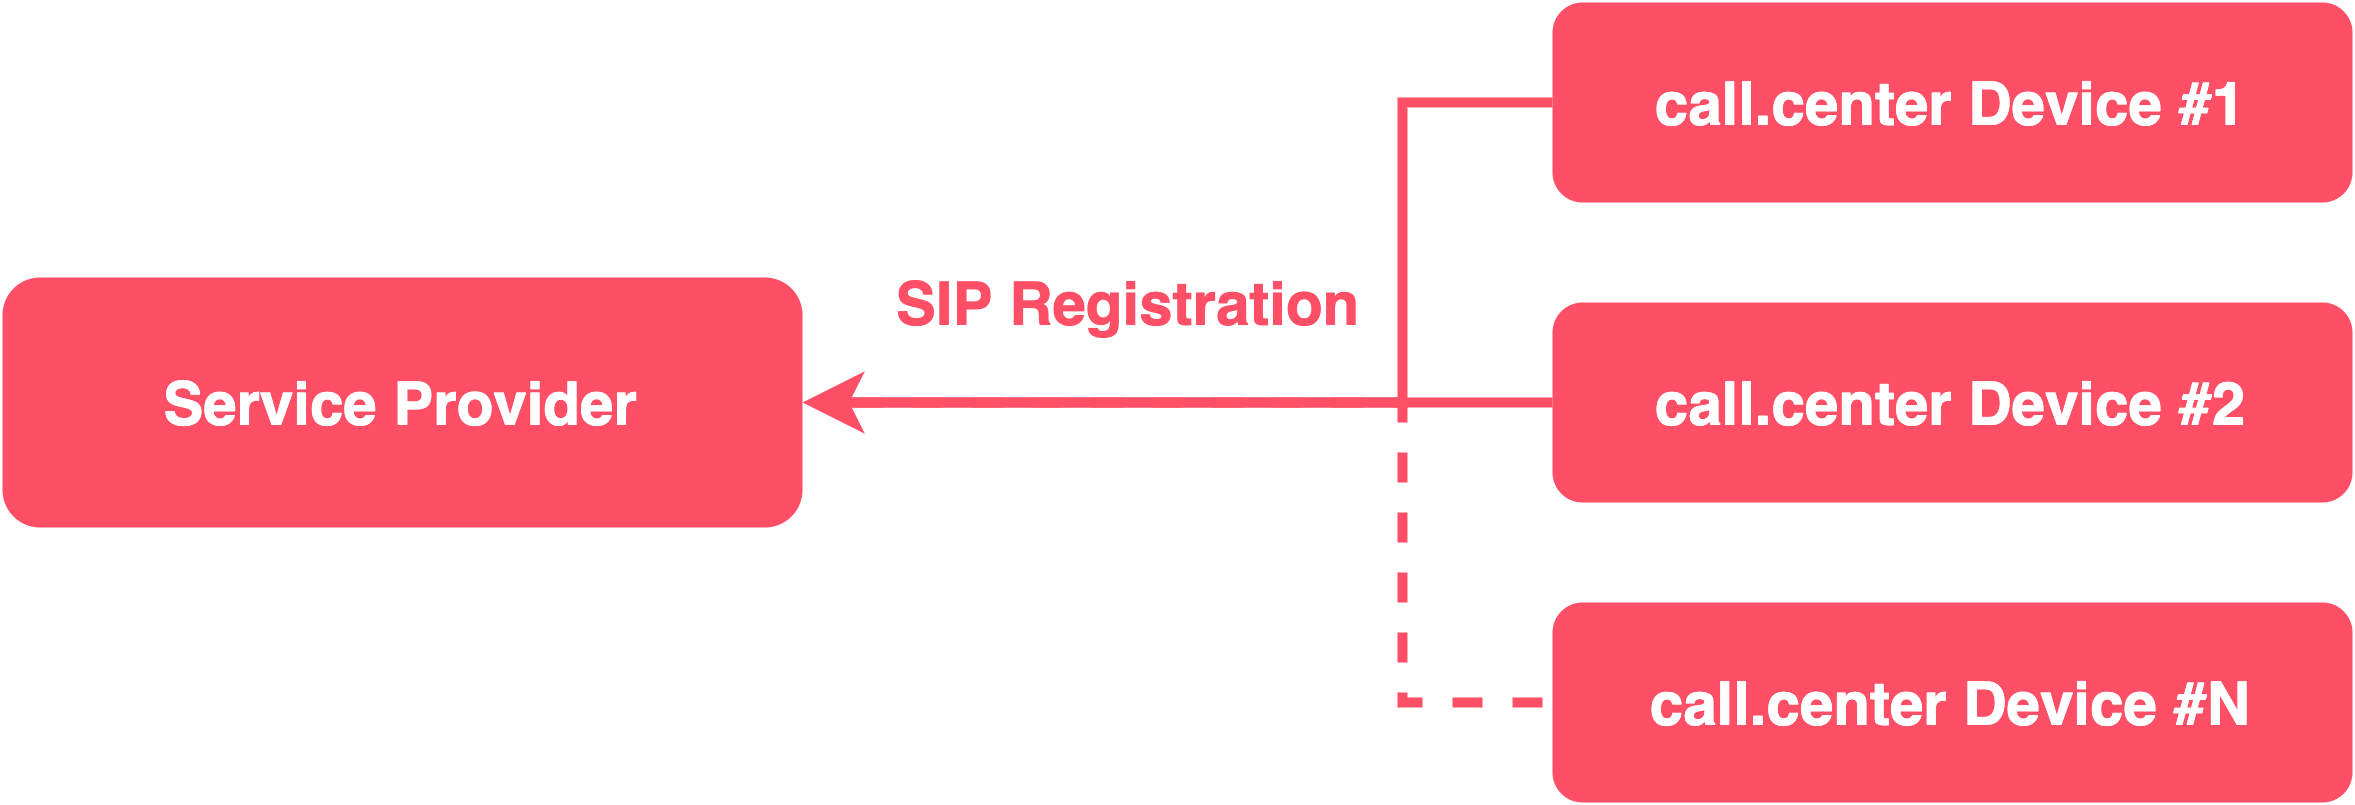
The call.center proxy server reduces the background overhead by transferring the continuous listening activity from the end device to the proxy server. This server registers with the SIP service provider as a client and maintains uninterrupted registration capabilities. Accordingly, when an incoming call is received, a push notification is generated on the device that has call.center™ installed, waking that device and allowing the user to process the incoming call.
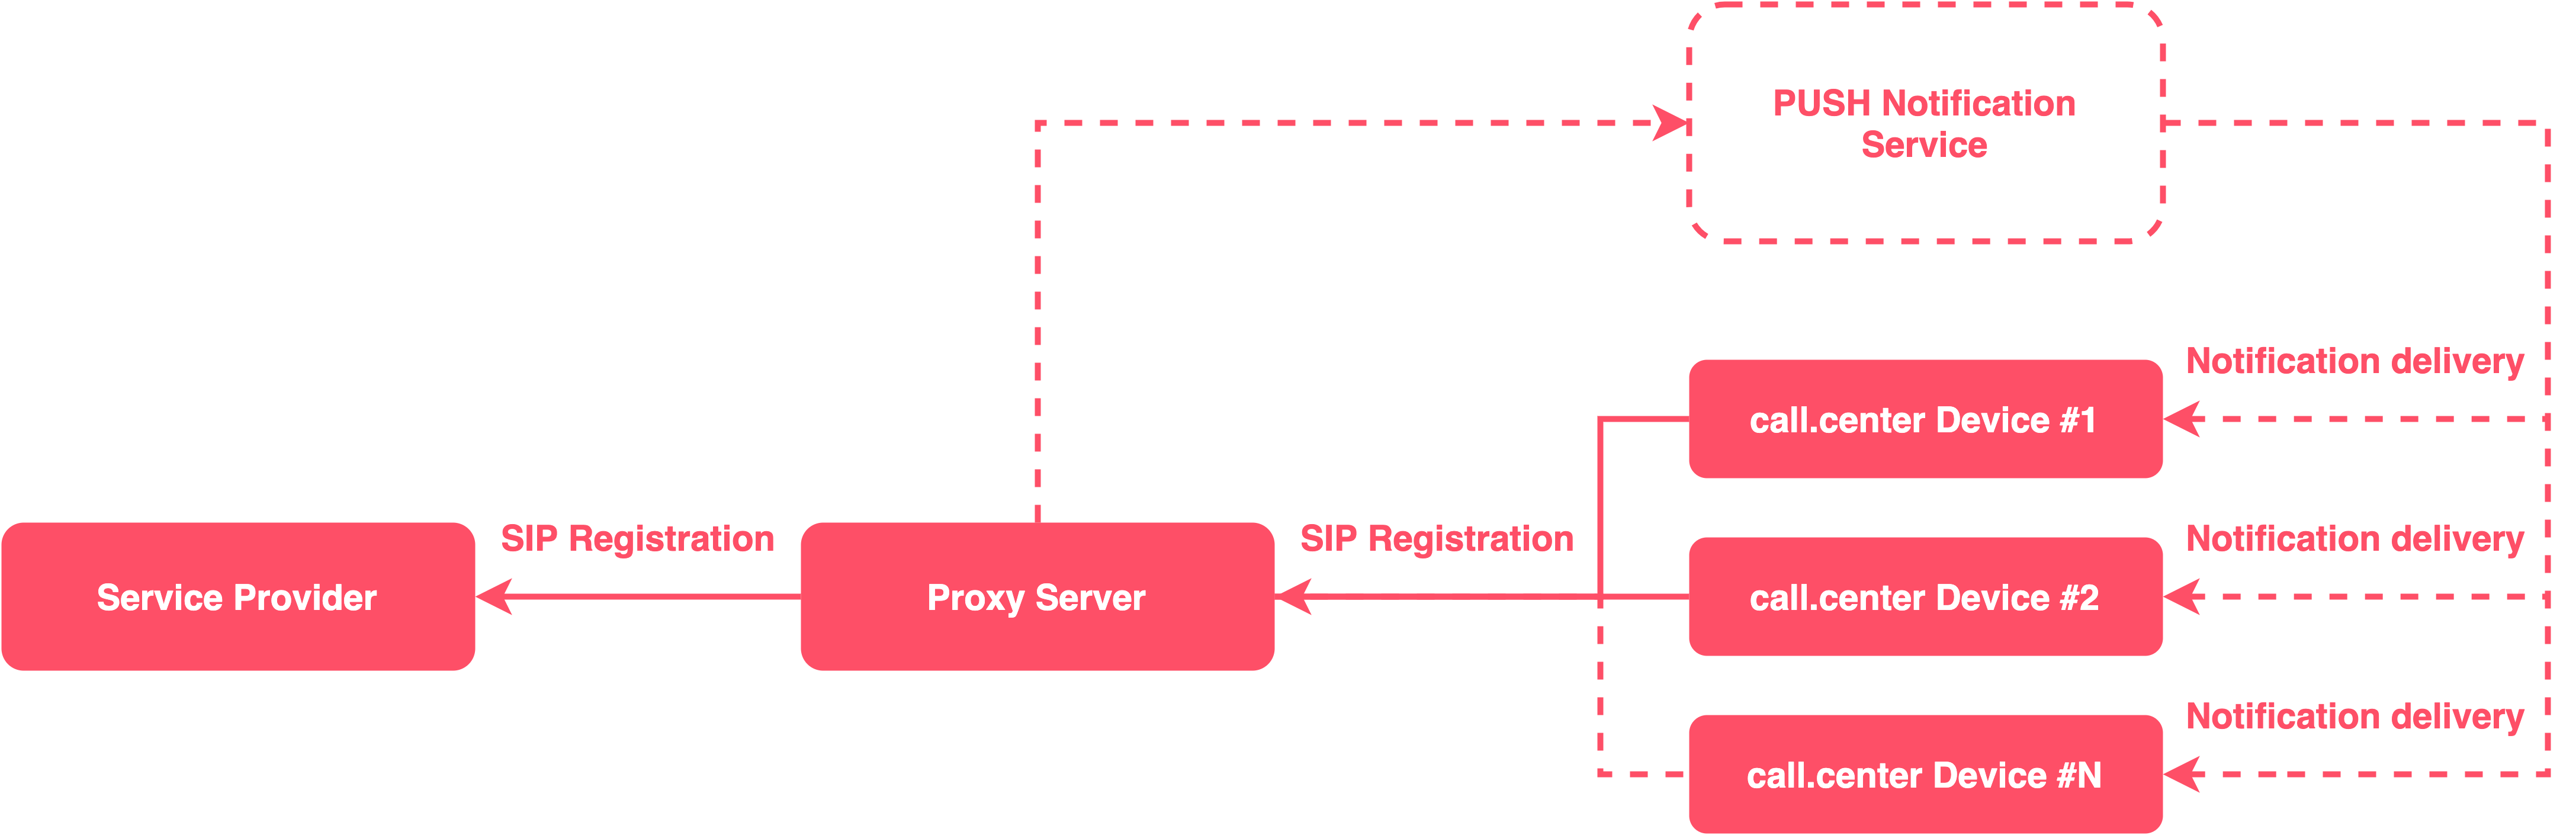
The call.center™ app supports push notifications on the following platforms:
- iOS
- Android
- Windows (Microsoft Store version)
It is highly recommended that the proxy server feature should be enabled for SIP Accounts used on mobile devices. This important feature will enable you to get the maximum benefit from your call.center™ application, and never miss an incoming call.
How to enable the use of Proxy server
The proxy server feature is enabled by default for phone.systems™ (version 2) SIP Accounts during the creation of these accounts. If a third-party SIP service provider is used with the call.center™ application, then the proxy server feature, if required, must be manually enabled for individual SIP Accounts. This is done from the call.center™ management portal by accessing the SIP Account’s “Advanced Settings” tab.
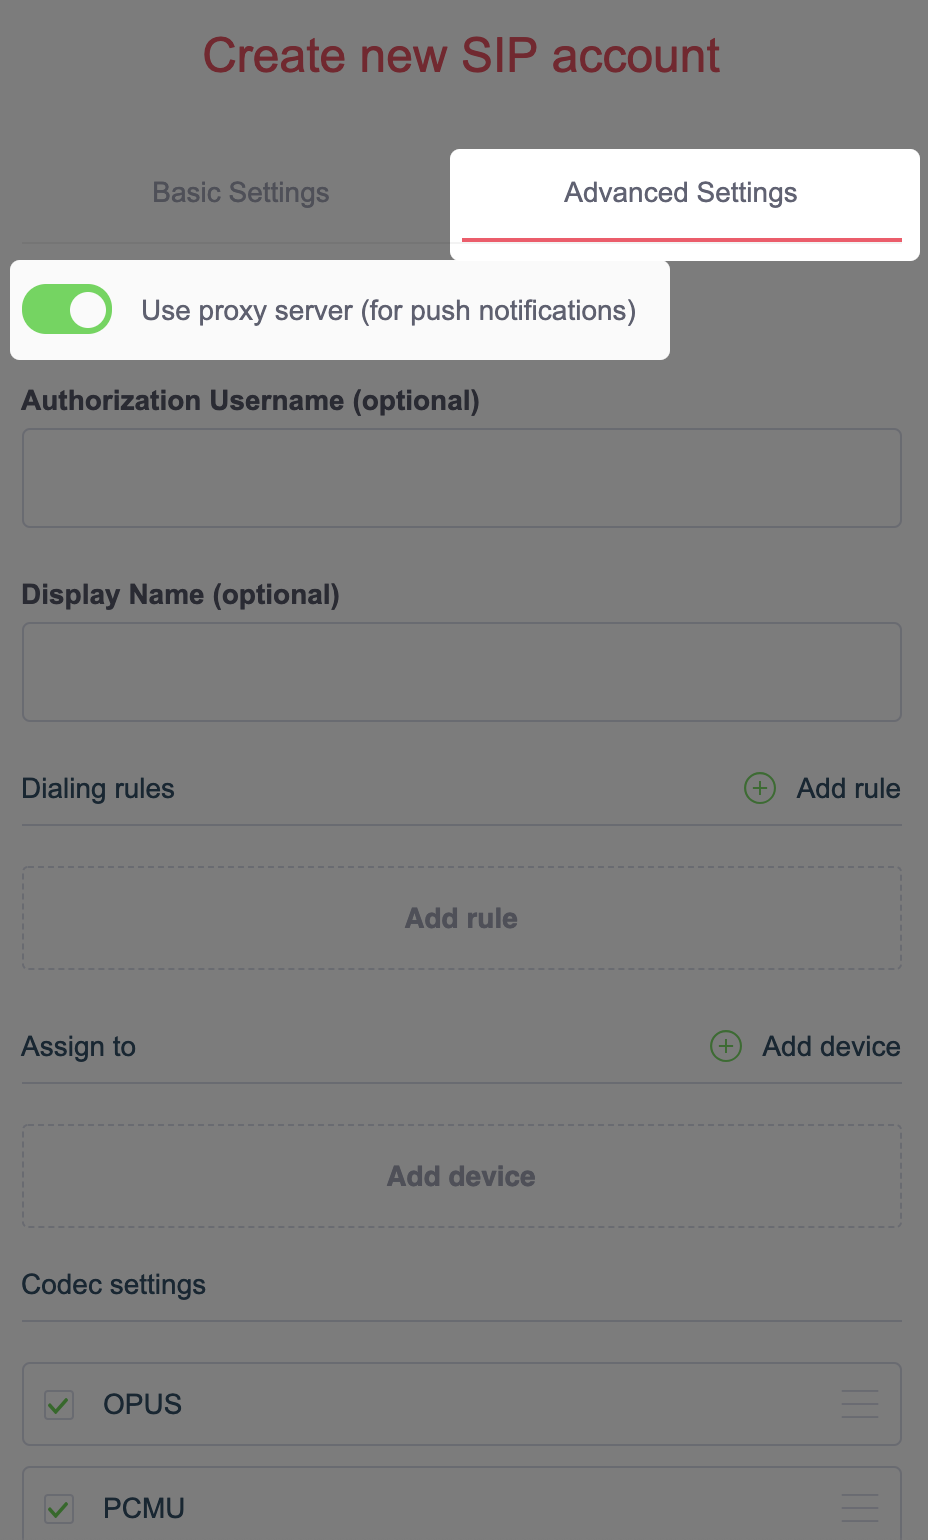
For more information on how to find the SIP account “Advanced Settings” tab, please refer to the “Managing SIP Accounts” section here.
IMPORTANT - Please ensure that the selected service provider has allowlisted the IP addresses found here. These addresses are required for call communication services when the proxy server feature is enabled.
Back to the topAndroid Devices
Data Saver
The Data Saver feature helps to reduce data usage by preventing some apps from sending or receiving data while running in the background.
If this setting is enabled on your Android device, it may prevent the call.center™ application from receiving incoming call notifications.
Data Saver settings on your Android device can usually be found under Settings -> Network & Internet -> Data usage -> Data Saver
You may disable the Data Saver altogether, or allow call.center™ to use unrestricted data when the Data Saver feature is enabled.
Battery optimization
If you are still experiencing issues with incoming call notifications, you may need to check the battery optimization settings on your device.
Some devices may have more aggressive battery optimization configurations that may lead to an application not receiving incoming call notifications.
Incoming Call Notification Display over other Apps
call.center™ application is capable of displaying incoming call notification over other applications.
This option can be enabled from the phone’s Settings window -> Apps & Notifications -> select the “call.center™” application from the list -> Tap on the “Advanced” option -> Select the “Display over other apps” option -> Enable the “Allow display over other apps” toggle.
The flow of enabling this feature may differ depending on your device’s Android version.
Back to the topiOS Devices
If you are experiencing issues with incoming call notifications on an iOS device, ensure that the following settings are enabled:
Go to Settings -> call.center™ and check that “Background App Refresh” is enabled.
Also, make sure that Allow Notifications in Settings -> call.center -> Notifications are enabled.
Back to the topcall.center IPs
If you are using a different service provider other than the default phone.systems™, make sure that the following IP addresses are allowlisted:
- 46.19.210.31 for Signaling
- 46.19.210.33 for Media and Outgoing traffic
You may also allowlist the whole subnet mask 46.19.208.0/21 (46.19.208.0 - 46.19.215.255), as in the future, additional call.center™ nodes may be created for call communication services.
Back to the topHow to send feedback
If you have not found a solution to your problem, you may send your feedback or questions directly to the developer team.
Please note that application log files will automatically be attached to the email. These files are used by the development team to perform a more thorough investigation of technical issues.
For the Windows platform
- Click on the call.center™ logo at the top right corner.
- Select the “Support” tab.
- Click on the "Get help from support team" button.
- Your default mailing application will be opened with the email's subject, recipient and log files already included. You may edit the email content by including your questions and feedback.
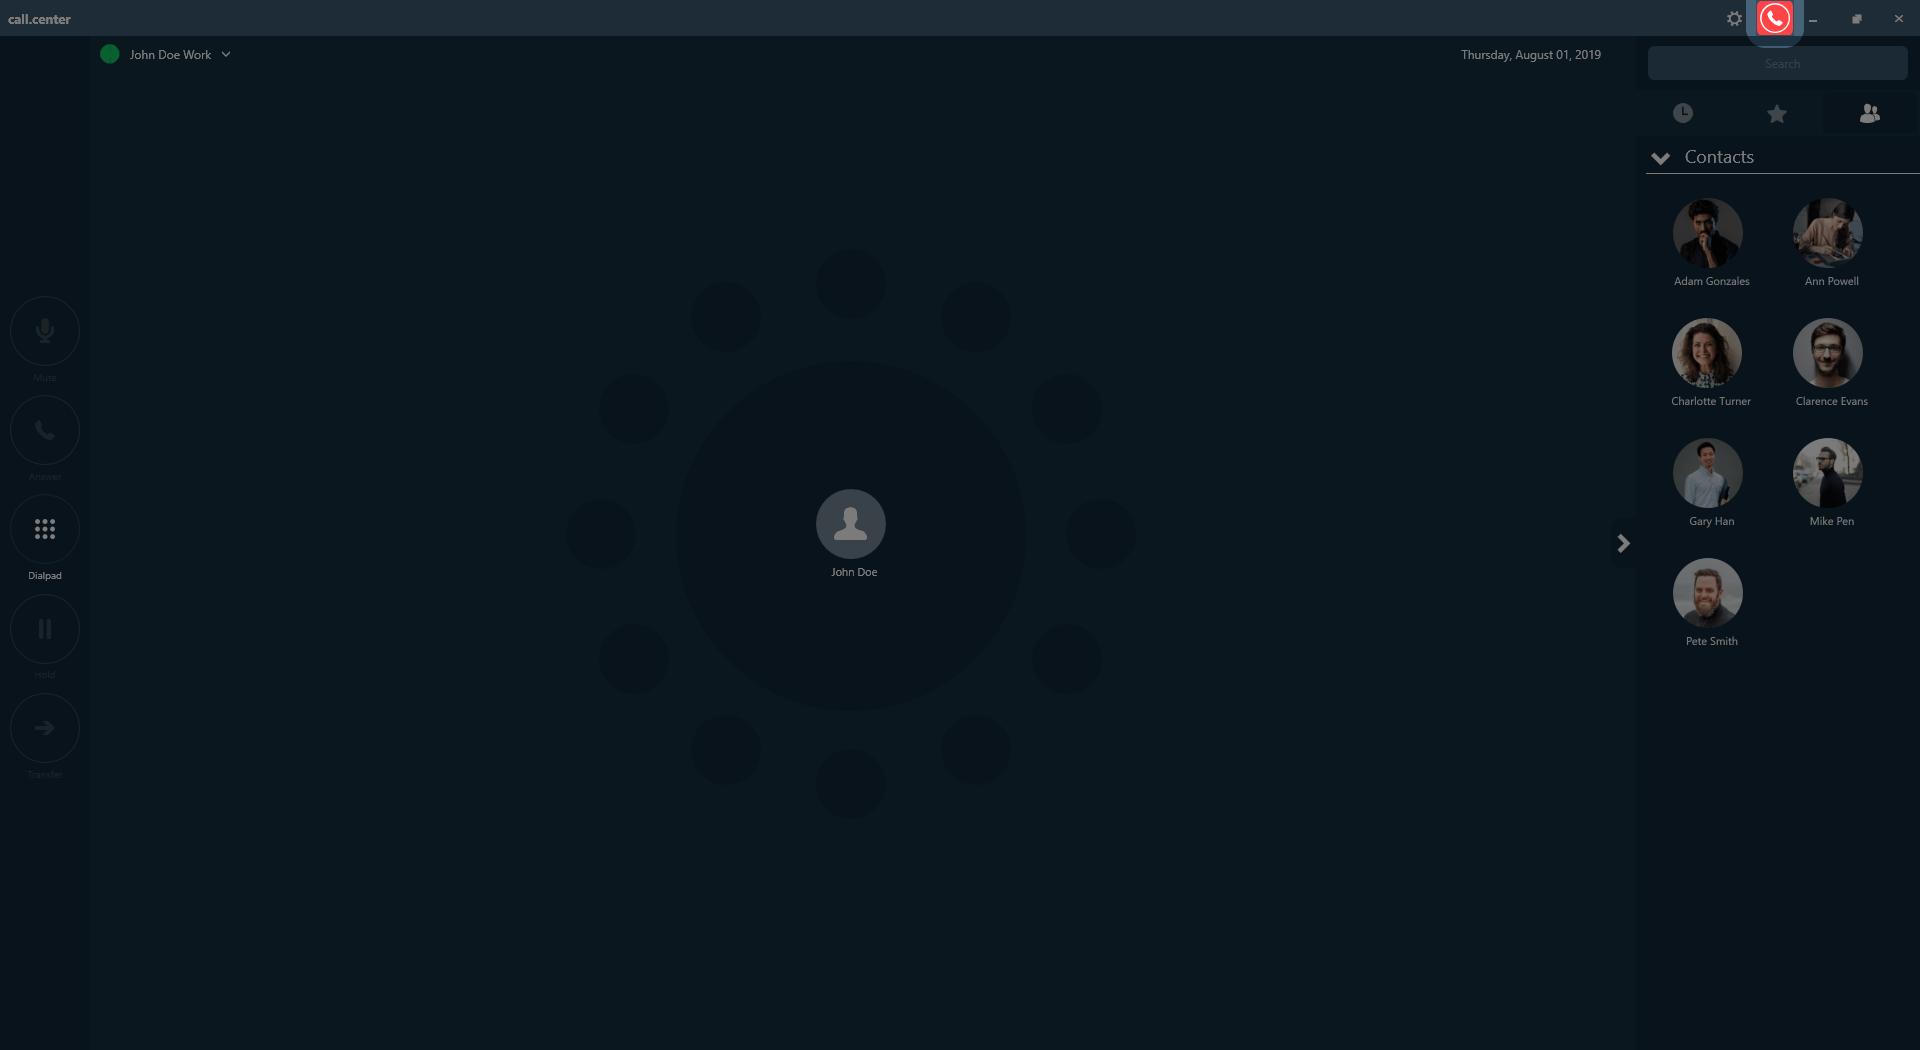
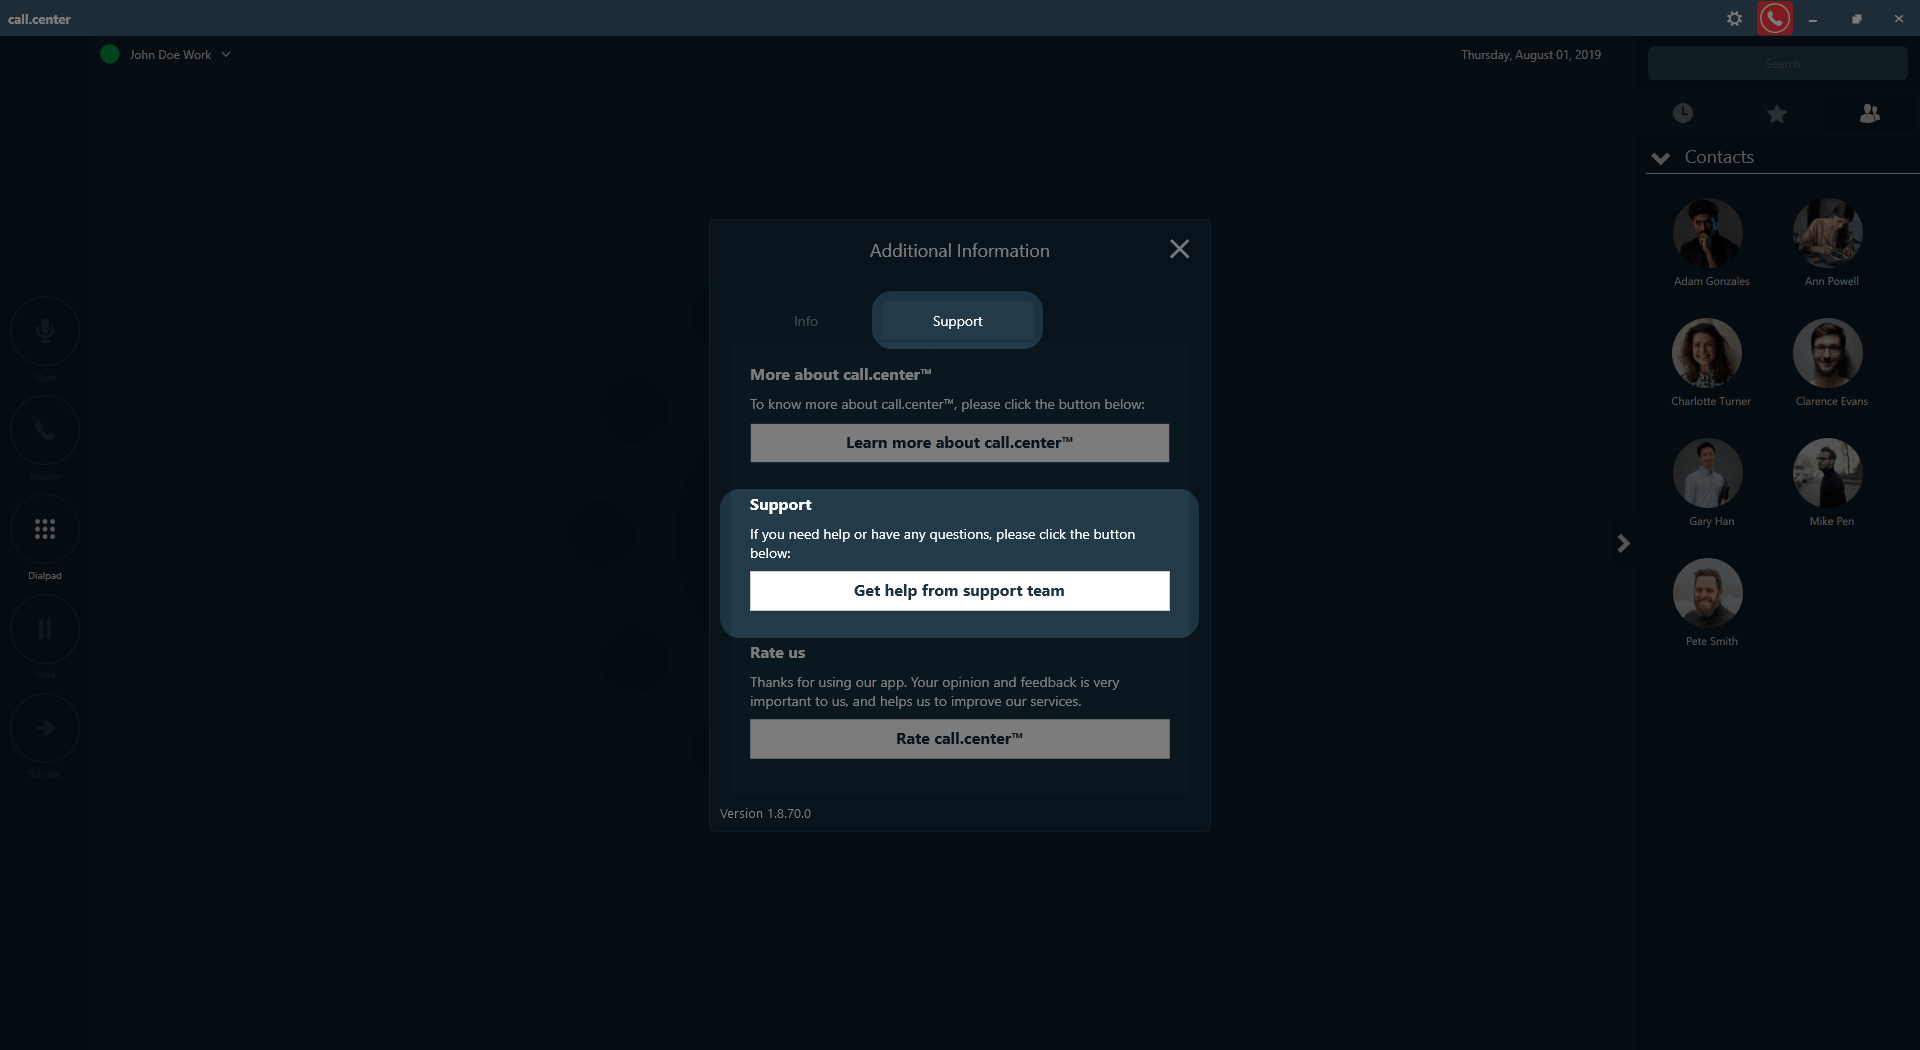
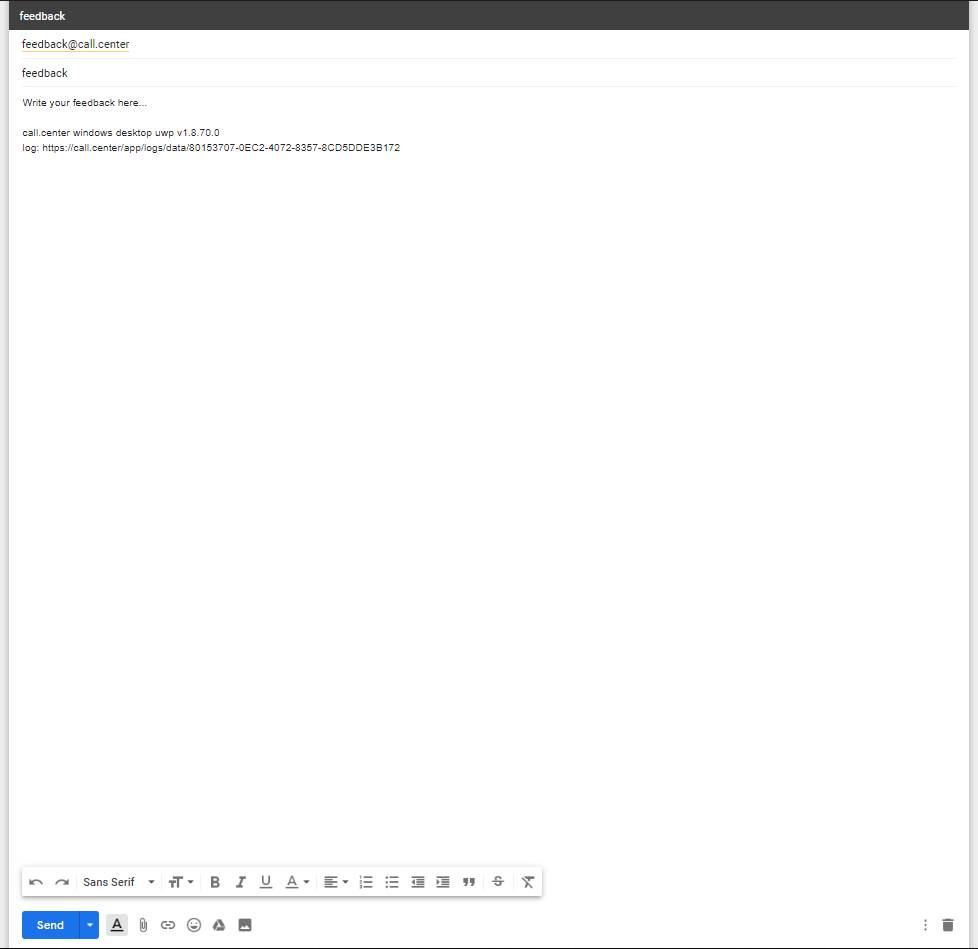
For Android, iOS, macOS platforms
- Click on the version number located at the bottom left of the screen.
- Select the “Support” tab.
- Click on the "Get help from support team" button.
- Your default mailing application will be opened with the email's subject, recipient and log files already included. You may edit the email content by including your questions and feedback.
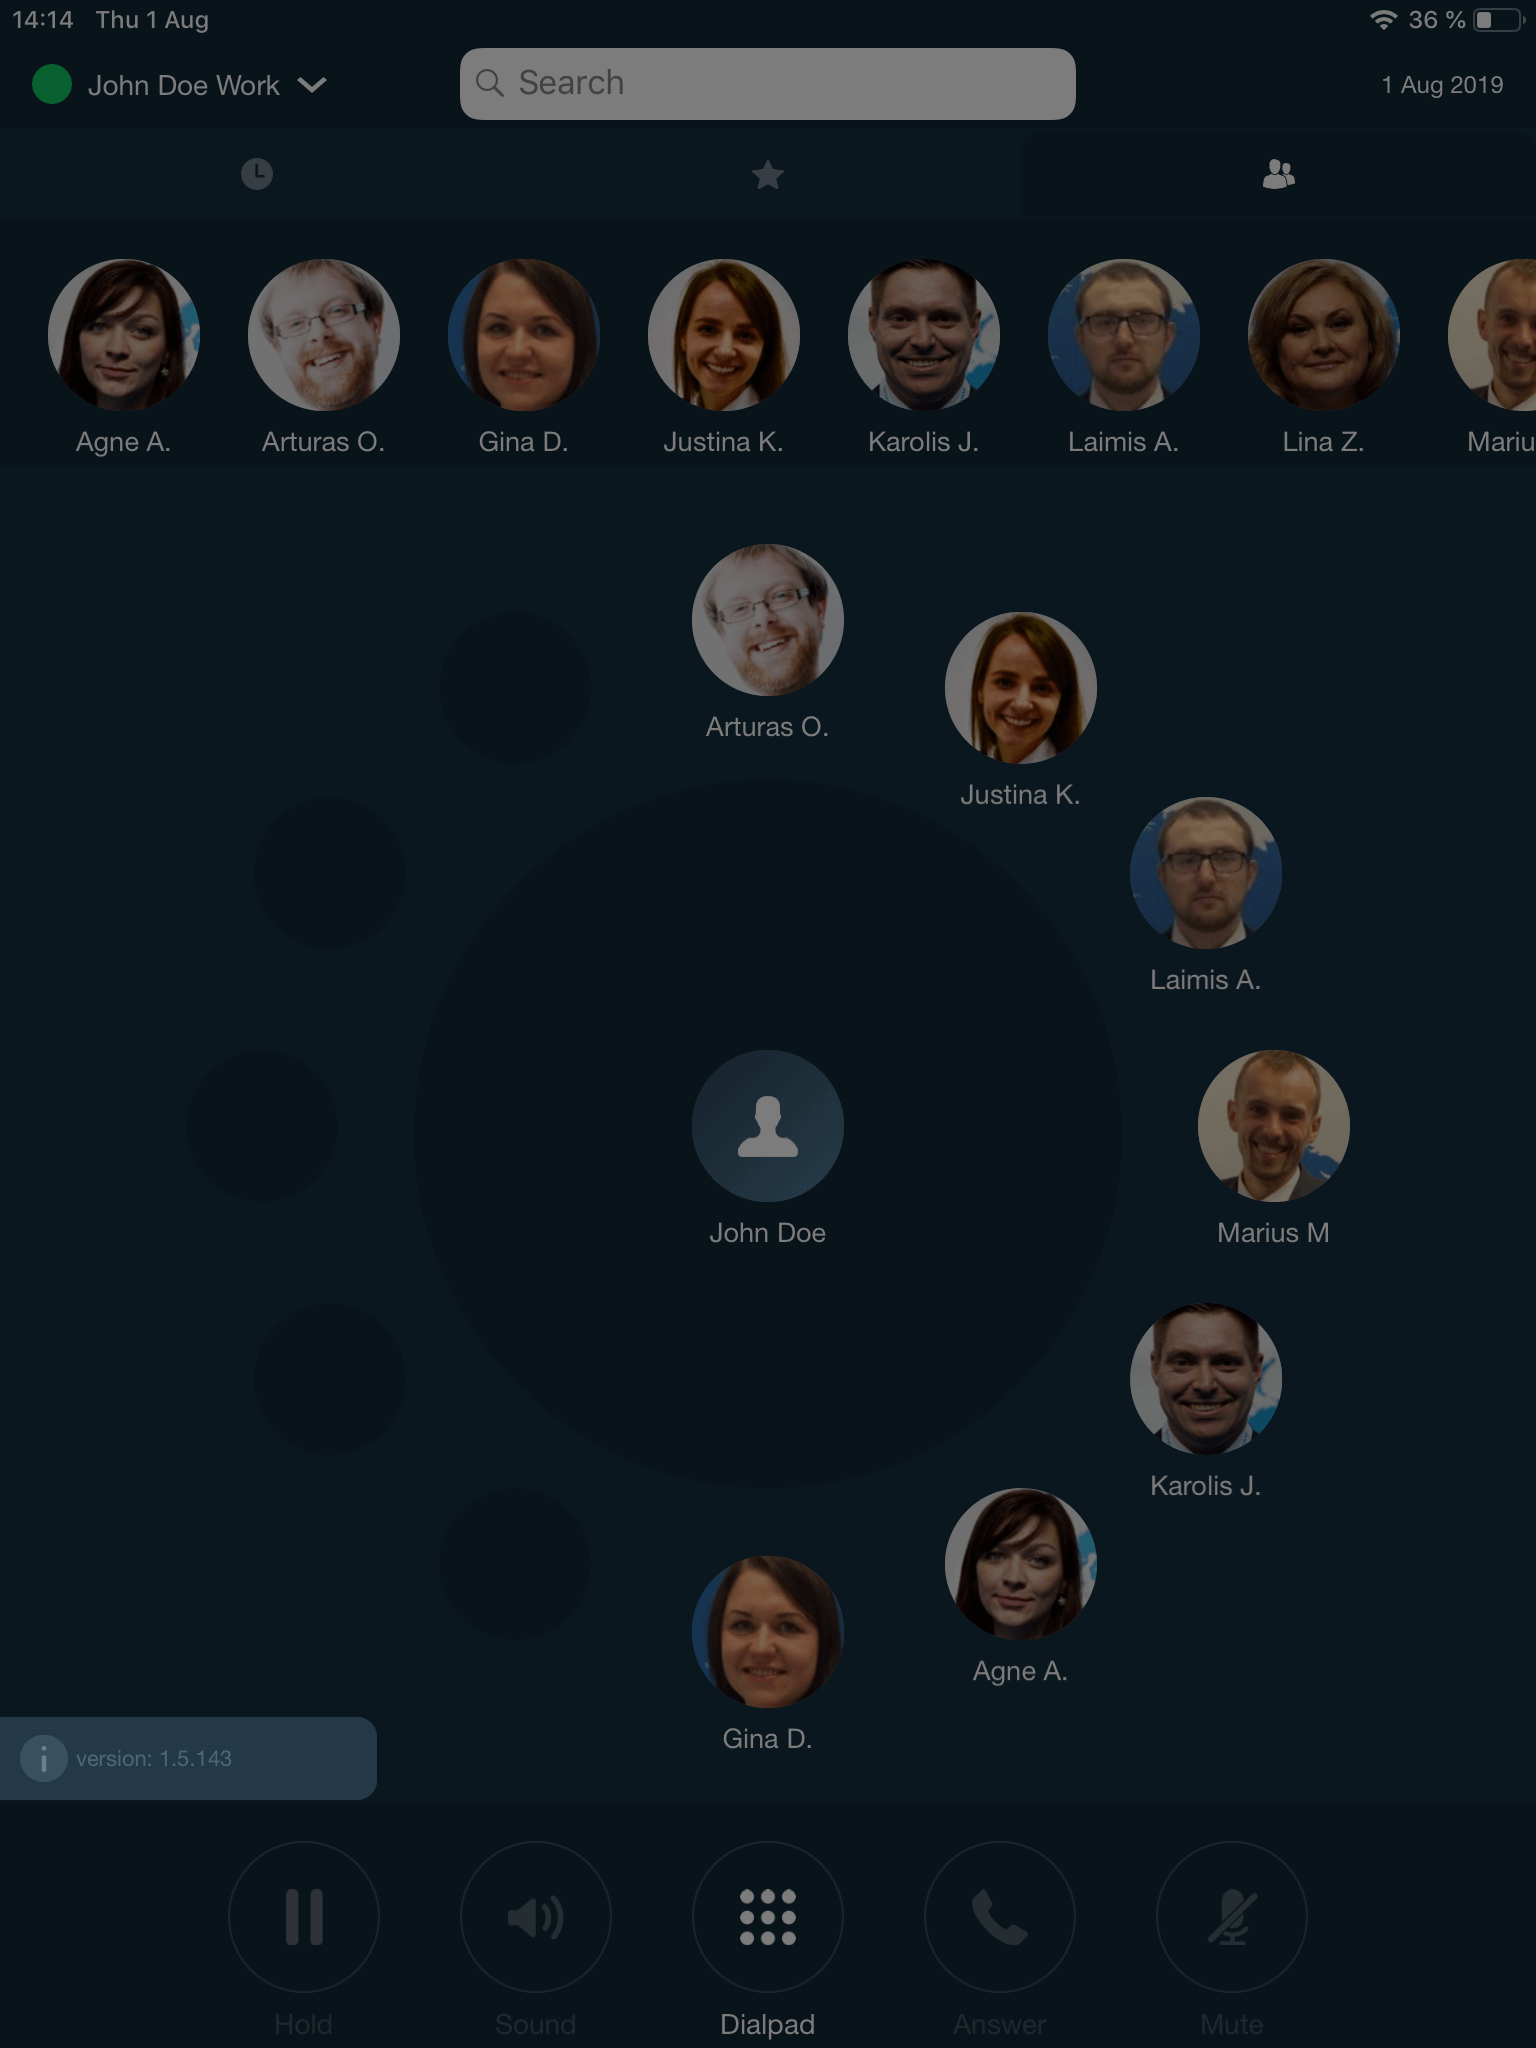

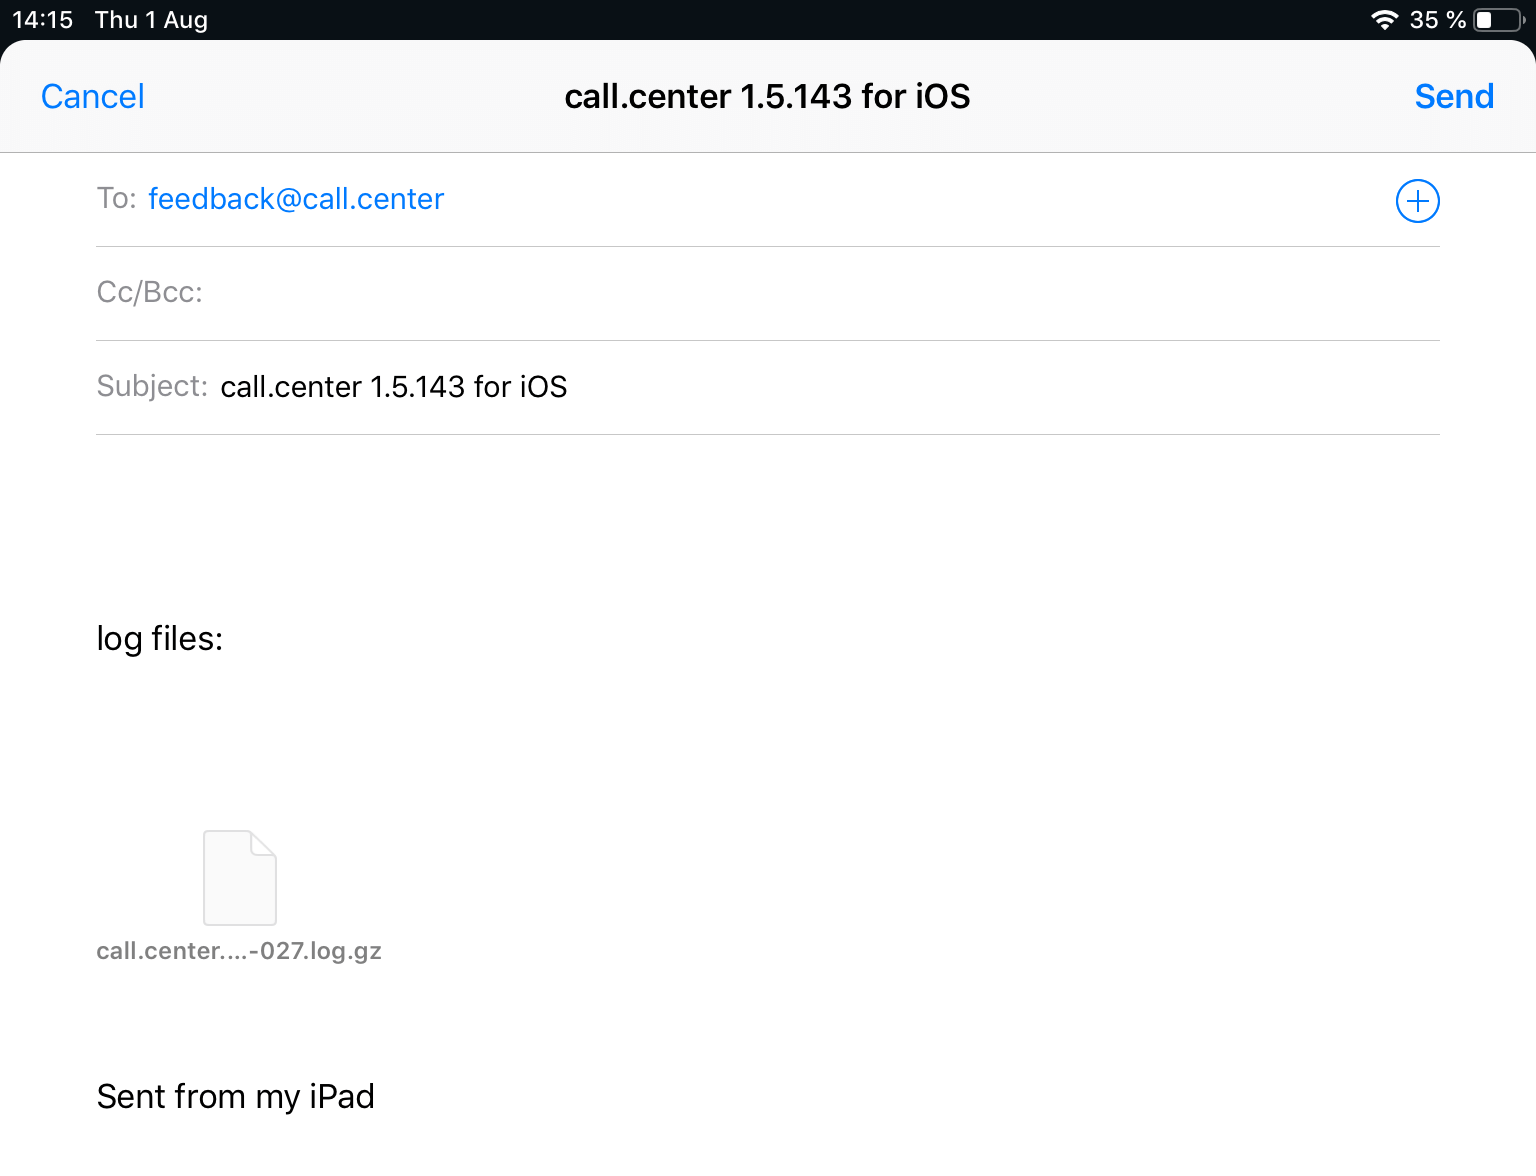
SIP ALG
A SIP ALG (Session Initiation Protocol Application Layer Gateway) is prevalent in many commercial routers. Its aim is to avoid some of the issues caused by router firewalls, and this is achieved by inspecting and changing VoIP traffic (packets) if necessary. However, the use of SIP ALG can be unpredictable, and SIP packets may be corrupted, rendering them unreadable. This can result in unexpected and undesirable behaviour, such as non-registering phones and audio degradation.
We recommend turning off SIP ALG in order to avoid the following issues:
Failed call registration - With a number of acknowledgments needed during a request, the call will not be set up if any malfunction occurs. This is called a failed registration, and is often attributable to SIP ALG operating in the background.
One-way audio - One-way SIP audio calls are usually the result of the packets being changed/dropped due to either incorrect firewall settings, or the ALG causing audio to be lost on one end of the call.
Unpredictable and random reduction in call quality – Static, lapses in sound transmission, or echoing may be an indication of packets being lost or changed during an internet-based call. This audio degradation may be attributable to a SIP ALG.
Lost Connections – When using SIP, calls may be dropped due to lost and unrecoverable data. Once again, this problem may be caused by a SIP ALG.
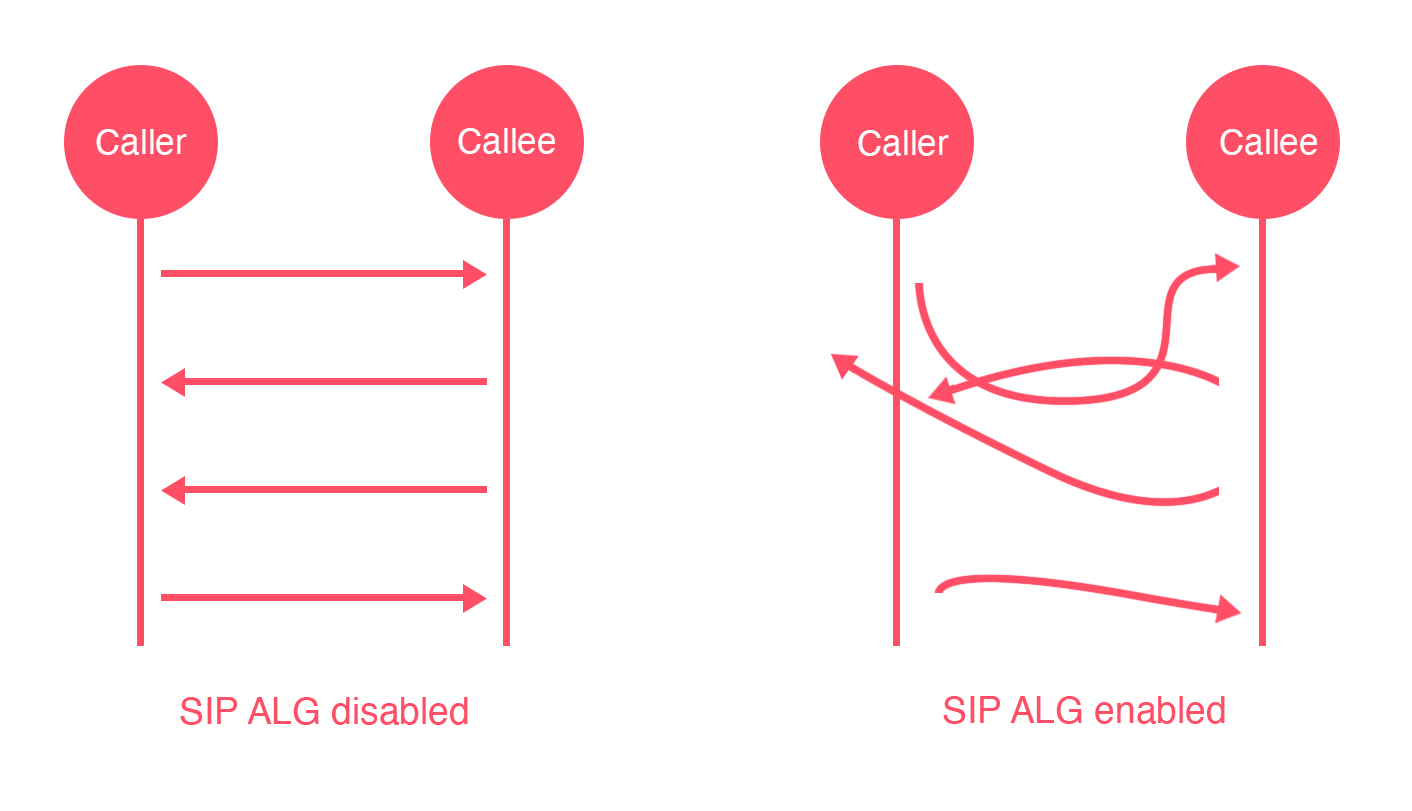 Back to the top